Sony PMW-EX1 Operating Instructions Manual
Solid-state memory camcorder
Hide thumbs
Also See for PMW-EX1:
- Service manual (220 pages) ,
- Operating instructions manual (135 pages) ,
- Getting started (9 pages)
Table of Contents
Advertisement
Quick Links
Download this manual
See also:
Service Manual
Advertisement
Table of Contents

Related Manuals for Sony PMW-EX1


Summary of Contents for Sony PMW-EX1
- Page 1 3-278-905-15(1) Solid-State Memory Camcorder PMW-EX1 Operating Instructions Before operating the unit, please read this manual thoroughly and retan it for future reference. Printed in Japan © 2007 Sony Corporation...
- Page 2 Part 15 of the FCC Rules. (controlled EMC environment, ex. TV studio). These limits are designed to provide reasonable protection against harmful The manufacturer of this product is Sony interference when the equipment is operated Corporation, 1-7-1 Konan, Minato-ku, Tokyo, in a commercial environment. This Japan.
- Page 3 (environnement EMC contrôlé, ex. studio de Für die folgenden elektromagnetischen télévision). Umgebungen: E1 (Wohnbereich), E2 (kommerzieller und in Le fabricant de ce produit est Sony beschränktem Maße industrieller Bereich), Corporation, 1-7-1 Konan, Minato-ku, Tokyo, E3 (Stadtbereich im Freien) und E4 Japon.
-
Page 4: Table Of Contents
Table of Contents Overview Package Configuration ............. 9 Features ..................10 Using the CD-ROM ..............12 Reading the CD-ROM Manuals ........12 System Requirements for Using the Applications ..13 Software Installation ............ 13 Parts Identifications ..............15 Camcorder ..............15 IR Remote Commander (Supplied) ...... - Page 5 Formatting the PHU-60K ..........36 Checking the Remaining Time Available for Recording ............... 36 Restoring the PHU-60K ..........36 Recording Basic Operation Procedure ............ 37 Selecting the Video Format ............ 39 Selectable Formats ............39 Changing the Format ............ 40 Switching the ND Filters ............
- Page 6 Setting the Timecode ............ 56 Setting the User Bits ............. 56 Displaying the Time Data ..........57 Recording Audio Signals ............57 Using the Built-in Stereo Microphones ......58 Using External Inputs ........... 58 Using an External Microphone ........58 Adjusting the Audio Recording Levels ......
- Page 7 Storing the Setup File ........... 81 Retrieving the Setup File ..........81 Resetting to the Standard Values ......... 81 Playback Playing Back Clips ..............82 Thumbnail Screen ............82 Playback ............... 83 Clip Operations ............... 86 Clip Operation Menus ..........86 Basic Operations of the Clip Operation Menus ...
- Page 8 VIDEO SET Menu ............. 107 LCD/VF SET Menu ........... 108 TC/UB SET Menu ............110 OTHERS Menu ............110 Connecting External Devices Connecting External Monitors ..........114 Operating Clips With a Computer ........115 Connecting an External Device (i.LINK Connection) ..118 Recording the Camcorder Picture on an External Device ..............
-
Page 9: Overview
Overview Package Configuration Make sure you have following items supplied with your camcorder. The number in parentheses indicates the number of that item supplied. BP-U30 battery pack (1) Lens hood with lens cap (1) BC-U1 battery charger (1) It is attached to the camcorder at the factory. If you attach an optional wide-conversion lens, remove the lens hood. -
Page 10: Features
Selectable bit rates Furthermore, thumbnails are automatically The PMW-EX1 offers a choice of bit rates: either generated for each clip as a visual reference, 35 Mbps (HQ mode) or 25 Mbps (SP mode), allowing the operator to cue-up to a desired scene depending on the desired picture quality and simply by guiding the cursor to a thumbnail. - Page 11 14x zoom lens Shutter-angle settings The PMW-EX1 is equipped with a zoom lens In addition to the electric shutter speed controls, specifically designed for the camcorder to offer the PMW-EX1 also has a “shutter angle” control, optimum picture performance. Independent rings which is familiar to cinematographers.
-
Page 12: Using The Cd-Rom
The CD-ROM labeled “Manuals for Solid-State Europe, Middle East, Africa, and Russia Memory Camcorder ” contains the pdf files of the http://www.sonybiz.net/xdcamex Operating Instructions for the PMW-EX1 Latin America (Japanese, English, French, German, Italian, http://www.sonypro-latin.com/xdcamex Spanish and Chinese). Australia The CD-ROM labelled “Utility Software for... -
Page 13: System Requirements For Using The Applications
If you have lost or damaged the CD-ROM, you • Macintosh and Mac OS are trademarks of Apple Inc. can purchase a new one to replace it. Contact your registered in the U.S States and other countries. Sony service representative. Software Installation System Requirements for Using the Applications... - Page 14 Uninstalling an application program Windows computer Choose “Start,” “Control Panel” then “Add or Remove Programs” and specify the program to be deleted. Macintosh computer Drop the folder of the software (default: /Application/XDCAM EX Clip Browser) into Trash. Using the CD-ROM...
-
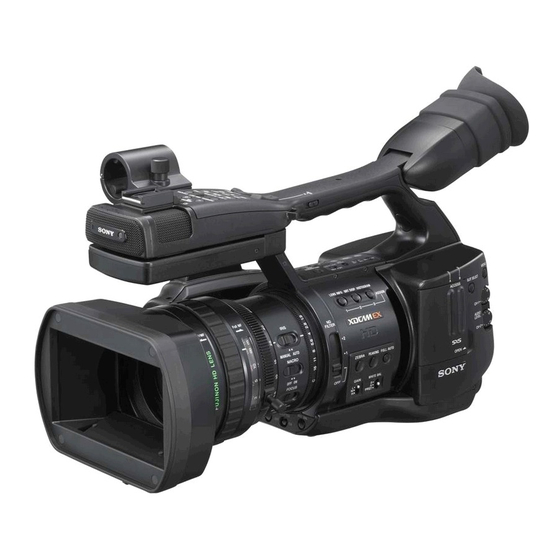
Page 15: Parts Identifications
Parts Identifications Camcorder Operation panel on the handle (page 17) Handle Upper operation panel (page 17) D IA O F F E R A Rear operation panel C A M C E L C A N O FF /S E T U R S E L P IC... - Page 16 B A T T E R R E L E A S Controls on the grip S D I O A/ V O (page 19) Cover of the lens control block (See Inside the cover “Note” below.) COMPONENT WHT BAL A/V OUT SHUTTER ASSIGN 4...
- Page 17 Operation panel on the handle Upper operation panel 43 44 45 46 MONITOR VOL TC/U-BIT/ STATUS DURATION THUMBNAIL SEL/SET CANCEL SHOT TRANSITION LCD B.LIGHT DISPLAY BARS/CAM BATT INFO F REV PLAY/PAUSE F FWD 47 48 PREV STOP NEXT SHOT TRANSITION operation block (page 67) START/STOP LCD B.LIGHT (LCD backlight) switch...
- Page 18 AUDIO AUDIO SELECT LEVEL GAIN WHITE BAL AUTO CH-2 CH-2 MANUAL PMW-EX1 BATTERY PRST RELEASE 73 74 ND filter select switch (page 40) MENU (menu display ON/OFF) button (page 99) ASSIGN (assignable)1/2/3 buttons (page SEL/SET (selection/set) dial (Jog dial) (page 99)
-
Page 19: Ir Remote Commander (Supplied)
Controls on the grip IR Remote Commander (Supplied) The buttons without remarks can be used in the same manner as the corresponding buttons on the camcorder. PUSH SET C O M P O N E N T O U T SHOTMARK ZOOM THUMBNAIL... -
Page 20: On-Screen Indications
On-Screen Indications Indications in Camera Mode Remarks When this unit is in Camera mode (mode for [M]: The indication of the items named with this recording), pressing the DISPLAY/BATT INFO button displays the statuses and settings of this suffix can be independently turned on/off unit on the LCD monitor/viewfinder screen. -
Page 21: Direct Menu Operation
Media remaining indication [M] (page 34) When the Direct mode is set to “Part,” the operation is limited depending on the GAIN, Zoom position indication [M] (page 49) SHUTTER, or WHITE BAL switch setting. TLCS mode indication [M][D] (page 105) When the Direct mode is set to “All,”... - Page 22 The Direct menu of the selected items appears. Example: Direct menu for TLCS mode selection TLCS TLCS TLCS 7 On ∗ 1 1.5 2 3 4 5 7 10 15 20 30 ATW 4300K PPOFF ND1 ++ F1.9 18dB SHT:1/200 Tilt the joystick or rotate the jog dial to select the setting then press the joystick or the jog dial.
-
Page 23: Preparations
Removing the battery pack priority even if a battery pack is mounted. Hold the BATTERY RELEASE button pressed, For safety, use only the Sony battery packs and slide the battery pack to the right to unlock, then AC adaptor listed below: pull it out. -
Page 24: Using Ac Power (Dc In Power)
The camcorder indicates the remaining usage Temporarily set the power switch to OFF and time in minutes by calculating the available time connect a power source via the DC IN connector with the battery pack if operation is continued at or replace the battery pack with one that is fully the current rate of power consumption. -
Page 25: Turning Power On
When recording or playback is in progress on advance. power from the DC IN connector, the input Removing the battery pack and the DC IN voltage is displayed on the LCD monitor/ power without first setting the power switch to viewfinder screen. -
Page 26: Setting The Clock
Setting the Clock INITIAL SETTING Time Zone: UTC +09:00 TOKYO Date / Time: 2007/01/01 00:00:00 SET 2008/01/01 00:00:00 SET F i n i sh When you turn the camcorder on for the first time after purchasing or replacing the backup battery (page 125), the Initial Setting display appears on Tilt the joystick or turn the jog dial to the LCD monitor/viewfinder screen. -
Page 27: Adjusting The Lcd Monitor And Viewfinder
Adjusting the LCD 180° Monitor and Viewfinder Adjusting the LCD Monitor 90° You can adjust the angle and the display conditions of the LCD monitor for the best view Adjusting the backlight in various shooting situations. These adjustments of the LCD monitor have no effect on pictures being recorded. -
Page 28: Adjusting The Viewfinder
LCD/VF SET Eyepiece focusing knob Color Cont rast Peaking Br i ght ness Marker 00:00 Zebra Display On/O f f Set color, contrast and brightness of the LCD monitor with the corresponding LCD menu items: Color, Contrast, and Brightness OF F M ED ER A CA M... -
Page 29: Adjusting The Grip
Using the eyecup (supplied) Adjusting the Grip A large eyecup is attached to the EVF at the factory. It can be removed by pulling it out, if not neccesary. To reattach the eyecup, stretch it a little to attach The grip rotates approx. 120 degrees to support a to the EVF and fit the rim of the eyecup into the variety of shooting styles. -
Page 30: Using The Ir Remote Commander
Note Using the IR Remote To avoid malfunctions, the remote control function is automatically deactivated when the Commander camcorder is turned off. Activate the function each time when required after you turn the camcorder on. Before use Battery lifetime Before you use the supplied IR Remote When the lithium battery’s power falls, the IR Commander for the first time, pull out the Remote Commander may not work even if you... -
Page 31: Handling Sxs Memory Cards
These cards comply with the ExpressCard standard. VORSICHT Explosionsgefahr bei Verwendung falscher • SxS and SxS PRO are trademarks of Sony Batterien. Batterien nur durch den vom Hersteller Corporation. empfohlenen oder einen gleichwertigen Typ • The ExpressCard word mark and logo are owned by Personal Computer Memory Card International ersetzen. -
Page 32: Inserting/Removing An Sxs Memory Card
Write-protect switch • We recommend that you make a backup copy of important data. Sony accepts no responsibility Note for any damage or loss of data you recorded. Do not operate the write-protect switch of an SxS • Do not apply a label sheet in places other than memory card while it is set in the camcorder. -
Page 33: Switching Between Sxs Memory Cards
A C C E A C C E S E L S E L M E N M E N S L O T S L O T F U L L S E L E F U L L S E L E A U T O A U T O... -
Page 34: Checking The Remaining Time Available For Recording
memory card that is not formatted or that was Checking the Remaining Time formatted with another system, a message to Available for Recording confirm if formatting is to be executed is displayed on the LCD monitor/EVF screen. In Camera mode, you can check the time Note on formatting remaining for the SxS memory cards loaded in the Any SxS memory card formatted with a device... -
Page 35: Using The Phu-60K
To restore a card Using the PHU-60K Select “Execute” by turning the jog dial or tilting the joystick then push the dial or joystick. The restore operation begins. You can use an optional PHU-60K Professional During restoration, the in-progress message and Hard Disk Unit with this camcorder. -
Page 36: Formatting The Phu-60K
Subsequently, the ACCESS lamp of the another device must be formatted again with camcorder lights in red then changes to green this camcorder. once the unit is ready for use. Notes Checking the Remaining Time • The cover of the card slot block cannot be Available for Recording closed with the PHU-60K connected. -
Page 37: Recording
Recording Basic Operation Procedure Basic recording can be performed with the following procedures: REC START/STOP LCD monitor REC REVIEW CAMERA MEDIA D IA O F F E R A C A M C E L C A N O FF /S E S E L T U R... - Page 38 Full Auto mode is turned on, activating the TLCS (Total Level Control System) (page START/STOP 105). Thus Auto Iris, AGC (Auto Gain Control), HOLD Auto Shutter, ATW (Auto Tracing White) REC HOLD lever are set to ON, whereby the brightness and To unlock the button, return the lever to its white balance will be automatically adjusted.
-
Page 39: Selecting The Video Format
Clip (recording data) and clip name Selecting the Video When you stop recording, video, audio and subsidiary data from the start to end of the Format recording are recorded as a single clip on an SxS memory card. For each clip recorded with this camcorder, a You can select various video formats for clip name of 8 characters (the first four recording/playback using “Video Format”... -
Page 40: Changing The Format
Format Indication on this Switching the ND Filters camcorder HQ 1280 × 720 HQ 720/30P 29.97 Progressive HQ 1280 × 720 HQ 720/24P 23.98 Progressive ND filters are available for keeping the aperture With “PAL Area” selected in a proper range. Set the ND filter switch according to the Format Indication on this... -
Page 41: Adjusting The White Balance
WHITE BAL switch Adjusting the White ZEBRA PEAKING FULL AUTO Balance GAIN WHITE BAL PRST The white balance must be adjusted to suit to the color temperature of the light source. You can select the adjustment mode according to the shooting conditions. OF F M ED ER A... -
Page 42: Executing Auto White Balance
Memory A or Memory If the error message continues to be displayed B mode. after several attempts, consult your Sony service representative. Select the appropriate ND filter according to the lighting condition. Place a white subject under the same... -
Page 43: Displaying The Markers And Zebra Patterns
Example: 95% Displaying the Markers 120min STBY TCG 00:00:00:00 and Zebra Patterns During recording, various markers and zebra patterns can be inserted into the image on the LCD monitor/EVF screen. This does not affect recording signals. When the aspect marker is on, the safety zone marker shows the effective area within the aspect marker. -
Page 44: Displaying The Zebra Patterns
1 (Zebra1): To display a zebra pattern in the area Displaying the Zebra Patterns of ±10% centering the video level set with “Zebra1 Level.” A zebra pattern(s) can be inserted to the picture 2 (Zebra2): To display a zebra pattern for the on LCD monitor/EVF screen to check the video level over 100%. -
Page 45: Setting The Gain
To change Press the MENU button to set the camcorder to Setting the Gain Menu mode, display the CAMERA SET menu with , and select “Gain Setup” from the menu. CAMERA SET You can set the gain of the video amplifier according to the brightness of the subject. -
Page 46: Setting The Electronic Shutter
shutter speed you specified with “Shutter” of the CAMERA SET menu. Setting the Electronic Note Shutter When Auto Shutter mode is ON, the fixed shutter cannot be selected. The electronic shutter of the camcorder permits you to change the shutter speed (the accumulation time per recording frame). -
Page 47: Shooting In Ex Slow Shutter Mode
For details on the Direct menu, see “Direct Menu Frame rate Shutter speed (sec.) Operation” on page 21. 1000 2000 Shooting in EX Slow Shutter Mode 1000 2000 Select “EX Slow Shutter” from the CAMERA SET menu. Angle (standard angle) mode Set “Mode”... -
Page 48: Adjusting The Iris
To adjust the target level with the Direct menu The target level can also be selected using the Adjusting the Iris Direct menu. When you press the DISPLAY/BATT INFO button, the current setting is displayed on the screen. Adjust the iris opening according to the brightness of the subject. -
Page 49: Adjusting The Zoom
Adjusting the Zoom You can adjust the zoom in Manual mode or BA TT ER Y RE LE AS E Power (Servo) mode on this camcorder. SD I OU A/V OU Manual Zoom mode Rotate the zoom ring to adjust the zoom. ZOOM MANU SERVO... - Page 50 Note Zoom speed switch If you set “Zoom Speed (High/Low)” of the ZOOM button Power zoom lever CAMERA SET menu to a value between 0 and 9 for a low speed, zooming may not operate START/STOP smoothly, depending on the individual characteristics of the lens or operating HOLD environments.
-
Page 51: Adjusting The Focus
Adjusting the Focus You can select any of three modes for focus OF F M ED ER A CA M CA NC adjustments. OF F SE T UR E SE L/ PI CT IL E ME NU ZE BR PR OF AC CE PE AK SLO T... -
Page 52: Adjusting In Mf Mode
Peaking When you press the PEAKING button, the peaking function is activated. This function emphasizes the contours of the images on the LCD monitor/EVF screen, making manual focusing easier. OF F M ED ER A CA M CA NC OF F SE T UR E SE L/... -
Page 53: Adjusting In Af Mode
Activating the MF Assist function using the Direct Using Macro Mode menu The current focus adjustment mode is displayed When you set the MACRO switch to ON in AF or on the screen when you press the DISPLAY/ MF mode, Macro mode is activated, permitting BATT INFO button. -
Page 54: Eliminating Picture Blurring (Steady Shot)
Eliminating Picture Reducing Flickers Blurring (Steady Shot) By activating the Steady Shot function, blurring To reduce flickers, try either of the following two of images due to camera shaking can be reduced. methods: Setting with the CAMERA SET menu Setting the shutter speed according to the power-supply frequency Set “Steady Shot”... -
Page 55: Setting The Time Data
The recommended “Mode” settings are shown below. Setting the Time Data Flicker Environments Reduce/ Under lighting Under lighting Mode that may cause that does not flicker cause flicker Time data, such as the timecodes, user bits, and Auto Recommended Acceptable the clock time, are recorded with pictures. -
Page 56: Setting The Timecode
Video Frame TC Format Setting the Timecode formats setting HQ1080/60i 00 to 29 DF/NDF switchable Specify the timecode to be recorded with SP 1080/60i (Fixed to DF in Clock “Timecode” and “TC Format” of the TC/UB SET HQ1080/30P mode) menu. HQ 1080/50i 00 to 24 Fixed to NDF... -
Page 57: Displaying The Time Data
TC/UB SET Recording Audio Signals Timecode Users B i t Mode : Fix TC Format : DF Set t i ng : 2 0 0 7 1 2 0 8 00:00 Two channels (CH-1/CH-2) of audio can be recorded (Linear PCM recording) in synchronization with video recording. -
Page 58: Using The Built-In Stereo Microphones
Using the Built-in Stereo Microphones Set the AUDIO IN switches, both CH-1 and CH-2, to INT. to AUDIO IN Using External Inputs External microphone Set the AUDIO IN switches CH-1 and CH-2 to EXT. Connect external audio sources to the Cable clamp AUDIO IN connectors CH-1 and CH-2. -
Page 59: Monitoring The Audio
Outputting the Color 1 1.5 2 3 4 5 7 10 15 20 30 Bars and Reference ND1 ++ F1.9 18dB SHT:1/2000 Tone Audio recording in special recording modes The camcorder can output a color-bar signal in • No audio recording is made in Interval place of the camera picture. -
Page 60: Recording Shot Marks
Recording Shot Marks Rec Review When you record shot marks for important scenes You can review the last recorded clip on the as subsidiary data, you can access the marked screen (Rec Review). points easily on a Shot Mark screen, which only displays scenes with shot marks only. -
Page 61: Changing Functions Of The Assignable Buttons
OTHERS Changing Functions of A l l Reset Camera Data the Assignable Buttons Time Zone : UTC +09:00 <1> : F reeze Mix Clock Set Language : Eng l i sh <2> : Shot Mark1 00:00 <3> : Shot Mark 2 Ass i gn But ton <4>... -
Page 62: Interval Recording
For details on menu operations, see “Basic Menu Operations” on page 99. Interval Recording Select “Interval Rec” of the CAMERA SET menu. CAMERA SET The Interval Recording (time-lapse recording) Shot T ransi t ion function is especially effective for shooting MF Assi s t : O f f objects that move very slowly. -
Page 63: Frame Recording
• The Freeze Mix function and Rec Review function cannot be used in Interval Recording Frame Recording mode. • The timecode is recorded in Rec Run mode (page 56) during Interval Recording. • Some extra frames may be recorded if you stop The Frame Recording function is especially recording or switch the card slot while effective for clay animation recording. -
Page 64: Performing Frame Recording
The camcorder enters Frame Recording Stopping Frame Recording mode. When the special recording mode indication Set “Setting” of “Frame Rec” of the on the screen is active, “Frame Rec” flashes CAMERA SET menu to “Off.” on the screen. Recording stops and Frame Rec mode is canceled. -
Page 65: Slow & Quick Motion Recording
Preparatory Settings Slow & Quick Motion Before starting Slow & Quick Motion recording, Recording make the necessary settings with the CAMERA SET menu in advance. When an HQ Progressive (P) video format is For details on menu operations, see “Basic Menu selected (page 39), you can set the frame rate for Operations”... -
Page 66: Recording In Slow & Quick Motion Mode
For details on the Direct menu, see “Direct Menu Operation” on page 21. Freeze Mix: Image Alignment Recording in Slow & Quick Motion Mode Using the Freeze Mix function, an image (still When the preparatory settings are completed, you picture) of a recorded clip can be temporarily superimposed on the current camera picture, can start recording. -
Page 67: Shot Transition
• The Freeze Mix function cannot be used if the recording video format is SP 1080/24P. Shot Transition • The Freeze Mix display cannot be obtained in Quick & Slow Motion mode or Slow Shutter mode. • You cannot operate the Setup menus and The Shot Transition function helps you to easily PICTURE PROFILE menu in Freeze Mix obtain complex picture effects by registering... -
Page 68: Preparatory Settings
When adjustments are required, set the mode to Store. A button B button Preparatory Settings TC/U-BIT/ STATUS DURATION SHOT TRANSITION LCD B.LIGHT DISPLAY Before you start recording using the Shot BARS/CAM BATT INFO Transition function, make the necessary settings MODE button and with the CAMERA SET menu in advance. -
Page 69: Recording With A Shot Transition
Time/Speed Off: Not to link to recording start Set whether to specify the duration of a (To use the A or B button to start the transition by time or by speed of zoom transition and specify the target shot) transition. - Page 70 Press the MODE button to display Making a transition from the current “Execute” in the shot-transition picture to a registered shot operation area. Adjust the camera settings to obtain an Press the REC START/STOP button. image with which you wish to start Recording begins with the camera settings recording.
-
Page 71: Fader Function
To cancel recording while a transition is in progress Fader Function If you press the REC START/STOP button during recording, the recording stops, even when a shot transition is in progress. The E-E picture of the settings where the Using the Fader function, you can start a recording stops is displayed. -
Page 72: Starting Recording With A Fade In
Fade In For fading in a scene Set this to “On” to start recording with fade Press the ASSIGN button to which you assigned the Fader function in STBY (recording standby) (When you operate the function using an status. assignable button, it is not necessary to set The fade-in function is turned on. -
Page 73: Picture Profiles
Note Picture Profiles The Fade In/Fade Out settings automatically return to “Off” when you turn off the camcorder, while the Type and Time settings set with the menu are maintained. You can customize the picture quality, depending on the conditions or circumstances of recording, and store them as a picture profile, enabling the picture quality to be resumed just by your selecting the picture profile. -
Page 74: Selecting A Picture Profile
Example: PICTURE PROFILE PICTURE PROFILE PP1: STANDARD PP2: STANDARD PP3: STANDARD PP1: SceneA PP4: STANDARD PP2: SceneB PP5: STANDARD PP3: SceneC PP6: STANDARD PP4: SceneD PP5: SceneE PP6: SceneF Operating the jog dial or the joystick, select “SET” and make the settings of The camcorder is adjusted to the picture the picture profile items. -
Page 75: Resetting A Picture Profile
Specify the target picture profile. “Execute” and “Cancel” are displayed. Select “Execute.” Copying begins. When copying ends, the completion message is displayed for three seconds, and the original screen display is restored. Resetting a Picture Profile You can reset a selected picture profile to the factory settings (standard status). -
Page 76: Picture Profile Items
Picture Profile Items The values when “Off” is selected at “SEL” of the PICTURE PROFILE menu are shown in bold face (example: Standard PICTURE PROFILE SET Items Subitems and setting values Contents Profile Name Profile name Set the profile name in 8 characters at maximum. You can use upper- and lowercase alphabetics, Changing the picture profile numerics 0 to 9, - (hyphen), _ (underscore) and... - Page 77 PICTURE PROFILE SET Items Subitems and setting values Contents White Offset White Set to “On” to shift the conversion value for auto On / Off white balance in Memory A or B mode and that for Setting the white balance auto tracing white in ATW mode to a lower color offset and the color temperature or a higher color temperature.
- Page 78 PICTURE PROFILE SET Items Subitems and setting values Contents Skin Tone Detail Setting Set to “On” to enable the detail level adjustment for On / Off specific color-phase areas. Adjusting the details to be The detail level is uniform over the entire picture applied to the areas of a with the Off setting.
- Page 79 PICTURE PROFILE SET Items Subitems and setting values Contents Gamma Level Adjust the gamma compensation level. –99 to +99 (±0) Adjusting the gamma compensation level and Select the type of reference curve for gamma Select selecting the gamma curve compensation. STD1 / STD2 / STD3 / STD4 / CINE1 / CINE2 / CINE3 / CINE4...
-
Page 80: Deleting Clips
Select “Execute” again. Deleting Clips The last recorded clip is deleted from the memory card. For details on menu operations, see “Basic Menu Operations” on page 99. In Camera mode, the Last Clip DEL function for deleting the last recorded clip and the All Clips Deleting All Clips DEL function for deleting all clips from a memory card are available. -
Page 81: Storing/Retrieving The Setting Data
Notes Storing/Retrieving the • If a setup file already exists on the memory card you specified in Step , a message to confirm Setting Data whether to overwrite the file is displayed. • If there is not sufficient space on the memory card, an error message is displayed. -
Page 82: Playback
Playback Playing Back Clips Turning the camcorder on with the power switch You can start playback from the clip selected on set to MEDIA sets it to Media mode, and the clips the thumbnail screen. recorded on the SxS memory card are displayed The playback picture can be seen on the LCD as thumbnails on the screen. -
Page 83: Playback
Special recording information Playback If the selected clip was recorded in a special recording mode (S&Q Motion, Interval Rec, or For playback operations, use the playback control Frame Rec), the mode is displayed. buttons on the handle. For a clip recorded in S&Q Motion mode, [recording frame rate/playback frame rate] fps is displayed to the right. - Page 84 Press the THUMBNAIL button to return to the Display example (Playback mode): thumbnail screen. Function when tilted up (toward the subject) Notes • The playback picture may be momentarily Function distorted or frozen between clips. The playback Function when tilted control buttons and THUMBNAIL button do when tilted to the right...
- Page 85 With the headphones connected to the headphone Cueing up jack, the built-in speaker is turned off. Press the MONITOR VOL buttons to adjust the To return to the top of the current clip sound volume. Press the PREV button. The level bar is displayed during adjustment. •...
-
Page 86: Clip Operations
Clip Operations In Media mode, you can operate the clips or The corresponding Clip Operation menu pops up confirm and change the subsidiary data for clips on the screens as shown below. using the Clip Operation menus. Clip Operation Menus Thumbnail screen (page 87) Still picture in Pause mode (page 87) CANCEL... -
Page 87: Basic Operations Of The Clip Operation Menus
Item Function Basic Operations of the Clip SHOT MARK2 To display thumbnails only of the Operation Menus frames with shot mark 2 recorded (page 90) EXPAND CLIP To display the EXPAND CLIP Displaying a Clip Operation menu screen (page 89) for the clip Press the joystick or the jog dial. -
Page 88: Displaying The Detailed Information Of A Clip
Displaying the Detailed Information of a Clip When you select “DISP CLIP INFO” from a Clip Operation menu, the CLIP INFO screen appears. 120min CLI P I NFO 0011 / 0300 JPAN0011 ( 1 ) 01 / JAN / 2007 10 : 53 HQ 1080 / 24p S&Q Mot i on 29 / 24f p s TCR 00 : 05 : 00 : 02... -
Page 89: Copying A Clip
Select “OK MARK DEL” from the Clip ABCD0002(2) if ABCD0002(1) exists ABCD0005(4) if ABCD0005(3) exists Operation menu. • If parenthetical numbers (1) to (9) already exist The information screen for the selected clip as the result of repeated copying, copying to appears, and a confirmation message is that card cannot be done any more. -
Page 90: Displaying The Shot Mark Screen
Pause the playback or select a clip on Timecode indication The timecode of the frame at the cursor is the thumbnail screen then press the displayed. joystick or the jog dial. The corresponding Clip Operation menu Clip Operation menu on the EXPAND CLIP pops up. -
Page 91: Adding/Deleting Shot Marks
SHOT MARK2: To display thumbnails only Adding a shot mark in Pause mode of the frames marked with shot mark 2 Pause the playback at the frame to SHOT MARK screen example which you wish to add a shot mark then press the joystick or the jog dial. -
Page 92: Changing The Index Frame
The information screen for the selected frame Select “Execute.” appears and a confirmation message is The selected and subsequent frames are displayed below the image. divided, creating two clips having different names. Select “Execute.” The first 4 characters of the original clip name are carried on, continuing to the last number on the Changing the Index Frame memory card by the second 4 numerics. -
Page 93: Status Displays
Status Displays Showing the Status Screens This camcorder provides status screens of five Switching the status screens kinds in Camera mode and four kinds in Media mode, permitting you to check the various Operating the joystick or the jog dial switches the settings and statuses of this unit. -
Page 94: Camera Status Screen
Zebra: Zebra status CAMERA Status Screen Display Contents This indication becomes “On” if you turn zebra on with the ZEBRA button when “1” or “Both” is selected for “Zebra Select” of the LCD/VF SET menu. The setting value The settings and statuses related to image of “Zebra1 Level”... -
Page 95: Audio Status Screen
In Media Mode AUDIO Status Screen AUDIO 1 / 4 CH-3 CH-4 oo -40 0 OVER Information regarding audio signals is displayed. Output CH : CH-3 / CH-4 Headphones : CH-3 / CH-4 The display configuration varies between Camera Speaker : CH-3+CH-4 mode and Media mode. -
Page 96: Video Status Screen
VIDEO Status Screen BUTTON/REMOTE Status Screen The information on video formats and settings for The functions assigned to the assignable buttons the COMPONENT OUT, SDI OUT, A/V OUT, and the status of the IR Remote Commander are i.LINK connectors is displayed. displayed. -
Page 97: Battery/Media Status Screen
BATTERY/MEDIA Status Screen The information on the battery pack and SxS memory cards is displayed. BATTERY/ MED I A 5 / 5 Ba t t er y Charge Count 55 HDD A HDD B 100% Media A 20min Media B 50min Protected 100% Battery: Battery charge remaining... -
Page 98: Menu Configuration And Detailed Settings
Menu Configuration and Detailed Settings Overview of the Setup Menus This camcorder permits you to make various Setup Menu Layers settings for recording and playback with Setup menus on the LCD monitor/EVF screen. The Setup menus can also be displayed on an MENU external monitor. -
Page 99: Basic Menu Operations
Basic Menu Operations OTHERS All Reset Camera Data Time Zone Clock Set Language This section covers basic operations for setting Assign Button the Setup menu items. Tally Hours Meter Menu controls IR Remote Battery Alarm Battery INFO MENU button Joystick Direct Menu Jog dial CANCEL button... - Page 100 Example: When the cursor is located at CAMERA SET (CAMERA SET menu icon) Gain Setup Menu icon Shu t t e r EX Slow Shut t e r Shot Tr ans i t ion CAMERA SET 00:00 MF Ass i s t : O f f Color Bar Type : Mul t i Gain Setup...
- Page 101 For an item that requires your confirmation Example When you select an item that you must confirm CAMERA SET before execution in step , the menu display temporarily disappears, and a confirmation Gain Setup message is displayed. Following the instructions Shu t t e r EX Slow Shut t e r of message, specify whether to execute or cancel.
-
Page 102: Setup Menu List
Setup Menu List The functions and available settings of menus are listed below. The default settings set at the factory are shown in bold face (example: Speed CAMERA SET Menu CAMERA SET Menu items Subitems and setting values Contents Gain Setup Set the gain level to be used when the switch is set to the L –3 / 0 / 3 / 6 / 9 /12 /18 dB position. - Page 103 CAMERA SET Menu items Subitems and setting values Contents Shot Trans Time Set the time it takes to make a shot transition. 2 to 15 sec (4 sec) Transition Setting the Trans Speed Set the speed of the transition. operating 1 to 10 (5) conditions of Shot Time / Speed...
- Page 104 CAMERA SET Menu items Subitems and setting values Contents Interval Rec Setting Turn the Interval Recording function on/off. On / Off Setting the Interval Recording Interval Time Set the interval of recording in Interval Recording. function 1 to 10/15/20/30/40/50 sec 1 to 10/15/20/30/40/50 min 1 to 4/6/12/24 hour Number of Frames...
- Page 105 CAMERA SET Menu items Subitems and setting values Contents TLCS Level Set the target level (to make brighter or darker) of auto iris +1.0 / +0.5 / ±0 / –0.5 / –1.0 control in TLCS. (This setting also affects the gain control in Setting the Total AGC mode and shutter-speed control in Auto Shutter mode.) Level Control...
-
Page 106: Audio Set Menu
CAMERA SET Menu items Subitems and setting values Contents Steady Shot On / Off Turn the Steady Shot (image stabilizer) function on/off. Setting the image stabilizer AUDIO SET Menu AUDIO SET Menu items Subitems and setting values Contents Audio Input TRIM CH-1 Finely adjust the sensitivity of channel 1 of external –11 dBu to –65 dBu (–41 dBu) -
Page 107: Video Set Menu
VIDEO SET Menu VIDEO SET Menu items Setting values Contents YPbPr/SDI Out HD / SD/ Off Select the output signal from the COMPONENT OUT connector and the SDI OUT connector. Select HD: To output the same HD signal as that in recording and Setting the playback component/SDI... -
Page 108: Lcd/Vf Set Menu
LCD/VF SET Menu LCD/VF SET Menu items Subitems and setting values Contents Color Adjust the color of pictures on the LCD monitor. –99 to +99 (±0) Adjusting the LCD monitor Contrast Adjust the contrast of pictures on the LCD monitor. –99 to +99 (±0) Brightness Adjust the brightness of pictures on the LCD monitor. - Page 109 LCD/VF SET Menu items Subitems and setting values Contents Display On/Off Video Level Warnings Turn the warning indication to be displayed when the picture On / Off is too bright or too dark on/off. Selecting the items to be displayed on Brightness Display Turn the numeric indication to show the picture brightness on/ the LCD monitor/...
-
Page 110: Tc/Ub Set Menu
TC/UB SET Menu TC/UB SET Menu items Subitems and setting values Contents Timecode Mode Set the timecode mode. Preset / Regen / Clock Preset: To start the timecode from the specified value Setting the Regen (regeneration): To continue the timecode from that of timecode the previous clip Clock: To use the current clock time as the timecode... - Page 111 OTHERS Menu items Subitems and setting values Contents Clock Set Date/Time Set the current time and date. Setting the built-in 12H/24H Select the display mode of time. clock 12H / 24H 12H: 12-hour mode 24H: 24-hour mode Date Mode Select the display mode of the date. YYMMDD / MMDDYY / YYMMDD: In sequence of year, month, day DDMMYY...
- Page 112 OTHERS Menu items Subitems and setting values Contents Tally Front Set the brightness of the tally lamp on the front. High / Low / Off High: To brighten the lamp Setting the tally Low: To dim the lamp lamps Off: To not light the lamp Rear Turn the tally lamp on the rear on/off.
- Page 113 OTHERS Menu items Subitems and setting values Contents Trigger Mode Internal / Both / External Internal: To activate recording start/stop operations only for an SxS memory card in a built-in slot. Setting whether to Both: To activate recording start/stop operations both for an trigger recording SxS memory card in a built-in slot and the external start/stop for an...
-
Page 114: Connecting External Devices
Connecting External Devices Connecting External Monitors To display recording/playback pictures on an When outputting SD signals, select in advance the external monitor, select the output signal and use output mode (Squeeze, Letterbox, or Edge Crop) an appropriate cable for the monitor to be with “Down Converter”... -
Page 115: Operating Clips With A Computer
Software End-User License Agreement. For information on installation of the driver, refer to the ReadMe on the supplied CD-ROM. For support information for the driver, visit the following URL: http://www.sony.net/SxS-Support/ to the ExpressCard slot SxS memory card Computer with SxS... - Page 116 To connect with a USB cable message (e.g., for formatting or restoration of When you connect the camcorder or the SBAC- an SxS memory card) is shown on the screen. US10 SxS Memory Card USB Reader/Writer It appears when formatting or restoration is (optional) using the supplied USB cable, the completed.
- Page 117 Macintosh For information on XDCAM Transfer, visit the web sites shown in “XDCAM EX web sites” on page 12 Drag the SxS memory card icon on the desktop to or on the cover page of the supplied CD-ROM. Trash. If the SxS memory card icon is located on Finder, click on the eject icon on its side.
-
Page 118: Connecting An External Device (I.link Connection)
Set the external device to recording Connecting an External standby status. For operations of the external device, refer to Device (i.LINK the operation manual of that device. Connection) Set the camcorder to Camera mode by setting the power switch to CAMERA. When an HDV-compatible video format (SP Press the REC START/STOP button. -
Page 119: Recording External Input Signals
such a signal using the nonlinear editing system, monitor connected to the A/V OUT a malfunction may occur, depending on the connector. nonlinear editing software in use. Press the REC START/STOP button on • If you specify a search speed other than 4 or 15 the handle. -
Page 120: About I.link
IEEE 1394 proposed by Sony, is a trademark supported by many companies worldwide. IEEE 1394 is an international standard defined by IEEE, the Institute of Electrical and Electronics Engineers, Inc. -
Page 121: Appendixes
Shipping If you notice bending, deformation, or surface • Remove the memory cards before transporting corrosion, contact your dealer or a Sony service the unit. representative as soon as possible to have the • If sending the unit by truck, ship, air or other battery terminal replaced. - Page 122 Aliasing • Locations subject to violent vibration • Near strong magnetic fields When fine patterns, stripes, or lines are shot, they • Close to radio or TV transmitters producing may appear jagged or flicker. strong electromagnetic fields. Flicker • In direct sunlight or close to heaters for If recording is made under lighting produced by extended periods discharge tubes, such as fluorescent, sodium, or...
-
Page 123: Formats And Limitations Of Outputs
Output formats in clip playback mode Formats and Limitations (Media mode) of Outputs Analog component signals from the COMPONENT OUT connector are output in the format shown below according to the video format of the playback clip and the “YPbPr/SDI Video Formats and Output Out Select”... -
Page 124: Limitations Of Outputs
The actual frame rate of the output signal is 1/1.001 of Clip format Output format the value shown in the table. Some frame may be YPbPr Out YPbPr Out deleted when converting the frame rate. Select: HD Select: SD 720/50P 720/50P 576/50i 720/25P... -
Page 125: Backup Battery
Replacing the backup battery Backup Battery Notes • Be sure to set the power switch to OFF when replacing the backup battery. • Be careful not to drop the removed screw into This camcorder uses a backup battery to retain the camcorder. -
Page 126: Troubleshooting
Troubleshooting Operating Power Symptoms Cause Remedy The camcorder does not No battery pack is mounted and no Mount a battery pack (page 23) or connect an AC power on when you set power is supplied to the DC IN power using the BC-U1/U2 (page 24) . the power switch either to connector. -
Page 127: External Devices
External Devices Symptoms Cause Remedy The equipment connected It sometimes takes time for the Wait for about 15 seconds. If the connected to the camcorder via an connected equipment to recognize equipment still does not react, do the following: i.LINK connection does the operation. -
Page 128: Error/Warning Indications
Rapidly The camcorder may be defective. flashing Turn off the power and consult Sony service personnel. (If power cannot be turned off by setting the power switch to OFF, remove both the battery pack and the DC IN source.) Warning Indications When one of the following indications is generated, follow the message to clear the problem. - Page 129 Warning indication Buzzer Tally Cause and measures on LCD/EVF lamps A partitioned memory card or one that contains recorded clips Unknown Media(A) exceeding the number permitted with this camcorder is loaded. Please Change. This card cannot be used with this camcorder. Remove it and load a compatible card.
-
Page 130: Mpeg-2 Video Patent Portfolio License
MPEG-2 Video Patent Specifications Portfolio License ANY USE OF THIS PRODUCT OTHER THAN General CONSUMER PERSONAL USE IN ANY MANNER THAT COMPLIES WITH THE Power requirements MPEG-2 STANDARD FOR ENCODING DC 12 V VIDEO INFORMATION FOR PACKAGED MEDIA IS EXPRESSLY PROHIBITED Power consumption WITHOUT A LICENSE UNDER Approx. -
Page 131: Camera Block
HQ mode: Approx. 50 min. Picture stabilizing function SteadyShot ON/OFF possible, shift-lens With one SBP-32 system SP mode: Approx.140 min. HQ mode: Approx. 100 min. Filter thread M77 mm, pitch 0.75 mm Continuous operation time (Recording, EVF On, LCD monitor Off) Macro With the BP-U60 ON/OFF switchable... -
Page 132: Audio Block
Output connectors Audio Block A/V OUT connector Built-in microphones AV multiconnector (1) Stereo electret condenser microphones Audio: –10 dBu (47kΩ load, reference Directivity: Omnidirectional level) Built-in speaker Analog composite/YC signals: NTSC or Monaural Output: 250 mW COMPONENT OUT connector Mini D connector (1) Displays Y: 1.0 Vp-p, 75Ω... - Page 133 STORAGE SYSTEMS OR ANY OTHER MEDIA OR STORAGE SYSTEMS TO RECORD CONTENT OF ANY TYPE. • Always verify that the unit is operating properly before use. SONY WILL NOT BE LIABLE FOR DAMAGES OF ANY KIND INCLUDING, BUT NOT LIMITED TO, COMPENSATION OR REIMBURSEMENT...
-
Page 134: Index
backlight (LCD) Index backup battery BARS/CAM button Battery Alarm Battery INFO BATTERY INFO display Numerics Battery Pack 24P System BATTERY RELEASE button BATTERY/MEDIA Status BC-U1 Battery Charger A/V OUT connector BC-U1/U2 AC adaptor Black AC power source Black Gamma 32, 33 ACCESS lamps BP-U30 Accessory shoe... - Page 135 61, 71, 104 Fader Fixed gain mode Date/Time Fixed Shutter mode DC IN connector 54, 103 Flicker Reduce DC IN Power focus delete a clip Focus ring DELETE CLIP Format Media delete shot marks Formatting Detail Frame Rec Frame Recording diopter compensation Free Run mode Direct Menu...
- Page 136 18, 99 Jog dial OK mark 17, 99 Joystick OK MARK ADD OK MARK DEL One-Push Auto Focusing OTHERS Menu Knee Output Formats Language 52, 108 Peaking 61, 80 Last Clip DEL PEAKING button 27, 108 PHU-60K LCD B.LIGHT + and – buttons 73, 76 PICTURE FROFILE menu LCD B.LIGHT switch...
- Page 137 21, 38, 105 SDI OUT connector TLCS SEL/SET button TRANSITION operation buttons SEL/SET dial Trigger Mode SET INDEX PIC Tripod receptacle Setup Troubleshooting setup file Setup menus Shockless White USB cable SHOT MARK user bits SHOT MARK screen Users Bit SHOT MARK1 Shot Mark1 SHOT MARK1 ADD...
- Page 138 Zoom Speed Zoom speed switch ZOOM switch Index...