Table of Contents
Advertisement
I. Warning
To avoid fire or electrical shock, do not expose this product to rain or moisture.
Do not flash at high level output continuously for over 15 times.
To avoid short circuit, make sure the batteries are securely packed so that the contacts
do not touch each other and take care not to short circuit the batteries when handling
them.
Please place the batteries and any other small parts that can be swallowed mistakenly
away from children. Contact a doctor immediately if this happens.
To avoid possible injury to eyes, do not use the flash light close to the eyes.
Do not use the flash light on the people who have medical conditions that might be
aggravated by this without first consulting a doctor.
Please remove the batteries from the flash light and stop using immediately in case of:
● It is dropped or otherwise seriously damaged so that inner components are revealed.
● If the battery leaks corrosive liquids or chemicals, please take out the battery with
gloves.
● The product gives off strange smell, smokes or becomes very hot.
Do not disassemble or maintain this product. Touching the internal high voltage circuits
will cause serious electrical shock.
Advertisement
Table of Contents

Related Manuals for Yongnuo YN560


Summary of Contents for Yongnuo YN560
- Page 1 I. Warning To avoid fire or electrical shock, do not expose this product to rain or moisture. Do not flash at high level output continuously for over 15 times. To avoid short circuit, make sure the batteries are securely packed so that the contacts do not touch each other and take care not to short circuit the batteries when handling them.
- Page 2 The improved wireless triggering sensor: YONGNUO improves the wireless triggering sensor for YN560, with S1 and S2 modes that can also be used outdoors, with a wireless triggering distance of up to 15m.
- Page 3 The more fine tuned output control: The output control of YN560 is more accurate selectable, ranging from 1/128 to 1/1 and each step has 8 smaller fine tuning steps;...
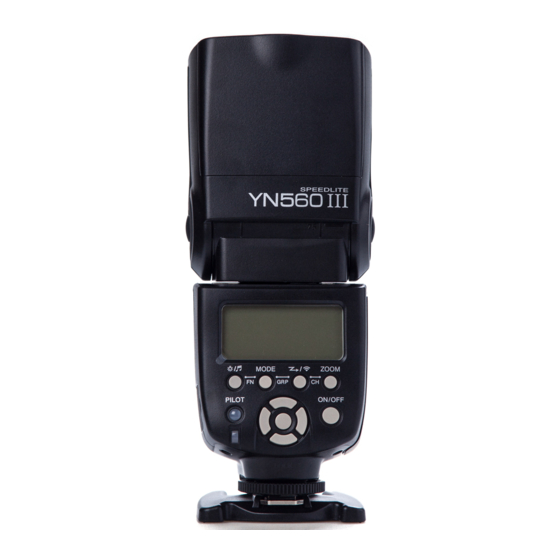
- Page 4 III. Parts (Please read this section carefully, to familiarize yourself with the product) 1. Built-in bounce card 2. Built-in wide-fl ash adapter 3. Flash light’s head 4. External power pack socket (It can be connected to the SF-18C or SF-17C external power pack) 5.
- Page 5 12. Mode indicator (M, S1, and S2): Indicates the current flash mode.
- Page 6 13. Output level indicator: Set the output power by button; there are 8 levels for output level adjustment. Indicates the output power and the fine-tuning; it also indicates the current focal length when adjusting the zoom. 14. The sound switch: A short press will enable or disable the ready sound; hold down the button for longer to turn on/off the power saving mode.
- Page 7 19.Power switch: Switch the flash light on/off by holding this button down for 2 seconds. 20.Power adjustment button: Adjust the power output major steps by pressing the [LEFT] [RIGHT] buttons of the main control, and make fine tune power changes by pressing [UP] [DOWN] and then press [OK] in the middle to set fine tune setting.
- Page 8 IV. Installation Instruction 1. Install Batteries Slide the battery bay cover in the direction of the arrows to open. Insert the batteries, with polarity according to the label inside battery bay. Make sure the battery polarity is correct. Close the battery bay cover in the direction of the arrows. 2.
- Page 9 V. Basic Functions 1. Basic Operations Operation of the buttons: Component Operation [Power Switch] Power switch for the flash light. The flash light can be switched on/off by pressing this button for 2 seconds. It is recommended that the batteries be removed from the battery bay only after the flash light is switched off using this button.
- Page 10 [UP] and [DOWN] You can make fine tune power changes by pressing these button and [OK] buttons and then press [OK] to set the fine tune setting. [-] ZOOM [+] By pressing these buttons, the head focal length of the flash button head can be cycled through (24 / 28 / 35 / 50 / 70 / 80 / 105).
- Page 11 Meaning of [Output control indicator]: ] represents <ON> state of display’s light, while [ ] represents <OFF> state. In M/S1/S2 Mode, indicates the output level State of [Output level indicator] Output Level 1/128 1/64 1/32 1/16...
- Page 12 Meaning of [Charging indicator] Status of [Charging Meaning Operation Indicator] The red light is lit The flash light is fully charged, Normal and can be used. The green light is lit The flash light has not been If the green light is lit for a fully charged.
- Page 13 The meaning of [Sound signal] Sound Meaning Operation 2 beeps a. The sound signal is enabled; Normal b. The flash is started; 3 beeps The flash is in the charging state Waiting for the completion of charging 4 beeps The sound switch is now disabled Normal Continuous beep There is insufficient power and...
- Page 14 [Power saving indicator] (for M Mode) Display mode Meaning Operation Lit for a long period The power saving Press the [Sound Switch] to mode is now off change Unlit for a long The power saving Press the [Sound Switch] to period mode is now change...
- Page 15 If the flash light does not charge within 20 seconds, the flash will automatically shutdown. Then you need to replace the batteries with new ones. You may press the test button [PILOT] to check that the flash works normally. After use, hold the power switch for 2S to switch off. 3.
- Page 16 environment respectively. Under these two modes, the way to adjust the output level is like that in M mode, which is to press the [LEFT] [RIGHT], [UP] [DOWN] and [OK] in the middle. When using S1/S2 mode, you should rotate the flash head to align the wireless triggering sensor to face the master light.
- Page 17 When testing the flash, the flash will flash at the output level you have set. 6. Power saving mode YONGNUO has designed a power saving mode for YN560. This mode is enabled or disabled by a long press of the [Sound Switch]. In M mode, if the power saving mode is enabled, the flash will enter sleep mode after 3 minutes of inactivity in order to save power.
- Page 18 In S1/S2 modes, if the power saving mode is enabled, the flash will automatically shut down after 30 minutes of inactivity; if the power saving mode is disabled, the flash will automatically shut down after being inactive for 60 minutes. Flash mode Power saving mode [ON] Power saving mode [OFF]...
- Page 19 8. Manually set the zoom focal length By pressing [-] ZOOM [+], you can manually set the zoom focal length. The zoom focal length of the flash will cycle between (24 / 28 / 35 / 50 / 70 / 80 / 105mm). In setting the flash zooming position, the LED indicators in the display panel will show the current length.
- Page 20 9. Sound signal When the sound signal is enabled, the flash will give different sounds to indicate its working situations. The meanings of the sounds can be found in the table below: Sound Meaning Operation 2 beeps a. The sound signal is enabled; Normal b.
- Page 21 VI. Advanced Use 1. Fine tuning the output power YN560 allows you to fine tune the output power. You can do more precise changes in the flash output with this function. When you use the [LEFT] and [RIGHT] button to adjust the major steps of flash power, press [UP] and [DOWN] to make the finer adjustment;...
- Page 22 fine tuning mode. Then you can fine tune the power output of the flash by [UP] and [DOWN]. The step size is 1/8ev, so you can achieve more precise exposure control. Press the [OK] button to exit this state, or it will automatically exit after no changes are made for 15 seconds.
- Page 23 2. Multi-flash Lighting Application Use inbuilt flash or top-mounted flash as master flash. Place the slave flash light in desired location. When outdoors, radio signals can be reflected by walls; therefore, place the slave flash where it has enough space to receive the signal. Before locating the slave flash light, make a test of whether S1/S2 can work synchronously (normally).
- Page 24 5. High-speed continuous shooting The YN560 flash light can work with high-speed continuous shooting. Please set the camera in the continuous shooting mode and then shoot. Please note: The number of photos that can be continuous shot is inversely related to the output level.
- Page 25 6. Rear-curtain Sync You can use slow shutter speeds to produce trailing smear for the object as the flash light will flash at the moment when the shutter is going to close; called rear-curtain sync. (The rear-curtain sync function needs support from the camera’s own settings; you should refer to the camera’s instruction book on how to set this mode).
- Page 26 8. Using the built-in Bounce Card Draw out the built-in bounce card and the wide-angle diffusion board from the flash head at the same time and then push the wide-angle diffusion board back in. In this way, if this flash light is used to take photos, it will produce a highlight point on the eyes of the subject and thus make the eyes more appealing (catch light).
- Page 27 9. Using the built-in Wide-angle Diffuser Pull out the wide-angle diffusion board and the built-in bounce card, and then push back the bounce board and arrange them as per the illustration. Used thus, the flash light will have an effective focal length of 18 mm and the flash effect will be softer and more natural.
- Page 28 VII. Specifications Circuit design ........Insulated Gate Bipolar Transistor (IGBT) Guide No..........58 meters (ISO 100, 105mm) Flash modes........M, S1, S2 Zoom range ........24, 28, 35, 50, 70, 80, 105mm Vertical tilt angle ........ -7~90 degrees Horizontal swivel angle...... 0~270 degrees Power supply........
- Page 29 Additional features ......Electronic flash head zoom, sound signal, automatic saving setting, PC port, power saving mode and over heat protection Dimensions......... ??×190×??mm (Flash head at 90 degrees) ??x???x??mm (Flash head at 0 degrees) Net weight .......... 350gm Accessories......... Flash light (1), carry bag (1), mini stand (1) and manual (1)
- Page 30 Guide Numbers for different focal length ranges (at ISO 100, in meters / feet) Flash Flash Coverage (mm) Output 15/49.2 28/91.9 30/98.4 39/127.9 42/137.8 50/164 53/173.9 58/190.3 10.6/34.8 19.8/65 21.2/69.6 27.6/90.7 29.7/97.4 35.4/116.1 37.5/123 41/134.5 7.5/24.6 14/45.9 15/49.2 19.5/64 21/68.9 25/82 26.5/86.9 29/95.1...
- Page 31 VIII. Possible problems during use and solutions 1. Please note when using the flash outdoors: When outdoors, please avoid direct sunlight on to the wireless triggering sensor to ensure normal function of the S1/S2 modes of the flash light. 2. Precaution for outdoor use with lighting umbrellas/modifiers: Lighting umbrellas/ modifiers are easily blown over and if mounted with the flash light it is possible to break the hot shoe foot.
- Page 32 The functions described in this manual are based on testing made by our company. Specifications and design may change without further notice. The YONGNUO logo in this manual is the registered trademark or trademark of SHENZHEN YONGNUO PHOTOGRAPHY EQUIPMENT Co., Ltd in China or/and other countries (regions).
Need help?
Do you have a question about the YN560 and is the answer not in the manual?
Questions and answers