Table of Contents
Advertisement
Advertisement
Table of Contents

Summary of Contents for Arturia Spark 2
- Page 1 USER’S MANUAL...
- Page 2 Information contained in this manual is subject to change without notice and does not represent a commitment on the part of ARTURIA. The hardware unit and the software product described in this manual are provided under the terms of a license agreement or non-disclosure agreement. The license agreement specifies the terms and conditions for its lawful use.
- Page 3 Hernan Velasco Greg Savage Stéphane Schott INDUSTRIALIZATION Nicolas Dubois Richard Phan Gerard Buracchini MANUAL WRITING William Talgorn Randy Lee Sebastien Rochard MANUAL TRANSLATION Tomoya Fukuchi Pierce Warnecke Jérome Parrod Sébastien Rochard ARTURIA – SPARK CREATIVE DRUM MACHINE – USER’S MANUAL...
- Page 4 Kevin Lamb, Patrick Kunz, Frank Orlich, Miguel Silva, Houston Haynes, Cristian Kreindler, Paul Steinway Sébastien Rochard, Tobias Carpenter, Hung Lee, Jason Huang, Wenyu Huang, Matty Yuan, Chen Xiaomai SOUND SAMPLES ARTURIA – SPARK CREATIVE DRUM MACHINE – USER’S MANUAL...
- Page 5 It’s important to register because this identifies you as the legitimate owner and ensures that you’ll receive the latest news and updates for your software and hardware. chapter 2 “Registration & Authorization” for more information about the authorization process. ARTURIA – SPARK CREATIVE DRUM MACHINE – USER’S MANUAL...
- Page 6 SPECIFICATIONS SUBJECT TO CHANGE: The information contained in this manual is believed to be correct at the time of printing. However, Arturia reserves the right to change or modify any of the specifications without notice or obligation to update existing units.
- Page 7 • Do not use the instrument if there is a gas leak nearby. • Arturia is not responsible for any damage or data loss. • HANDLING CD-ROMS: Avoid touching or scratching the shiny underside (encoded surface) of the disc. A damaged or dirty CD-ROM disc may not read properly.
-
Page 8: Table Of Contents
SPARK LEGAL INFORMATION ......................100 ......................100 OFTWARE LICENSE AGREEMENT FCC INFORMATION (USA) ....................... 102 CANADA .............................. 103 EUROPE ............................... 103 NOTES ................................. 104 ARTURIA – SPARK CREATIVE DRUM MACHINE – USER’S MANUAL... -
Page 9: Introduction
Moog Modular. Nearly a year after they began work on the algorithms, Arturia was ready for feedback. At the 2002 NAMM show in California, Arturia shared an early version of what would later be the Moog Modular V with the renowned maker of the original Moog synthesizer, Doctor Bob Moog. - Page 10 Star Wars’ R2-D2 sounds have been made with the ARP. At the Winter NAMM Show 2006, ARTURIA announced the release of its seventh product: the Prophet V. This powerful hybrid gives you two instruments in one: it combines the warmth of the legendary Prophet 5 programmable analog synth with the unique Vector Synthesis textures of the digital Prophet VS.
-
Page 11: Registration & Authorization
In order to proceed, go to this web page and follow the instructions: http://www.arturia.com/register Note: If you don’t have an Arturia account yet, you will need to create one. The process is quick, but it does require that you can access your e-mail address during the registration process. -
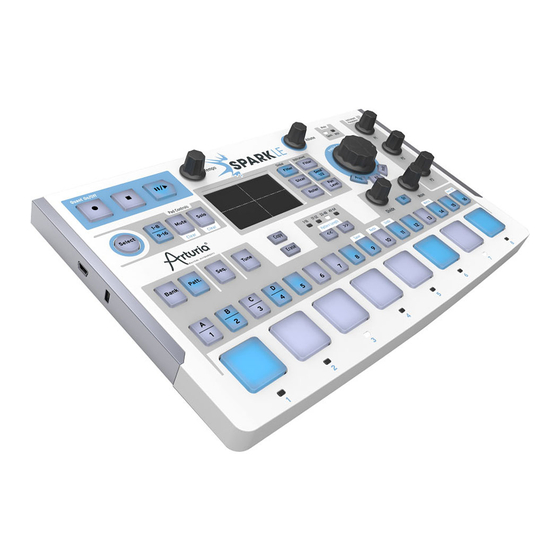
Page 12: The Sparkle Controller: An Overview
Jog Dial and Project / Kit / Instrument mode buttons Instrument parameter knobs Sequencer zone Instrument pads 3.1.1 The Transport zone Record, play, pause or stop a pattern or song with these buttons. ARTURIA – SPARK CREATIVE DRUM MACHINE – USER’S MANUAL... - Page 13 1-8 / 9-16 page button can toggle between the other set of eight instruments in the current kit. Use the Mute and Solo buttons to silence one or more Instrument tracks or bring others to the forefront of the mix. ARTURIA – SPARK CREATIVE DRUM MACHINE – USER’S MANUAL...
- Page 14 Use the supplied USB cable to connect the SparkLE controller to your computer’s USB 2.0 port. SparkLE is bus-powered, so no additional power supply is needed. 3.2.2 Kensington lock slot SparkLE is highly portable, so this slot will allow an added degree of security. ARTURIA – SPARK CREATIVE DRUM MACHINE – USER’S MANUAL...
-
Page 15: Anel
The Spark Creative controller looks the same as its Center panel in the Spark Engine. In this overview we will focus on the features specific to the hardware controller. Display Sequencer zone Song/Pattern zone Jog Dial FX Live pad Instrument control zone ARTURIA – SPARK CREATIVE DRUM MACHINE – USER’S MANUAL... - Page 16 Play the pads and tweak the parameters of one or more instruments at the same time, either while recording a track or while playing back a pattern or song. Select between two banks of instruments and mute or solo them using the buttons in this zone. ARTURIA – SPARK CREATIVE DRUM MACHINE – USER’S MANUAL...
- Page 17 Be sure to use one with the right specifications, though: 9 volts DC, 800 mA, and center positive. 4.2.5 Power on/off switch Use this to toggle the Spark Creative controller on or off. ARTURIA – SPARK CREATIVE DRUM MACHINE – USER’S MANUAL...
- Page 18 Sync playback with Host (only in Host mode) Sync tempo with Host (only in Host mode) ‘Connect hardware’ switch (only in Host mode) Metronome volume Metronome on/off Main volume fader and vu meter Soft clipping on/off CPU consumption ARTURIA – SPARK CREATIVE DRUM MACHINE – USER’S MANUAL...
- Page 19 Tempo and Shuffle control knobs FX Live pad and FX Selection buttons Master Volume control knob Current project display Instrument parameter knobs (right-click: edit motion/disable motion) Sequencer zone Instrument pads (right-click to edit the instrument) ARTURIA – SPARK CREATIVE DRUM MACHINE – USER’S MANUAL...
- Page 20 Click Solo again to return the pads to their previous state. Use Select + Solo to clear the solo status. 5.2.3 The Tempo / Shuffle zone Tempo control knob ARTURIA – SPARK CREATIVE DRUM MACHINE – USER’S MANUAL...
- Page 21 By right-clicking any of the Global effect buttons you can choose between "Latch" or "Touch" performance for that effect. "Latch" will hold the effect at its current value when ARTURIA – SPARK CREATIVE DRUM MACHINE – USER’S MANUAL...
- Page 22 FX Live pad (except for the Tape effect, which only happens once per press). Multiple presses of the Slicer button will allow you to choose between the following effects: ARTURIA – SPARK CREATIVE DRUM MACHINE – USER’S MANUAL...
- Page 23 The Strobe effect will play and shut off the sound alternately at the rate of the selected note value. The Pan effect will move the sound from the left speaker to the right speaker at the rate of the selected note value. Bit Crush ARTURIA – SPARK CREATIVE DRUM MACHINE – USER’S MANUAL...
- Page 24 This is a great way to enter notes into a pattern. Note: The only way to trigger the Roller effect when the SparkLE controller is not connected is to use the Latch feature. ARTURIA – SPARK CREATIVE DRUM MACHINE – USER’S MANUAL...
- Page 25 The Instrument effect Pan / Level button allows you to control the stereo position and volume of a single Instrument inside a kit. So if you want to sweep the closed hi-hat ARTURIA – SPARK CREATIVE DRUM MACHINE – USER’S MANUAL...
- Page 26 “Pitch”. A drop-down list will appear. Make a selection from the list by clicking on one of the parameters. The list will disappear and the name of the new parameter will be visible under the knob. ARTURIA – SPARK CREATIVE DRUM MACHINE – USER’S MANUAL...
- Page 27 To erase a bank, press Erase and then select one of the banks (A-D) To erase a pattern, make sure you’re inside the proper bank before you press the Erase button. Then press Erase and select the pattern ARTURIA – SPARK CREATIVE DRUM MACHINE – USER’S MANUAL...
- Page 28 1 and 9 indicate bass drum events on beats 1 and 3 of the first bar. The gray light on pad 4 is lighter than the others, which indicates the current real- time playing position. ARTURIA – SPARK CREATIVE DRUM MACHINE – USER’S MANUAL...
- Page 29 16 semi-tones by using the 1-8 / 9-16 button: With the 1-8 / 9-16 button unlit you can play notes from the current instrument • tuned from -8 semi-tones to -1 semi-tone. ARTURIA – SPARK CREATIVE DRUM MACHINE – USER’S MANUAL...
- Page 30 Solo button (Click Solo, then select one or more instruments) FX – Aux 1 and 2 – Pan and volume Knobs (right-click: edit motion/disable motion) Click within a zone to select instrument track ARTURIA – SPARK CREATIVE DRUM MACHINE – USER’S MANUAL...
- Page 31 Slicer button (right-click: Latch or Touch operation) Roller button (right-click: Latch or Touch operation) Jog Dial Bank select buttons (A-B-C-D) Pattern select Buttons (1 to 16) Pre-1.7 instrument browsing selector Pre-1.7 kit browsing selector Song select button ARTURIA – SPARK CREATIVE DRUM MACHINE – USER’S MANUAL...
- Page 32 Loop On/Off button Move loop locator knob (right-click: Shift by one step/Shift by one loop size) Sequencer Steps: ON/OFF pads Shuffle knob (right-click: Swing range / Velocity emphasis) Master volume knob ARTURIA – SPARK CREATIVE DRUM MACHINE – USER’S MANUAL...
- Page 33 The step resolution is a sixteenth note by default. You can change the resolution in the pattern panel (see section 5.4.1). 5.3.2.2 The Shuffle Knob ARTURIA – SPARK CREATIVE DRUM MACHINE – USER’S MANUAL...
- Page 34 The Tap button allows you to define the tempo of your pattern by simply tapping this pad at the desired tempo. It is a beat/minute counter, so you have to tap the beats. ARTURIA – SPARK CREATIVE DRUM MACHINE – USER’S MANUAL...
- Page 35 To delete an automation you created, click on Erase then turn the knob of the parameter whose automation you want to delete. ARTURIA – SPARK CREATIVE DRUM MACHINE – USER’S MANUAL...
- Page 36 Listen! Your patterns are now chained together and played one after another in the sequence defined in the song panel. The Step pads (numbered from 1 to 16 at the top of the Center Panel) are used to trigger the 16 pattern chains. ARTURIA – SPARK CREATIVE DRUM MACHINE – USER’S MANUAL...
- Page 37 5.3.4.1 Loading Kits, Projects, Instruments or Samples Use Select+Step 7 or click on the interface to switch to the library panel. Use the jog dial and the select button to browse kits, projects, instruments or samples : ARTURIA – SPARK CREATIVE DRUM MACHINE – USER’S MANUAL...
- Page 38 Next enable the Slicer button. You will have the Filter set to your last setting and can play the slicer on the FX Live pad. Note that the Roller effect is not active when Slicer is set to Latch mode. ARTURIA – SPARK CREATIVE DRUM MACHINE – USER’S MANUAL...
- Page 39 Click to choose the value of the note to be repeated with the Repeat mix effect. The effect will be applied for the amount of time your mouse click is maintained. Release your click to cancel and resume normal playing. ARTURIA – SPARK CREATIVE DRUM MACHINE – USER’S MANUAL...
- Page 40 When Swing dotted effect is on, a dotted beat is added after the first beat. When Triplet is on, three notes are played per note value. ARTURIA – SPARK CREATIVE DRUM MACHINE – USER’S MANUAL...
- Page 41 ‘on’. Hold Select button and press step sequencer 13 to enter Tune mode. You can now use the pads as a keyboard to play notes on the current instrument. You can play 16 semi-tones using the 1-8 / 9-16 button: ARTURIA – SPARK CREATIVE DRUM MACHINE – USER’S MANUAL...
- Page 42 Press and hold SELECT and turn the knob that you want to change assignment on. You will see the different parameters in the LCD screen and on the software screen. ARTURIA – SPARK CREATIVE DRUM MACHINE – USER’S MANUAL...
- Page 43 Studio Edit instrument view. (See next chapter 5.6 The Studio). To change the filter and/or the mixer parameters, first select an instrument and simply click on one of the filter or mixer parameter knobs and while maintaining your click, ARTURIA – SPARK CREATIVE DRUM MACHINE – USER’S MANUAL...
- Page 44 Resonance: Set Filter resonance on current instrument. • Aux1/Aux2: Set Aux1 or Aux2 amount on current instrument. • Pan: Set amount of Pan on current Instrument • Volume: Set the volume on current Instrument • ARTURIA – SPARK CREATIVE DRUM MACHINE – USER’S MANUAL...
- Page 45 Export current pattern as MIDI file Delete entire pattern or all active automations Click to select bank A to D Click to display patterns 1 to 16 Change upper part Change lower part ARTURIA – SPARK CREATIVE DRUM MACHINE – USER’S MANUAL...
- Page 46 1/16=sixteenth note - 1/8=eighth note - 1/4=a quarter note, etc. A pattern has from 1 to a maximum of 64 steps. Click to display Steps 1 to 32 or steps 33 to 64 in the current pattern. ARTURIA – SPARK CREATIVE DRUM MACHINE – USER’S MANUAL...
- Page 47 Mute button in the center panel will flash to indicate that a mute has been set from another panel (studio, mixer or sequencer). Sequencing area. Write your patterns for all 16 instruments here Automation area. Currently editable automation ARTURIA – SPARK CREATIVE DRUM MACHINE – USER’S MANUAL...
- Page 48 Add a new automation lane Automation tools 5.4.2.1 How to select a track To select a track, move your cursor over the track. When the track lights up, click to select. ARTURIA – SPARK CREATIVE DRUM MACHINE – USER’S MANUAL...
- Page 49 Click to draw automation Right click to erase Shift+click to draw a line Alt+click to draw a global automation Cmd+click (mac) or Ctrl+click (win) to draw values at smaller resolution (sub-values) ARTURIA – SPARK CREATIVE DRUM MACHINE – USER’S MANUAL...
- Page 50 When chains are linked together, they will play one after the other, from left to right. In this example, when chain 2 finishes playing, chain 3 will play. When chain 3 finishes playing, chain 2 will play again. ARTURIA – SPARK CREATIVE DRUM MACHINE – USER’S MANUAL...
- Page 51 [Ctrl]+Drag and Drop on Windows or [Alt]+Drag and Drop on Mac. You can also delete them using the [Del] key or the Delete button [9]. ARTURIA – SPARK CREATIVE DRUM MACHINE – USER’S MANUAL...
- Page 52 A small window appears next to the knob to let you know the amount and direction of volume applied. Double clicking the VOLUME knob will reset it to a default value ARTURIA – SPARK CREATIVE DRUM MACHINE – USER’S MANUAL...
- Page 53 The solo button on the center panel will flash to indicate that a solo has been set from another panel (studio, mixer or sequencer). Edit mode button Click on the Edit mode button to enter the instrument edit Mode. 5.6.1.1 Instrument Edit Window Rename instrument. ARTURIA – SPARK CREATIVE DRUM MACHINE – USER’S MANUAL...
- Page 54 Gain knob for each layer Effect unit 1. See 5.8.1.3 for a full detail of effects. Effect unit 2. See 5.8.1.3 for a full detail of effects. The selected instrument as described in 6.4.1 ARTURIA – SPARK CREATIVE DRUM MACHINE – USER’S MANUAL...
- Page 55 RANDOM - You will also be able to control a Random parameter. The more randomness you add, the more often Spark will play a different slice from the one it was supposed to play. ARTURIA – SPARK CREATIVE DRUM MACHINE – USER’S MANUAL...
- Page 56 [4] can be considered as your main VCA envelope: It needs to be activated by the pad so the [Trig] output of the Pad module must be connected to the [Trig] ARTURIA – SPARK CREATIVE DRUM MACHINE – USER’S MANUAL...
- Page 57 From there, you will be able to set the amount of modulation (gain knob) and the type of modulation (unipolar: only positive modulation – or bipolar: both positive and negative modulation) ARTURIA – SPARK CREATIVE DRUM MACHINE – USER’S MANUAL...
- Page 58 Each Macro knob can control up to four of the parameters found in your patch. To achieve this, you need to select which module you want to control, for instance in [11] we control Envelope 1. ARTURIA – SPARK CREATIVE DRUM MACHINE – USER’S MANUAL...
- Page 59 The first of the 6 Macro knobs needs to control the Coarse tune parameter in the case of an Oscillator, or the Pitch parameter in the case of the Sampler. The ranges need to be Min=0 and Max=1. ARTURIA – SPARK CREATIVE DRUM MACHINE – USER’S MANUAL...
- Page 60 Inserting a REX player module will clear your current patch and create a new one with the basic connections already built in. These connections will be required for the REX player to work. ARTURIA – SPARK CREATIVE DRUM MACHINE – USER’S MANUAL...
- Page 61 The output connections are a mono Audio output, and a Sync output. 5.7.3.4 The Filter The Filter module is a mono multimode filter. You will find controls for CUTOFF frequency and RESONANCE amount, and a FILTER MODE selector. The modes available are: ARTURIA – SPARK CREATIVE DRUM MACHINE – USER’S MANUAL...
- Page 62 The Input connections are the 5 audio sources and an Amplitude modulation. The Output connection is the mixed audio. This mixer is a mono mixer. ARTURIA – SPARK CREATIVE DRUM MACHINE – USER’S MANUAL...
- Page 63 5.7.3.9 The Karplus Strong module The Karplus Strong module is a physical modeling tool that will emulate the behavior of a plucked string. You can define the frequency of the string, a ARTURIA – SPARK CREATIVE DRUM MACHINE – USER’S MANUAL...
- Page 64 Release. Other parameters are accessible using the Macro knob assignations. See 5.7.2 for an explanation on how to do that. Here is the full list of parameters contained in the envelope, taken from the Macro knob assignation drop down: ARTURIA – SPARK CREATIVE DRUM MACHINE – USER’S MANUAL...
- Page 65 You can also activate the Sync function to sync the LFO frequency to the tempo of Spark. The Input connections are: Trig to retrigger the LFO waveform Amplitude Modulation Frequency Modulation Pulse Width Modulation for the square waveform. ARTURIA – SPARK CREATIVE DRUM MACHINE – USER’S MANUAL...
- Page 66 Each track is numbered from 1 to 16 at the top of the window. To the right of the mixer window are Return1 – Return 2 and finally the Master track. Let's take a close look at the Mixer. ARTURIA – SPARK CREATIVE DRUM MACHINE – USER’S MANUAL...
- Page 67 Track volume and vu meter Assign an output for instrument 1 (available when Spark is inserted into a host sequencer with Multi-output Mode. See section 6.2 “Plug-in mode” for more details) ARTURIA – SPARK CREATIVE DRUM MACHINE – USER’S MANUAL...
- Page 68 5.8.1.2 The Return and master tracks Open FX window for this Open Master FX 1 and 2 track window Set volume for AUX return Set Master volume ARTURIA – SPARK CREATIVE DRUM MACHINE – USER’S MANUAL...
- Page 69 Bypass FX1/FX2 for one instrument /channel-Aux-Master insert Change/Remove FX (Inst./Channel, Aux or Master insert) Load an FX preset Save FX preset Delete FX preset Set Dry/Wet mix (Inst./Channel, Aux or Master insert) Effect parameters ARTURIA – SPARK CREATIVE DRUM MACHINE – USER’S MANUAL...
- Page 70 LFO. Delay is the delay time and feedback is the amount of delayed signal added back to the dry signal. Both of these parameters emphasize the effect when increased. Spread refers to the width of the sound in the stereo field. ARTURIA – SPARK CREATIVE DRUM MACHINE – USER’S MANUAL...
- Page 71 Parametric EQ allows one to boost or reduce the volume of frequency bands. FREQ selects the frequency and GAIN allows one to remove or add volume to that band. Width (MID only) determines the width of the middle band around the specified FREQ. ARTURIA – SPARK CREATIVE DRUM MACHINE – USER’S MANUAL...
- Page 72 Stereo refers to the width of the stereo field of the reverb. Dampening sets how much the reverb should be filtered using the Lo and Hi Cut filter settings. ARTURIA – SPARK CREATIVE DRUM MACHINE – USER’S MANUAL...
- Page 73 The resulting bit reduction may produce a “warmer” sound impression, or a harsh one, depending on the amount of bit reducer and resampler. Harmonic distortion adds overtones that are whole number multiples of a sound wave's frequencies. ARTURIA – SPARK CREATIVE DRUM MACHINE – USER’S MANUAL...
- Page 74 (pan set to 0), or the user can specify a different position. The motion parameter will modulate the sound’s position in space. Space pan must be used on stereo sounds. ARTURIA – SPARK CREATIVE DRUM MACHINE – USER’S MANUAL...
- Page 75 Hard or Soft Knee controls whether the bend in the response curve is a sharp angle or has a rounded edge. A soft knee reduces the audible change from uncompressed to compressed. ARTURIA – SPARK CREATIVE DRUM MACHINE – USER’S MANUAL...
- Page 76 Analog Delay parameters The Analog Delay is a different algorithm from the “delay” effect plugin. The sound might suit better in some circumstances. ARTURIA – SPARK CREATIVE DRUM MACHINE – USER’S MANUAL...
- Page 77 The Leslie speaker is an amplifier/loudspeaker combination that is used to create a modulation effect based on the Doppler effect. Both the treble horn and the woofer speaker have rotating parts, giving that particular tone. ARTURIA – SPARK CREATIVE DRUM MACHINE – USER’S MANUAL...
-
Page 78: Graphic Equalizer
The Vocal filter is a formant filter that recreates the sound of vowels. Graphic Equalizer The 10 band graphic equalizer allows you to shape the frequency content of your sound by choosing the individual gains of each frequency band. ARTURIA – SPARK CREATIVE DRUM MACHINE – USER’S MANUAL... -
Page 79: The Library
If you want to load an instrument, you can select the pad on which you want to load it. You can also activate the “Auto Preview” feature, which will let you hear the instruments automatically as you browse through the results list. ARTURIA – SPARK CREATIVE DRUM MACHINE – USER’S MANUAL... - Page 80 Use the Jog Wheel on Spark CDM and SparkLE to browse the result list, and Select+Jog Wheel to browse the filter list. ARTURIA – SPARK CREATIVE DRUM MACHINE – USER’S MANUAL...
- Page 81 Otherwise, one must first select the new bank, then specify the pattern of this new bank, even if it's the same pattern number as the currently played pattern. ARTURIA – SPARK CREATIVE DRUM MACHINE – USER’S MANUAL...
- Page 82 Choose your Controller GUI: Select between the Spark CDM GUI and the Spark 2 GUI. Spark CDM GUI is identical to the Spark CDM hardware. 5.10.1.2 File preferences Save a copy of Audio samples in Library: When importing .wav/.aiff files to Spark, the source file will be copied in the library.
-
Page 83: Mode
To launch the Spark application: Windows: Start menu > Programs > Arturia > Spark… and choose Spark. • OS X: Finder > Applications > Arturia > Spark… and double-click on the • Spark application icon. 6.1.2 Configuration of Audio & MIDI settings 6.1.2.1 Windows... - Page 84 MIDI Clock sample Set an offset on internal Spark Midi Clock to compensate audio offset driver latency errors. Active MIDI inputs Displays the available MIDI inputs that can be used to control SPARK. ARTURIA – SPARK CREATIVE DRUM MACHINE – USER’S MANUAL...
- Page 85 When using the Spark Engine as a plug-in within a DAW the tool bar will show two additional buttons: Host button When on, the current Spark pattern will start and stop along with the host sequencer transport. ARTURIA – SPARK CREATIVE DRUM MACHINE – USER’S MANUAL...
- Page 86 6.3.1.2 Mac OS X The VST plug-in is automatically installed in the folder of the system corresponding to the VST instruments: /Library/Audio/Plug-Ins/VST/ The VST plug-in will be usable by all your VST host applications. ARTURIA – SPARK CREATIVE DRUM MACHINE – USER’S MANUAL...
- Page 87 Create an instrument using the VST Instrument Menu then click on Spark; then select the output you want to enable by clicking on the button just on the left of the instrument name in this menu. ARTURIA – SPARK CREATIVE DRUM MACHINE – USER’S MANUAL...
- Page 88 Audio Unit plug-in manager, click on the menu Preferences > Audio Units Manager. This Manager will show you the list of available plug-ins, test their compatibility with Logic, and then allow you to activate or de-activate them. ARTURIA – SPARK CREATIVE DRUM MACHINE – USER’S MANUAL...
- Page 89 6.4.2.1 Stereo Mode Select an Instrument track. On the mixer portion of the corresponding track, click on the button “I/O” to obtain the list of plug-ins, then select AU Instruments > Arturia > Spark > Stereo. 6.4.2.2 Multi Output Mode To use the separate outputs: Select an Instrument track.
- Page 90 Make sure you activate the track before starting to play or record. 6.4.3.2 Multi Output Mode To use the separate outputs, create the number of new Audio tracks you want, and then choose the correct OUT of the Spark plugin. ARTURIA – SPARK CREATIVE DRUM MACHINE – USER’S MANUAL...
- Page 91 To use separate outputs: select an Instrument track. Then on the portion of the mixer corresponding to the selected track, click on the button “I/O” to obtain the list of plug- ins, then select AU Instruments > Arturia > SPARK > Multi Output (16xStereo). PRO TOOLS 6.5.1 Installation...
- Page 92 - Configure the new Midi track (the left track in the image below) . Set ‘Midi From’ to ‘Spark’ and change ‘Pre FX’ to ‘Spark’ in the drop-down menu . Set Monitor to ‘Auto’ . Arm the session recording ARTURIA – SPARK CREATIVE DRUM MACHINE – USER’S MANUAL...
- Page 93 - Launch ‘Audio MIDI Setup’ to configure the IAC Driver that will be used for sending Midi data to the AU host. Double-click on the IAC Driver Icon in the MIDI Studio view ARTURIA – SPARK CREATIVE DRUM MACHINE – USER’S MANUAL...
- Page 94 - Launch Logic and create a software instrument track - Add the Spark LE plug-in by navigating to I/O > AU Instruments > Arturia > Spark - Activate the Host and Tempo buttons in the Spark LE plug-in’s Tool bar window - Open Window >...
-
Page 95: Controller
6.7.11 Assign a MIDI CC to tempo knob Same as previous on corresponding knob. 6.7.12 Assign a MIDI CC to stop and play functions using Cmd+Click Same as previous on play and stop buttons. ARTURIA – SPARK CREATIVE DRUM MACHINE – USER’S MANUAL... - Page 96 ARTURIA – SPARK CREATIVE DRUM MACHINE – USER’S MANUAL...
-
Page 97: Ontroller With The
However, the instrument pads on the hardware controller are pressure-sensitive, so you can change the velocity output of the Roll effect in real time. ARTURIA – SPARK CREATIVE DRUM MACHINE – USER’S MANUAL... -
Page 98: Midi D Evices
Use as USB/MIDI interface (Spark Creative only) To use your SPARK Controller as USB/MIDI interface, open the public MIDI port in your host program and connect the MIDI cable(s) to your Spark Creative controller. ARTURIA – SPARK CREATIVE DRUM MACHINE – USER’S MANUAL... -
Page 99: Center
Our free MIDI Control Center software allows you to customize the functions of the Pads, Knobs and Buttons of your Spark or SparkLE hardware according to your needs. You can download the software from the Arturia.com web page A full manual of MIDI Control Center features is available from inside the MIDI Control Center software. - Page 100 The Licensee must register the Product to Arturia to get access to client support, and to activate his Product. (An internet connection is required to register and activate the Product, either on the computer on which the Product is installed, either on another device able to exchange files with the computer on which the Product is installed).
- Page 101 The Licensee must register the Product to Arturia to get access to client support, and to activate his Product. (An internet connection is required to register and activate the Product, either on the computer on which the Product is installed, either on another device able to exchange files with the computer on which the Product is installed).
- Page 102 Privacy Policy at www.arturia.com/privacy. 7. Limited Warranty Arturia warrants that the physical media on which the software is provided is free from defects in materials and workmanship under normal use for a period of thirty (30) days from the date of purchase. The Licensee’s invoice shall be evidence of the date of purchase.
-
Page 103: Canada
Canada. EUROPE This product complies with the requirements of European Directive89/336/EEC. This product may not work correctly by the influence of electro-static discharge; if it happens, simply restart the product. ARTURIA – SPARK CREATIVE DRUM MACHINE – USER’S MANUAL... -
Page 104: Note
NOTES ARTURIA – SPARK CREATIVE DRUM MACHINE – USER’S MANUAL...
Need help?
Do you have a question about the Spark 2 and is the answer not in the manual?
Questions and answers