Table of Contents
Advertisement
Thank you for purchasing this product.
Please read these instructions carefully before using this product,
and save this manual for future use.
Included Installation Instructions (l 3, 28, 29)
The installation work should be done by a qualified installation specialist.
Before commencing work, carefully read these installation instructions and the operating
instructions to ensure that installation is performed correctly.
(Please keep these instructions. You may need them when maintaining or moving this system.)
Model number suffix "EB" denotes UK model.
EB GN
Operating Instructions
Wireless Speaker System
Model No. SC-NE5DB
VQT4U56
Advertisement
Table of Contents

Related Manuals for Panasonic SC-NE5DB


Summary of Contents for Panasonic SC-NE5DB
-
Page 1: Operating Instructions
Operating Instructions Wireless Speaker System Model No. SC-NE5DB Thank you for purchasing this product. Please read these instructions carefully before using this product, and save this manual for future use. Included Installation Instructions (l 3, 28, 29) The installation work should be done by a qualified installation specialist. -
Page 2: Table Of Contents
® Listening to DAB/DAB+........19 Bluetooth SIG, Inc. and any use of such marks by Panasonic Corporation is under license. Listening to FM radio ........21 Other trademarks and trade names are those of their respective Sound adjustment .......... -
Page 3: Safety Precautions
Safety precautions WARNING Product Identification Marking is located on the bottoms of the CD unit and the speaker unit. Unit ≥ To reduce the risk of fire, electric shock or product damage, – Do not expose this unit to rain, moisture, dripping or splashing. -
Page 4: Supplied Items
≥Most major credit and debit cards accepted. memory of this system. ≥All enquiries transactions and distribution facilities are provided directly by Panasonic UK. ≥It couldn’t be simpler! ≥Also available through our Internet is direct shopping for a wide range of finished products. -
Page 5: Playable Media
≥ Only one memory card will be selected when connecting a multiport USB card reader, typically the first memory card ≥ Please be aware that Panasonic accepts no responsibility for inserted. the loss of data and/or information. Compatible CD ≥... -
Page 6: Control Reference Guide
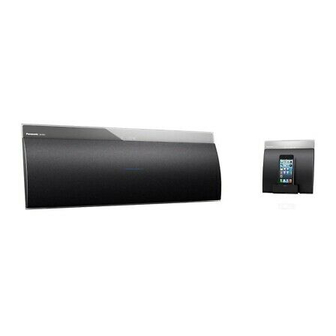
Control reference guide This system consists of the CD unit and the speaker unit. The both units are wirelessly connected when turned on. ∫ CD unit Side view ∫ Speaker unit Top view VOLUME Standby/on switch (Í/I) Standby/on indicator Press to switch the unit from on to standby mode While this system is turned on: or vice versa. -
Page 7: Remote Control
≥The CD unit’s display turns off if the CD unit is left unused for more than 3 minutes and the audio selector is set “CD” “IPOD_DOCK” IPOD_PORT to an option other than , or “ ”. To turn the display on, press any button on “CD”... -
Page 8: Connections
Connections Connect an external music device (for AUX mode) Basic connection Connect the DAB indoor antenna (supplied) to the speaker unit. Audio cable (not supplied) 1 Plug the audio cable (not supplied) into the AUX jack. Adhesive tape (not supplied) Plug type: ‰3.5 mm stereo 2 Press [ , AUX] to select “AUX”... -
Page 9: Inserting Media
Inserting media Inserting a disc Select “CD” as the source. The label side 10 cm Press [CD <] to open the lid on the back of the CD unit. ≥ Leave a space more than 10 cm behind the unit. ≥... -
Page 10: Network Settings
2.4 GHz wireless network as the AirPlay network router refer to compatible device (l 5 or the DLNA compatible http://panasonic.jp/support/global/cs/ device. (This site is in English only.) ≥ It is also possible to use AirPlay without a wireless network router. (l 14, “Directly streaming to this system (AirPlay)”) - Page 11 Method 2 The settings are completed when “SUCCESS” is displayed and the Wi-Fi status indicator stops If you're using an iPod touch/iPhone/iPad. (iOS version 5.0 or later.) blinking and lights in blue. With this method you will share the wireless If “FAIL”...
- Page 12 When a message indicating the completion of the Wi-Fi setup of this system is displayed, close the app, and then check the operation of AirPlay, etc. ≥ “Panasonic Stereo System Network Setup” for Mac OS is also available at the App Store. VQT4U56...
- Page 13 Advanced network settings Select and input the details. ≥ Check your home wireless network name (Network ≥ The below settings are the alternative or additional name (SSID)) and password for this network. This can (l 12 settings for “Method 4”. often be found on the wireless network router itself.
-
Page 14: Using Airplay With This System's Speakers
≥ If the Music app on your iOS device is used, select the “PW _ _ _ _ _”* is displayed. audio file you want to play. The 5 digits after “PW” is the password for this Select “Panasonic NE5 _ _ _ _ _ _”* from the 1, 2 network. AirPlay icon. -
Page 15: Playing Back Music Files On The Dlna Server
The new password is displayed. ≥ The device name of this system will be ≥ The 5 digits after “PW” is the new password for displayed as “Panasonic NE5 _ _ _ _ _ _”* 1, 2 this network. ≥ For details on how to use DMC compatible Press any button to exit. -
Page 16: Bluetooth ® Operations
Bluetooth operations ® By using the Bluetooth connection, you can listen to the sound from the Bluetooth audio device from this ® ® system wirelessly. ≥Refer to the operating instructions of the Bluetooth device for details. ® Bluetooth transmission mode ®... -
Page 17: About Bluetooth
About Bluetooth Media playback operations ® The following marks indicate the availability of the Panasonic bears no responsibility for data and/ feature. or information that is compromised during a wireless transmission. [CD] : CD audio in CD-DA format and a CD that contains MP3 files (l 5) ∫... -
Page 18: Playback Modes
Playback modes ≥ To use this system’s remote control with a Bluetooth device, ® [CD] [USB] [AirPlay] the Bluetooth device must support AVRCP (Audio Video ® Select the playback mode. Remote Control Profile). Depending on the device or the status of the device, some operations may not work. -
Page 19: Listening To Dab/Dab
Listening to DAB/DAB+ Presetting DAB/DAB+ stations Preparation You can preset up to 20 DAB/DAB+ stations. ≥ Make sure that the DAB antenna is connected. (l 8) Preparation ≥ Turn this system on. ≥ Press [CD/RADIO] repeatedly to select “DAB/ DAB+”. Memorising stations While listening to a DAB broadcast To listen to DAB/DAB+ broadcasts, the available... - Page 20 Display ≥ If broadcasting stations are memorised, proceed to Press [DISPLAY, iPod MENU] to change the display. “To re-scan DAB/DAB+ stations” to memorise stations on other frequency blocks. (l 19) The information will scroll through the display. ≥ If “SCAN FAILED” is still displayed, repeat steps 1 to 3 until a Each time you press the button: station is memorised.
-
Page 21: Listening To Fm Radio
Listening to FM radio ∫ Manual tuning and presetting You can preset up to 30 channels. Select a radio broadcast. Preparation Press [PLAY MENU] repeatedly to select ≥ Make sure that the antenna is connected. (l 8) “TUNEMODE”. ≥ Turn this system on. Press [3, 4] to select “MANUAL”... -
Page 22: Sound Adjustment
Sound adjustment Play timer The following sound effects can be added to the audio You can set the timer so this system turns on at a output. certain time every day. Press [SOUND] repeatedly to select the effect. Preparation Set the clock (l left). Press [3, 4] to select the setting and then press ∫... -
Page 23: Others
– If “D.CONNECT” is set to “ON”, change the setting to “OFF” and connect this system to a wireless network that When other Panasonic equipment responds to the is connected to the Internet. supplied remote control, change the remote control code. - Page 24 Changing the communication mode Network standby To change the wireless communication quality This system can turn on automatically from standby between the CD unit and the speaker unit. If the units mode when this system is selected as the AirPlay are not wirelessly connected, or output sound is speakers.
-
Page 25: Troubleshooting
“SC-NE5” manually. Read the operating Do you have the latest software installed? instructions for the device for details. ≥ Occasionally, Panasonic may release updated software for this system that may add or improve the way a feature The sound is interrupted. - Page 26 Radio My wireless network router is WPS PBC compatible, but the pairing does not work. DAB/DAB+ reception is poor. ≥ If the network is set to be invisible, the push button ≥ Keep the antenna away from computers, televisions, other configuration does not work.
- Page 27 “CANNOT ACCEPT” “NOCONNECT” ≥ The remote control cannot be operated due to a wireless ≥ This system cannot connect to the network. communication problem between the CD unit and the Check the network connection. (l 10) speaker unit. (l 25) ≥...
-
Page 28: Attaching The Speaker Unit To A Wall (Optional)
67 mm Professional installation is required. The installation should never be done by any 83 mm other than a qualified installation specialist. PANASONIC DISCLAIMS ANY PROPERTY DAMAGE AND/OR SERIOUS INJURY, 122 mm INCLUDING DEATH RESULTING FROM IMPROPER INSTALLATION OR INCORRECT 252 mm HANDLING. - Page 29 Attach the wall mount bracket to the wall with Hook the unit securely onto the wall mount 2 screws (not supplied). (Both sides) brackets with both hands. ≥ Use a level to ensure both wall mount brackets are ≥ Connect the antenna and the AC mains lead to the unit level.
-
Page 30: Specifications
Specifications ∫ TERMINALS SECTION iPod Port ∫ GENERAL USB Standard USB 2.0 full speed Media file format support MP3 (¢.mp3) Power consumption USB device file system FAT12, FAT16, FAT32 CD unit 23 W iPod port power DC OUT 5 V 2.1 A MAX Speaker unit 14 W Lightning Connector... -
Page 31: Limited Warranty (Only For Australia)
Panasonic Warranty 1. The product is warranted for 12 months from the date of purchase. Subject to the conditions of this warranty Panasonic or its Authorised Service Centre will perform necessary service on the product without charge for parts or labour, if in the opinion of Panasonic, the product is found to be faulty within the warranty period. - Page 32 This symbol might be used in combination with a chemical symbol. In this case it complies with the requirement set by the Directive for the chemical involved. Pursuant to the applicable EU legislation Panasonic Marketing Europe GmbH Panasonic Testing Centre Winsbergring 15, 22525 Hamburg, Germany Panasonic Corporation Web Site: http://panasonic.net...