Table of Contents
Advertisement
Quick Links
Advertisement
Table of Contents

Related Manuals for Sharp PN-TPCi7W7


Summary of Contents for Sharp PN-TPCi7W7
-
Page 1: User Guide
PN-TPCi7W7 User Guide Version – 1... -
Page 2: Getting Started
Getting Started Getting Started Introduction to PN-TPCi7W7 The PN-TPCi7W7 is a full-featured High Definition PC based upon Intel ® ® architecture, and powered by an Intel Core™ i7 CPU. Targeted for Commercial applications such as interactive digital white boards, ®... -
Page 3: Federal Communications Commission (Fcc) Statement
Getting Started Federal Communications Commission (FCC) Statement This equipment has been tested and found to comply with the limits for a Class B digital device, pursuant to Part 15 of FCC Rules. These limits are designed to provide reasonable protection against harmful interference in a residential installation. -
Page 4: Specifications
32bit/64bit, Windows Vista ® 32bit/64bit, and Windows 7 32bit/64bit ® Supports Linux Windows 7 Pro installed 64bit Software Included: ® Sharp Pen Software™ Installer ® Sharp SDSS Digital Signage Software Trial Software Installed: ® Microsoft Internet Explorer® ®... - Page 5 Specifications Specifications (con’t) On board RealTek™ 8111E Gigabit LAN Chip Supports 10/100/1000Mbps operation 1 x RJ45 LAN Port Onboard Audio o RealTek™ ALC888S High-Definition audio chip o Supports up to 8-channel (2/4/5.1/7.1-channel) o 8-Channel Audio Ports on Back Panel o Supports Jack-Sensing function (under Windows) o Support for S/PDIF Out Header (Internal) Green Function...
- Page 6 Specifications Specifications (con’t) Optional o Watchdog timer Environmental o Operating Temperature: 0° to 40° C o Operating Humidity: 80% maximum relative humidity, non-condensing Power o Input Voltage: 12V 7A o Power Dissipation: 70 Watts Wireless o WLAN 150Mbps o 2.4GHz 802.11 b/g/n o 6dBi Antenna...
-
Page 7: Before Beginning
Installation Mounting PN-TPCi7W7 on Sharp PN-L Series Displays 1. Before beginning Make sure to turn off the monitor and remove the AC power. 2. Items needed • Sharp PN-L Series Touch-Screen Display • PN-TPCi7W7 • Mounting Plate • AC Power Adapter •... - Page 8 PN-TPCi7W7 and two small fingers on either side of AC power adapter holder on the mounting plate. Figure 4 As you slide the PN-TPCi7W7 into the mounting plate, insert the two fingers into these slits as in Figure 5. Figure 5...
- Page 9 Installation There are two fingers on the left side of the mounting plate to catch the PN-TPCi7W7 in place as shown in Figure 6, and they need to be tightened with two include M3 screws. Figure 6 6. Connect the HDMI video cable and...
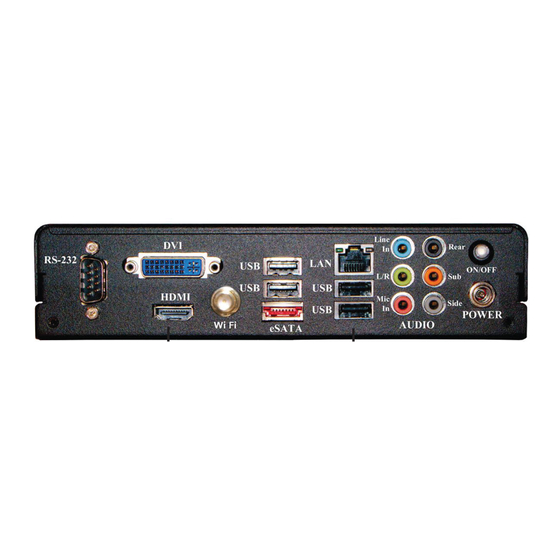
- Page 10 Installation Rear Connector Layout Audio Port 2-Channel 4-Channel 5.1-Channel Blue Line-In Line-In Line-In Green Line-Out Front Speaker Out Front Speaker Out Pink Mic In Mic In Mic In Orange Center/Subwoofer Out Black Rear Speaker Out Rear Speaker Out Grey Audio Port 7.1-Channel Blue Line-In...
- Page 11 TPCi7W7’s power input jack (as in the figure 2). 2. Power Button This button will stay lit if the PN-TPCi7W7 is powered on. If the PN-TPCi7W7 doesn’t power up after the AC is connected, then press this button to power up. If normal Windows shutdown is not shutting down the PN-TPCi7W7, then press this button for more than 4 seconds will turn off the PN-TPCi7W7.
- Page 12 Player 11 ® Microsoft PowerPoint Viewer 2007 ® ® Adobe Flash Player 10 ® ® Apple QuickTime Media Player Codec Pack v.3.9.5 6. Install Sharp Pen Software™ & Optimize Windows Follow instructions from the included Sharp Pen Software operating manual.
- Page 13 United States. To receive repair handling instructions and to find the location of the nearest Sharp Authorized Service Center, please call Sharp toll free at 1-800-BE-SHARP (1-800-237-4277). If it is necessary to ship the Product for servicing, please be sure it is insured and packaged securely.