Table of Contents
Advertisement
Quick Links
Contents of Set
● Personal Studio ST7
* Pickup Mute are not included.
11
Yamaha Silent Brass
Personal Studio ST7
Thank you for purchasing the Yamaha Silent
Brass Personal Studio ST7. In order to obtain
the maximum performance and enjoyment from
your ST7, we urge you to read this Owner's
Manual thoroughly before using. Please keep
this Owner's Manual, and the warranty in a safe
place for later reference.
● Owner's Manual
Advertisement
Table of Contents

Related Manuals for Yamaha ST-7


Summary of Contents for Yamaha ST-7
- Page 1 Yamaha Silent Brass Personal Studio ST7 Thank you for purchasing the Yamaha Silent Brass Personal Studio ST7. In order to obtain the maximum performance and enjoyment from your ST7, we urge you to read this Owner’s Manual thoroughly before using. Please keep this Owner’s Manual, and the warranty in a safe...
- Page 2 Personal Studio ST7 Disconnecting the cable while the power is ON may result in damage to the unit. Frequency Characteristics The sudden noise may also may result in PLAYER 1/2 : 200Hz to 16KHz, includes an hearing impairments. internal equalizer AUX IN : 20Hz to 16 KHz Input/Output Levels...
-
Page 3: Special Message Section
• Direct sunlight (e.g. near a window). supplied or; a cart, rack, or stand that is recommended by cable. Yamaha. If a cart, etc., is used, please observe all safety • High temperatures (e.g. near a heat • Disconnect all cables before moving... -
Page 4: Nameplate Location
Park, CA 90620 spaces provided below and retain this manual as a The above statements apply ONLY to those products distributed by Yamaha Corporation of America permanent record of your purchase. or its subsidiaries. -
Page 5: Setup And Use
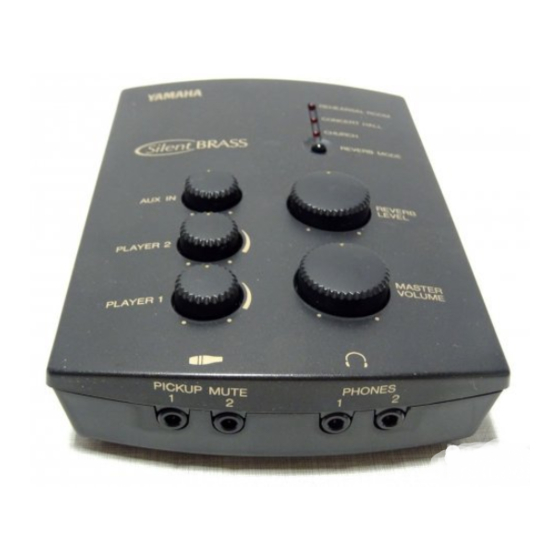
Set up and Use Personal Studio ST7 ■ Front Panel ■ Top Panel POWER DC10 -12V LINE OUT AUX IN REHEARSAL ROOM CONCERT HALL CHURCH REVERB MODE AC Adaptor PA-1D AUX IN REVERB LEVEL PLAYER 2 PICKUP MUTE PHONES MASTER VOLUME PLAYER 1 The above illustration shows the standard settings... - Page 6 Claw Insert the batteries as shown below. Belt hook Attaching the battery cover is easier if you press down on the notched portion (4 lines) and the claw simultaneously.
-
Page 7: Using A Power Adaptor
Power Supply The Personal Studio ST7 can be operated with battery or AC power. Always turn the power OFF when making AC power connections or replacing batteries. Using a Power Adaptor Please use the supplied power adaptor. *(adaptor not included in some countries) Plug the DC output cable from the adaptor into the When using an AC adaptor, use the supplied AC DC10-12V jack q on the top panel. - Page 8 Using the Silent Brass Before connecting the cable and attaching the mute, make sure the power is switched OFF and the earphones are removed from your ears. Connect the ST7 PICKUP MUTE 1 Jack w to the Pickup Make sure the Pickup Mute is firmly inserted into Mute’s Output Jack with the supplied cable.
- Page 9 About the Reverb The ST7’s internal processor includes 3 reverb types. Reverb is added to the input signal received by the PICKUP MUTE 1/2 w inputs. Set the REVERB LEVEL Dial !0 to about the mid level REHEARSAL ROOM point. CONCERT HALL Pressing the REVERB MODE button !1 1 will cause the CHURCH...
- Page 10 Using the AUX IN/LINE OUT Jacks ■ The AUX IN jack The ST7’s AUX IN jack !2 can be used to connect an external POWER DC10 -12V stereo signal source to the ST7. Connecting a CD player, LINE OUT AUX IN tape recorder, etc.