Table of Contents
Advertisement
Quick Links
Advertisement
Table of Contents

Related Manuals for Canon Scan Kiosk II


Summary of Contents for Canon Scan Kiosk II
- Page 1 Version 2.0 Setup and Administrator’s Guide 18001-20-UD1-003...
- Page 2 This page is intentionally left blank. Scan Kiosk II V2.0 Setup and Administrator’s Guide...
-
Page 3: Table Of Contents
Entering Characters Using the Virtual Keyboard ........20 1.4.2 Entering Characters Using a USB Keyboard ..........23 Chapter 2 Setting Up Scan Kiosk II ............25 Initial System Startup ..................25 Logging On to the Windows Admin Mode ............27 Enabling Auto Login .................. - Page 4 Initializing All Settings ................243 Configuring the System Settings ..............246 4.6.1 Backing Up All Data .................. 246 4.6.2 Restoring Data..................253 4.6.3 Displaying the Version Information ............257 4.6.4 Specifying the Logging Settings ............... 260 Scan Kiosk II V2.0 Setup and Administrator’s Guide...
- Page 5 Deleting the Device’s Entire Operation History ......... 303 4.10 Registering and Deleting an SFTP Private Key ..........306 4.10.1 Registering an SFTP Private Key ............. 306 4.10.2 Deleting an SFTP Private Key ..............310 Chapter 5 Troubleshooting ..............315 Scan Kiosk II V2.0 Setup and Administrator’s Guide...
- Page 6 This page is intentionally blank. Scan Kiosk II V2.0 Setup and Administrator’s Guide...
-
Page 7: Preface
This manual provides instructions for the configuration and administration of Scan Kiosk II. This manual does not provide instructions on how to specify Windows settings on the tablet or instructions on how to use Scan Kiosk II. For instructions on using Scan Kiosk II, see the “Scan Kiosk II User’s Guide.”... -
Page 8: Displays Used In This Manual
When this manual is in its native PDF form, the blue underlined text represents a hyperlink to the corresponding sections of this manual or to external Web sites. For example: See Chapter 1, “Introduction,” on p. 15. Likewise, all entries in the Table of Contents are hyperlinks. Scan Kiosk II V2.0 Setup and Administrator’s Guide... -
Page 9: Legal Notices
Legal Notices Trademarks Canon and the Canon logo are registered trademarks, of Canon Inc. in the United States and may also be trademarks or registered trademarks in other countries. imageFORMULA is a trademark of Canon Electronics Inc. Microsoft, Windows, Windows Server, and Internet Explorer are registered trademarks of Microsoft Corporation in the United States and are trademarks or registered trademarks of Microsoft Corporation in other countries. -
Page 10: Fcc Regulations
This Class B digital apparatus complies with Canadian ICES-003. Cet appareil numérique de la classe B est conforme à la norme NMB-003 du Canada. Canon USA, Inc. One Canon Park, Melville, NY 11747, U.S.A., Tel. No. (800) 652-2666 Scan Kiosk II V2.0 Setup and Administrator’s Guide... -
Page 11: Radio Interference Regulations
RÈGLEMENT SUR LE BROUILLAGE RADIOÉLECTRIQUE Cet appareil numérique respecte les limites de bruits radioélectriques applicables aux appareils numériques de Classe B prescrites dans la norme sur le matériel brouilleur: “Appareils Numériques”, NMB-003 édictée par l’Industrie Canada. Scan Kiosk II V2.0 Setup and Administrator’s Guide... -
Page 12: Important Safety Instructions
(condensation) may form inside the product. • Avoid locations near equipment that generate a magnetic field, such as speakers, televisions, or radios. Scan Kiosk II V2.0 Setup and Administrator’s Guide... -
Page 13: Power
• Keep the area around the power plug clear of objects, so that the power cord can be disconnected easily in an emergency. • Use only the AC adapter provided with this product. Also, do not use the AC adapter provided with any other electrical devices. Scan Kiosk II V2.0 Setup and Administrator’s Guide... -
Page 14: Handling
Also, turn OFF the power, and disconnect the AC adapter from the product and disconnect the power cord from the power outlet for safety when the product will not be used for an extended period of time, such as during consecutive holidays. Scan Kiosk II V2.0 Setup and Administrator’s Guide... -
Page 15: Chapter 1 Introduction
• Scan Kiosk II requires an Administrator to be authenticated to set up and configure the product on the Windows tablet PC. • Scan Kiosk II can be configured at the device, or remotely from a Web browser. If you are configuring Scan Kiosk II remotely, some screens may differ from the ones that appear on the local UI. -
Page 16: System Requirements
System Requirements Scan Kiosk II requires the proper set up and configuration of all the items documented in this guide. Failure to correctly set up and configure Scan Kiosk II will affect its operation. 1.2.1 Scan Kiosk II Tablet PC Specifications... -
Page 17: Hardware Requirements
• DR-G2140 (USB Only) • DR-X10C II • DR-G2090 (USB Only) IMPORTANT The DR Scanners are sold separately, and are not included in the Scan Kiosk II package. 1.2.2.1 Scanner Specifications Scan Kiosk II with Scanner Scanner Spec by Model... -
Page 18: 1.2.2.3 Network Environment
236. • DHCP Support: Scan Kiosk II uses the DHCP. The DHCP obtains the device’s IP address automatically from a DHCP server. If this is acceptable for your network environment, you do not have to configure the IP address for the device. -
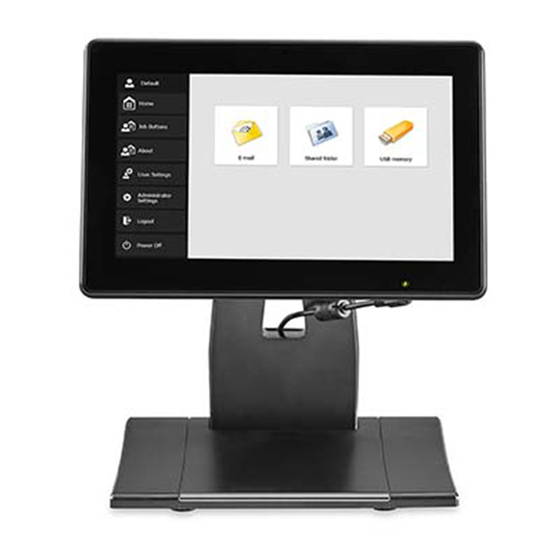
Page 19: Parts And Their Functions
® Tablet PC Stand: Provides a stable platform to which the tablet PC must be attached. ¯ Touch Panel Display: Touch this screen to operate the Scan Kiosk II application. Bottom View ¬ Serial Ports: Not used in this configuration. -
Page 20: Entering Characters
If you touch a text box and the pop-up virtual keyboard appears, enter characters using the keys displayed on the touch panel display. IMPORTANT Certain keys on the keyboard, such as [CTRL] and [ALT] only work in the Maintenance (Windows Administrator) mode. Scan Kiosk II V2.0 Setup and Administrator’s Guide... - Page 21 • The [ENTER] key ( ) acts as if you pressed [OK] on the screen. It does not move you to the next line in a field. Scan Kiosk II V2.0 Setup and Administrator’s Guide...
- Page 22 2. When you have entered all characters, press [] to close the keyboard. Scan Kiosk II V2.0 Setup and Administrator’s Guide...
-
Page 23: Entering Characters Using A Usb Keyboard
If a virtual keyboard appears, press [] to close the virtual keyboard. IMPORTANT The ENTER key on the USB keyboard is only used to enter line breaks, and to log in on the Log In screen. Scan Kiosk II V2.0 Setup and Administrator’s Guide... - Page 24 This page is intentionally left blank. Scan Kiosk II V2.0 Setup and Administrator’s Guide...
-
Page 25: Chapter 2 Setting Up Scan Kiosk Ii
This chapter describes how to set up the Kiosk Administrator account upon the first boot up of the Scan Kiosk II, how to log on to the Windows Admin Mode, enable Auto Login, update the device certificate, and the Windows Update process. - Page 26 20. 3. Enter a unique name (different from all devices on your network) in the [Please name your device. (No spaces)] text box for the Scan Kiosk II Windows tablet PC. IMPORTANT • The device’s name can be a combination of letters (A-Z, a-z), numbers (0-9), and hyphens (-), up to 15 characters long.
-
Page 27: Logging On To The Windows Admin Mode
Be careful when you perform operations in the Windows Admin Mode. Any procedures that are not mentioned in this guide, may disable the Scan Kiosk II device. 1. From the Kiosk Mode’s Home screen, log on ➞ press [Administrator Settings] ➞... - Page 28 The Windows Admin Mode log on screen (red screen) appears. If you do not want to log out of the Kiosk Mode, press [No]. 4. Press the [Password] text box ➞ enter the Kiosk Administrator’s password. Scan Kiosk II V2.0 Setup and Administrator’s Guide...
-
Page 29: Enabling Auto Login
Enabling Auto Login If you add the Scan Kiosk II to your network domain, change the Kiosk User password, or change any group policies, it may disable the Auto Login Mode. Perform the steps in this section to enable the Auto Login Mode. - Page 30 3. Right-click the [Auto_Login_KioskUser.reg] file ➞ select [Merge]. A confirmation message appears. 4. Press [Yes]. A confirmation message appears. If you do not want to continue, press [No]. Scan Kiosk II V2.0 Setup and Administrator’s Guide...
- Page 31 1. Right-click the [Auto_Login_KioskUser.reg] file ➞ select [Edit]. 2. Replace the “DefaultPassword” value with the new password (in quotes). 3. Click the [File] menu ➞ click [Save] ➞ close the file. 4. Right-click the [Auto_Login_KioskUser.reg] file ➞ select [Merge]. Scan Kiosk II V2.0 Setup and Administrator’s Guide...
-
Page 32: Updating The Device Certificate
IMPORTANT Be careful when you perform operations in the Windows Admin Mode. Any procedures that are not mentioned in this guide, may disable the Scan Kiosk II device. 1. Log on to the Windows Admin Mode. For instructions, see “Logging On to the Windows Admin Mode,”... - Page 33 3. Execute the [gen_selfsigned_cert.bat] file. 4. Reboot the device. The device certificate is updated. Scan Kiosk II V2.0 Setup and Administrator’s Guide...
-
Page 34: Applying Windows Updates
For instructions, see step 3 below. IMPORTANT Be careful when you perform operations in the Windows Admin Mode. Any procedures that are not mentioned in this guide, may disable the Scan Kiosk II device. 1. Log on to the Windows Admin Mode. For instructions, see “Logging On to the Windows Admin Mode,”... - Page 35 5. Open the [Windows Update Process] folder ➞ right-click the [Enable_Auto_Login_KioskUser.reg] file ➞ select [Merge]. 6. Reboot the Scan Kiosk II device. The device automatically logs you on to the Kiosk Mode. Scan Kiosk II V2.0 Setup and Administrator’s Guide...
- Page 36 This page is intentionally left blank. Scan Kiosk II V2.0 Setup and Administrator’s Guide...
-
Page 37: Chapter 3 Logging On
Chapter 3 Logging On This chapter describes how to log on to the Scan Kiosk II device as the Administrator when the device is turned ON for the first time, and when the password has already been changed and entered successfully. - Page 38 1. When the Scan Kiosk II device is powered ON for the first time, the Change Password screen appears, as shown below. Scan Kiosk II V2.0 Setup and Administrator’s Guide...
- Page 39 ➞ enter the same password in the [New Password (Confirmation)] text box ➞ press [OK]. You can also enter the e-mail address for the Administrator in the [Administrator Address] text box. The device reboots. Scan Kiosk II V2.0 Setup and Administrator’s Guide...
-
Page 40: Logging On After The Administrator Password Has Been Set
Administrator has logged on to the machine. 1. From the Main screen, press [Administrator Settings]. If you are logging on to Scan Kiosk II remotely, the Home screen does not appear. Press [Administrator Settings] ➞ proceed to step 2. - Page 41 If you do not want to enter the Administrator password, press [Cancel]. To change the Administrator’s password, see “Configuring the System Administration Settings,” on p. 267. The Administrator Settings screen is displayed. Scan Kiosk II V2.0 Setup and Administrator’s Guide...
- Page 42 This page is intentionally left blank. Scan Kiosk II V2.0 Setup and Administrator’s Guide...
-
Page 43: Chapter 4 Configuring The Administrator Settings
Chapter 4 Configuring the Administrator Settings This chapter describes how to properly configure the Scan Kiosk II’s Administrator Settings. Configuring the User Administration Settings This section describes how to configure the User Administration Settings and how to add a new user, modify, delete, delete by server synchronization, export, or import users for the Scan Kiosk II application. -
Page 44: Creating A New User And Specifying The User Administration Settings
This section shows how to create a new user, and specify the User Administration settings. 1. From the Scan Kiosk II Home screen, press [Administrator Settings]. IMPORTANT The [E-mail] button only appears on the Home screen if an e-mail server has been configured. - Page 45 3. Press [User Administration]. To go back to the previous screen, press [Back]. Scan Kiosk II V2.0 Setup and Administrator’s Guide...
- Page 46 4. To add a new user, press [Edit] ➞ [New User]. The New User screen is displayed. Scan Kiosk II V2.0 Setup and Administrator’s Guide...
- Page 47 Default User’s settings. In the [Password] field, enter the password for the new user that matches the user password on the authentication server ➞ enter the same password in the [Password(confirmation)] field. Scan Kiosk II V2.0 Setup and Administrator’s Guide...
- Page 48 If <SMTP/POP Before SMTP Authentication> or <POP before SMTP Authentication> has been selected as the protocol for the E-mail Server settings, enter your User Name and Password to authenticate to the Mail Server. Scan Kiosk II V2.0 Setup and Administrator’s Guide...
- Page 49 Press [] to go to page 2 of the User Administration settings. Scan Kiosk II V2.0 Setup and Administrator’s Guide...
- Page 50 The default address book is ‘My Address Book’, which is stored on the device. The Shared Address Book is stored in the Scan Kiosk II application. Any user who logs on to Scan Kiosk II can use the Shared Address Book. You must configure a shared folder. For more information, see “Configuring...
- Page 51 The default job button screen is ‘My Job Button screen’, which is stored in the Scan Kiosk II application. The Shared Job Button is stored in the Scan Kiosk II application. Any user who logs on to Scan Kiosk II can use the Shared Job Button.
- Page 52 From the Screen after Login drop-down list, select [Home] or [Job Button screen]. The default screen after a user logs on to the Scan Kiosk II application is the Home screen. If you want a user’s initial screen to be the Job Button screen, select [Job Button screen].
- Page 53 The user’s e-mail address is displayed, even if it has not been registered in the address book. The default <Send to my mailbox> setting is ‘OFF’. Press [] to go to page 1 of the User Administration settings. Scan Kiosk II V2.0 Setup and Administrator’s Guide...
- Page 54 IMPORTANT You must fill out all fields on the New User screen, before you can specify a custom file name. The Custom File Name screen appears. Scan Kiosk II V2.0 Setup and Administrator’s Guide...
- Page 55 Select the [Enable] check box to include a counter in the file name, and then specify the starting value and Counter number of digits used for the counter. Scan Kiosk II V2.0 Setup and Administrator’s Guide...
- Page 56 The file name changes as you make your selections, as shown at the bottom of the item list. NOTE The [String] check box is always selected. You cannot clear the check box. All other check boxes can be cleared. Scan Kiosk II V2.0 Setup and Administrator’s Guide...
- Page 57 The order of the items returns to the default order. 5.1.5 Press [OK] to return to the Custom File name screen. If you do not want to specify these settings, press [Cancel]. Scan Kiosk II V2.0 Setup and Administrator’s Guide...
- Page 58 Next to <Custom file name> at the top of the screen, the file name changes, as you make your selections. To change the order of any of the items in the file name, see step 5.1.2. Scan Kiosk II V2.0 Setup and Administrator’s Guide...
- Page 59 To change the order of any of the items in the file name, see step 5.1.2. NOTE You cannot use these characters in the text string: / : ? * “ < > Scan Kiosk II V2.0 Setup and Administrator’s Guide...
- Page 60 Next to <Custom file name> at the top of the screen, the file name changes, as you make your selections. To change the order of any of the items in the file name, see step 5.1.2. Scan Kiosk II V2.0 Setup and Administrator’s Guide...
- Page 61 To change the order of any of the items in the file name, see step 5.1.2. Press [] to go to the next page of the Custom File Name settings. Scan Kiosk II V2.0 Setup and Administrator’s Guide...
- Page 62 If you want to add the device’s name to the file name, press the [Device] check box The [Enable] check box may have already been selected from the <Set the order of information> screen. See, step 5.1.3. Scan Kiosk II V2.0 Setup and Administrator’s Guide...
- Page 63 You can specify from ‘1’ to ‘9’ digits for the counter. 5.10 Press [OK]. The Custom File Name is set. If you want to cancel specifying the custom file name, press [Cancel]. The screen returns to the Edit User screen. Scan Kiosk II V2.0 Setup and Administrator’s Guide...
- Page 64 IMPORTANT You must enter a name in the User name field on the New User screen, before you can specify the Index settings. The Index Settings screen appears. Scan Kiosk II V2.0 Setup and Administrator’s Guide...
- Page 65 Press [XML] or [CSV] to select the file format of the index files. ‘CSV’ is the default file format. Scan Kiosk II V2.0 Setup and Administrator’s Guide...
- Page 66 Press the button next to <Set the order of information> to configure the order of the items that are included in the index file, and enable Index items on the Index settings screen. Scan Kiosk II V2.0 Setup and Administrator’s Guide...
- Page 67 The items are added, as you make your selections, as shown at the bottom of the item list. NOTE The [Index string] check box is always selected. You cannot clear the check box. All other check boxes can be cleared. Scan Kiosk II V2.0 Setup and Administrator’s Guide...
- Page 68 6.2.2, as you make your selections. To change the order of any of the index items, see step 6.2.2. NOTE You cannot use these characters in the text string: & “ ‘ < > Scan Kiosk II V2.0 Setup and Administrator’s Guide...
- Page 69 6.2.2, as you make your selections. To change the order of any of the index items, see step 6.2.2. Press [] to continue specifying the Index settings. Scan Kiosk II V2.0 Setup and Administrator’s Guide...
- Page 70 ‘Date’ is the default field name. To change the order of any of the index items, see step 6.2.2. Repeat step 6.6 to specify the Time settings. The time set on the device is used. Scan Kiosk II V2.0 Setup and Administrator’s Guide...
- Page 71 The [Enable] check box may have already been selected from the <Set the order of information> screen. See step 6.2.1. ‘Device’ is the default field name. To change the order of any of the index items, see step 6.2.2. Scan Kiosk II V2.0 Setup and Administrator’s Guide...
- Page 72 Then, enter a name for the Destination Path field. Press the [Sheets] check box to include the number of images Sheets in the scanned file. Then, enter a name for the Sheets field. The Index settings are complete. Scan Kiosk II V2.0 Setup and Administrator’s Guide...
- Page 73 7. Press [OK]. The User Administration settings are complete. Scan Kiosk II V2.0 Setup and Administrator’s Guide...
-
Page 74: Modifying A User
4.1.2 Modifying a User This section shows how to modify a user. 1. From the Scan Kiosk II Home screen, press [Administrator Settings]. IMPORTANT The [E-mail] button only appears on the Home screen if an e-mail server has been configured. See “Configuring an E-Mail Server,”... - Page 75 3. Press [User Administration]. To go back to the previous screen, press [Back]. Scan Kiosk II V2.0 Setup and Administrator’s Guide...
- Page 76 4. Select the check box next to the user you want to modify ➞ press [Edit] ➞ [Modify]. 5. Modify the User Administration settings, as shown in steps 4.1 to 7 of “Creating a New User and Specifying the User Administration Settings,” on p. 44. Scan Kiosk II V2.0 Setup and Administrator’s Guide...
-
Page 77: Restricting User Functions
4.1.3 Restricting User Functions This section shows how to restrict user functions. 1. From the Scan Kiosk II Home screen, press [Administrator Settings]. IMPORTANT The [E-mail] button only appears on the Home screen if an e-mail server has been configured. See “Configuring an E-Mail Server,”... - Page 78 3. Press [User Administration]. To go back to the previous screen, press [Back]. Scan Kiosk II V2.0 Setup and Administrator’s Guide...
- Page 79 • If you restrict the functions of the <Default User>, the function restrictions are applied to new users, and users registered automatically by server authentication. • If multiple users are selected, the function restrictions are set for all of the selected users. Scan Kiosk II V2.0 Setup and Administrator’s Guide...
- Page 80 Job Button screen after the user logs on to the device, press [Yes] next to <Use only Job Buttons>. If you want to permit the user to scan from the Home screen, press [No]. The default setting is ‘No’. Scan Kiosk II V2.0 Setup and Administrator’s Guide...
- Page 81 Clear the check mark next to the destination to disable it. The destinations that are grayed-out, are disabled for Scan Kiosk II. 7. Press [] to continue restricting the user functions. Scan Kiosk II V2.0 Setup and Administrator’s Guide...
- Page 82 Clear the check mark next to the setting to disable it. If you set to permit the user to edit these settings, only the existing addresses and job buttons are going to be available to the user. Scan Kiosk II V2.0 Setup and Administrator’s Guide...
- Page 83 10. Under <Restriction to Hide Send Buttons>, make sure there is a check mark in the [Hide Restricted Buttons] check box to hide the restricted Send buttons. Restricted Send buttons are not displayed. 11. Press [OK]. The Restriction settings are complete. Scan Kiosk II V2.0 Setup and Administrator’s Guide...
-
Page 84: Deleting A User
This section shows how to delete a user. You can only delete registered users. The Default User cannot be deleted. 1. From the Scan Kiosk II Home screen, press [Administrator Settings]. IMPORTANT The [E-mail] button only appears on the Home screen if an e-mail server has been configured. - Page 85 3. Press [User Administration]. To go back to the previous screen, press [Back]. Scan Kiosk II V2.0 Setup and Administrator’s Guide...
- Page 86 4. Select the check box next to the user you want to delete ➞ press [Edit] ➞ [Delete]. A confirmation message appears. IMPORTANT If multiple users are selected, they are all deleted. Scan Kiosk II V2.0 Setup and Administrator’s Guide...
- Page 87 5. Press [Yes]. If you do not want to delete the user, press [No]. The user is deleted. Scan Kiosk II V2.0 Setup and Administrator’s Guide...
-
Page 88: Deleting A User By Server Synchronization
This section shows how to delete a user by server synchronization. 1. From the Scan Kiosk II Home screen, press [Administrator Settings]. IMPORTANT The [E-mail] button only appears on the Home screen if an e-mail server has been configured. - Page 89 3. Press [User Administration]. To go back to the previous screen, press [Back]. Scan Kiosk II V2.0 Setup and Administrator’s Guide...
- Page 90 4. Select the check box next to the user you want to delete by server synchronization ➞ press [Edit] ➞ [Delete by Server Synchronization]. A confirmation message appears. IMPORTANT If multiple users are selected, they are all deleted. Scan Kiosk II V2.0 Setup and Administrator’s Guide...
- Page 91 When the user list is synchronized with the one on the LDAP server, and if there are any users in the user list who do not exist on the LDAP server, they are deleted. Scan Kiosk II V2.0 Setup and Administrator’s Guide...
-
Page 92: Exporting A User
CSV format. Export users when you want to back up the data or move the data to a different server. 1. From the Scan Kiosk II Home screen, press [Administrator Settings]. IMPORTANT The [E-mail] button only appears on the Home screen if an e-mail server has been configured. - Page 93 3. Press [User Administration]. To go back to the previous screen, press [Back]. Scan Kiosk II V2.0 Setup and Administrator’s Guide...
- Page 94 [Export]. You can export multiple users at the same time. If you are accessing Scan Kiosk II remotely, a dialog box opens. Proceed to the next step. If you are on the Local UI, the Export screen appears. For detailed instructions on specifying the Export settings from the Local UI, see “Exporting a Job Button,”...
- Page 95 ➞ press [Save]. If you do not want to open or save the user’s csv file, press [Cancel]. The Export settings are complete. Scan Kiosk II V2.0 Setup and Administrator’s Guide...
-
Page 96: Importing A User
4.1.7 Importing a User This section shows how to import user data. 1. From the Scan Kiosk II Home screen, press [Administrator Settings]. IMPORTANT The [E-mail] button only appears on the Home screen if an e-mail server has been configured. See “Configuring an E-Mail Server,”... - Page 97 3. Press [User Administration]. To go back to the previous screen, press [Back]. Scan Kiosk II V2.0 Setup and Administrator’s Guide...
- Page 98 If you are importing a user from a Web browser (remotely), proceed to the next steps. If you are importing a user from the Local UI, see “Importing a Job Button,” on p. 135. Scan Kiosk II V2.0 Setup and Administrator’s Guide...
- Page 99 5. Press [Browse] next to <Users Setting file> ➞ navigate to the location where the user data is saved ➞ select the user file ➞ press [Open]. Scan Kiosk II V2.0 Setup and Administrator’s Guide...
- Page 100 [Abort sending]. [Overwrite the file]: Select this setting to overwrite the currently registered users with the imported user data. [Abort sending]: Select this setting to cancel importing users if a user already exists. Scan Kiosk II V2.0 Setup and Administrator’s Guide...
- Page 101 If you selected [Overwrite the file] in step 6, the confirmation message, shown below, appears. Press [Back]. If you selected [Abort sending] in step 6 and there is a user that already exists, the screen below appears. Press [OK]. The Import settings are complete. Scan Kiosk II V2.0 Setup and Administrator’s Guide...
-
Page 102: Configuring The Job Button Settings
Configuring the Job Button Settings This section describes how to configure the Job Button Settings for the Scan Kiosk II application. IMPORTANT • You can access the Administrator Settings from the touch panel display, or remotely from a supported Web browser. - Page 103 3. Press [Job Button Settings]. To go back to the previous screen, press [Back]. Scan Kiosk II V2.0 Setup and Administrator’s Guide...
- Page 104 4. Press [Edit] ➞ [New Job Button]. The New Job Button screen appears. Scan Kiosk II V2.0 Setup and Administrator’s Guide...
- Page 105 5. Specify the Job Button Settings. To specify on which device this job button appears, select the device from the Device drop-down list. Scan Kiosk II V2.0 Setup and Administrator’s Guide...
- Page 106 NOTE Job buttons are sorted and displayed by job button name. If you want to display job buttons in a particular order, insert sequential letters or numbers before the name. Scan Kiosk II V2.0 Setup and Administrator’s Guide...
- Page 107 If necessary, from the Color of Job Button drop-down list, select a color for the job button. ‘Blue’ is the default job button color. Scan Kiosk II V2.0 Setup and Administrator’s Guide...
- Page 108 [Skip Scan Setting Screen]: After the job button is pressed, scanning starts automatically. [Display Scan Setting Screen]: After the job button is pressed, the Scan Settings screen is displayed. Scan Kiosk II V2.0 Setup and Administrator’s Guide...
- Page 109 Press the [File name] text box ➞ enter baseline name for the 5.5.1 scanned image file. For instructions on entering characters from the virtual keyboard or USB keyboard, see “Entering Characters,” on p. 20. Scan Kiosk II V2.0 Setup and Administrator’s Guide...
- Page 110 [Display the file name entry screen]: Select to provide the user the option to change the file name. [Skip the file name entry screen]: Select if you do not want the user to change the file name. Scan Kiosk II V2.0 Setup and Administrator’s Guide...
- Page 111 “Configuring the User Administration Settings,” on p. 54. 5.5.4 Press [OK]. The Custom File Name Settings are complete. If you do not want to specify the Custom File Name Settings, press [Cancel]. Scan Kiosk II V2.0 Setup and Administrator’s Guide...
- Page 112 For instructions on specifying the Scan and Send settings, see the “Scan Kiosk II V2.0 User’s Guide.” The Scan and Send settings are complete. To specify the Index Settings for scanned image files, press [Modify] next to <Index settings>. Scan Kiosk II V2.0 Setup and Administrator’s Guide...
- Page 113 Press [ON] to attach index files (metadata) to the scanned image file after you press the job button, and to activate the When you select this Job Button drop-down list. ‘OFF’ is the default setting. Scan Kiosk II V2.0 Setup and Administrator’s Guide...
- Page 114 6 “Configuring the User Administration Settings,” on p. 64. 5.7.3 Press [OK]. The Index Settings are complete. If you do not want to specify the Index Settings, press [Cancel]. Scan Kiosk II V2.0 Setup and Administrator’s Guide...
- Page 115 If you want to return the job button settings to their default settings, press [Default]. If you do not want to specify the job button settings, press, [Cancel]. The Job Button settings are complete, and the Job Button Settings screen is displayed. Scan Kiosk II V2.0 Setup and Administrator’s Guide...
-
Page 116: Modifying The Job Button Settings
Modifying the Job Button Settings This section shows how to modify a job button. 1. From the Scan Kiosk II Home screen, press [Administrator Settings]. IMPORTANT The [E-mail] button only appears on the Home screen if an e-mail server has been configured. - Page 117 3. Press [Job Button Settings]. To go back to the previous screen, press [Back]. Scan Kiosk II V2.0 Setup and Administrator’s Guide...
- Page 118 4. Select the check box next to the job button you want to modify ➞ press [Edit] ➞ [Modify]. 5. Modify the job button settings, as shown in steps 5 to 6 of “Creating a New Job Button and Specifying the Job Button Settings,” on p. 102. Scan Kiosk II V2.0 Setup and Administrator’s Guide...
-
Page 119: Copying A Job Button
Copying a Job Button This section shows how to copy a job buttons and register it as a new job button. 1. From the Scan Kiosk II Home screen, press [Administrator Settings]. IMPORTANT The [E-mail] button only appears on the Home screen if an e-mail server has been configured. - Page 120 3. Press [Job Button Settings]. To go back to the previous screen, press [Back]. Scan Kiosk II V2.0 Setup and Administrator’s Guide...
- Page 121 4. Select the check box next to the job button you want to copy ➞ press [Edit] ➞ [Copy]. The Copy screen appears. Scan Kiosk II V2.0 Setup and Administrator’s Guide...
- Page 122 5. Press [OK]. A duplicate job button with the same name as the copied button is created. Scan Kiosk II V2.0 Setup and Administrator’s Guide...
- Page 123 6. If you want to modify the copied job button, select the copied job button ➞ press [Edit] ➞ [Modify]. Scan Kiosk II V2.0 Setup and Administrator’s Guide...
- Page 124 “Creating a New Job Button and Specifying the Job Button Settings,” on p. 102. The new job button appears on the Job Button Settings screen, as shown below. The Job Button Settings are complete. Scan Kiosk II V2.0 Setup and Administrator’s Guide...
-
Page 125: Deleting A Job Button
4.2.4 Deleting a Job Button This section shows how to delete a job button. 1. From the Scan Kiosk II Home screen, press [Administrator Settings]. IMPORTANT The [E-mail] button only appears on the Home screen if an e-mail server has been configured. - Page 126 3. Press [Job Button Settings]. To go back to the previous screen, press [Back]. Scan Kiosk II V2.0 Setup and Administrator’s Guide...
- Page 127 4. Select the check box next to the job button you want to delete ➞ press [Edit] ➞ [Delete]. A confirmation message appears. 5. Press [Yes] to delete the job button. If you do not want to delete the selected job button, press [No]. The job button is deleted. Scan Kiosk II V2.0 Setup and Administrator’s Guide...
-
Page 128: Exporting A Job Button
Export job buttons when you want to back them up or move them to a different server. 1. From the Scan Kiosk II Home screen, press [Administrator Settings]. IMPORTANT The [E-mail] button only appears on the Home screen if an e-mail server has been configured. - Page 129 3. Press [Job Button Settings]. To go back to the previous screen, press [Back]. Scan Kiosk II V2.0 Setup and Administrator’s Guide...
- Page 130 [Export]. You can export multiple job buttons at the same time. If you are configuring the settings remotely, a CSV file opens automatically. It you are at the device, proceed to step Scan Kiosk II V2.0 Setup and Administrator’s Guide...
- Page 131 If the connection is successful, ‘OK’ is displayed. If the connection failed, ‘NG’ (No Good) is displayed. For instructions on entering characters from the virtual keyboard or USB keyboard, see “Entering Characters,” on p. 20. Scan Kiosk II V2.0 Setup and Administrator’s Guide...
- Page 132 For instructions on entering characters from the virtual keyboard or USB keyboard, see “Entering Characters,” on p. 20. 7. Press the [Fully Qualified Domain / Workgroup] text box ➞ enter the user’s fully-qualified domain name or workgroup name. Scan Kiosk II V2.0 Setup and Administrator’s Guide...
- Page 133 If you press [Browse] and have entered invalid user credentials, you must enter the user credentials again to gain access to the folder on the server, and then press [OK], as shown below. Scan Kiosk II V2.0 Setup and Administrator’s Guide...
- Page 134 9. Press [OK]. The Job Button Export settings are complete. Scan Kiosk II V2.0 Setup and Administrator’s Guide...
-
Page 135: Importing A Job Button
This section shows how to import a job button from a shared folder on a server to the Scan Kiosk II application. 1. From the Scan Kiosk II Home screen, press [Administrator Settings]. IMPORTANT The [E-mail] button only appears on the Home screen if an e-mail server has been configured. - Page 136 3. Press [Job Button Settings]. To go back to the previous screen, press [Back]. Scan Kiosk II V2.0 Setup and Administrator’s Guide...
- Page 137 4. Press [Edit] ➞ [Import]. The Import screen appears. Scan Kiosk II V2.0 Setup and Administrator’s Guide...
- Page 138 If the connection is successful, ‘OK’ is displayed. If the connection failed, ‘NG’ (No Good) is displayed. For instructions on entering characters from the virtual keyboard or USB keyboard, see “Entering Characters,” on p. 20. Scan Kiosk II V2.0 Setup and Administrator’s Guide...
- Page 139 For instructions on entering characters from the virtual keyboard or USB keyboard, see “Entering Characters,” on p. 20. 7. Press the [Fully Qualified / Workgroup] text box ➞ enter the user’s fully-qualified domain name or workgroup name. Scan Kiosk II V2.0 Setup and Administrator’s Guide...
- Page 140 If you press [Browse] and your user credentials are not found, you must enter the correct user credentials and the domain of the folder on the server, and then press [OK], as shown below. If you do not want to correct your user credentials, press [Cancel]. Scan Kiosk II V2.0 Setup and Administrator’s Guide...
- Page 141 [Replaces the whole data]: Deletes all currently registered job buttons, and overwrites them with the imported job buttons. [Appends data]: Adds the imported job buttons to the currently registered job buttons. Scan Kiosk II V2.0 Setup and Administrator’s Guide...
- Page 142 10. Press [OK]. The Job Button Import settings are complete. Scan Kiosk II V2.0 Setup and Administrator’s Guide...
-
Page 143: Configuring The Server Settings
4.3.1 Configuring an E-Mail Server This section shows how to configure an e-mail server. 1. From the Scan Kiosk II Home screen, press [Administrator Settings]. IMPORTANT The [E-mail] button only appears on the Home screen if an e-mail server has been configured. - Page 144 3. Press [Server Settings]. To go back to the previous screen, press [Back]. Scan Kiosk II V2.0 Setup and Administrator’s Guide...
- Page 145 4. Press [E-mail Server]. If you do not want to configure the Server Settings, press [Close]. The E-mail Server screen appears. Scan Kiosk II V2.0 Setup and Administrator’s Guide...
- Page 146 For more information, see “Importing Root Certificates,” on p. 280. • If you select [SMTPS] or [STARTTLS], you can only select [SMTP Authentication] as the Mail Server Authentication Method setting. Scan Kiosk II V2.0 Setup and Administrator’s Guide...
- Page 147 If the connection is successful, ‘OK’ is displayed. If the connection failed, ‘NG’ (No Good) is displayed. For instructions on entering characters from the virtual keyboard or USB keyboard, see “Entering Characters,” on p. 20. Scan Kiosk II V2.0 Setup and Administrator’s Guide...
- Page 148 7. Press the [Port number] text box ➞ enter a different SMTP server’s port number, if necessary. For instructions on entering characters from the virtual keyboard or USB keyboard, see “Entering Characters,” on p. 20. The default port number is ‘25’. Scan Kiosk II V2.0 Setup and Administrator’s Guide...
- Page 149 IMPORTANT This setting is only for servers that support it. If your server does not support this setting, select [None] from the drop-down list. Scan Kiosk II V2.0 Setup and Administrator’s Guide...
- Page 150 For instructions on entering characters from the virtual keyboard or USB keyboard, see “Entering Characters,” on p. 20. IMPORTANT Make sure to separate each e-mail domain by a semi-colon (;). Scan Kiosk II V2.0 Setup and Administrator’s Guide...
- Page 151 20. If an e-mail message exceeds the set size, it is not sent. The default e-mail message size is ‘25 MB’. 11. Press [] to continue specifying the E-Mail Server settings. Scan Kiosk II V2.0 Setup and Administrator’s Guide...
- Page 152 E-mail Server settings screen to authenticate to the SMTP server. 12.1 If you selected [SMTP] as the Mail Server Authentication Method, press [OK]. The E-Mail Server settings are complete. Scan Kiosk II V2.0 Setup and Administrator’s Guide...
- Page 153 If the connection is successful, ‘OK’ is displayed. If the connection failed, ‘NG’ (No Good) is displayed. For instructions on entering characters from the virtual keyboard or USB keyboard, see “Entering Characters,” on p. 20. Scan Kiosk II V2.0 Setup and Administrator’s Guide...
- Page 154 For instructions on entering characters from the virtual keyboard or USB keyboard, see “Entering Characters,” on p. 20. If you do not want to specify the E-mail Server settings, press [Cancel]. 13. Press [OK]. The E-Mail Server settings are complete. Scan Kiosk II V2.0 Setup and Administrator’s Guide...
-
Page 155: Configuring A Fax Server
4.3.2 Configuring a Fax Server This section shows how to configure a fax server. 1. From the Scan Kiosk II Home screen, press [Administrator Settings]. IMPORTANT The [E-mail] button only appears on the Home screen if an e-mail server has been configured. - Page 156 3. Press [Server Settings]. To go back to the previous screen, press [Back]. Scan Kiosk II V2.0 Setup and Administrator’s Guide...
- Page 157 4. Press [FAX]. If you do not want to configure the Server Settings, press [Close]. The FAX screen appears. Scan Kiosk II V2.0 Setup and Administrator’s Guide...
- Page 158 6. In the [To], [Subject], and [E-mail Message] fields, enter the necessary information for sending a fax ➞ press [OK]. If you do not want to specify the FAX settings, press [Cancel]. Scan Kiosk II V2.0 Setup and Administrator’s Guide...
-
Page 159: Configuring An Authentication Server
This section shows how to configure an authentication server. IMPORTANT The domain server must be compatible with Active Directory or OpenLDAP. 1. From the Scan Kiosk II Home screen, press [Administrator Settings]. IMPORTANT The [E-mail] button only appears on the Home screen if an e-mail server has been configured. - Page 160 3. Press [Server Settings]. To go back to the previous screen, press [Back]. Scan Kiosk II V2.0 Setup and Administrator’s Guide...
- Page 161 4. Press [Authentication Server]. The Authentication Server screen appears. 5. From the Authentication Server drop-down list, select an authentication server to configure. You can configure up to four (4) authentication servers. Scan Kiosk II V2.0 Setup and Administrator’s Guide...
- Page 162 Scan Kiosk II. 7. If you want to use a secure connection to communicate with the authentication server, press the [Use SSL] check box. Scan Kiosk II V2.0 Setup and Administrator’s Guide...
- Page 163 8. From the Authentication Method drop-down list, select [Simple] (not shown in the screen shot below) or [Active Directory]. Select [Simple] if the authentication server uses OpenLDAP. Select [Active Directory] if the authentication server uses Active Directory. Scan Kiosk II V2.0 Setup and Administrator’s Guide...
- Page 164 9. Press the [Search Base] text box ➞ enter the search base to use for finding e-mail addresses that are registered on the authentication server. For example, enter: cn=users,dc=country,dc=domain,ou=org_unit For instructions on entering characters from the virtual keyboard or USB keyboard, see “Entering Characters,” on p. 20. Scan Kiosk II V2.0 Setup and Administrator’s Guide...
- Page 165 “Entering Characters,” on p. 20. 11. Press the [Domain] text box ➞ enter the domain associated with the host name. 12. Press [] to continue specifying the Authentication Server settings. Scan Kiosk II V2.0 Setup and Administrator’s Guide...
- Page 166 The standard port number is ‘389’. If the [Use SSL] check box is selected, the port number changes to ‘636’. For instructions on entering characters from the virtual keyboard or USB keyboard, see “Entering Characters,” on p. 20. Scan Kiosk II V2.0 Setup and Administrator’s Guide...
- Page 167 If the user credentials are not set in the step above, the user’s log on credentials are used, if available. 15. Press [OK]. If you do not want to specify the Authentication Server settings, press [Cancel]. The Authentication Server settings are complete. Scan Kiosk II V2.0 Setup and Administrator’s Guide...
-
Page 168: Configuring An Address Book Server
Configuring an Address Book Server This section shows how to configure an address book server. 1. From the Scan Kiosk II Home screen, press [Administrator Settings]. IMPORTANT The [E-mail] button only appears on the Home screen if an e-mail server has been configured. - Page 169 3. Press [Server Settings]. To go back to the previous screen, press [Back]. 4. Press [Address Book Server]. The Address Book Server screen appears. Scan Kiosk II V2.0 Setup and Administrator’s Guide...
- Page 170 5. From the Address Book Server drop-down list, select an address book server to configure. You can configure up to four (4) address book servers. Scan Kiosk II V2.0 Setup and Administrator’s Guide...
- Page 171 For instructions on specifying the server settings, see steps 7 to 14 of “Configuring an Authentication Server,” on p. 159. 7. Press [OK]. If you do not want to specify the Address Book Server settings, press [Cancel]. The Address Book Server settings are complete. Scan Kiosk II V2.0 Setup and Administrator’s Guide...
-
Page 172: Configuring An Ftp Server
Configuring an FTP Server This section shows how to enable the End-of-Batch log file for the FTP server. 1. From the Scan Kiosk II Home screen, press [Administrator Settings]. IMPORTANT The [E-mail] button only appears on the Home screen if an e-mail server has been configured. - Page 173 3. Press [Server Settings]. To go back to the previous screen, press [Back]. 4. Press [FTP Server]. The FTP Server screen appears. Scan Kiosk II V2.0 Setup and Administrator’s Guide...
- Page 174 End-of-Batch log file in the same directory with the same file name as the image file. 6. Press [OK]. If you do not want to enable the End-of-Batch log file, press [Cancel]. Scan Kiosk II V2.0 Setup and Administrator’s Guide...
-
Page 175: Configuring An Http Proxy Server
Configuring an HTTP Proxy Server This section shows how to configure an HTTP Proxy server. 1. From the Scan Kiosk II Home screen, press [Administrator Settings]. IMPORTANT The [E-mail] button only appears on the Home screen if an e-mail server has been configured. - Page 176 3. Press [Server Settings]. To go back to the previous screen, press [Back]. 4. Press [HTTP Proxy Server]. The HTTP Proxy Server screen appears. Scan Kiosk II V2.0 Setup and Administrator’s Guide...
- Page 177 6. Press the [Port number] text box ➞ enter the proxy server’s port number ➞ press [OK]. If you do not want to specify the HTTP Proxy Server settings, press [Cancel]. The HTTP Proxy Server settings are complete. Scan Kiosk II V2.0 Setup and Administrator’s Guide...
-
Page 178: Configuring An Ftp Proxy Server
Configuring an FTP Proxy Server This section shows how to configure an FTP Proxy server. 1. From the Scan Kiosk II Home screen, press [Administrator Settings]. IMPORTANT The [E-mail] button only appears on the Home screen if an e-mail server has been configured. - Page 179 3. Press [Server Settings]. To go back to the previous screen, press [Back]. 4. Press [FTP proxy Server]. The FTP proxy Server screen appears. Scan Kiosk II V2.0 Setup and Administrator’s Guide...
- Page 180 6. Press the [Port number] text box ➞ enter the FTP proxy server’s port number ➞ press [OK]. If you do not want to specify the FTP Proxy Server settings, press [Cancel]. The FTP Proxy Server settings are complete. Scan Kiosk II V2.0 Setup and Administrator’s Guide...
-
Page 181: Configuring The Address Book Settings
• The available settings vary, depending on the type of address selected (E-Mail, Shared Folder, or Group). 1. From the Scan Kiosk II Home screen, press [Administrator Settings]. IMPORTANT The [E-mail] button only appears on the Home screen if an e-mail server has been configured. - Page 182 For instructions on logging on to the device as an Administrator, see Chapter 3, “Logging On,” on p. 37. 3. Press [Address Book Settings]. To go back to the previous screen, press [Back]. Scan Kiosk II V2.0 Setup and Administrator’s Guide...
- Page 183 4. From the Address Book Type drop-down list, select the address book type (Shared Address Book or My Address Book) ➞ from the Address Type drop-down list, select the address type you want to create. Scan Kiosk II V2.0 Setup and Administrator’s Guide...
- Page 184 5. Press [Edit] ➞ [New]. The New Address screen appears. Scan Kiosk II V2.0 Setup and Administrator’s Guide...
- Page 185 If you selected [E-mail] in step 4, press the [Name] text box ➞ enter a name for the sender’s e-mail address ➞ press the [E-mail address] text box ➞ enter the sender’s e-mail address ➞ press [OK]. Scan Kiosk II V2.0 Setup and Administrator’s Guide...
- Page 186 Select [WebDAV] or [WebDAV over SSL] to activate the Port number and Use HTTP proxy settings. Press the [Name] text box ➞ enter the name to appear in the 5.2.2 address book. Scan Kiosk II V2.0 Setup and Administrator’s Guide...
- Page 187 If necessary, press [Connection test] to test the connection to the computer. If the connection is successful, ‘OK’ is displayed. If the connection failed, ‘NG’ (No Good) is displayed. Scan Kiosk II V2.0 Setup and Administrator’s Guide...
- Page 188 If [WebDAV] or [WebDAV over SSL] was selected in step 4, press the [Port number] text box ➞ enter the port number for the HTTP connection. The standard WebDAV port number is ‘80’. The standard WebDAV over SSL port number is ‘443’. Scan Kiosk II V2.0 Setup and Administrator’s Guide...
- Page 189 You must add a backslash (\) to the end of the folder path. This enables users to create folders on the root of the share. 5.2.6 Press [] to continue to specify the Shared Folder settings. Scan Kiosk II V2.0 Setup and Administrator’s Guide...
- Page 190 Domain or Workgroup name that is associated with the user in the [Fully Qualified Domain / Workgroup] text box. If a different protocol, other than [SMB] is selected, the Fully Qualified Domain / Workgroup field is grayed-out. Scan Kiosk II V2.0 Setup and Administrator’s Guide...
- Page 191 If you selected [Group] in step 4, enter a name for the group in the [Name] text box. 5.3.1 To add addresses to the group, press [Add]. The address list appears. Scan Kiosk II V2.0 Setup and Administrator’s Guide...
- Page 192 ➞ from the Address type drop-down list, select the address types (only E-mail and Shared folders are supported) you want displayed in the list. Scan Kiosk II V2.0 Setup and Administrator’s Guide...
- Page 193 The addresses are added to the group. 5.3.4 Press [OK]. The Address Book Settings screen appears. 6. Press [OK]. The New Address settings are complete. If you do not want to specify the New Address settings, press [Cancel]. Scan Kiosk II V2.0 Setup and Administrator’s Guide...
-
Page 194: Modifying An Address
Modify an address if you receive a send error, or if the address is incorrect and must be changed. This section shows how to modify an address. 1. From the Scan Kiosk II Home screen, press [Administrator Settings]. IMPORTANT The [E-mail] button only appears on the Home screen if an e-mail server has been configured. - Page 195 3. Press [Address Book Settings]. To go back to the previous screen, press [Back]. Scan Kiosk II V2.0 Setup and Administrator’s Guide...
- Page 196 4. From the address type drop-down list, select the address type to modify. 5. Select the address you want to modify from the list ➞ press [Detail Info]. The Detailed Information screen for the address appears. Scan Kiosk II V2.0 Setup and Administrator’s Guide...
- Page 197 6. Check the detailed information for the selected address ➞ determine what information needs to be changed ➞ press [Back]. Scan Kiosk II V2.0 Setup and Administrator’s Guide...
- Page 198 7. Make sure that the user you want to modify is still selected ➞ press [Edit] ➞ [Modify]. 8. Modify the address. For information on modifying the address, see steps 5.1 to 6 of “Creating a New Address,” on p. 181. Scan Kiosk II V2.0 Setup and Administrator’s Guide...
-
Page 199: Copying An Address
This section shows how to copy an address, and register it as a new address. You can also copy addresses between a Shared Address Book and My Address Book. 1. From the Scan Kiosk II Home screen, press [Administrator Settings]. IMPORTANT The [E-mail] button only appears on the Home screen if an e-mail server has been configured. - Page 200 3. Press [Address Book Settings]. To go back to the previous screen, press [Back]. Scan Kiosk II V2.0 Setup and Administrator’s Guide...
- Page 201 4. From the Address Book Type drop-down list, select the Address Book Type (Shared Address Book or My Address Book) ➞ from the Address type drop-down list, select the kind of address you want to copy. Scan Kiosk II V2.0 Setup and Administrator’s Guide...
- Page 202 5. Select the address you want to copy from the list ➞ press [Edit] ➞ [Copy]. The Address Copy screen appears. Scan Kiosk II V2.0 Setup and Administrator’s Guide...
- Page 203 6. From the Copy to drop-down list, select the address book destination to where you want to copy the address. 7. Make sure a check mark appears by the address you selected in step 5 ➞ press [OK]. The copied address appears in the list. Scan Kiosk II V2.0 Setup and Administrator’s Guide...
- Page 204 8. If you want to modify the copied address, select the copied address ➞ press [Edit] ➞ [Modify]. Depending on the address type you selected, the settings screen for that address type appears. Scan Kiosk II V2.0 Setup and Administrator’s Guide...
- Page 205 9. Modify the address, as necessary ➞ press [OK]. For instructions on specifying the address settings, see “Creating a New Address,” on p. 181. The new address appears in the address list, as shown below. Scan Kiosk II V2.0 Setup and Administrator’s Guide...
-
Page 206: Deleting An Address
Deleting an Address This section shows how to delete an address from the selected address book. 1. From the Scan Kiosk II Home screen, press [Administrator Settings]. IMPORTANT The [E-mail] button only appears on the Home screen if an e-mail server has been configured. - Page 207 3. Press [Address Book Settings]. To go back to the previous screen, press [Back]. Scan Kiosk II V2.0 Setup and Administrator’s Guide...
- Page 208 4. From the Address Book Type drop-down list, select the Address Book Type (Shared Address Book or My Address Book) ➞ from the Address type drop-down list, select the kind of address you want to delete. Scan Kiosk II V2.0 Setup and Administrator’s Guide...
- Page 209 5. Select the address you want to delete ➞ press [Edit] ➞ [Delete]. A confirmation screen appears. 6. Press [Yes]. If you do not want to delete the address, press [No]. The address is deleted from the address book. Scan Kiosk II V2.0 Setup and Administrator’s Guide...
-
Page 210: Exporting An Address
Exporting an Address This section shows how to export an address from the selected address book. 1. From the Scan Kiosk II Home screen, press [Administrator Settings]. IMPORTANT The [E-mail] button only appears on the Home screen if an e-mail server has been configured. - Page 211 3. Press [Address Book Settings]. To go back to the previous screen, press [Back]. Scan Kiosk II V2.0 Setup and Administrator’s Guide...
- Page 212 4. From the Address Book Type drop-down list, select the Address Book Type (Shared Address Book or My Address Book) ➞ from the Address type drop-down list, select the kind of addresses you want to export. Scan Kiosk II V2.0 Setup and Administrator’s Guide...
- Page 213 If you are exporting the addresses from the Local UI, proceed to the next step. If you are exporting the addresses remotely, follow the instructions to save the data. For instructions, see “Exporting a User,” on p. 92. Scan Kiosk II V2.0 Setup and Administrator’s Guide...
- Page 214 6. Enter the necessary information for each item ➞ press [OK]. For instructions, see “Exporting a Job Button,” on p. 128. The Export starts, and a confirmation message appears. Press [Yes]. The Export settings are complete. Scan Kiosk II V2.0 Setup and Administrator’s Guide...
-
Page 215: Importing An Address
Importing an Address This section shows how to import an address into a selected address book. 1. From the Scan Kiosk II Home screen, press [Administrator Settings]. IMPORTANT The [E-mail] button only appears on the Home screen if an e-mail server has been configured. - Page 216 3. Press [Address Book Settings]. To go back to the previous screen, press [Back]. Scan Kiosk II V2.0 Setup and Administrator’s Guide...
- Page 217 4. From the Address Book Type drop-down list, select the Address Book Type (Shared Address Book or My Address Book) to where you want to import the address book data. Scan Kiosk II V2.0 Setup and Administrator’s Guide...
- Page 218 If you are importing the addresses from a Web browser (remotely), proceed to the next steps. If you are importing the addresses from the Local UI, see “Importing a Job Button,” on p. 135. Scan Kiosk II V2.0 Setup and Administrator’s Guide...
- Page 219 6. Press [Browse] next to <Address Book file> ➞ navigate to the location where the address data is saved ➞ select the Address Book file ➞ press [Open]. Scan Kiosk II V2.0 Setup and Administrator’s Guide...
- Page 220 [Appends data]: Select this setting to add the imported address book data to the current address book. If you do not want to specify the Import settings, press [Cancel]. Scan Kiosk II V2.0 Setup and Administrator’s Guide...
- Page 221 8. Press [OK]. A confirmation message appears. 9. Press [Back] to return to the Address Book Settings screen. The Import settings are complete. Scan Kiosk II V2.0 Setup and Administrator’s Guide...
-
Page 222: Device Configuration Settings
Specifying the SMB Settings This section shows how to specify the SMB settings of the device. 1. From the Scan Kiosk II Home screen, press [Administrator Settings]. IMPORTANT The [E-mail] button only appears on the Home screen if an e-mail server has been configured. - Page 223 3. Press [Device Configuration]. The Device Configuration screen appears. To go back to the previous screen, press [Back]. 4. Press [SMB Settings]. The SMB Settings screen appears. Scan Kiosk II V2.0 Setup and Administrator’s Guide...
- Page 224 If you do not want to use the SMBv1 protocol, clear the check mark in the [Enable] check box. IMPORTANT If you disable the use of the SMBv1 protocol, you must use shared folders that support SMBv2. Scan Kiosk II V2.0 Setup and Administrator’s Guide...
- Page 225 ‘OK’ is displayed. If the connection failed, ‘NG’ (No Good) is displayed. 7. Press [OK]. The SMB Settings are complete. If you do not want to specify the SMB settings, press [Cancel]. Scan Kiosk II V2.0 Setup and Administrator’s Guide...
-
Page 226: Verifying The Language, Time Zone, And Daylight Saving Time
If you want to specify these settings, you must specify them in the Windows Maintenance mode. 1. From the Scan Kiosk II Home screen, press [Administrator Settings]. IMPORTANT The [E-mail] button only appears on the Home screen if an e-mail server has been configured. - Page 227 3. Press [Device Configuration]. The Device Configuration screen appears. To go back to the previous screen, press [Back]. 4. Press [Language/Time Zone]. The Language/Time Zone screen appears. Scan Kiosk II V2.0 Setup and Administrator’s Guide...
- Page 228 5. Verify the language, time zone, and daylight saving time setting on the device ➞ press [OK]. Scan Kiosk II V2.0 Setup and Administrator’s Guide...
-
Page 229: Verifying The Date And Time
If you want to specify these settings, you must specify them in the Windows Maintenance mode. 1. From the Scan Kiosk II Home screen, press [Administrator Settings]. IMPORTANT The [E-mail] button only appears on the Home screen if an e-mail server has been configured. - Page 230 3. Press [Device Configuration]. The Device Configuration screen appears. To go back to the previous screen, press [Back]. 4. Press [Date/Time]. The Date/Time screen appears. Scan Kiosk II V2.0 Setup and Administrator’s Guide...
- Page 231 5. Verify the date and time set on the device ➞ press [OK]. The date set on the device is applied to custom file names. Scan Kiosk II V2.0 Setup and Administrator’s Guide...
-
Page 232: Specifying The Auto Log Out Settings
This section shows how to specify the amount of idle time that can pass before a user is logged out of the device. 1. From the Scan Kiosk II Home screen, press [Administrator Settings]. IMPORTANT The [E-mail] button only appears on the Home screen if an e-mail server has been configured. - Page 233 3. Press [Device Configuration]. The Device Configuration screen appears. To go back to the previous screen, press [Back]. 4. Press [Auto Logout]. The Auto Logout screen appears. Scan Kiosk II V2.0 Setup and Administrator’s Guide...
- Page 234 5. From the Device drop-down list, select the target device. Scan Kiosk II V2.0 Setup and Administrator’s Guide...
- Page 235 6. From the Waiting Time till Logout drop-down list, select the amount of idle time that can pass until the user is logged out of the device ➞ press [OK]. The default idle time is ‘After 60 minutes’. The Auto Logout settings are complete. Scan Kiosk II V2.0 Setup and Administrator’s Guide...
-
Page 236: Accessing The Windows Admin Mode
This section shows how to access the Windows Admin mode. IMPORTANT • You can only access the Windows Admin mode from the Scan Kiosk II tablet PC’s Local UI. • Be careful when you perform operations in the Windows Admin Mode. Any procedures that are not mentioned in this guide or in Microsoft Windows documentation, may disable the Scan Kiosk II device. - Page 237 3. Press [Device Configuration]. To go back to the previous screen, press [Back]. The Device Configuration screen appears. 4. Press [Windows Admin Mode]. The Enter the Maintenance Password pop-up dialog box appears. Scan Kiosk II V2.0 Setup and Administrator’s Guide...
- Page 238 If you do not want to enter the Windows Maintenance password, press [Cancel]. A confirmation message appears. 6. Press [Yes]. If you do not want to continue, press [No]. IMPORTANT You must reboot the system to return to the Kiosk Mode. Scan Kiosk II V2.0 Setup and Administrator’s Guide...
-
Page 239: Updating The Device Certificate
This section shows how to update the current device certificate. IMPORTANT Device certificates must be in the X.509 (PFX) format. 1. From the Scan Kiosk II Home screen, press [Administrator Settings]. IMPORTANT The [E-mail] button only appears on the Home screen if an e-mail server has been configured. - Page 240 3. Press [Device Configuration]. To go back to the previous screen, press [Back]. The Device Configuration screen appears. 4. Press [Device Certificate]. The Import Certificate screen appears. Scan Kiosk II V2.0 Setup and Administrator’s Guide...
- Page 241 7. In the [Password] text box, enter the password that is associated with the new device certificate ➞ press [OK]. If you do not want to import a device certificate, press [Cancel]. A confirmation message appears. Scan Kiosk II V2.0 Setup and Administrator’s Guide...
- Page 242 8. Press [OK]. If you do not want to continue, press [Cancel]. The device restarts, and the device certificate is imported and activated. Scan Kiosk II V2.0 Setup and Administrator’s Guide...
-
Page 243: Initializing All Settings
PC, such as user information, address books, and job buttons. Always back up the data on the Scan Kiosk II tablet before you initialize the settings. • Do not turn OFF the Scan Kiosk II tablet PC before the initialization is complete. 1. From the Scan Kiosk II Home screen, press [Administrator Settings]. - Page 244 3. Press [Device Configuration]. To go back to the previous screen, press [Back]. The Device Configuration screen appears. 4. Press [Reset Settings]. A confirmation screen appears. Scan Kiosk II V2.0 Setup and Administrator’s Guide...
- Page 245 5. Press [Yes]. If you do not want to initialize the settings, press [No]. The device restarts. The Home screen appears when the initialization is complete. Scan Kiosk II V2.0 Setup and Administrator’s Guide...
-
Page 246: Configuring The System Settings
IP address or name>/chorin-webapp/. 4.6.1 Backing Up All Data This section shows how to back up all Scan Kiosk II data to a shared folder on the network. 1. From the Scan Kiosk II Home screen, press [Administrator Settings]. - Page 247 3. Press [System Settings]. The System Settings screen appears. To go back to the previous screen, press [Back]. Scan Kiosk II V2.0 Setup and Administrator’s Guide...
- Page 248 4. Press [Backup All Settings]. The Backup screen appears. If you do not want to back up all settings, press [Close]. Scan Kiosk II V2.0 Setup and Administrator’s Guide...
- Page 249 If the connection is successful, ‘OK’ is displayed. If the connection failed, ‘NG’ (No Good) is displayed. For instructions on entering characters from the virtual keyboard or USB keyboard, see “Entering Characters,” on p. 20. Scan Kiosk II V2.0 Setup and Administrator’s Guide...
- Page 250 For instructions on entering characters from the virtual keyboard or USB keyboard, see “Entering Characters,” on p. 20. 7. Press the [Fully Qualified Domain / Workgroup] text box ➞ enter the user’s fully-qualified domain name or workgroup name. Scan Kiosk II V2.0 Setup and Administrator’s Guide...
- Page 251 If you press [Browse] and have entered invalid user credentials, you must enter the user credentials again to gain access to the folder on the server, and then press [OK], as shown below. Scan Kiosk II V2.0 Setup and Administrator’s Guide...
- Page 252 10. Press [OK]. The Backup settings are complete. IMPORTANT You can back up the settings remotely. The backup file is downloaded to a local location. Scan Kiosk II V2.0 Setup and Administrator’s Guide...
-
Page 253: Restoring Data
4.6.2 Restoring Data This section shows how to restore the Scan Kiosk II data that has been backed up from a shared folder on the network. 1. From the Scan Kiosk II Home screen, press [Administrator Settings]. IMPORTANT The [E-mail] button only appears on the Home screen if an e-mail server has been configured. - Page 254 3. Press [System Settings]. The System Settings screen appears. To go back to the previous screen, press [Back]. Scan Kiosk II V2.0 Setup and Administrator’s Guide...
- Page 255 The Restore screen appears. If you do not want to restore all settings, press [Close]. 5. From the Device drop-down list, select the device on which you want to restore the Scan Kiosk II data. Scan Kiosk II V2.0 Setup and Administrator’s Guide...
- Page 256 6. Press the [File name] text box ➞ enter the file name directly, or press [Browse] to navigate to the file. 7. Press [OK]. The data is restored to the selected device. Scan Kiosk II V2.0 Setup and Administrator’s Guide...
-
Page 257: Displaying The Version Information
4.6.3 Displaying the Version Information This section shows how to display and verify the Scan Kiosk II version information. 1. From the Scan Kiosk II Home screen, press [Administrator Settings]. IMPORTANT The [E-mail] button only appears on the Home screen if an e-mail server has been configured. - Page 258 3. Press [System Settings]. The System Settings screen appears. To go back to the previous screen, press [Back]. Scan Kiosk II V2.0 Setup and Administrator’s Guide...
- Page 259 4. Press [Version Info]. The Version Information screen appears. If you do not want to display the version information, press [Close]. 5. Verify the version information ➞ press [Back]. The System Settings screen appears. Scan Kiosk II V2.0 Setup and Administrator’s Guide...
-
Page 260: Specifying The Logging Settings
To access the device remotely from your supported Web browser, enter https://<device IP address or name>/chorin-webapp/. 1. From the Scan Kiosk II Home screen, press [Administrator Settings]. IMPORTANT The [E-mail] button only appears on the Home screen if an e-mail server has been configured. - Page 261 3. Press [System Settings]. The System Settings screen appears. To go back to the previous screen, press [Back]. Scan Kiosk II V2.0 Setup and Administrator’s Guide...
- Page 262 4. Press [Logging Settings]. The Logging Settings screen appears. If you do not want to specify the Logging Settings, press [Close]. Scan Kiosk II V2.0 Setup and Administrator’s Guide...
- Page 263 Messages that provide some visibility into the functional process. DEBUG Messages only of concern to the developer. ERROR Current operation cannot proceed from this error. FATAL Application cannot recover from this error. TRACE Report the application’s state. Scan Kiosk II V2.0 Setup and Administrator’s Guide...
- Page 264 6. From the System Log Level drop-down list, select the appropriate severity level. Severity Level Definition ERROR Current operation cannot proceed from this error. INFO Messages that provide some visibility into the functional process. DEBUG Messages only of concern to the developer. Scan Kiosk II V2.0 Setup and Administrator’s Guide...
- Page 265 7. Make sure you are connected to the device remotely (via a Web browser) ➞ click [Export Error Log]. An Open/Save dialog box appears. 8. Open or save the error log. If you do not want to open or save the error log, click [Cancel]. Scan Kiosk II V2.0 Setup and Administrator’s Guide...
- Page 266 9. Click [Apply Settings]. A confirmation message appears. 10. Click [OK]. If you do not want to change the logging level, press [Cancel]. The Logging Settings are complete. Scan Kiosk II V2.0 Setup and Administrator’s Guide...
-
Page 267: Configuring The System Administration Settings
IP address or name>/chorin-webapp/. 4.7.1 Specifying the Log On Type This section shows how to specify how a user logs on to the Scan Kiosk II device. There are two log on screen types: 1. List Type: A user can select their user name from a list of registered users. - Page 268 For instructions on logging on to the device as an Administrator, see Chapter 3, “Logging On,” on p. 37. 3. Press [System Administration]. The System Administration screen appears. To go back to the previous screen, press [Back]. Scan Kiosk II V2.0 Setup and Administrator’s Guide...
- Page 269 4. Press [Login Type Settings]. The Login Type Settings screen appears. Scan Kiosk II V2.0 Setup and Administrator’s Guide...
- Page 270 The List type of log in is used when there is no authentication server enabled. If an authentication server is enabled, the Key-in log in type is used. If you do not want to specify the Login Type Settings, press [Cancel]. The Login Type Settings are complete. Scan Kiosk II V2.0 Setup and Administrator’s Guide...
-
Page 271: Testing The Network Connection
This section shows how to confirm whether communication is enabled between the Scan Kiosk II device and other devices on the network. 1. From the Scan Kiosk II Home screen, press [Administrator Settings]. IMPORTANT The [E-mail] button only appears on the Home screen if an e-mail server has been configured. - Page 272 3. Press [System Administration]. The System Administration screen appears. To go back to the previous screen, press [Back]. Scan Kiosk II V2.0 Setup and Administrator’s Guide...
- Page 273 4. Press [Network Test]. The Network Test screen appears. Scan Kiosk II V2.0 Setup and Administrator’s Guide...
- Page 274 ➞ press [Connection test]. If the connection is successful, ‘OK’ is displayed. If the connection failed, ‘NG’ (No Good) is displayed. 6. Press [Back] to return to the System Administration screen. Scan Kiosk II V2.0 Setup and Administrator’s Guide...
-
Page 275: Changing The Administrator's Password And E-Mail Address
Changing the Administrator’s Password and E-Mail Address This section shows how to change the Administrator’s password and e-mail address. 1. From the Scan Kiosk II Home screen, press [Administrator Settings]. IMPORTANT The [E-mail] button only appears on the Home screen if an e-mail server has been configured. - Page 276 3. Press [System Administration]. The System Administration screen appears. To go back to the previous screen, press [Back]. Scan Kiosk II V2.0 Setup and Administrator’s Guide...
- Page 277 4. Press [Administrator Settings]. The Administrator Settings screen appears. 5. To change the Administrator’s password, select the [Change Password] check box. The [New Password] fields become activated. Scan Kiosk II V2.0 Setup and Administrator’s Guide...
- Page 278 6. In the [New Password] text box, enter a new password ➞ in the [New Password (Confirmation)] text box, enter the same password. For instructions on entering characters from the virtual keyboard or USB keyboard, see “Entering Characters,” on p. 20. Scan Kiosk II V2.0 Setup and Administrator’s Guide...
- Page 279 This e-mail address is used when an error notification is delivered from the mail server. 8. Press [OK]. If you do not want to change the Administrator’s password or e-mail address, press [Cancel]. The Administrator Settings are complete. Scan Kiosk II V2.0 Setup and Administrator’s Guide...
-
Page 280: Importing Root Certificates
For example, when using SMTPS, the SMTP server sends its server certificate, which in turn, may be signed by a root CA certificate. Scan Kiosk II needs the root CA certificate to verify that the SMTP server certificate is valid, and can be trusted. -
Page 281: Importing A Root Certificate
• Root certificates must be in the .cer format. • You can import up to 50 certificates. 1. From the Scan Kiosk II Home screen, press [Administrator Settings]. IMPORTANT The [E-mail] button only appears on the Home screen if an e-mail server has been configured. - Page 282 3. Press [Certificates]. The Certificates screen appears. To go back to the previous screen, press [Back]. Scan Kiosk II V2.0 Setup and Administrator’s Guide...
- Page 283 4. Press [Edit] ➞ [Import]. The Import Certificate screen appears. Scan Kiosk II V2.0 Setup and Administrator’s Guide...
- Page 284 5. Next to <File name>, press [Choose File] ➞ navigate to the root certificate that you want to import ➞ press [Open]. 6. Press [OK]. The import starts. Scan Kiosk II V2.0 Setup and Administrator’s Guide...
- Page 285 7. If the certificate imports successfully, press [Back]. If the certificate does not import successfully, an error screen appears. Press [OK], and then try to import a valid root certificate again. The certificate appears in the certificate list. Scan Kiosk II V2.0 Setup and Administrator’s Guide...
- Page 286 8. Press [Restart]. The device restarts, and the certificate is activated. Scan Kiosk II V2.0 Setup and Administrator’s Guide...
-
Page 287: Viewing The Detailed Information Of A Certificate
This section shows how to view the detailed information of an imported root certificate. 1. From the Scan Kiosk II Home screen, press [Administrator Settings]. IMPORTANT The [E-mail] button only appears on the Home screen if an e-mail server has been configured. - Page 288 3. Press [Certificates]. The Certificates screen appears. To go back to the previous screen, press [Back]. Scan Kiosk II V2.0 Setup and Administrator’s Guide...
- Page 289 4. Select the root certificate that you want to view ➞ press [Detail Info]. 5. View the information ➞ press [Back]. The Certificates screen appears. Scan Kiosk II V2.0 Setup and Administrator’s Guide...
-
Page 290: Deleting A Root Certificate
4.8.3 Deleting a Root Certificate This section shows how to delete a root certificate. 1. From the Scan Kiosk II Home screen, press [Administrator Settings]. IMPORTANT The [E-mail] button only appears on the Home screen if an e-mail server has been configured. - Page 291 3. Press [Certificates]. The Certificates screen appears. To go back to the previous screen, press [Back]. Scan Kiosk II V2.0 Setup and Administrator’s Guide...
- Page 292 4. Select the certificate that you want to delete ➞ press [Edit] ➞ [Delete]. A confirmation screen appears. 5. Press [Yes]. If you do not want to delete the certificate, press [No]. The certificate is removed from the list. Scan Kiosk II V2.0 Setup and Administrator’s Guide...
- Page 293 6. Press [Restart]. The device restarts. Operations are complete. Scan Kiosk II V2.0 Setup and Administrator’s Guide...
-
Page 294: Showing The Operation History
Showing the Operation History This section describes how to view, export, and delete the Scan Kiosk II device’s operation history. You can display the operation history for all users or a particular registered user. IMPORTANT • You can access the Administrator Settings from the touch panel display, or remotely from a supported Web browser. - Page 295 For instructions on logging on to the device as an Administrator, see Chapter 3, “Logging On,” on p. 37. 3. Press [Show Operation History]. The Show Operation History screen appears. To go back to the previous screen, press [Back]. Scan Kiosk II V2.0 Setup and Administrator’s Guide...
- Page 296 4. From the User Name drop-down list, select [All Users] or an individual user to view their device use. The user’s history appears. Scan Kiosk II V2.0 Setup and Administrator’s Guide...
- Page 297 ➞ press [Detail Info]. You can select only one operation at a time. To scroll through the history list, press [] or []. If you do not want to view the operation history, press [Back]. Scan Kiosk II V2.0 Setup and Administrator’s Guide...
- Page 298 6. View the detailed information ➞ press [Back]. The Show Operation History screen appears. Scan Kiosk II V2.0 Setup and Administrator’s Guide...
-
Page 299: Exporting The Device's Operation History
The operation history list is in order by the most recent date and time. IMPORTANT You must log on to Scan Kiosk II remotely to export the Operation History file. 1. From the Scan Kiosk II Home screen, press [Administrator Settings]. - Page 300 For instructions on logging on to the device as an Administrator, see Chapter 3, “Logging On,” on p. 37. 3. Click [Show Operation History]. The Show Operation History screen appears. To go back to the previous screen, click [Back]. Scan Kiosk II V2.0 Setup and Administrator’s Guide...
- Page 301 4. From the User Name drop-down list, select [All Users] or an individual user. The user’s history appears. 5. Press [Export]. A dialog box appears. If you are using a remote connection, the file is downloaded automatically. Scan Kiosk II V2.0 Setup and Administrator’s Guide...
- Page 302 If you want to open the file, click [Open]. If you do not want to export the Operation Info file, click [Cancel]. The file is exported to the specified location. The Show Operation History screen appears. Scan Kiosk II V2.0 Setup and Administrator’s Guide...
-
Page 303: Deleting The Device's Entire Operation History
4.9.3 Deleting the Device’s Entire Operation History This section shows how to delete all of the Scan Kiosk II device’s operation history. The operation history list is in order by the most recent date and time. 1. From the Scan Kiosk II Home screen, press [Administrator Settings]. - Page 304 3. Click [Show Operation History]. The Show Operation History screen appears. To go back to the previous screen, click [Back]. Scan Kiosk II V2.0 Setup and Administrator’s Guide...
- Page 305 4. Press [Delete All]. A confirmation screen appears. 5. Press [Yes]. If you do not want to delete the entire operation history, press [No]. The operation history list is cleared. Scan Kiosk II V2.0 Setup and Administrator’s Guide...
-
Page 306: 4.10 Registering And Deleting An Sftp Private Key
1. Open a supported Web browser, enter https://<device IP address or name>/chorin-webapp/ in the Address bar. (Enter the device’s IP address in place of <device IP address or name>). 2. Click [Administrator Settings]. Scan Kiosk II V2.0 Setup and Administrator’s Guide... - Page 307 If you do not want to enter the Administrator’s password, click [Cancel]. 4. Click [SFTP Private Key]. The SFTP Private Key screen appears. To go back to the previous screen, press [Back]. Scan Kiosk II V2.0 Setup and Administrator’s Guide...
- Page 308 5. To register a new SFTP Private Key, click [Choose File]. 6. Navigate to the file ➞ click [Open]. Scan Kiosk II V2.0 Setup and Administrator’s Guide...
- Page 309 7. Verify that the correct file was selected ➞ click [OK]. The SFTP private key is registered. 8. Click [Back]. Scan Kiosk II V2.0 Setup and Administrator’s Guide...
-
Page 310: 4.10.2 Deleting An Sftp Private Key
1. Open a supported Web browser, enter https://<device IP address or name>/chorin-webapp/ in the Address bar. (Enter the device’s IP address in place of <device IP address or name>). 2. Click [Administrator Settings]. Scan Kiosk II V2.0 Setup and Administrator’s Guide... - Page 311 If you do not want to enter the Administrator’s password, click [Cancel]. 4. Click [SFTP Private Key]. The SFTP Private Key screen appears. To go back to the previous screen, click [Back]. Scan Kiosk II V2.0 Setup and Administrator’s Guide...
- Page 312 5. Next to <Registered>, click [Delete]. A confirmation dialog box appears. Scan Kiosk II V2.0 Setup and Administrator’s Guide...
- Page 313 6. Click [Yes]. If you do not want to delete the SFTP Private Key file, click [No]. The SFTP Private Key file is deleted. 7. Click [OK]. Scan Kiosk II V2.0 Setup and Administrator’s Guide...
- Page 314 This page is intentionally left blank. Scan Kiosk II V2.0 Setup and Administrator’s Guide...
-
Page 315: Chapter 5 Troubleshooting
Contact your local authorized Canon dealer. The device may need to be restored to its factory default settings. Problem After Powering ON Scan Kiosk II, the message <The user name or password is incorrect. Try again.> appears. Remedy Contact your local authorized Canon dealer. The device may need to be restored to its factory default settings. - Page 316 A Fax error occurred, and the fax is not sent from the MFP (Multi-Function Device). Remedy Check the MFP’s Scan settings, and make sure to set the scan settings to ‘Black & White’, up to ‘400 dpi’, and select ‘TIFF’ as the file format. Scan Kiosk II V2.0 Setup and Administrator’s Guide...