Miele K 14827 SD Operating And Installation Instructions
Refrigerator with perfectfresh zone and dynamiccooling
Hide thumbs
Also See for K 14827 SD:
- Operating and installation manual (60 pages) ,
- Operating and installation instructions (64 pages)
Table of Contents
Advertisement
Quick Links
Advertisement
Table of Contents

Related Manuals for Miele K 14827 SD


Summary of Contents for Miele K 14827 SD
- Page 1 Operating and installation instructions Refrigerator with PerfectFresh zone and DynamicCooling K 14827 SD ed en - AU, NZ To avoid the risk of accidents or damage to the appliance, it is essential to read these instructions before it is installed and used for the first time.
-
Page 2: Table Of Contents
Contents Guide to the appliance ..........4 Caring for the environment . - Page 3 Contents Adjusting the interior fittings ........25 Moving the shelves .
-
Page 4: Guide To The Appliance
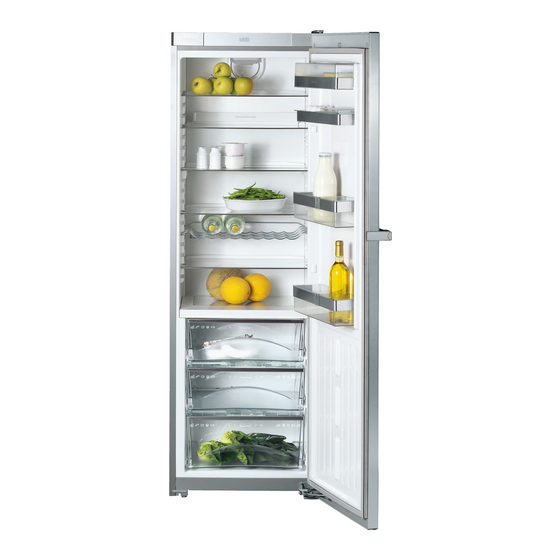
Guide to the appliance a On/Off sensor e Temperature display b SuperCool sensor f "Cooling" symbol c Sensor for setting a lower g Sensor for setting a higher temperature (X) temperature (Y) d Safety lock indicator light h Alarm off sensor (only visible when Safety lock is (only visible when the door alarm activated) - Page 5 Guide to the appliance a DynamicCooling fan b Ceiling lighting c Butter and cheese compartment d Universal container e Egg tray/Condiment tray f Bottle rack g Active charcoal filter holder h Adjustable shelves i Bottle shelf j Bottle divider* k Condensate channel and drain hole l PerfectFresh zone, dry compartment m Control for setting the moisture level...
-
Page 6: Caring For The Environment
Caring for the environment Disposal of the packing Disposing of your old material appliance The transport and protective packing Electrical and electronic appliances has been selected from materials which often contain materials which, if are environmentally friendly for disposal handled or disposed of incorrectly, and can normally be recycled. -
Page 7: Warning And Safety Instructions
Warning and Safety instructions Correct application This appliance complies with all This appliance is intended for relevant local and national safety domestic use only for the cool storage requirements. Improper use can, of food and drink. however, present a risk of both Any other usage is not supported by personal injury and material the manufacturer and could be... - Page 8 Warning and Safety instructions Technical safety The more coolant there is in an appliance, the larger the room it should Before setting up the appliance, be installed in. In the event of a check it for any externally visible leakage, if the appliance is in a small damage.
- Page 9 Faulty components must only be national and local safety regulations. Repairs and other work by unqualified replaced by genuine Miele original persons could be dangerous. The spare parts. The manufacturer can only guarantee the safety of the appliance manufacturer cannot be held liable for unauthorised work.
- Page 10 Warning and Safety instructions Correct use Do not use defrosting sprays or de-icers, as they might contain Never store explosive materials in substances which could damage the the appliance or any products plastic parts or which could cause a containing propellants (e.g. spray build-up of gases and pose a danger to cans).
- Page 11 Warning and Safety instructions Disposal of your old appliance Before disposing of an old appliance, first make the door latch or lock unusable. This way you will prevent children from accidentally locking themselves in and endangering their lives. Be careful not to damage any part of the pipework whilst awaiting disposal, e.g.
-
Page 12: How To Save Energy
How to save energy Normal energy Increased energy consumption consumption Installation site In a ventilated room. In an enclosed, unventilated room. Protected from direct sunlight. In direct sunlight. Not situated near to a heat source Situated near a heat source (radiator, oven). -
Page 13: Switching On And Off
^ Touch the On/Off sensor until the suitable stainless steel conditioning temperature display comes on. agent (available from The appliance will start to cool, and the www.miele-shop.com) (depending on interior lighting will come on when the country). door is opened. Important: A stainless steel... -
Page 14: Settings Mode
Switching on and off Settings mode Switching the sensor tones on/off Certain settings on the appliance can The sensor tone which sounds each only be selected in the settings mode. time a sensor is touched can be deactivated. How to select the settings mode and how to change the settings is described in the relevant section of these instructions. -
Page 15: Activating Or De-Activating The Safety Lock
Switching on and off Activating or de-activating the safety You have now left the settings mode. lock The safety lock indicator will light up in the temperature display when the The safety lock can be activated to prevent the appliance being switched safety lock has been activated. -
Page 16: The Correct Temperature
The correct temperature DynamicCooling It is very important to set the correct temperature for storing food in the The DynamicCooling fan automatically appliance. Micro-organisms will cause switches on when the cooling system food which is not stored at the correct for the refrigerator switches on. -
Page 17: Temperature Range
The correct temperature – Leaving a finger on the sensor, adjusts the temperature continuously. When the highest or lowest temperature in the range is reached, ^ Touch and leave your finger on the X the X or Y sensor disappears. sensor. -
Page 18: Temperature Display
The correct temperature ^ Touch the X sensor repeatedly until d § 5 is the default setting for the appears in the display. PerfectFresh zone. If a setting of § 1 ^ Touch the On/Off sensor again. to § 4 is selected, the temperature ^ The temperature display brightness can fall below 0°C. -
Page 19: Alarm
Alarm To switch off the door alarm Your appliance has been fitted with an alarm to avoid energy being wasted if whilst the door is still open the door is left open and to prevent If you want to keep the door open stored food becoming too warm. -
Page 20: Supercool
SuperCool The SuperCool function The SuperCool function can be used to rapidly reduce the temperature in the refrigerator to its lowest setting (depending on the room temperature). Switching on SuperCool SuperCool is particularly recommended for the faster chilling of large amounts of fresh food or drink. -
Page 21: Using The Refrigerator Efficiently
Using the refrigerator efficiently Different storage zones – pre-packed vegetables and other fresh food with a label stating it Due to the natural circulation of the air should be kept at a temperature of in the appliance, there are different approx. -
Page 22: Food Which Should Not Be Stored In A Refrigerator
Using the refrigerator efficiently Food which should not be Storing food correctly stored in a refrigerator Food should generally be stored covered or packaged in the refrigerator Not all food is suitable for refrigeration. (there are some exceptions to this rule This includes: in the PerfectFresh zone - see below). -
Page 23: Using The Perfectfresh Zone
Using the PerfectFresh zone What are the advantages of the For every type of food, there are ideal storage conditions to ensure it stays PerfectFresh zone? fresh as long as possible, retaining As food remains fresh for up to three both flavour and vitamins. -
Page 24: Humidity-Controlled Compartment
Using the PerfectFresh zone Always keep these foods covered or Take food out of the PerfectFresh wrapped. zone approx. 30 - 60 minutes before Exception: Meat. The surface of the meat dries out slightly, helping to using it. The aroma and taste do not fully develop until the food has prevent the growth of bacteria, which results in the meat lasting longer. -
Page 25: Adjusting The Interior Fittings
Adjusting the interior fittings Moving the shelves To move the split shelf: ^ Take both halves of the split glass The shelves can be adjusted according to the height of the food. shelf out, ^ Raise the shelf, and pull it forwards slightly until the notch at the side is in line with the shelf support. -
Page 26: Adjusting The Condiment Tray/Bottle Shelf
Adjusting the interior fittings PerfectFresh zone Adjusting the condiment compartments tray/bottle shelf ^ Lift the tray/shelf up and out of the The compartments in the PerfectFresh zone are on telescopic rails, and can stainless steel frame to remove. be removed for filling, emptying or ^ Push up the stainless steel frame, cleaning purposes. -
Page 27: Universal Container
Adjusting the interior fittings Universal container Moving the bottle divider (depending on model) (depending on model) The universal container can be used The bottle divider can be moved to the both to store and serve food. left or right to ensure that bottles are held securely in position when the door is opened and shut. -
Page 28: Automatic Defrost
Automatic defrost Refrigerator section and PerfectFresh zone The refrigerator section and the PerfectFresh zone defrost automatically. Condensate and frost can build up on the back wall of the refrigerator section and the PerfectFresh zone whilst in use. You do not need to remove this, as it will defrost and evaporate automatically with the warmth generated by the appliance. -
Page 29: Cleaning And Care
Cleaning and care Before cleaning A range of Miele branded cleaning ^ Switch the appliance off, switch off at and conditioning agents is available the socket and remove the plug. from the Miele Spare Parts ^ Take any food out of the appliance Department, or via the internet at www.miele-shop.com (depending on... -
Page 30: Ventilation Gaps
Cleaning and care ^ After cleaning, stainless steel Metal grille at the back of the surfaces should be treated with a appliance conditioning agent for stainless steel. The metal grille at the back of the appliance (heat exchanger) should be It is important to do this every time dusted at least once a year. -
Page 31: Active Charcoal Filters
If you do not have new active charcoal filters, you can order them from your Miele Chartered Agent or from the Miele Spare Parts Department. You can switch off the Change active charcoal filter indicator early if you would prefer not to have the red indicator showing. - Page 32 (in holders) in the appliance. Active charcoal filters and holders ^ At the same time, briefly touch the can be obtained from your Miele On/Off sensor (without letting go of Chartered Agent or from the Miele the X sensor).
-
Page 33: Problem Solving Guide
^ Check that the fuse is not defective and that the mains fuse has not . . . the interior lighting is not working. tripped. If it has, contact the Miele Service Department. ^ Was the door left open for too long? The lighting switches itself off . - Page 34 ^ Replace the active charcoal filters. You can order replacement filters via your Miele Chartered Agent or the Miele Spare Parts Department.."_F" shows in the temperature display.
-
Page 35: Noises
Noises Normal noises What causes them Humming noise made by the motor (compressor). This noise can Brrrrr... get louder for brief periods when the motor is switching on. Blubb, blubb..A gurgling noise can be heard when coolant is circulating through the pipes. -
Page 36: After Sales
You will find the address and telephone number of Miele on the back cover of the manual. When contacting your Chartered Agent or Miele, please quote the model and serial number of your appliance. This information is given on the data plate inside your appliance. -
Page 37: Electrical Connection
Electrical connection Electrical connection All electrical work should be carried out by a suitably qualified and competent person in strict accordance with current local and national safety regulations. The appliance is supplied with a mains cable and moulded plug ready for connection to an AC single phase 220-240 V 50 Hz supply. -
Page 38: Installation
Your Miele Chartered Agent will be and going off. able to advise you on which models are suitable. Ventilation... -
Page 39: Installation
Installation Installation ^ Remove the cable clip from the back of the appliance. ^ Check that all parts at the back of the appliance are unhindered. Carefully remove any hindrance. ^ Carefully push the appliance into position with the back against the wall. -
Page 40: Appliance Dimensions
Installation Appliance dimensions K 14827 SD ed 1852 mm 600 mm 630 mm... -
Page 41: Changing The Door Hinging
Changing the door hinging The appliance is supplied right-hand hinged. If left-hand door hinging is required, follow the instructions below. To change the door hinging you will need the following tools: – a cross-slotted screwdriver, – a flat-bladed screwdriver, – a selection of Torx screwdrivers, –... - Page 42 Changing the door hinging ^ Fit restraining clip b (supplied with Removing the soft-close door mechanism the appliance) onto soft-close mechanism c. The soft-close door mechanism is at the bottom of the door. The restraining clip stops the hinge from snapping shut. Do not remove the clip until told to do so.
- Page 43 Changing the door hinging ^ Remove cover a by sliding it forwards from the back and then lifting it off. ^ Remove cover b by pulling it upwards. Caution. The appliance door is not secure as soon as the hinge plate is removed.
- Page 44 Changing the door hinging ^ With the help of another person, carefully tip the appliance back and pull hinge pin c downwards to remove. ^ Take care not to lose hinge bush d. ^ Undo screws e and take hinge plate f off.
- Page 45 Changing the door hinging ^ Insert the soft-close mechanism back into the door, starting at the right ^ Fit hinge plate c onto the opposite hand side. side and secure it with screws d. If necessary drill a pilot hole for the screws.
- Page 46 Changing the door hinging Refitting the handle Please make sure you follow the instructions below carefully when you refit the handle. The door seal will be damaged if the handle is fitted incorrectly. ^ Attach panel b to soft-close mechanism bracket d. ^ Align bracket d to the hinge plate, and insert pin e from above so that the right angle fits into the recess.
- Page 47 Changing the door hinging It is important to check that the side section of the handle d does not come into contact with the door seal when opening the door, as this would damage the door seal permanently. If, after you have refitted the handle, you find that the side section does touch the door seal when the door is opened:...
-
Page 48: Aligning The Appliance
Aligning the appliance The appliance door can be aligned to the housing using the outer long slots in the lower hinge plate. In the following illustration the door is shown open to make it easier to see what you have to do. ^ Remove centre screw a from the hinge plate. -
Page 49: Building In The Appliance
Building in the appliance The air inlet and outlet must not be covered or blocked in any way. They should be dusted on a regular basis. When built into a kitchen run (max. depth 580 mm), the appliance can be installed directly next to a kitchen furniture housing unit. - Page 52 Alteration rights reserved / 0210 M.-Nr. 07 810 090 / 00 K 14827 SD ed...