Sony VGN-FS960P User Manual
Vaio® laptop computers: vaio® notebook computer
Hide thumbs
Also See for VGN-FS960P:
- Specifications (2 pages) ,
- User manual (149 pages) ,
- Service manual (28 pages)
Table of Contents
Advertisement
Quick Links
Download this manual
See also:
Service Manual
Advertisement
Table of Contents

Related Manuals for Sony VGN-FS960P


Summary of Contents for Sony VGN-FS960P
-
Page 1: User Guide
User Guide Personal Computer V G N - F S 9 0 0 S e r i e s... -
Page 2: Table Of Contents
Contents Before Use ...6 Documentation ...6 Ergonomic Considerations ...8 Getting Started ...10 Locating Controls and Ports...11 About the Indicator Lights ...17 Connecting a Power Source ...18 Using the Battery Pack ...19 Shutting Down Your Computer Safely ...24 Using Your VAIO Computer ...25 Using the Keyboard ...26 Using the Touch Pad ...28 Using the Optical Disc Drive ...29... - Page 3 Using Peripheral Devices ...54 Connecting External Speakers ...55 Connecting an External Display ...56 Selecting Display Modes...60 Using the Multiple Monitors Function ...61 Connecting an External Microphone ...63 Connecting a Universal Serial Bus (USB) Device...64 Connecting a Printer ...67 Connecting an i.LINK Device ...68 Connecting to a Network (LAN) ...70 Customizing Your VAIO Computer ...71 Setting the Password ...72...
- Page 4 Precautions ...91 On Handling the LCD Screen ...92 On Using the Power Source ...93 On Handling Your Computer...94 On Handling Floppy Disks ...96 On Handling Discs ...97 On Using the Battery Pack...98 On Using Headphones...99 On Handling Memory Stick Media...99 On Handling the Hard Disk ...100 Troubleshooting ...101 Computer ...102...
- Page 5 Floppy Disks ...133 PC Cards ...134 Audio/Video...135 Memory Stick Media ...136 Peripherals ...137 Support Options ...138 Sony Support Information ...138 Program Support Information...141...
-
Page 6: Before Use
Your documentation includes printed information and user guides to read on your VAIO computer. Printed Documentation Welcome mat — Contains an overview of connections, setting up information, etc. Safety information — Contains safety guidelines and owner information. ® computer, and welcome to the on-screen User Guide. Sony has Before Use... - Page 7 Specifications — The online Specifications describe the hardware and software configuration of your VAIO computer. To view the online Specifications: Connect to the Internet. Go to the Sony online support Web site at http://www.sony.ca/support American countries or areas. VAIO Recovery Guide — Provides information about restoring individual software programs, software drivers, and drive partition(s) or your entire hard disk drive to the original factory installed settings.
-
Page 8: Ergonomic Considerations
Ergonomic Considerations You will be using your computer as a portable device in a variety of environments. Whenever possible, you should attempt to take account of the following ergonomic considerations to both stationary and portable environments: Position of your computer – Place the computer directly in front of you (1). Keep your forearms horizontal (2), with your wrists in a neutral, comfortable position (3) while using the keyboard, touch pad, or external mouse. - Page 9 Before Use Viewing angle of the computer's display – Use the display's tilting feature to find the best position. You can reduce eye strain and muscle fatigue by adjusting the tilt of the display to the proper position. Adjust the brightness setting of the display as well.
-
Page 10: Getting Started
Getting Started This section describes how to get started with using your VAIO computer. Before the first computer startup, do not connect any new hardware that did not normally come with your computer. Make sure to start up your computer with only the supplied accessories connected and set up your system. Upon completion, connect one device (for example, a printer, external hard disk drive, scanner, and so on) at a time, following the manufacturer's instructions. -
Page 11: Locating Controls And Ports
Locating Controls and Ports Take a moment to identify the controls and ports shown on the following pages. Front LCD screen (page 92) Speakers Keyboard (page 26) Touch pad (page 28) Power indicator (page 17) Battery indicator (page 17) Hard disk drive/Optical disc drive indicator Memory Stick media indicator (page 17) WLAN (Wireless LAN) switch... - Page 12 LCD screen lid lock latch Num lock indicator (page 17) Caps lock indicator (page 17) Scroll lock indicator (page 17) Power button Getting Started...
- Page 13 Back Air vent Battery connector (page 19) Getting Started...
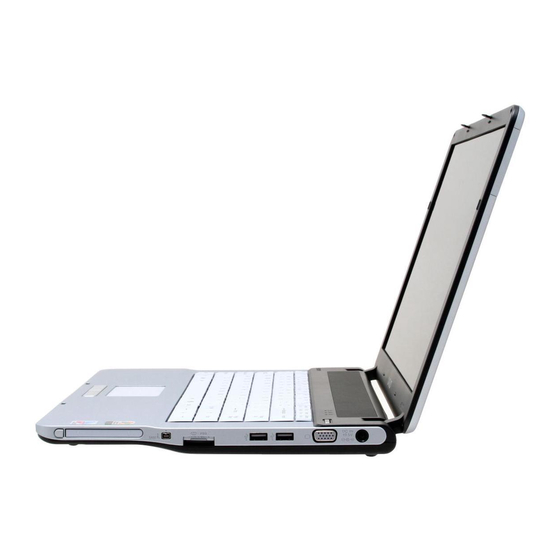
- Page 14 Right PC Card release button (page 40) PC Card slot (page 38) ® i.LINK (IEEE 1394) S400 port (page 68) Memory Stick media slot (page 42) Hi-Speed USB (USB 2.0) ports (page 64) Monitor (VGA) port (page 57) DC IN port (page 18) Your computer supports Memory Stick Duo media and Memory Stick PRO with high speed and high capacity capabilities.
- Page 15 Left Network (Ethernet) port (page 70) Modem port (page 44) Optical disc drive (page 29) Manual eject hole (page 120) Drive eject button (page 29) Getting Started...
- Page 16 Getting Started Bottom Air vents...
-
Page 17: About The Indicator Lights
About the Indicator Lights Your computer is equipped with the following indicator lights. Indicator Functions Power 1 Illuminates when the power of the computer is on, blinks in Standby mode, and turns off when the computer is in Hibernate mode or off. Battery e Illuminates when the computer is using battery power, blinks when the battery is running out of power, and double-blinks when the battery is charging. -
Page 18: Connecting A Power Source
Connecting a Power Source You can use either an AC adapter or a rechargeable battery pack as a power source for your computer. Using the AC Adapter Use the computer only with the supplied AC adapter. To use the AC adapter Plug one end of the power cord (1) into the AC adapter (3). -
Page 19: Using The Battery Pack
Using the Battery Pack The battery pack supplied with your computer is not fully charged at the time of purchase. Installing the Battery Pack To install the battery pack Turn off the computer and close the LCD screen lid. Slide the lock switch (1) to the UNLOCK position. Slide the battery into the battery compartment until it clicks into place. - Page 20 Slide the lock switch (1) to the LOCK position to secure the battery on the computer. When the computer is directly connected to AC power and has a battery pack installed, it uses power from the AC outlet. This computer is designed to operate only with genuine Sony batteries.
-
Page 21: Charging The Battery Pack
Charging the Battery Pack The battery pack supplied with your computer is not fully charged at the time of purchase. To charge the battery pack Install the battery pack. Connect the AC adapter to the computer. The computer automatically charges the battery (the battery indicator light flashes in a double blink pattern as the battery charges). - Page 22 Getting Started When the battery is running out of power, both the battery and power indicator lights blink. Keep the battery pack in the computer while it is directly connected to AC power. The battery pack continues to charge while you are using the computer. If the battery level falls below 10%, you should either attach the AC adapter to recharge the battery or shut down the computer and install a fully charged battery.
-
Page 23: Removing The Battery Pack
Removing the Battery Pack You may lose data if you remove the battery pack while the computer is on and not connected to the AC adapter or if you remove the battery while the computer is in Standby mode. To remove the battery pack Turn off the computer and close the LCD screen lid. -
Page 24: Shutting Down Your Computer Safely
Shutting Down Your Computer Safely To avoid losing unsaved data, be sure to shut down your computer properly, as described below. To shut down your computer Turn off any peripherals connected to the computer. Click Start and then Turn Off Computer. The Turn off computer window appears. -
Page 25: Using Your Vaio Computer
Using Your VAIO Computer This section describes how to get the most out of using your computer. Using the Keyboard (page 26) Using the Touch Pad (page 28) Using the Optical Disc Drive (page 29) Using PC Cards (page 38) Using the Memory Stick Media Using the Internet (page 44) -
Page 26: Using The Keyboard
Using the Keyboard Your keyboard is very similar to a desktop computer keyboard, but has additional keys that perform model-specific tasks. Combinations and Functions with the Fn Key Some functions are not available until Windows is launched. Combinations/Feature Fn + % (F2): speaker switch Fn + 2 (F3/F4): speaker volume Fn + 8 (F5/F6): brightness control Fn +... - Page 27 Combinations/Feature Fn + (F10): zoom Fn + (F12): Hibernate Functions Changes the screen resolution to magnify/restore your computer's screen view. The magnified view is not as clear as the standard view, as it is implemented by applying a lower resolution to the computer screen with a higher resolution.
-
Page 28: Using The Touch Pad
Using the Touch Pad The keyboard contains a cursor-pointing device, the touch pad (1). You can point to, select, drag, and scroll objects on the screen using the touch pad. Action Description Point Slide one finger on the touch pad to place the pointer (2) on an item or object. Click Press the left button (3) once. -
Page 29: Using The Optical Disc Drive
Using the Optical Disc Drive Your computer is equipped with an optical disc drive. To insert a disc Turn on the computer. Press the drive eject button (1) to open the drive. The tray slides out. Place a disc in the middle of the tray with the label side facing up and gently push it until the disc clicks into place. Using Your VAIO Computer... - Page 30 Using Your VAIO Computer Close the tray by pushing it in gently. Do not remove the optical disc when the computer is in a power saving mode (Standby or Hibernate). Doing so may cause the computer to malfunction. If you plan to use an external optical disc drive, connect the drive before you launch any preinstalled CD/DVD program.
- Page 31 Reading and Writing CDs and DVDs Your computer plays and records CDs and DVDs, depending on the model you purchased. Check your specifications for the type of optical disc drive installed on your model. Use the table below to see which types of media your optical disc drive supports.
- Page 32 Due to the multiple formats of discs now available, when buying pre-recorded or blank discs for use with a VAIO computer, be sure to read the notices on the disc packaging carefully to check both playback and recording compatibility with your computer's optical disc drives. Sony does NOT guarantee the compatibility of VAIO CD drives with discs that not compliant with the official "CD"...
- Page 33 Using Your VAIO Computer Notes on writing data to a disc To make the data on a disc readable on an optical disc drive, you need to close the session when you eject it. To complete this process, follow the instructions included with your software. Only use circular discs.
- Page 34 Notes on playing DVDs To achieve optimum performance when playing DVDs, you should follow these recommendations. You can play DVDs using the optical disc drive and the DVD playback software, such as VAIO Zone or WinDVD. See the help file on such software for details. Close all open applications before playing a DVD movie.
-
Page 35: Playing Cds
Playing CDs To play an audio CD Insert a disc into the optical disc drive. If nothing appears on the desktop, then click Start, point to All Programs, and click to open a CD program, such as the SonicStage software. If the Audio CD window appears, click to select an option. -
Page 36: Copying Files To Cds
Copying Files to CDs See the online Specifications to find the type of your optical disc drive, and then Reading and Writing CDs and DVDs (page 31) to find about the supported disc media. To copy files to a disc Do not strike or shake the computer while writing data onto a disc. -
Page 37: Playing Dvds
Playing DVDs To play a DVD Close all open programs. Insert a DVD into the optical disc drive. If nothing appears on the desktop, then click Start, point to All Programs, and click to open a DVD program to play the DVD. -
Page 38: Using Pc Cards
Using PC Cards PC Cards allow you to connect portable external devices to your computer. Inserting a PC Card Some PC Cards or their functions may not be compatible with the computer. You do not need to shut down the computer before inserting or removing a PC Card. To insert a PC Card Insert the PC Card into the PC Card slot with the front label facing up. - Page 39 Using Your VAIO Computer Some devices may not function properly if you continually switch to Normal mode from Standby mode or Hibernate mode. For some PC Cards, if you alternate between Normal mode and Standby or Hibernate mode while the card is inserted, you may find that a device connected to your system is not recognized.
-
Page 40: Removing A Pc Card
Removing a PC Card Follow the steps below to remove the PC Card while your computer is on. If it is not removed properly, your system may not work properly. To remove a PC Card To remove a PC Card when the computer is off, skip steps 1 to 6. Double-click the Safely Remove Hardware icon on the taskbar. -
Page 41: Using The Memory Stick Media
Latin American countries or areas. Your computer has been tested and found compatible with the Sony branded Memory Stick media with capacity of up to 4 GB that are available as of January 2006. Sony assumes no liability for compatibility with any other Memory Stick media that meet the same conditions. -
Page 42: Inserting A Memory Stick Media
Inserting a Memory Stick Media To insert a Memory Stick media Hold the Memory Stick media with the arrow facing up and toward the Memory Stick media slot. Lift the Memory Stick media slot cover. Carefully slide the Memory Stick media into the slot until it clicks in place. The Memory Stick media is automatically detected by your system and appears in your My Computer window as a local drive, under the appropriate letter (depending on the configuration of the computer). -
Page 43: Removing A Memory Stick Media
To view the contents of the Memory Stick media Click Start and then My Computer to open the My Computer window. Double-click the Memory Stick media icon To format a Memory Stick media Use the Memory Stick Formatter software. See the help file on the Memory Stick Formatter software for details. Removing a Memory Stick Media To remove a Memory Stick media Check that the Memory Stick media indicator is off. -
Page 44: Using The Internet
Using the Internet Setting Up a Dial-up Internet Connection Before you can connect to the Internet, you need to connect your computer to a telephone line via a telephone cable (may not supplied). Once you set up your telephone cable, you're ready to connect to the Internet. To connect a telephone cable Plug one end of the phone cable (1) into the modem port Plug the other end into the wall jack (2). -
Page 45: Using Wireless Lan (Wlan)
(radio) connection. So there is no need anymore to pull cables or wires through walls and ceilings. The Sony WLAN supports all normal Ethernet activities, but with the added benefits of mobility and roaming. You can still access information, internet/intranet and network resources, even in the middle of a meeting, or as you move from one place to another. -
Page 46: Communicating Without An Access Point (Ad-Hoc)
Using Your VAIO Computer Communicating without an Access Point (Ad-hoc) An ad-hoc network is a network in which a local network is created only by the wireless devices themselves, with no other central controller or access point. Each device communicates directly with other devices in the network. You can set up an ad-hoc network easily at home. - Page 47 To communicate without an access point (ad-hoc) Turn on the WIRELESS or WIRELESS LAN switch. The WIRELESS LAN indicator lights up. On models with the Bluetooth functionality Switch window. Select the Enable 2.4 GHz Wireless LAN check box and click OK. Click Start and then Control Panel.
- Page 48 12 Enter the network key The network key should be 5 or 13 alphanumeric characters or 10 or 26 hexadecimal whatever you want. 13 Enter exactly the same network key again, for confirmation. 14 Select the check box This is a computer-to-computer (ad hoc) network; wireless access points are not used at the bottom of the screen.
- Page 49 To disconnect from a computer-to-computer (ad-hoc) network Click Start and then Control Panel. Click Network and Internet Connections. Click Network Connections. The Network Connections window appears. In the right panel under LAN or High-Speed Internet, right-click Wireless Network Connection. Click Properties. The Wireless Network Connection Properties window appears.
-
Page 50: Communicating With An Access Point (Infrastructure)
An infrastructure network is a network that extends an existing wired local network to wireless devices by providing an access point, for example the Sony Access Point. The access point bridges the wireless and wired LAN and acts as a central controller for the Wireless LAN. - Page 51 To connect to a wireless network Make sure an access point is set up. See the manual that came with your access point for more information. Turn on the WIRELESS or WIRELESS LAN switch. The WIRELESS LAN indicator lights up. On models with the Bluetooth functionality Switch window.
- Page 52 To connect to a wireless network (Models with the Wireless Setup Utility software only) Use the Wireless Setup Utility software to guide you through the set up process and provide you with more detailed information about wireless connections. Make sure an access point is set up. See the manual that came with your access point for more information.
- Page 53 Wireless LAN Channel Selection In an 802.11b/g configuration, channel 1 to 11 can be used. (a) With an access point ("infrastructure") The channel used will be the channel selected by the access point. For details on how to select the channel that will be used by the access point, see the access point manual. (b) Without an access point ("ad-hoc") If the Wireless connection is initiated by the VAIO computer, channel 11 will be selected.
-
Page 54: Using Peripheral Devices
Using Peripheral Devices You can add functionality to your computer by using the various ports on the computer. Connecting External Speakers Connecting an External Display Selecting Display Modes (page 60) Using the Multiple Monitors Function Connecting an External Microphone Connecting a Universal Serial Bus (USB) Device Connecting a Printer (page 67) Connecting an i.LINK Device... -
Page 55: Connecting External Speakers
Connecting External Speakers You can enhance the sound quality of your computer by connecting external speakers. To connect external speakers Plug the speaker cable (1) into the headphones jack (2) i. Plug the other end of the speaker cable to the external speaker (3). Turn down the volume of the speakers before you turn them on. -
Page 56: Connecting An External Display
Connecting an External Display You can connect an external display to your computer. For example, you can use the computer with a computer display or a projector. Connecting a Computer Display Connecting a Multimedia Computer Display Connecting a Projector (page 59) Connect the power cord after connecting all other cables. -
Page 57: Connecting A Computer Display
Connecting a Computer Display You can connect a computer display (monitor) directly to your computer. To connect a computer display If necessary, plug one end of the display's power cord (1) into the display, and the other end into an AC outlet. Plug the display cable (2) (not supplied) into the monitor (VGA) port (3) a on the computer. -
Page 58: Connecting A Multimedia Computer Display
Connecting a Multimedia Computer Display You can connect a multimedia computer display that includes built-in speakers and a microphone to your computer. To connect a multimedia computer display Plug the power cord of the multimedia computer display (1) into an AC outlet. Plug the display cable (2) (not supplied) into the monitor (VGA) port (3) a on the computer. -
Page 59: Connecting A Projector
Connecting a Projector You can connect a projector (for example, the Sony LCD projector) directly to your computer. To connect a projector Connect the power cord (1) of the projector into an AC outlet. Plug the RGB signal cable (2) into the monitor (VGA) port (3) a on the computer. -
Page 60: Selecting Display Modes
Selecting Display Modes You can select which display to be used as the primary monitor when an external display (desktop monitor, etc.) is connected to your computer. If you want to work on your computer screen and the external display at the same time, see Using the Multiple Monitors Function (page 61) for more information. -
Page 61: Using The Multiple Monitors Function
Using the Multiple Monitors Function The Multiple Monitors function allows you to distribute portions of your desktop across separate displays. For example, if you have an external display attached to the monitor (VGA) port, your computer screen and the external display can function as a single desktop. - Page 62 To select the Multiple Monitors mode Right-click on the desktop to display the context menu. Click the menu item for graphic properties. Follow the on-screen instructions to change the settings. Additionally, you can set the display colors and resolution for each display and customize the Multiple Monitors mode. Using Peripheral Devices...
-
Page 63: Connecting An External Microphone
Using Peripheral Devices Connecting an External Microphone If you need to use a sound input device (for example, to chat on the Internet) you need to plug in an external microphone. To connect an external microphone Plug the microphone cable (1) into the microphone jack (2) m. Make sure your microphone is designed for computer use. -
Page 64: Connecting A Universal Serial Bus (Usb) Device
Connecting a Universal Serial Bus (USB) Device To prevent your computer and/or USB devices from damage, observe the following: When moving the computer with USB devices connected, avoid any shock or force to the USB ports. Do not put the computer into a bag or carrying case when it has USB devices connected. Connecting a USB Mouse To connect a USB mouse Choose the USB port (1) -
Page 65: Connecting A Usb Floppy Disk Drive
Connecting a USB Floppy Disk Drive You can purchase a USB floppy disk drive and connect it to your computer. To connect a USB floppy disk drive Choose the USB port you prefer to use. Plug the USB floppy disk drive cable into the USB port. Your USB floppy disk drive is now ready for use. -
Page 66: Disconnecting A Usb Floppy Disk Drive
Disconnecting a USB floppy disk drive You can disconnect a USB floppy disk drive when the computer is on or off. Disconnecting the drive when the computer is in a power saving mode (Standby or Hibernate) may cause the computer to malfunction. If the computer is off, you can unplug the USB cable directly from the computer. -
Page 67: Connecting A Printer
Connecting a Printer You can connect a Windows-compatible printer to your computer to print documents. Connecting a Printer Using the USB Port You can connect a USB printer compatible with your version of Windows to the computer. To connect a printer using the USB port Plug the printer power cord into an AC outlet (1). -
Page 68: Connecting An I.link Device
Connecting an i.LINK Device Notes on connecting i.LINK devices The computer includes an i.LINK (IEEE 1394) port, which you can use to connect to an i.LINK device such as a digital video camcorder or to connect two VAIO computers in order to copy, delete or edit files. The i.LINK port of the computer does not supply power to external devices generally powered by i.LINK ports. -
Page 69: Connecting A Digital Video Camcorder
On Sony digital video cameras, ports labeled DV Out, DV In/Out or i.LINK are i.LINK-compatible. The Sony digital video camcorder shown here is an example; your digital video camcorder may need to be connected differently. You cannot access the pictures stored on a Memory Stick media when using an i.LINK connection. -
Page 70: Connecting To A Network (Lan)
Connecting to a Network (LAN) You can connect your computer to 100BASE-TX/10BASE-T-type networks via an Ethernet network cable. Connect one end of an optional network cable to the Network (Ethernet) port on the computer and the other end to your network. For detailed settings and devices needed to connect to the network, see your network administrator. -
Page 71: Customizing Your Vaio Computer
Customizing Your VAIO Computer This section briefly describes how to change the main settings of your computer. Among other things, you will learn how to use and customize the look of your Sony software and utilities, etc. Setting the Password... -
Page 72: Setting The Password
Setting the Password Use one of the BIOS functions to set the password. Once you have set the password, you will have to enter the password after the VAIO logo appears to start your computer. The power-on password will allow you to protect your computer from unauthorized access. Adding the Power-on Password Once you have set the power-on password, you cannot start the computer without entering the password. - Page 73 Select Password when Power ON under Security. Press the space bar to change the setting from Disabled to Enabled. Press the < or , key to select Exit, select Exit (Save Changes) or Exit Setup, and then press the Enter key. On the Setup Confirmation screen, make sure that Yes is selected and then press the Enter key.
-
Page 74: Changing/Removing The Power-On Password
Changing/Removing the Power-on Password To change or remove the power-on password Turn on the computer. Press the F2 key when the VAIO logo appears. The BIOS setup screen appears. If not, restart the computer and press the F2 key several times when the VAIO logo appears. -
Page 75: Setting Up Your Computer With Vaio Central
Setting Up Your Computer with VAIO Central The VAIO Central utility allows you to consult system information and specify preferences for system behavior. To use VAIO Central Click Start, point to All Programs, and click VAIO Central. The VAIO Central window appears. Select the desired control item and change the settings. -
Page 76: Using The Power Saving Modes
Using the Power Saving Modes When you use a battery as the power source for your computer, you can take advantage of power management settings to conserve battery life. In addition to the normal operating mode, which allows you to turn off specific devices, your computer has two distinct power saving modes: Standby and Hibernate. -
Page 77: Using Standby Mode
Using Standby Mode Standby mode turns off the LCD screen and sets the hard disk and the CPU to a low power consumption mode. The umber power light flashes in this mode. To activate Standby mode Click Start and then Turn Off Computer. Click Stand By. - Page 78 To change the Standby mode settings Click Start and then Control Panel. Click Performance and Maintenance. Click Power Options. The Power Options Properties window appears. Select the Power Schemes tab. Change the System Standby settings. Customizing Your VAIO Computer...
-
Page 79: Using Hibernate Mode
Using Hibernate Mode In Hibernate mode, the state of the system is saved on the hard disk and power is turned off. Even when the battery runs down, no data will be lost. The power indicator light is off in this mode. To activate Hibernate mode Press the Fn+F12 keys. - Page 80 Customizing Your VAIO Computer If you do not use the computer for a long period of time, put the computer into Hibernate mode. This power saving mode saves you the time of shutting down or resuming. When the computer is in Hibernate mode, you cannot insert a disc. Hibernate mode requires more time than Standby mode to be activated.
-
Page 81: Managing Power With Vaio Power Management
Customizing Your VAIO Computer Managing Power with VAIO Power Management Power management helps you to set up power schemes for running on AC power or batteries to suit your requirements for power consumption. VAIO Power Management is a software application developed exclusively for VAIO computers. With this software application, you can enhance the Windows power management functions to ensure better operations of your computer and for longer battery life. - Page 82 Activating VAIO Power Management When you start the computer, a power status icon appears on the taskbar. This icon indicates what kind of power source you are using at that time, for example, AC power. If you double-click this icon, the window appears showing your power status. VAIO Power Management functionalities are added to the Windows Power Options Properties.
- Page 83 Activating VAIO Power Management Power Schemes VAIO Power Management provides several predefined power schemes. Each power scheme consists of a group of power management settings that are designed to meet specific power management goals, ranging from maximum power management to no power management. To activate a VAIO Power Management power scheme Click Start and then Control Panel.
-
Page 84: Upgrading Your Vaio Computer
For the type of module and amount of memory installed on your model, refer to the online Specifications. For assistance, contact an authorized Sony Service Center. To find the nearest center or agent, visit the Sony online support Web site. -
Page 85: Adding And Removing Memory
Adding and Removing Memory If you want to expand the functionality of your computer, you can increase the memory by installing optional memory modules. Before you upgrade your computer's memory, read the notes and procedures in the following pages. The number of available slots depends on the configuration of your model. - Page 86 Use the special bag delivered with the memory module or wrap the module in aluminum foil to protect it from electrostatic discharge. Introducing any liquids or any foreign substances or objects into the memory slots, or other internal components of the computer, will result in damage to the computer and any repair costs will not be covered by the warranty.
-
Page 87: Removing And Installing A Memory Module
Removing and Installing a Memory Module To change or add a memory module Shut down the computer and disconnect all peripheral devices. Unplug the computer and remove the battery pack. Wait until the computer cools down. Unscrew the screw (indicated by the arrow below) on the bottom of the computer and remove the memory module compartment cover. - Page 88 Remove the memory module: Pull the latches in the direction of the arrows (1). The memory module is released. Make sure that the memory module tilts up and then pull it out in the direction of the arrow (2). Remove the new memory module from its packaging. Upgrading Your VAIO Computer...
- Page 89 Slide the memory module into the memory module slot and push it in until it clicks into place. Do not touch any other components on the motherboard. Do not damage the insulation sheet equipped for module protection. Replace the memory module compartment cover. 10 Tighten the screw on the bottom of the computer.
-
Page 90: Viewing The Amount Of Memory
Viewing the Amount of Memory To view the amount of memory Turn on the computer. Click Start, point to All Programs, and click VAIO Central. Click the System Information tab in the VAIO Central window. Double-click the System Information folder. Double-click the System Information icon. -
Page 91: Precautions
Precautions This section describes safety guidelines and precautions to help you protect your computer from potential damage. On Handling the LCD Screen On Using the Power Source (page 93) On Handling Your Computer (page 94) On Handling Floppy Disks (page 96) On Handling Discs (page 97) On Using the Battery Pack... -
Page 92: On Handling The Lcd Screen
Precautions On Handling the LCD Screen Do not leave the LCD screen facing the sun. This could damage the LCD screen. Be careful when using the computer near a window. Do not scratch the LCD screen or exert pressure on it. This could cause a malfunction. Using the computer in low temperature conditions may produce a residual image on the screen. -
Page 93: On Using The Power Source
Make sure that the AC outlet is easily accessible. When the AC adapter is not used, unplug it from the AC outlet. Use the AC adapter supplied with the computer or genuine Sony products. Do not use any other AC adapter as it may cause a malfunction. -
Page 94: On Handling Your Computer
On Handling Your Computer Clean the cabinet with a soft cloth, which is dry or lightly moistened with a mild detergent solution. Do not use any type of abrasive pad, scouring powder, or solvent such as alcohol or benzine, as these may damage the finish of the computer. If you drop a solid object or any liquid onto the computer, shut down the computer and then unplug it. - Page 95 If any problems occur, unplug the computer and contact an authorized Sony Service Center. To find the nearest center or agent, visit the Sony online support Web site. Make sure you disconnect the power cord before cleaning the computer.
-
Page 96: On Handling Floppy Disks
Precautions On Handling Floppy Disks Do not open the shutter manually or touch the surface of the floppy disk. Keep floppy disks away from magnets. Keep floppy disks away from direct sunlight and other sources of heat. Keep the floppy disk away from any liquid. Do not let the floppy disk get wet. When you are not using the floppy disk, always remove it from the floppy disk drive and use a storage case. -
Page 97: On Handling Discs
Precautions On Handling Discs Do not touch the surface of the disc. Do not drop or bend the disc. Fingerprints and dust on the surface of a disc may cause read errors. Always hold the disc by its edges and central hole, as shown below: Proper care of the disc is essential to its continuous reliability. -
Page 98: On Using The Battery Pack
Charge the batteries at temperatures between 18°F to 86°F (10°C to 30°C). Lower temperatures require a longer charging time. This computer is designed to operate only with genuine Sony batteries. While the battery is in use or being charged, the battery pack heats up. This is normal and is not cause for concern. -
Page 99: On Using Headphones
On Using Headphones Road safety – Do not use headphones while driving, cycling, or operating any motorized vehicle. It may create a traffic hazard and is illegal in some areas. It can also be potentially dangerous to play loud music while walking, especially at pedestrian crossings. -
Page 100: On Handling The Hard Disk
On Handling the Hard Disk The hard disk has a high storage density and reads or writes data in a short time. However, it can be easily damaged by mechanical vibration, shock or dust. Although the hard disk has the internal safety device to prevent losing data due to mechanical vibration, shock or dust, you should be careful when handling the computer. -
Page 101: Troubleshooting
Troubleshooting This section describes how to solve common problems you might encounter when using your computer. Many problems have simple solutions. Try these suggestions before visiting the Sony online support Web site at for customers in USA, at http://www.sony.ca/support customers in Latin American countries or areas. -
Page 102: Computer
Remove any extra memory modules you may have inserted since purchase. Check that you are using the supplied Sony AC adapter. For your safety, use only genuine Sony rechargeable battery packs and AC adapters, which are supplied by Sony for your VAIO computer. -
Page 103: What Should I Do If A Bios Error Appears When I Turn On My Computer
The message Save configuration changes and exit now? appears. Select Yes, and press the Enter key. Your computer restarts. If this occurs frequently, contact an authorized Sony Service Center. To find the nearest center or agent, visit the Sony online support Web site. Troubleshooting... - Page 104 What should I do if the power indicator (Green) lights but my computer screen stays blank? Follow these steps: Press the power button for more than four seconds to check that the power indicator goes out. Then turn on your computer again.
-
Page 105: What Should I Do If My Computer Or Software Stops Responding
Troubleshooting What should I do if my computer or software stops responding? It is best to turn off your computer using the Turn Off Computer option on the Microsoft Windows Start menu, located on the taskbar. Using other methods, including those listed below, may result in loss of unsaved data. Click Start, point to Turn Off Computer, and then click Turn Off. -
Page 106: What Should I Do If The Battery Indicator Is Flashing And My Computer Does Not Start
If the symptom persists after performing the above, it means the installed battery pack is not compatible. Remove the battery pack and contact an authorized Sony Service Center. To find the nearest center or agent, visit the Sony online support Web site. - Page 107 If the symptom persists after performing the above, it means the installed battery pack is not compatible. Remove the battery pack and contact an authorized Sony Service Center. To find the nearest center or agent, visit the Sony online support Web site.
- Page 108 Why does the System Properties window display a slower CPU speed than the maximum? This is normal. Because your computer's CPU utilizes a type of CPU speed controlling technology for power conservation purposes, System Properties may display the CPU's current speed instead of the maximum speed. What should I do if Windows does not start, showing a message, when I start my computer? If you enter a wrong power-on password three times consecutively, the Enter Onetime Password message appears and...
-
Page 109: What Should I Do If I Cannot Remember The Bios Password
What should I do if I cannot remember the BIOS password? If you have forgotten the BIOS password, contact an authorized Sony Service Center to reset it. A reset fee will be charged. To find the nearest center or agent, visit the Sony online support Web site. -
Page 110: How Can I Change The Volume Of The Startup Sound
How can I change the volume of the startup sound? To change the startup sound volume Press the F2 key. The BIOS setup screen appears. Press the < or , key to select Advanced. Press the M or m key to select Speaker Volume and press the Enter key. Press the M or m key to select the speaker volume at startup and press the Enter key. -
Page 111: System Security
System Security This section provides information about keeping your computer operating smoothly and protecting against potential threats to the computer's security. How can I protect my computer against security threats, such as viruses? The Microsoft Windows operating system is preinstalled on your computer. The best way to protect your computer against security threats, such as viruses, is to download and install the latest Windows updates regularly. -
Page 112: How Do I Keep My Antivirus Software Updated
To visit the Windows Updates web site Connect to the Internet. Type http://windowsupdate.microsoft.com/ in the address bar of your browser. The Microsoft Windows Update and Security Warning windows appear. In the Security Warning window, start installation and run Windows Update. In the Microsoft Windows Update window, select an installation type, and follow the on-screen instructions. -
Page 113: Battery
Battery How do I find the battery charging status? See Charging the Battery Pack (page When is my computer using AC power? When your computer is directly connected to the AC adapter, it uses AC power, even if a battery is installed. When should I recharge the battery? When the battery level falls below 10 percent. -
Page 114: Can My Computer Enter Hibernate Mode While Using Battery Power
Can my computer enter Hibernate mode while using battery power? Your computer can enter Hibernate mode while using battery power, but some software programs and peripheral devices prevent the system from entering Hibernate mode. If you are using a program that prevents the system from entering Hibernate mode, save your data frequently to avoid losing data. -
Page 115: Internet
Make sure the telephone cable is working. Plug the cable into an ordinary telephone and listen for a dial tone. Make sure the telephone number the program is dialing is correct. Make sure the software you are using is compatible with your computer's modem. (All preinstalled Sony programs are compatible.) Make sure the modem is the only device connected to your phone line. -
Page 116: Why Is My Modem Connection Slow
Why is my modem connection slow? Your computer is equipped with a V.92/ V.90 compatible modem. Many factors may influence modem connection speed, including telephone line noise or compatibility with telephone equipment, such as fax machines or other modems. If you think your modem is not connecting properly to other PC-based modems, fax machines, or your Internet Service Provider (ISP), do any of the following: Ask your telephone company to verify your telephone line is free of any line noise. -
Page 117: Networking
Networking What should I do if my computer cannot connect to a wireless LAN access point? Connection availability is affected by distance and obstructions. You may need to move your computer away from obstructions or closer to any access point you may be using. Make sure the WIRELESS or WIRELESS LAN switch is on and the WIRELESS LAN indicator is lit on your computer. -
Page 118: What Should I Do If I Cannot Access The Internet
What should I do if I cannot access the Internet? Check the access point settings. See the manual that came with your access point for more information. Make sure your computer and the access point are connected to one another. Move your computer away from obstructions or closer to any access point you may be using. - Page 119 Wireless LAN communication occurs on divided frequency bands known as channels. Third-party wireless LAN access point channels may be preset to different channels from Sony devices. If you are using a wireless LAN access point, see connectivity information contained in the manual that came with your access point.
-
Page 120: Cds And Dvds
CDs and DVDs Why does my computer freeze when I try to read a disc? The disc that your computer is trying to read may be dirty or damaged. Follow these steps: Restart the computer by clicking Start, Turn Off Computer, and Restart. Eject the disc from the optical disc drive. - Page 121 What should I do if I cannot play a CD or DVD properly on my computer? Make sure the disc was inserted into the optical disc drive with the label facing up. Make sure the necessary program(s) is installed according to the manufacturer's instructions. If the CD or DVD is dirty or damaged, your computer will stop responding.
- Page 122 Double-click the optical disc drive device to open the submenu. Double-click the listed drive, and select the Properties tab. Click to select the Enable digital CD audio for this CD-ROM device check box, if it is not selected. You can confirm the driver software by selecting the Driver tab, and clicking Driver Details. Click OK to close the window.
- Page 123 What should I do if I cannot write data to CD media? Do not launch any software application or allow any to launch automatically, not even a screen saver. Do not use the keyboard. Do not use a CD-R/RW disc that has a label affixed to it. This could cause a write error or other damage. What should I do if I cannot write data to DVD media? Make sure you are using the correct DVD recordable media.
- Page 124 What should I do if I cannot write data to DVD-RAM media using Windows functions? This Q & A entry applies to selected models only. See the online Specifications to see whether your model is equipped with the DVD±RW/RAM drive. Follow these steps to change the settings: Click Start and then My Computer.
-
Page 125: Display
Display Why did my computer screen go blank? Your computer screen may go blank if the computer has lost power or has entered a power saving mode (Standby or Hibernate). If the computer is in LCD (Video) Standby mode, press any key to activate the computer screen. See Using the Power Saving Modes (page 76) Make sure your computer is securely plugged into a power source and turned on. - Page 126 What should I do if the LCD brightness of your computer screen changes? The LCD brightness setting, adjusted with the Fn+F5/F6 keys, is temporary and this adjustment is overridden by the setting on the VAIO Power Management tab when another power scheme is selected. To save this preference for the brightness To do the following procedure, you must have administrator rights on your computer.
-
Page 127: Printing
Printing What should I do if I cannot print a document? Make sure your printer is on, and the printer cable is securely connected to the ports on the printer and computer. Make sure your printer is compatible with the Windows operating system installed on your computer. You may need to install the printer driver software before you use your printer. -
Page 128: Microphone
Troubleshooting Microphone What should I do if my microphone does not work? If you are using an external microphone, make sure the microphone is turned on and is properly plugged into the Microphone jack on your computer. -
Page 129: Mouse
Mouse What should I do if my computer does not recognize my mouse? Make sure your mouse is securely plugged into the port. Restart your computer with your mouse connected. What should I do if the pointer does not move when I use my mouse? Make sure another mouse is not installed. -
Page 130: Speakers
Speakers What should I do if my speakers do not work? Make sure your speakers are properly connected and the volume is turned up loud enough to hear sound. Make sure your speakers are designed for computer use. If your speakers have a muting button, set the button to off. If you have connected an audio cable to the headphones jack, disconnect the cable and use the speaker cable supplied with your speakers. -
Page 131: Touch Pad
Touch Pad What should I do if the touch pad does not work? Try restarting your computer. Press the Ctrl+Alt+Delete keys simultaneously. In the Windows Task Manager window, select Restart from the Shut Down menu to restart the computer. If the pointer does not move while playing a disc, press the Ctrl+Alt+Delete keys simultaneously to stop playback and restart your computer. -
Page 132: Keyboard
Keyboard What should I do if the keyboard configuration is wrong? The language layout of your computer's keyboard is specified on the sticker on the box. If you choose a different regional keyboard when you complete the Windows setup, the key configuration will be mismatched. To change the keyboard configuration, follow these steps: Click Start and then Control Panel Click Date, Time, Language and Regional Options, and click Regional and Language Options. -
Page 133: Floppy Disks
Floppy Disks Why doesn't the Safely Remove Hardware icon appear on the taskbar when the drive is connected? Your computer does not recognize the floppy disk drive. First, make sure the USB cable is properly connected to the USB port. If you need to secure the connection, wait a few moments for the computer to recognize the drive. If the icon still does not appear, follow these steps: Close all programs that were accessing the floppy disk drive. -
Page 134: Pc Cards
Make sure the PC Card is compatible with the Microsoft Windows operating system installed on your computer. See the manual that came with your PC Card for more information. You may need to install driver software if you are not using a Sony PC Card. Why doesn't my computer recognize attached devices? For some PC Cards, if you alternate between normal power operation and the Standby or Hibernate modes while the card is inserted into the PC Card slot, your computer may not recognize the PC Card or the connected device. -
Page 135: Audio/Video
Sony used only to designate that a product contains an IEEE 1394 connection. The i.LINK connection may vary, depending on the software applications, operating system, and compatible i.LINK devices. All products with an i.LINK connection may not communicate with each other. -
Page 136: Memory Stick Media
Using recorded music requires permission of the copyright holders. Sony is not responsible for music files that cannot be recorded from a CD or downloaded from other sources. Can I copy images from a digital camera using Memory Stick media? Yes, and you can view video clips that you have recorded with Memory Stick media-compatible digital cameras. -
Page 137: Peripherals
Peripherals What should I do if I cannot connect a USB device? If applicable, check the USB device is turned on and using its own power supply. For example, if you are using a digital camera, check the battery is charged. If you are using a printer, check the power cable is connected properly to the AC outlet. -
Page 138: Support Options
Sony Computing Support This service provides instant access to information on commonly encountered problems. Type a description of the problem and the Knowledge Database searches for the corresponding solutions online. You can visit the Sony online support Web site at http://esupport.sony.com/EN/VAIO/... - Page 139 For users in Latin American countries or areas Customer Information Center If you do not find the information you are looking for at our site, you may call Sony directly. In order to receive the fastest and most efficient services, please have the following information readily available:...
- Page 140 In order to contact a Sony technical support representative, please call the following numbers: In Argentina: (011) 6770-SONY (7669) In Mexico: In Mexico City: 5002-9819 In the Mexican Republic: 01-800-759-7669 In Colombia: 01-800-550-7000 In Peru: 0-801-1-7000 or 511-6100 In Chile:...
-
Page 141: Program Support Information
Program Support Information Depending on the computer model and particular configuration you purchased, your computer may not include all of the software programs listed below. Contacts for Sony software products are listed below: For users in USA Web Site http://esupport.sony.com/EN/VAIO/... - Page 142 ® America Online (Dial-Up) America Online, Inc. For users in USA and Canada Web Site http://www.aol.com ® Music Now America Online, Inc. For users in USA and Canada Web Site http://www.premiumservices.aol.com ® Explorer America Online, Inc. For users in USA and Canada Web Site http://www.aol.com ®...
- Page 143 Click to DVD software Sony Electronics Inc. At the touch of a button, Click to DVD software allows you to automatically burn DVDs from a digital video (DV) device. Create DVDs by capturing video content straight from a DV device or by importing video from stored files — and you can also edit the video.
- Page 144 DVgate Plus software Sony Electronics Inc. Connect a compatible digital video camera to your computer's i.LINK® port and capture video clips and still images. Edit clips from your video, add new clips, and combine clips into new movie segments. Save your movies back to your digital video camera or in a variety of popular file formats.
- Page 145 60-Day Trial Version of Microsoft The Microsoft Office 2003 60-Day Trial software included with this computer system is intended for evaluation purposes only. The software has been installed and you must activate the software before you can use it. Product activation procedures will be detailed during initial launch of the software; activation requires Internet access.
- Page 146 ® SonicStage software Sony Electronics Inc. The SonicStage jukebox software program gives you all the tools you need to manage music on your computer. SonicStage software supports high-quality digital audio storage, a sleek player skin design, and audio CD burning capability.
- Page 147 ™ SonicStage Mastering Studio software Sony Electronics Inc. Use SonicStage Mastering Studio software to record songs from analog records or cassette tapes into your computer and output them to CDs, DVDs, or audio files in WAV format. For contacts about the software, see Program Support Information ®...
- Page 148 For contacts about the software, see Program Support Information ® VAIO Security Center Sony Electronics Inc. Sony cares about your VAIO personal computer. The VAIO Security Center highlights some of the security features your machine includes. For contacts about the software, see Program Support Information (page 141).
- Page 149 TV programs and burn them to DVD. For contacts about the software, see Program Support Information (page 141). ® computer up to date by regularly checking the Sony Online Support (page 141). (page 141).
- Page 150 Telephone 510-651-0888 Wireless Setup Utility Sony Electronics Inc. The Wireless Setup Utility walks you through setting up your wireless network connection and offers useful diagnostic tests to help keep your wireless network running smoothly. For contacts about the software, see Program Support Information ™...
- Page 151 © 2006 Sony Corporation...