Table of Contents
Advertisement
Advertisement
Table of Contents

Related Manuals for Miele KMDA 7774


Summary of Contents for Miele KMDA 7774
- Page 1 Operating and installation instructions Ceramic cooktops with induction To prevent the risk of accidents or damage to the appliance, it is essential to read these instructions before it is installed and used for the first time. en-AU, NZ M.-Nr. 10 732 580...
-
Page 2: Table Of Contents
Contents Warning and Safety instructions................ 5 Caring for the environment ................ 18 Overview....................... 19 Cooktop with extractor..................19 Controls / Indicators....................20 Cooktop...................... 20 Extractor ...................... 21 Cooking zone data ....................22 Before using for the first time ................ 23 Cleaning the cooktop for the first time.............. - Page 3 Installation examples..................... 64 Installation dimensions – Surface-mounted ............. 65 Worktop depth 600 mm ..................66 Worktop depth greater than 600 mm ..............68 Installation dimensions – Flush................ 70 KMDA 7774 FL ...................... 70 Worktop depth 600 mm ..................71 Worktop depth greater than 600 mm ..............73...
- Page 4 Contents Change extraction direction ................ 75 Installation...................... 77 Connection to window contact, if required ............77 Installation of surface-mounted cooktops ............79 Flush-fit installation ....................80 Exhaust ducting.................... 81 Electrical connection .................. 82 Service........................ 84 Contact in case of fault ..................84 Data plate: ......................
-
Page 5: Warning And Safety Instructions
They contain important notes on installation, safety, use and maintenance. Miele cannot be held liable for non-compliance with these instructions. Keep these instructions in a safe place and ensure that new users... - Page 6 This cooktop is not suitable for outdoor use. It is intended only to cook food and keep it warm. Any other use is not supported by Miele and could be dangerous. This appliance is not intended for use by persons (including...
- Page 7 Warning and Safety instructions Safety with children Young children must not be allowed to use this appliance. Older children may only use the appliance when its operation has been clearly explained to them and they are able to use it safely, recognising the dangers of misuse.
- Page 8 Repairs and other work by unqualified persons could be dangerous. Installation, maintenance work and repairs to electrical appliances must only be carried out by a Miele approved service technician. A damaged appliance is dangerous. Check it for any visible damage.
- Page 9 The manufacturer's warranty will be invalidated if the appliance is not repaired by a Miele approved service technician. Faulty components must only be replaced by genuine Miele spare parts. The manufacturer can only guarantee the safety of the appliance when Miele replacement parts are used.
- Page 10 Warning and Safety instructions If the cooktop is installed behind a furniture door, do not close the door while the cooktop is in operation. Heat and moisture can build up behind the closed door. This can result in damage to the cooktop, the housing unit and the floor.
- Page 11 Warning and Safety instructions Using at the same time as other heating appliances that depend on the air from the room Danger of toxic fumes! Great care should be taken when using the extractor in the same room or the same area of the house as another heating appliance that depends on the air from the room.
- Page 12 Warning and Safety instructions In order to ensure safe operation and to prevent gases given off by the heating appliance from being drawn back into the room when the extractor and the heater are both operated simultaneously, an underpressure in the room of 4 Pa (0.04 mbar) is the maximum permissible.
- Page 13 Warning and Safety instructions Correct use The cooktop gets hot when in use and remains hot for a while after being switched off. There is a danger of burning until the residual heat indicators go out. Oil and fat can overheat and catch fire. Do not leave the cooktop unattended when cooking with oil and fat.
- Page 14 Warning and Safety instructions You could burn yourself on the hot cooktop. Protect your hands with heat-resistant pot holders or gloves when handling hot pots and pans. Do not let them get wet or damp, as this causes heat to transfer through the material more quickly with the risk of scalding or burning yourself.
- Page 15 Warning and Safety instructions Only use pots and pans with smooth bases. Rough bases will scratch the ceramic glass. Lift pans into position on the cooktop. Sliding them into place can cause scuffs and scratches. Induction heating works extremely quickly. Therefore, the base of the pan could heat up to the temperature at which oil or fat self- ignites within a very short time.
- Page 16 Warning and Safety instructions If the cookware only partially covers a cooking zone or extended zone, the handle could become very hot. Always place cookware in the middle of a cooking zone or extended zone! Deposits of grease and dirt will prevent the extractor from working properly.
- Page 17 The steam could reach the electrical components and cause a short circuit. Accessories Use only genuine original Miele spare parts. If spare parts or accessories from other manufacturers are used, the warranty will be invalidated, and Miele cannot accept liability.
-
Page 18: Caring For The Environment
Caring for the environment Disposal of the packing Disposing of your old material appliance The transport and protective packaging Electrical and electronic appliances has been selected from materials which often contain valuable materials. They are environmentally friendly for also contain specific materials, disposal, and can normally be recycled. -
Page 19: Overview
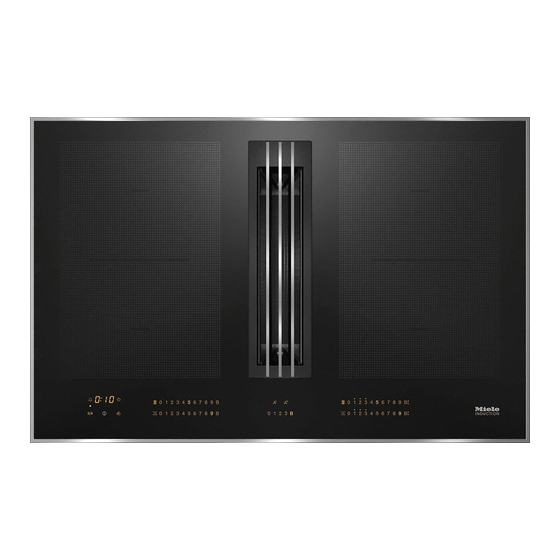
Overview Cooktop with extractor a PowerFlex cooking zone cd can be combined to form a PowerFlex cooking area b PowerFlex cooking zone e Controls / Indicators ab can be combined to form a f Grille PowerFlex cooking area c PowerFlex cooking zone g Grease filter d PowerFlex cooking zone h Removable drip tray... -
Page 20: Controls / Indicators
Overview Controls / Indicators Cooktop Sensor controls a For switching the cooktop on/off b Stop & Go c Wipe protection d Switching PowerFlex cooking zones on together/separately e Activating/Deactivating the keeping warm function f Numerical keybank For setting power levels/minute minder and switch-off times g Automatic switch-off selector for cooking zones h Minute minder Indicator lights... -
Page 21: Extractor
Overview Extractor a Numerical keybank for setting the power level b Sensor control for the 5 minute run-on option c Sensor control for the 15 minute run-on option d Clean grease filter indicator e Reactivate charcoal filter indicator... -
Page 22: Cooking Zone Data
Overview Cooking zone data Ø in cm* Cooking zone Rating in watts for 230 V** 15–23 Normal 2100 TwinBooster, level 1 3000 TwinBooster, level 2 3650 15–23 Normal 2100 TwinBooster, level 1 3000 TwinBooster, level 2 3650 + 22–23 / Normal 3400 15 x 23–23 x 39... -
Page 23: Before Using For The First Time
Before using for the first time Please stick the extra data plate for Switching on the cooktop for the appliance supplied with this the first time documentation in the space provided The metal components have a in the “Service” section of this protective coating which may give off a booklet. -
Page 24: Induction
Induction How it works When the appliance is switched on either deliberately or by mistake, An induction coil is located under each or when there is residual heat cooking zone. When a cooking zone is present, there is the risk of any metal switched on, this coil creates a items placed on the cooktop (e.g. -
Page 25: Noises
Induction Noises When using an induction cooking zone, the following noises can occur in the pan, depending on what it is made of and how it has been constructed. On the higher power settings, it might buzz. This will decrease or cease altogether when the power setting is reduced. -
Page 26: Cookware
Induction – To make optimum use of the cooking Cookware zones, choose pans with a suitable Suitable pans include: base diameter (see chapter “Cooking zones”). If the pan is too small, it will – stainless steel pans with a base that not be recognised and the set power can be magnetised, level will flash in the numerical... -
Page 27: How The Extractor Works
How the extractor works The extractor can be operated in one of Operating hours counter the following ways: The number of hours that the extractor has been used for is stored in memory. Air extraction mode When the grease filter symbol or the The air is drawn in and cleaned by the charcoal filter symbol ... -
Page 28: Tips On Saving Energy
Tips on saving energy – Use a lid whenever possible to – Clean or replace the filters at regular minimise heat loss. intervals. Heavily soiled filters reduce performance, increase the risk of fire – Select a smaller pan when cooking and are unhygienic. -
Page 29: Cooking Zone Power Levels
Cooking zone power levels The cooking zones are set as standard with 9 power levels. If you wish to fine-tune a setting, you can extend the power level range to 17 power levels (see “Programming”). Power level range Default Extended setting settings (9 power (17 power... -
Page 30: Operation
Operation Operating principles Malfunction due to dirty and/or covered sensors: This ceramic cooktop is equipped with If the sensors are dirty or covered, electronic sensor controls which react this could cause them to fail to react, to finger contact. For safety reasons, in to activate a function or even to order to switch the cooktop on, the On/ switch the cooktop off automatically... -
Page 31: Switching On The Cooktop
Operation Switching off a cooking zone/ Fire hazard! the cooktop Do not leave the cooktop unattended whilst it is being used. To switch off a cooking zone, touch Please note that the heating up time the 0 sensor for that cooking zone. on induction cooktops is significantly ... -
Page 32: Setting The Power Level - Extended Setting Range
Operation Setting the power level - PowerFlex area extended setting range The PowerFlex cooking zones combine automatically to form a PowerFlex Touch the numerical keybank in cooking area when you place a between two number sensors. sufficiently large pot or pan on them The sensors in front of and after the (see “Guide to the appliance - interim level will light up brighter than... -
Page 33: Auto Heat-Up
Operation Auto heat-up Continued Heat-up time cooking setting [min : sec] When Auto heat-up has been activated, the cooking zone switches on approx. 0 : 15 automatically at the highest setting and approx. 0 : 15 then switches to the continued cooking setting which you have previously approx. -
Page 34: Booster
Operation In each case two cooking zones are Booster linked together in order to provide The cooking zones are equipped with a sufficient power for the Booster. While TwinBooster. the Booster is in operation some of the power is taken away from the linked When activated, the power is boosted cooking zone. -
Page 35: Keeping Warm
Operation Activating/Deactivating the keeping Keeping warm warm function This function is for keeping food warm Touch the sensor for the cooking which has just been cooked and is still zone you wish to use. hot. It is not for reheating food that has gone cold. -
Page 36: Extractor
Operation Run-on time Extractor It is advisable to run the fan for a few The extractor will switch itself on minutes after cooking has finished. This automatically if a there is a pan on a helps to neutralise any lingering cooking zone and a power level has vapours and odours in the air. -
Page 37: Timer
Timer The cooktop has to be switched on if The functions can be used at the same you wish to use the timer. time. The shortest time is always You can set a duration between displayed and the sensor (minute 1 minute (:) and 9 hours 59 minutes minder) or the indicator light for the cooking zone (automatic switch-off) -
Page 38: Switching Off A Cooking Zone Automatically
Timer Changing the switch-off time Switching off a cooking zone automatically Touch the sensor repeatedly until the indicator light for the zone you You can set a time after which the require flashes. cooking zone will switch off automatically. -
Page 39: Additional Functions
Additional functions Stop & Go Recall When Stop & Go is activated, the power If the cooktop is switched off of all cooking zones in use is reduced to inadvertently during operation, this power level 1. The power level of the function can be used to reset all extractor is not reduced. -
Page 40: Wipe Protection
Additional functions Wipe protection Displaying cooktop data The model designation and software The cooktop sensors can be locked version can be displayed. There must for 20 seconds in order, for example, not be any pots or pans on the to remove soiling. The sensor cooktop. -
Page 41: Safety Features
Safety features The safety lock is activated when the System lock / Safety lock cooktop is switched on. When the The safety lock is deactivated if there safety lock is activated, the cooktop is a break in the mains electricity can be operated only under certain supply. - Page 42 Safety features Activating the safety lock Touch and hold the and sensors at the same time for 6 seconds. The time counts down in the timer display. will appear once the time has elapsed. The safety lock is activated.
-
Page 43: Safety Switch-Off
Safety features Safety switch-off Power level* Maximum operating time [h:min] Safety switch-off if the sensors are Safety setting covered Your cooktop will switch off 10:00 8:00 5:00 automatically if one or several of the sensors remain covered for longer than 10:00 7:00 4:00... -
Page 44: Overheating Protection
– The set power level will be reduced. If, despite removing the cause, the overheating protection mechanism – The cooking zone switches off triggers again, contact Miele. automatically. flashes in the timer display alternating with . You can use the cooking zones again as usual when the fault message has gone out. -
Page 45: Programming
Programming You can adapt the programming of the code you want appears in the display cooktop to your personal needs. or touch the appropriate number on Several settings can be altered in the numerical keybank. succession. How to save the settings After accessing the programming ... - Page 46 C:01 System lock activated automatically P:09 Maximum operating time C:00 Safety setting 0 C:01 Safety setting 1 C:02 Safety setting 2 P:10 Miele@home/Con@ctivity C:00 Not available C:01 Signed off C:02 Signed on P:12 Sensor controls reaction C:00 Slow speed C:01...
- Page 47 Programming Settings Programme Code P:15 Permanent pan recognition C:00 Not active C:01 Active Programmes not shown here have no allocation. The factory setting is shown in bold. After switching the cooktop on, appears in the timer display for several seconds. In the text and charts, the extended power levels are shown with a dot after the number for better understanding.
-
Page 48: Cleaning And Care
Cleaning and care Allow the cooktop to cool down Danger of burning! before cleaning. The cooking zones must be switched off. The cooktop needs to cool Clean the cooktop after every use. down. Dry the cooktop thoroughly every ... - Page 49 Then clean the ceramic glass surface with the Miele ceramic and stainless steel cooktop cleaner (see “optional accessories”) or with a proprietary ceramic glass cleaner applied with kitchen paper or a clean cloth.
-
Page 50: Extractor Drip Tray
Cleaning and care Extractor drip tray Grease filter / Extraction grille Clean the drip tray if liquid from food The extraction grille and the reusable being spilled or boiling over has got into metal grease filter collect solid matter the extractor. from kitchen vapours (grease, dust etc.) and therefore prevent soiling of the ... -
Page 51: Resetting The Grease Filter Operating Hours Counter
Cleaning and care Cleaning the grease filter and the Resetting the grease filter extraction grille by hand operating hours counter Clean the extraction grille and the After cleaning the grease filter, the grease filter with a soft nylon brush in operating hours counter needs to be a mild solution of hot water and a reset. -
Page 52: Problem Solving Guide
With the help of the following guide, minor faults in the performance of the appliance, some of which may result from incorrect operation, can be remedied without contacting Miele. This will save you time and money because you won't need a service call. - Page 53 Problem solving guide Problem Possible cause and remedy After the cooktop has The system lock or safety lock is activated. been switched on or a Deactivate the system lock or safety lock (see sensor has been “System lock / Safety lock”). touched, ...
- Page 54 The cooktop is incorrectly connected. with in the timer Disconnect the cooktop from the mains electricity display and a tone is supply. sounding. Contact Miele. The cooktop must be connected to the mains according to the wiring diagram.
- Page 55 Interrupt the power supply to the cooktop for digit number in the approx. 1 minute. timer display. If the problem persists after power is restored, please contact Miele. alternating with a number flashes in the The overheating protection mechanism has been timer display.
- Page 56 Problem solving guide Problem Possible cause and remedy The sensor is lit up. The charcoal filter needs to be reactivated. If the extractor is being operated in Recirculation mode, proceed as described in the operating and installation instructions supplied with the recirculation box.
-
Page 57: Optional Accessories
Original Miele all purpose microfibre Saucepans and frying pans cloth Miele offers a wide range of pans which are perfect for Miele cooktops. Please refer to the Miele website for more details on individual products. – Pans in various sizes Removes finger marks and light soiling. -
Page 58: Miele@Home/Con@Ctivity
Miele@home/Con@ctivity Signing on the cooktop Signing off the cooktop To sign the cooktop onto Miele@home, If you want to sign the cooktop off from prepare the logging-on process on the Miele@home, first carry out the signing master appliance. off procedure on the master appliance. -
Page 59: Safety Instructions For Installation
Safety instructions for installation The appliance must only be installed and connected to the electricity supply by a suitably qualified and competent person in strict accordance with current national and local safety regulations. Fit the wall units and rangehood before fitting the cooktop to avoid damaging the cooktop. -
Page 60: Safety Distances
Safety distances Safety distance above the cooktop The safety distance specified by the manufacturer of the rangehood must be maintained between the cooktop and the rangehood above it. For any flammable objects, e.g. utensil rails, wall units etc., a minimum safety distance of 600 mm must be maintained between these objects and the highest part of the cooktop below. - Page 61 Safety distances Safety distances to the sides and back of the appliance Ideally the cooktop should be installed with plenty of space on either side. The minimum distance shown below must be maintained between the back of the cooktop and a tall unit or wall. Ideally the cooktop should be installed with plenty of space on either side.
-
Page 62: Installation Notes
Installation notes Tiled worktop All dimensions in this instruction booklet are given in mm. Installation of surface- mounted cooktops Seal between the cooktop and the worktop Grout lines and the hatched area underneath the cooktop frame must be smooth and even. If they are not, the cooktop will not sit flush with the worktop and the sealing strip underneath the cooktop will not provide... -
Page 63: Flush-Fit Installation
Installation notes The cooktop can be installed Flush-fit installation – directly in a suitable cut-out in a Flush-fit installation is only possible in natural stone worktop, natural stone (granite, marble), solid wood and tiled worktops. Certain – in a suitable cut-out in a solid wood, models are suitable for building into tiled or glass worktop with a wooden glass worktops - please see advice... -
Page 64: Installation Examples
Installation notes Installation examples Recirculation mode Extraction mode... -
Page 65: Installation Dimensions - Surface-Mounted
Installation dimensions – Surface-mounted a Front KMDA 7774 FL b Removable drip tray c Mains connection box with mains connection cable, L = 1440 mm d Air duct connection – at the back (ex-works) e Air duct connection - on the right... -
Page 66: Worktop Depth 600 Mm
Installation dimensions – Surface-mounted Worktop depth 600 mm KMDA 7774 FL a Housing unit back panel The housing unit back panel must be removable for service work. The housing unit wall and an adjoining room wall or furniture housing must be at least 110 mm apart to ensure sufficient room for the ducting. - Page 67 Installation dimensions – Surface-mounted Extraction to the rear (standard) Extraction to the right Extraction to the left...
-
Page 68: Worktop Depth Greater Than 600 Mm
Installation dimensions – Surface-mounted Worktop depth greater than 600 mm KMDA 7774 FL a Housing unit back panel The housing unit back panel must be removable for service work. The housing unit wall and an adjoining room wall or furniture housing must be at least 110 mm apart to ensure... - Page 69 Installation dimensions – Surface-mounted Extraction to the rear (standard) Extraction to the right Extraction to the left...
-
Page 70: Installation Dimensions - Flush
Installation dimensions – Flush a Front KMDA 7774 FL b Removable drip tray c Mains connection box with mains connection cable, L = 1440 mm d Stepped cut-out e Wooden frame (to be provided on site) f Air duct connection – at the back... -
Page 71: Worktop Depth 600 Mm
Installation dimensions – Flush Worktop depth 600 mm KMDA 7774 FL a Housing unit back panel The housing unit back panel must be removable for service work. The housing unit wall and an adjoining room wall or furniture housing must be at least 110 mm apart to ensure sufficient room for the ducting. - Page 72 Installation dimensions – Flush Extraction to the rear (standard) Extraction to the right Extraction to the left...
-
Page 73: Worktop Depth Greater Than 600 Mm
Installation dimensions – Flush Worktop depth greater than 600 mm KMDA 7774 FL a Housing unit back panel The housing unit back panel must be removable for service work. The housing unit wall and an adjoining room wall or furniture housing must be at least 110 mm apart to ensure sufficient room for the ducting. - Page 74 Installation dimensions – Flush Extraction to the rear (standard) Extraction to the right Extraction to the left...
-
Page 75: Change Extraction Direction
Change extraction direction Rotating the fan Place the cooktop on its ceramic surface on a soft underlay. Rotate the fan by 90°. Secure the fan by the 5 screws. Make sure that the plastic edge is on the ... - Page 76 Change extraction direction Extraction to the left Undo the 4 screws on the frame. Guide the cable under the fan. Reattach the cable tie. Refit the 4 screws in the frame. Loosen the cable tie. ...
-
Page 77: Installation
Installation Connection to window contact, if required The window contact is connected to the mains voltage! Danger of electric shock! Disconnect the cooktop from the mains electricity supply before connecting the switching mechanism. The connection cable of the switching system must only be connected by a suitably qualified and competent electrician. - Page 78 Installation Exchange the jumper with the connection cable of the switching system. Close the casing. Tighten the strain relief screw. Reinsert the plug.
-
Page 79: Installation Of Surface-Mounted Cooktops
Installation Installation of surface- mounted cooktops Create the worktop cut-out. Remember to maintain the minimum safety distances (see “Safety distances”). Seal the cut surfaces of wooden worktops with a suitable heat- resistant sealant to avoid swelling caused by moisture. The sealant must be temperature-resistant. -
Page 80: Flush-Fit Installation
Installation Flush-fit installation Create the worktop cut-out. Remember to maintain the minimum safety distances (see “Safety distances”). Solid wood, tiled and glass worktops: Fix a wooden frame 5.5 mm below the top edge of the worktop (see building-in diagram for “Flush-fit installation”). -
Page 81: Exhaust Ducting
Exhaust ducting If the extractor is used at the same time as a heating appliance that relies on oxygen from the same room, there is a risk of toxic fumes. It is essential that the “Warning and Safety instructions” are observed. The extractor should be installed according to local and national ... -
Page 82: Electrical Connection
For extra safety, it is advisable to repair work is dangerous to users. protect the appliance with a suitable Miele cannot be held liable for residual current device (RCD) with a trip damage or injury caused by incorrect range of 30 mA. - Page 83 200-240 V~ accordance with current local and national safety regulations in order to avoid a hazard. When replacing the mains connection cable, please use cable type H 05 VV-F with a suitable cross-section. These cables are available from the manufacturer or from Miele.
-
Page 84: Service
Service Contact in case of fault In the event of any faults which you cannot remedy yourself, please contact Miele. Contact information for Miele can be found at the end of this document. Please quote the model and serial number of your appliance when contacting Miele. - Page 87 Miele Experience Centre South Melbourne: Freemans Bay, Auckland 1011 206-210 Coventry Street South Melbourne, VIC 3205 Miele Experience Centre Auckland: Miele Experience Centre and Office Sydney: 8 College Hill 3 Skyline Place Freemans Bay, Auckland 1011 Frenchs Forest, NSW 2086 Telephone:...
- Page 88 KMDA 7774 en-AU, NZ M.-Nr. 10 732 580 / 00...