Table of Contents
Advertisement
Quick Links
Advertisement
Chapters
Table of Contents

Related Manuals for Yamaha RCX142


Summary of Contents for Yamaha RCX142
- Page 1 YAMAHA 4-AXIS ROBOT CONTROLLER RCX142 User’s Manual ENGLISH E92-Ver. 1.09...
- Page 3 Introduction Our sincere thanks for your purchase of this YAMAHA robot controller. This manual explains how to install and operate the robot controller. Be sure to read this manual carefully as well as related manuals and comply with their instructions for using the YAMAHA robot controllers safely and correctly.
- Page 4 Safety precautions (Be sure to read before using) Before using the YAMAHA robot controller, be sure to read this manual and related manu- als, and follow their instructions to use the robot controller safely and correctly. Warning and caution items listed in this manual relate to YAMAHA robot controllers.
- Page 5 [System design safety points] WARNING • Refer to this manual for details on the operating status of the robot controller and to related instruction manuals. Design and configure the system including the robot controller so that it will always work safely. •...
- Page 6 • When performing maintenance of the robot controller under instructions from the YAMAHA or YAMAHA sales dealer, turn off the robot controller and wait for at least 30 minutes. Some components in the robot controller may be hot or still retain a high voltage shortly after operation, so burns or electrical shocks may occur if those parts are touched.
- Page 7 Before using the robot controller (Be sure to read the following notes.) Please be sure to perform the following tasks before using the robot controller. Failing to perform these tasks will require absolute reset for setting the origin position each time the power is turned on or may cause abnormal operation (vibration, noise). [1] When connecting the power supply to the robot controller Reference Always make a secure connection to the ground terminal on the robot controller to...
- Page 8 YAMAHA robot models and simplifies maintenance. 5. CE marking* As a YAMAHA robot series product, the RCX series robot controller is designed to conform to machinery directives, low-voltage directives and EMC (Electromagnetic compatibility) directives. In this case, the robot controller is set to operate under SAFE mode.
-
Page 9: Table Of Contents
1. System overview ................2-1 Main system configuration ..............2-1 Axis definition for the RCX142 series ..........2-3 2. Part names and functions............2-4 RCX142 (Maximum number of axes: 4 axes) ........2-4 RCX142-T ................... 2-4 3. Controller system ..............2-5 RCX142 ....................2-5 RCX142-T ................... - Page 10 6. Connecting the MPB programming box ........3-10 7. I/O connections ............... 3-11 8. Connecting a host computer ............3-12 9. Connecting the absolute battery ..........3-13 10. Replacing the absolute battery ..........3-16 11. Connecting a regenerative unit ..........3-17 12. Precautions for cable routing and installation ......3-18 12.1 Wiring methods ................
- Page 11 9. “AUTO” mode .................4-25 Automatic operation ................. 4-27 Stopping the program ................ 4-28 Resetting the program ............... 4-29 Switching task display ............... 4-32 Switching the program ..............4-33 Changing the automatic movement speed ......... 4-34 Executing the point trace ..............4-34 9.7.1 PTP motion mode ...................
- Page 12 11. “MANUAL” mode ..............4-71 11.1 Manual movement ................4-74 11.2 Displaying and editing point data ............. 4-77 11.2.1 Point data input and editing ................4-78 11.2.1.1 Restoring point data ..................4-79 11.2.2 Point data input by teaching ................4-80 11.2.3 Point data input by direct teaching ..............
- Page 13 12.2 Communication parameters ............4-187 12.3 OPTION parameters ............... 4-193 12.3.1 Setting the area check output ................ 4-194 12.3.2 Setting the “SERVICE” mode ................. 4-199 12.3.2.1 Saving the “SERVICE” mode parameters ............4-204 12.3.2.2 Help display in “SERVICE” mode ..............4-204 12.3.3 SIO settings ....................
- Page 14 2.2.3.1 Point data input by teaching ................5-9 2.2.3.2 Input by point data direct teaching ..............5-10 2.2.4 Pallet definition ....................5-10 2.2.4.1 Setting the point in pallet definition by teaching ..........5-11 2.2.4.2 Pallet definition by teaching ................5-11 2.2.5 Changing the manual movement speed ............
- Page 15 Character code table ................8-8 Connecting to a PC ................8-9 Chapter 9 Specifications 1. Controller basic specifications ...........9-1 RCX142 basic specifications ............... 9-1 RCX142-T basic specifications ............9-2 2. Controller basic functions............9-3 3. Robot controller external view ..........9-4 RCX142 external view ................ 9-4 RCX142-T external view ..............
- Page 16 [ 3] Program file operating errors ................... 10-9 [ 4] Data entry and edit errors ..................10-11 [ 5] Robot language syntax (compiling) errors ............. 10-11 [ 6] Robot language execution errors ................10-19 [ 9] Memory errors ...................... 10-24 [10] System setting or hardware errors .................
-
Page 17: Chapter 1 Safety
Chapter 1 Safety Contents 1. Safety ....................1-1 1.1 Safety precautions during robot operation ..........1-2 1.2 Safety precautions during maintenance ........... 1-2 1.3 Motor overload precautions ..............1-2 1.4 Warning labels ..................1-3 1.5 Warning marks ..................1-3 2. Warranty ..................1-4 3. - Page 18 MEMO...
-
Page 19: Safety
1. Safety Please observe all safety rules and cautions to ensure safe and correct use of the YAMAHA robot. Also, bear in mind that not all safety items can be listed in detail, so that accurate judgment by the operator or service personnel is essential for operating the robot and controller safely. -
Page 20: Safety Precautions During Robot Operation
The robot must be operated by a person who has received the proper training on safety and operation from YAMAHA or an authorized YAMAHA sales dealer. b. During operation of the robot, be sure to stay out of the work area of the robot manipulator. -
Page 21: Warning Labels
1. Safety Warning labels The warning labels shown below are affixed to the controller. To use the YAMAHA robot and controller safely and correctly, be sure to observe the instructions and caution on the labels. a. “Electric Hazard” label C A U T I O N ELECTRIC HAZARD This label warns you of possible electrical shock. -
Page 22: Warranty
2. Warranty The YAMAHA robot and/or related product you have purchased are warranted against the defects or malfunctions as described below. Warranty description: If a failure or breakdown occurs due to defects in materials or workmanship in the genuine parts constituting this YAMAHA robot and/or related product within the warranty period, then YAMAHA will repair or replace those parts free of charge (hereafter called "warranty... -
Page 23: Operating Environment
3. Operating environment Operating temperature The ambient temperature should be maintained within a range of 0 to 40°C during operation. This is the range in which continuous operation of the robot controller is guaranteed according to the initial specifications. If the robot controller is installed in a narrow space, then heat generated from the controller itself and from peripheral equipment may drive the temperature above the allowable operating temperature range. - Page 24 MEMO...
-
Page 25: Chapter 2 System Overview
1.1 Main system configuration ..............2-1 1.2 Axis definition for the RCX142 series ............2-3 2. Part names and functions ..............2-4 2.1 RCX142 (Maximum number of axes: 4 axes) ........... 2-4 2.2 RCX142-T ....................2-4 3. Controller system ................2-5 3.1 RCX142 .................... - Page 26 MEMO...
-
Page 27: System Overview
Main system configuration Configuration 1: System for controlling one robot Example : YK500X All the axes on the robot controller are used as the main robot axes. Fig. 2-1-1 System for controlling one robot B A T YAMAHA robot... - Page 28 Axes 1 and 2 on the robot controller are used as the main robot axes and axes 3 and 4 are used as the main auxiliary axes. Fig. 2-1-2 System for controlling one robot and auxiliary axes B A T YAMAHA robot...
-
Page 29: Axis Definition For The Rcx142 Series
1. System overview Axis definition for the RCX142 series Axis definitions for the YAMAHA RCX142 series robot controller are shown below. Robot Main group (MG) Main robot (MR) Main robot axis (M?) controller (RC) Main robot auxiliary axis (m?) Subgroup (SG) -
Page 30: Part Names And Functions
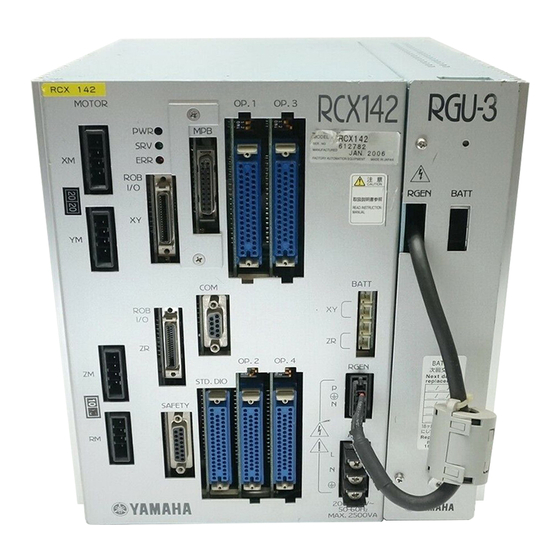
2. Part names and functions RCX142 (Maximum number of axes: 4 axes) Fig. 2-2-1 RCX142 MOTOR OP.1 OP.3 MODEL. SER. NO. MANUFACTURED FACTORY AUTOMATION EQUIPMENT MADE IN JAPAN 注意 CAUTION 取扱説明書参照 READ INSTRUCTION MANUAL BATT OP.2 OP.4 RGEN STD.DIO SAFETY... -
Page 31: Controller System
3. Controller system The basic block diagram of the RCX robot controller system is shown below. RCX142 Fig. 2-3-1 D POWER BOARD ASSY CN10 HEATSINK MOTOR DRIVER2 BOARD ASSY ROB I/O XY ROB I/O ZR DRIVER1 BOARD ASSY SAFETY CN10... -
Page 32: Rcx142-T
3. Controller system RCX142-T Fig. 2-3-2 D POWER BOARD ASSY CN10 HEATSINK MOTOR DRIVER2 BOARD ASSY ROB I/O XY ROB I/O ZR DRIVER1 BOARD ASSY SAFETY CN10 CN10 CN13 CPU BOARD ASSY STD.DIO OP.BOARD OP.BOARD... -
Page 33: Optional Devices
The expansion I/O board used in the robot controller has 24 general-purpose input points and 16 general-purpose output points. The RCX142 holds a maximum of 4 expansion I/O boards, and the RCX142-T holds a maximum of 2 expansion I/O boards. -
Page 34: Basic Sequence From Installation To Operation
5. Basic sequence from installation to operation The basic sequence from installation to actual operation is shown below. Refer to this sequence to use the RCX142 series safely, correctly and effectively. Before beginning the work, read this user's manual thoroughly. -
Page 35: Chapter 3 Installation
Chapter 3 Installation Contents 1. Unpacking ..................3-1 Packing box ..................3-1 Unpacking .................... 3-1 2. Installing the robot controller ............3-2 Installation .................... 3-2 Installation methods ................3-3 3. Connector names ................3-5 4. Connecting to the power ..............3-6 AC200 to 230V single-phase specifications ........... - Page 36 MEMO...
-
Page 37: Unpacking
The robot controller is high precision equipment and is carefully packed in a cardboard box to avoid shocks and vibrations. If there is any serious damage or dents on the packing box, please notify your YAMAHA sales dealer without unpacking the box. Unpacking The robot controller is packed with accessories as shown below, according to the order specifications. -
Page 38: Installing The Robot Controller
Installation Fig. 3-2-1 CAUTION 50mm or more 1. When carrying the robot controller, use a dolly or similar hand truck and move it carefully RCX142 MOTOR OP.1 OP.3 to avoid dropping and resultant MODEL. damage. SER. NO. -
Page 39: Installation Methods
2. Installing the robot controller Installation methods There are 4 methods for installing the robot controller as explained below. 1) Using the rubber feet (attached as standard parts) Fig. 3-2-2-1 2) Attaching the L-type brackets (supplied as standard accessories) to the front Fig. - Page 40 2. Installing the robot controller 3) Attaching the L-type brackets (supplied as standard accessories) to the rear CAUTION • When attaching the L-type Fig. 3-2-2-3 brackets to the rear of the controller, provide a clearance of at least 30mm between the rear panel and wall or other objects.
-
Page 41: Connector Names
Connector for dedicated input/output and standard general-purpose STD.DIO input/output. Connectors attached to optional expansion I/O boards. OP.1-4 (OP.2 and OP.4 cannot be used with RCX142-T.) BATT [XY/ZR] Battery connector for absolute backup. Connector for regenerative unit. REGN [P/ (Cannot be connected to RCX142-T.) Terminal block for power cable. -
Page 42: Connecting To The Power
Prepare a suitable power supply while referring to the tables below. regulated within ±10%. If the voltage drops, the robot controller may issue Controller: RCX142 an abnormal voltage alarm causing the robot to trigger emergency stop. (1) When connected to SCARA robot... - Page 43 Power capacity (VA) X-axis Y-axis Z-axis R-axis 1000 1200 1100 1400 1600 1300 1500 1800 2100 1400 1700 2000 2200 2500 * Axis current sensor values can be substituted for each other. Controller: RCX142-T Robot model Power capacity (VA) YK120X,150X...
-
Page 44: Installing An External Leakage Breaker
3. Make sure that the controller is securely grounded. R C X 1 4 2 4mA(MAX) 4. Stray capacitance between the cable and FG may vary RCX142-T 2mA(MAX) depending on the cable installation condition, causing the leakage current to fluctuate. Installing a circuit protector... -
Page 45: Connecting The Robot Cables
A misconnection will cause the robot to malfunction. Connected to YAMAHA robot • Keep robot cables separate from the robot controller power connection lines and other equipment power lines. Using them in close contact with lines carrying power may cause malfunctions. -
Page 46: Connecting The Mpb Programming Box
6. Connecting the MPB programming box As shown in the figure below, the MPB should be connected to the MPB connector on the front panel of the robot controller. If not connecting the MPB, plug an MPB terminator (supplied as an accessory) into the MPB connector. -
Page 47: I/O Connections
7. I/O connections The various input/output (I/O) signals from peripheral equipment can be connected to the robot con- troller. Each I/O is set with a number, and the I/O connector to be used depends on that number. For more detailed information on inputs and outputs, see Chapter 6, "Parallel I/O interface" or see Chapter 7, "SAFETY I/O interface". -
Page 48: Connecting A Host Computer
COM connector on the front of the robot controller and the RS-232C port of the computer. For more detailed information on the RS-232C interface, see “RS-232C Interface” in Chapter 8. Fig. 3-8-1 Host computer connection RCX142 MOTOR OP.1 OP.3 MODEL. -
Page 49: Connecting The Absolute Battery
9. Connecting the absolute battery The absolute batteries are fully charged at factory prior to shipping. However, the battery connectors are left disconnected to prevent discharge. After installing the controller, always be sure to connect the absolute battery as shown in this manual, before connecting the robot cable. - Page 50 9. Connecting the absolute battery Parallel connection CAUTION When connecting in parallel use the 1) Connect the absolute battery connectors to the "BATT XY/ZR" connectors on the same batteries. front right of the controller as shown below. In this case, connect the two absolute batteries each to the "BATT XY" and/or "BATT ZR"...
- Page 51 (KS4-M53G0-100) Parallel connection 1360h years. • Contact YAMAHA when the *1) YAMAHA exclusive battery name. battery specifications differ. *2) Time at ambient temperature of 20°C. *3) Time after power is off with the absolute battery fully charged.
-
Page 52: Replacing The Absolute Battery
Parallel connection 1360h guide changes according to the ambient temperature, etc., but is *1) YAMAHA exclusive battery name. approximately one and a half *2) Time at ambient temperature of 20°C. years. *3) Time after power is off with the absolute battery fully charged. -
Page 53: Connecting A Regenerative Unit
RGEN connector on the RGU-2 regenerative unit, by using the cable that comes with the regenerative unit. Fig. 3-11 NOTE • The RCX142-T does not require a regenerative unit. The RCX142 may require a regenerative unit depending on the robot type to be connected. -
Page 54: Precautions For Cable Routing And Installation
6) Do not extend the ground wire longer than necessary. The ground wire should be as short as possible. Refer to the drawing below when making the cable connections. Fig. 3-12-1 I/O cable RCX142 MOTOR OP.1 OP.3 MODEL. SER. NO. -
Page 55: Precautions For Installation
12. Precautions for cable routing and installation 12.2 Precautions for installation This robot controller is not designed with an explosion-proof, dust-proof or drip-proof structure. Do not install it in the following locations or environments (1) where exposed to flammable gases or liquids. (2) where conductive debris such as metal cutting chips are spread. -
Page 56: Checking The Robot Controller Operation
• SAFETY connector (supplied) (Pin 3 is shorted to pin 13, and pin 4 is shorted to pin 14 in the SAFETY connector.) 13.1 Cable connection Fig. 3-13-1 B A T Neutral Power cable Earth SAFETY connector (supplied) YAMAHA robot... -
Page 57: Emergency Stop Input Signal Connection
13. Checking the robot controller operation 13.2 Emergency stop input signal connection Fig. 3-13-2 RCX142 CAUTION External emergency stop and the RCX142 MPB emergency stop button are Emergency stop button disabled when pin 13 and pin 14 are MPB connector directly shorted to each other on the SAFETY connector. -
Page 58: Operation Check
13. Checking the robot controller operation 13.3 Operation check After connecting the robot and special connector (supplied) to the controller, turn on the NOTE An interlock signal always appears power to the controller and check the following points. because no connection is made to the STD. -
Page 59: Chapter 4 Operation
Chapter 4 Operation Contents 1. Operation overview ................. 4-1 2. The RCX robot controller ..............4-2 Part names .................... 4-2 Main functions ..................4-2 3. MPB programming box ..............4-3 Part names .................... 4-3 Main functions ..................4-4 Connection to the robot controller ............4-5 4. - Page 60 9. “AUTO” mode ................4-25 Automatic operation ................4-27 Stopping the program ................4-28 Resetting the program ................. 4-29 Switching task display ................. 4-32 Switching the program ................ 4-33 Changing the automatic movement speed ........... 4-34 Executing the point trace ..............4-34 9.7.1 PTP motion mode ................
- Page 61 11.“MANUAL” mode ................4-71 11.1 Manual movement ................4-74 11.2 Displaying and editing point data ............4-77 11.2.1 Point data input and editing ..............4-78 11.2.1.1 Restoring point data ................4-79 11.2.2 Point data input by teaching ..............4-80 11.2.3 Point data input by direct teaching ............4-84 11.2.4 Point jump display ................
- Page 62 12.1.4 Parameters for option boards .............. 4-181 12.1.4.1 Option DIO setting ................4-182 12.1.4.2 Serial I/O setting ................... 4-183 12.1.4.3 Setting the network parameters ............. 4-185 12.2 Communication parameters .............. 4-187 12.3 OPTION parameters ................. 4-193 12.3.1 Setting the area check output ............. 4-194 12.3.2 Setting the “SERVICE”...
-
Page 63: Operation Overview
1. Operation overview The controller configuration and main functions are shown below. Set up the equipment as needed according to the operation to be performed. Fig. 4-1-1 Operation overview Programming box MPB MPB is used for • robot operation • programming •... -
Page 64: The Rcx Robot Controller
2. The RCX robot controller Part names Controller front panel Fig. 4-2-1 Part names and layout 2 “POWER” LED 3 “SERVO” LED 4 “ERROR” LED RCX142 MOTOR OP.1 OP.3 MODEL. SER. NO. MANUFACTURED FACTORY AUTOMATION EQUIPMENT MADE IN JAPAN 5 MPB connector... -
Page 65: Mpb Programming Box
3. MPB programming box The MPB is connected to the robot controller and allows you to edit or execute robot programs. Part names Fig. 4-3-1 MPB programming box q Display (liquid crystal screen) t UPPER button y LOWER button e Emergency stop button u Display contrast adjustment trimmer (side of MPB) w Sheet key... -
Page 66: Main Functions
3. MPB programming box Main functions q Display (liquid crystal screen) This is a liquid crystal display (LCD) with 40 characters × 8 lines, showing various types of information. The screen contrast is adjustable. w Sheet keys Use these keys to operate the robot or edit programs. The sheet keys are grouped into 3 main types: function keys, control keys and data keys. -
Page 67: Connection To The Robot Controller
Connect the MPB programming box to the MPB connector on the front panel of the robot controller. Connect the cable securely since poor connections might cause malfunctions or breakdowns. Fig. 4-3-2 Robot controller connection MPB programming box RCX142 MOTOR OP.1 OP.3 MODEL. SER. NO. -
Page 68: Turning Power On And Off
4. Turning power on and off This section explains how to turn power on and off, assuming that the external emergency stop circuit and other necessary units are connected according to the instructions in Chapter 3, "Installation", and also that the robot controller operates correctly. 1) Connect the MPB to the MPB connector on the front panel of the robot controller. -
Page 69: Operation Keys
5. Operation keys MPB screen The MPB screen display is composed of 4 areas as shown below. 1) System line (1st line) The current mode and its hierarchy are displayed on the 1st line at the top left of the screen. -
Page 70: Operation Key Layout
5. Operation keys Operation key layout The operation keys are covered with a plastic sheet to prevent dust. There are 3 main kinds of keys. 1) Function keys 2) Control keys 3) Data keys Fig. 4-5-2 Sheet key layout Function key Control key Data key... -
Page 71: Basic Key Operation
5. Operation keys Basic key operation 1) Each operation key has 3 different functions as shown below. Use the key as needed to enable various functions. UPPER LOWER Fig. 4-5-3 Key configuration Shift 1 Shift 3 Shift 2 2) There are 3 ways (shift 1 to shift 3) to use each operation key. Shift Example of key input Input data... -
Page 72: Function Keys
5. Operation keys Function keys To operate the MPB, select the menus by pressing the function keys. The relation of the function keys to their menus in “MANUAL” mode is shown below. Function key Selected menu (F 1) POINT F 11 (F 2) PALLET F 12... - Page 73 5. Operation keys Relation of function keys to menus Fig. 4-5-4 Function keys and menus MANUAL 50%[MG][S0H0J] Current position *M2= 0 *M3= *M4= POINT PALLET VEL+ VEL- ↓ ↓ ↓ ↓ ↓ [F1] [F2] [F3] [F4] [F5] ∧ SHIFT HAND UNITCHG VEL++ VEL—...
-
Page 74: Control Keys
5. Operation keys Control keys There are 6 kinds of control keys: (1) Mode selection keys, (2) Extended function keys, (3) Cursor keys, (4) Page keys, (5) Edit keys, (6) Jog keys. The functions of each key are explained below. (1) Mode selection keys : Displays the mode menu (highest hierarchy). - Page 75 5. Operation keys (5) Edit keys These keys are enabled when the editing cursor is displayed. : Toggles between Insert and Overwrite modes. The cursor “_” appears in Overwrite mode and “ ” appears in Insert mode. : Deletes one character at the cursor position. : Inserts one line at the cursor position.
-
Page 76: Data Keys
5. Operation keys : Moves axis 6 in the + direction. : Moves axis 6 in the - direction. Data keys The data keys are used for data input, programming and data editing. There are 2 kinds of data keys. (1) Alphanumeric keys : Enters numbers. -
Page 77: Emergency Stop
6. Emergency stop If for some reason you want to stop the robot immediately during operation, press the emergency stop button on the MPB. Pressing the emergency stop button cuts off power to the robot to stop operation. A message as shown below appears on the MPB screen. The highlighted display for the mode name is cancelled during emergency stop. -
Page 78: Emergency Stop Reset
6. Emergency stop Emergency stop reset To return to normal operation after emergency stop, emergency stop must be reset. NOTE • Emergency stop can also be triggered by an emergency stop 1) Cancel the emergency stop button on the MPB. input from the SAFETY I/O Emergency stop is released by turning the emergency stop button clockwise. - Page 79 6. Emergency stop 5) Press the (On) key to turn on the motor power. At the same time, the servomotor sets to HOLD status. The mode name “UTILITY” on the system line (1st line) is highlighted. NOTE If the motor power is turned off due to Fig.
-
Page 80: Mode Configuration
7. Mode configuration The robot operation mode consists of the following modes. Basic operation modes “SERVICE” mode “DI/DO “AUTO” “MANUAL” “PROGRAM” “SYSTEM” “UTILITY” monitor” mode mode mode mode mode mode “SERVICE” mode can be used only when “SAFE” mode is enabled. Basic operation modes Robot operation is classified into 5 basic modes as follows. -
Page 81: Other Operation Modes
Use the key to select this mode. DISPLAY (2) "UTILITY" mode Use this mode to perform maintenance of the YAMAHA robots such as recovery from emergency stop and motor servo on/off switching. Use the key to select this UTILITY... -
Page 82: Mode Hierarchy
7. Mode configuration Mode hierarchy Robot operation is mainly performed by pressing the function keys to select the desired mode from the menu. (Refer to the “Mode hierarchy diagram” described later.) When the controller is turned on, the “MANUAL” mode menu first appears on the screen. Pressing the key displays the 4 basic modes on the guideline (bottom line) of the MODE... - Page 83 7. Mode configuration Functions are switched with the shift keys. The menu display changes UPPER LOWER while this shift key is pressed. Fig. 4-7-3 Shift keys UPPER LOWER Fig. 4-7-4 Function switching NOTE • When the data is being edited such as in “EDIT”...
- Page 84 7. Mode configuration Mode hierarchy diagram F1 AUTO F1 PTP/ARCH/LINEAR F1 RESET F2 ARCHPOS (when F1 is ARCH) F2 TASK F3 JUMP F3 DIR F4 VEL+ F4 VEL+ F5 VEL- F5 VEL- F6 A.AXIS+ (when F1 is ARCH) F7 A.AXIS- (when F1 is ARCH) UNITCHG F9 VEL++ F6 POINT...
- Page 85 7. Mode configuration F4 SYSTEM F1 PARAM F1 ROBOT F1 EDIT F2 JUMP F2 AXIS F1 EDIT F2 JUMP F3 OTHER F1 EDIT F2 JUMP F5 OP. BRD F10 PASSWRD F2 CMU F1 EDIT F2 JUMP F3 OPTION F1 POS.OUT F1 EDIT F2 JUMP F2 SERVICE...
-
Page 86: Service" Mode
8. “SERVICE” mode “SERVICE” mode can be used only when “SAFE” mode is enabled. Use “SERVICE” mode to perform safe maintenance work with the MPB while within the safety enclosure of the robot system. This mode can be selected by turning DI02 (“SERVICE” mode) OFF. Operation device CAUTION •... -
Page 87: Auto" Mode
9. “AUTO” mode “AUTO” mode executes robot language programs and related tasks. The initial “AUTO” mode screens are shown in Fig. 4-9-1 and Fig. 4-9-2. Fig. 4-9-1 “AUTO” mode (one-robot setting) e Automatic movement speed r Program name q Mode hierarchy w Task display t Message line y Online command... - Page 88 9. “AUTO” mode y Online command execution mark When an online command is being executed, an “@” mark is displayed in the second column on the second line. This mark changes to a dot ( . ) when the online command ends.
- Page 89 9. “AUTO” mode Valid keys and submenu descriptions in “AUTO” mode are shown below. Valid keys Menu Function Cursor key Scrolls the program listing. ( ↑ / ↓ ) Page key Switches to other screens. Resets the program. RESET Changes the program listing according to each task. TASK Changes the current program.
-
Page 90: Automatic Operation
9. “AUTO” mode Automatic operation Program commands are executed continuously during automatic operation. Before starting automatic operation, make sure that return-to-origin, program debugging, I/O signal connections and point data teaching have already been completed. When the execution NOTE level is set to other than level 0, automatic operation is possible even if return-to-origin is Regardless of the execution level, some incomplete. -
Page 91: Stopping The Program
9. “AUTO” mode Stopping the program [Procedure] 1) Press the key during program execution to stop the program. STOP Fig. 4-9-4 Program stop screen AUTO [T1] 100% <TEST1 > CAUTION Do not turn off the robot controller RESET TASK VEL+ VEL- during program execution. -
Page 92: Resetting The Program
9. “AUTO” mode Resetting the program To restart a program stopped with the key from the beginning, reset the program. STOP [Procedure] NOTE The output is also reset when the Fig. 4-9-5 Program reset program is reset. However, the output will not be reset when a sequence program is being executed without AUTO... - Page 93 9. “AUTO” mode When the program “_SELECT” exists: 1) Press the (RESET) key in “AUTO” mode. The following message appears on the guideline when “_SELECT” exists among the programs. Press the (YES) key to reset the selected program by switching it to “_SELECT”, or press the (NO) key to just reset the current program.
-
Page 94: Switching Task Display
9. “AUTO” mode Switching task display When a program executing multiple tasks is stopped, the program listing for each task can be displayed. [Procedure] 1) Press the key during program execution to stop the program. STOP 2) Press the key to display the program listing. The pointer indicates the next command line number to be executed in the current task. -
Page 95: Switching The Program
9. “AUTO” mode Switching the program If the program displayed on the screen is not the one you want to execute, it can be switched to another program. [Procedure] NOTE 1) Press the (DIR) key in “AUTO” mode. The output is also reset when the Program information appears. -
Page 96: Changing The Automatic Movement Speed
9. “AUTO” mode Changing the automatic movement speed NOTE When two robots are specified, two speeds are displayed for “ main group Automatic movement speed for the selected robot group can be set within the range of 1 ”. The speed shown sub group to 100%. - Page 97 9. “AUTO” mode Valid keys and submenu descriptions in “AUTO > POINT” mode are shown below. Valid keys Menu Function Cursor key Switches the point number and scrolls the screen. ( ↑ / ↓ ) Page key Switches to other screens. PTP/ARCH/ Switches the trace movement mode.
-
Page 98: Ptp Motion Mode
9. “AUTO” mode 9.7.1 PTP motion mode 1. When no auxiliary axis is specified: [Procedure] 1) Press the key in “AUTO>POINT” mode to display a screen like that shown below, then press the (PTP) key to select the PTP motion mode. Fig. - Page 99 9. “AUTO” mode 2. When auxiliary axis is specified: [Procedure] 1) Press the key in “AUTO>POINT” mode to display a screen like that shown below, then press the (PTP) key. Fig. 4-9-15 Point trace screen in PTP motion mode (with auxiliary axis) AUTO >POINT [RIGHTY] 50/100% [MG][S0H0J]...
-
Page 100: Arch Motion Mode
9. “AUTO” mode 9.7.2 ARCH motion mode 1. When no auxiliary axis is specified: [Procedure] 1) Press the key in “AUTO>POINT” mode to display a screen like that shown below, then press the (ARCH) key. Fig. 4-9-18 Point trace screen in ARCH motion mode (with no auxiliary axis) AUTO>POINT [RIGHTY] 50/100% [MG][S0H0J] ————————————x———————y———————z———————r———... - Page 101 9. “AUTO” mode 2. When auxiliary axis is specified: [Procedure] 1) Press the key in “AUTO>POINT” mode to display a screen like that shown below, then press the (ARCH) key. Settings in steps 2) and 3) are not required when performing point trace using an auxiliary axis.
-
Page 102: Linear Interpolation Motion Mode
9. “AUTO” mode 9.7.3 Linear interpolation motion mode 1. When no auxiliary axis is specified: [Procedure] 1) Press the key in “AUTO>POINT” mode to display a screen like that shown below, then press the (LINEAR) key. Fig. 4-9-24 Point trace screen in linear interpolation motion mode (with no auxiliary axis) AUTO >POINT [RIGHTY]... - Page 103 9. “AUTO” mode 2. When auxiliary axis is specified: [Procedure] 1) Press the key in “AUTO>POINT” mode to display a screen like that shown below, then press the (LINEAR) key. Fig. 4-9-26 Point trace screen in linear interpolation motion mode (with auxiliary axis) AUTO>POINT [RIGHTY] 50/100% [MG][S0H0J] ————————————x———————y———————z———————r———...
-
Page 104: Direct Command Execution
9. “AUTO” mode Direct command execution In “AUTO>DIRECT” mode, one line of the command statement can be executed just after you have entered it. [Procedure] 1) Press the (DIRECT) key in “AUTO” mode. The screen switches to “AUTO>DIRECT” mode and the cursor appears on the screen. The prompt (>) also appears on the bottom line of the screen. -
Page 105: Break Point
9. “AUTO” mode Break point An ongoing program can be stopped if a break point is set in the program. This is useful when debugging the program. The program execution pauses on the line just prior to a break point. The program execution NOTE will restart from the break point when the key is pressed. -
Page 106: Deleting Break Points
9. “AUTO” mode 9.9.2 Deleting break points Break points can be deleted. Press the (SEARCH) key as needed to find a break point that was set. [Procedure] 1) Use the cursor (↑/↓) keys to select the line number where the break point is set. 2) Press the (CANCEL) key. -
Page 107: Executing A Step
9. “AUTO” mode 9.10 Executing a step [Procedure] WARNING 1) Press the (STEP) key in “AUTO” mode. The robot may begin to move F 11 when STEP is executed. To avoid danger, do not enter the robot movement range. 2) Each time this key is pressed, the command statement of the highlighted line number is executed. -
Page 108: Program" Mode
10. “PROGRAM” mode Robot language programs can be edited, deleted and managed in “PROGRAM” mode. The initial “PROGRAM” mode screen is shown in Fig. 4-10-1. On entering “PROGRAM” mode, the currently selected program appears on the screen. Fig. 4-10-1 “PROGRAM” mode Online command Mode hierarchy Message line... -
Page 109: Scrolling A Program Listing
10. “PROGRAM” mode Valid keys and submenu descriptions in “PROGRAM” mode are shown below. Valid keys Menu Function Cursor key Selects the program and scrolls the screen. ( ↑ / ↓ ) Page key Switches the page display. EDIT Edits the program. Displays the program data. -
Page 110: Program Editing
10. “PROGRAM” mode 10.2 Program editing [Procedure] 1) Press the (EDIT) key in “PROGRAM” mode. A cursor appears on the top line of a program listing as shown in Fig. 4-10-2, allowing program editing. 2) Use the cursor keys to move the cursor to the position to be edited and enter a program command with the MPB. - Page 111 10. “PROGRAM” mode Valid keys and submenu descriptions in “PROGRAM > EDIT” mode are shown below. Valid keys Menu Function Cursor key Moves the cursor and scrolls the screen. ( ↑ / ↓ ) Page key Switches the page display. Switches between Insert and Overtype modes.
-
Page 112: Cursor Movement
10. “PROGRAM” mode 10.2.1 Cursor movement [Procedure] 1) Pressing the cursor (↑/↓) keys in “PROGRAM>EDIT” mode moves the cursor up or down one line at a time. Pressing the cursor (←/→) keys moves the cursor right or left one character at a time. 2) Pressing the page ( ) key moves the cursor one page <<... -
Page 113: Inserting A Line
10. “PROGRAM” mode 2) Press the key again. The cursor changes back to a thick line ( ), and the screen returns to Overwrite mode. In Overtype mode, the input character replaces the character at the cursor position. Fig. 4-10-5 Overtype mode PROGRAM >EDIT <TEST2... -
Page 114: Deleting A Line
10. “PROGRAM” mode 10.2.5 Deleting a line [Procedure] Pressing the ) key in the “PROGRAM > EDIT” mode deletes L.DEL LOWER one line at the cursor position. The program lines after the cursor position then move upward. For example, deleting one line on the screen in Fig. -
Page 115: Quitting Program Editing
10. “PROGRAM” mode 10.2.7 Quitting program editing Press the key to quit program editing in “PROGRAM>EDIT” mode. 10.2.8 Specifying the copy/cut lines [Procedure] 1) In “PROGRAM>EDIT” mode, move the cursor to the line you want to copy or cut. 2) Press the (SELECT) key to select the line. -
Page 116: Cutting The Selected Lines
10. “PROGRAM” mode 10.2.10 Cutting the selected lines [Procedure] After selecting the lines in “10.2.8”, press the (CUT) key. The data on the selected lines are cut and stored into the buffer. The “ “ marks then disappear. Fig. 4-10-11 Cutting the selected lines PROGRAM >EDIT <TEST2... -
Page 117: Line Jump
10. “PROGRAM” mode 10.2.13 Line jump [Procedure] 1) In “PROGRAM>EDIT” mode, press the (JUMP) key to enter “PROGRAM>EDIT>JUMP” mode. The message “Enter line no. > “ appears on the guideline. Fig. 4-10-13 Line jump PROGRAM >EDIT <TEST2 > ——————————————————————————————————————————— 1 ’***** TEST2 PROGRAM ***** GOTO *_’... -
Page 118: Searching A Character String
10. “PROGRAM” mode 10.2.14 Searching a character string [Procedure] 1) In “PROGRAM>EDIT” mode, press the (FIND) key to enter “PROGRAM>EDIT>FIND” mode. The message “Character string >” appears on the guideline. 2) Enter the character string you want to search for and press the key. -
Page 119: Directory
10. “PROGRAM” mode 10.3 Directory When the (DIR) key is pressed in “PROGRAM” mode, information on each NOTE A maximum of 100 programs can be program appears as shown below. stored. Fig. 4-10-17 Program information (1) PROGRAM >DIR <TEST1 > Name Line Byte... -
Page 120: Cursor Movement
10. “PROGRAM” mode Valid keys and submenu descriptions in “PROGRAM >DIR” mode are shown below. Valid keys Menu Function Cursor key Selects the program or scrolls the screen vertically. ( ↑ / ↓ ) Cursor key Switches between the program information display and the date/time display. (←... -
Page 121: Directory Information Display
10. “PROGRAM” mode Fig. 4-10-19 Registering a new program NOTE The following program names have special meanings. PROGRAM >DIR <TEST1 > “FUNCTION” “SEQUENCE” Name Line Byte RW/RO “_SELECT” “COMMON” TEST1 (Refer to “Programming Manual” for 2 *TEST2 these programs.) PARTS100 TEST100 1968 Enter program name >ABC123_... -
Page 122: Copying A Program
10. “PROGRAM” mode 10.3.4 Copying a program A program in the directory can be copied under a different name. [Procedure] 1) In “PROGRAM>DIR” mode, use the cursor (↑/↓) keys to select the program to be copied. 2) Press the (COPY) key to enter “PROGRAM>DIR>COPY” mode. The message “Enter program name >“... -
Page 123: Erasing A Program
10. “PROGRAM” mode 10.3.5 Erasing a program Unnecessary programs in the directory can be erased. [Procedure] 1) In “PROGRAM>DIR” mode, use the cursor (↑/↓) keys to select the program to be erased. 2) Press the (ERASE) key to enter “PROGRAM>DIR>ERASE” mode. A confirmation message appears on the guideline. -
Page 124: Renaming A Program
10. “PROGRAM” mode 10.3.6 Renaming a program To change the names of programs in the directory, proceed as follows. [Procedure] 1) In “PROGRAM>DIR” mode, use the cursor (↑/↓) keys to select the program to be renamed. 2) Press the (RENAME) key to enter “PROGRAM>DIR>RENAME” mode. The message “Enter program name”... -
Page 125: Changing The Program Attribute
10. “PROGRAM” mode 10.3.7 Changing the program attribute Editing and erasing the programs can be prohibited by specifying the program attribute. There are two program attributes: RW and RO. Each time a change is made a program attribute is alternately switched. 1. -
Page 126: Creating A Sample Program Automatically
10. “PROGRAM” mode 10.3.9 Creating a sample program automatically This section explains the procedure of automatically creating a sample program for defin- ing user function keys which can be used in “MANUAL” and “PROGRAM” modes. [Procedure] 1) In “PROGRAM>DIR” mode, press the (EXAMPLE) key to enter F 15 NOTE... - Page 127 10. “PROGRAM” mode [Sample program listing] *** <FUNCTION> SAMPLE PROGRAM **** '*You can change any statements '*as you like. '*<FUNCTION> will help you in '*MANUAL and PROGRAM mode. '********************************************************* *M_F1:'DO(20)ALTERNATE DO(20)= ~ DO(20) *M_F2:'DO(21)ALTERNATE DO(21)= ~ DO(21) *M_F3:'DO(22)ALTERNATE DO(22)= ~ DO(22) *M_F4:'DO(23)ALTERNATE DO(23)= ~ DO(23) *M_F5:'DO(24)ALTERNATE...
-
Page 128: Compiling
10. “PROGRAM” mode 10.4 Compiling To compile the program and create an executable object program, follow the procedure below. The object program allows you to check input errors or bugs after program editing. [Procedure] 1) In “PROGRAM>DIR” mode, select the program to compile with cursor (↑/↓) keys and press the key. -
Page 129: Line Jump And Character String Search
10. “PROGRAM” mode 10.5 Line jump and character string search (JUMP), (FIND), (FIND+) and (FIND-) keys can be used in the same way as in “PROGRAM>EDIT” mode. Refer to “10.2.13 Line jump” and “10.2.14 Searching a character string” earlier in this chapter.) 10.6 Registering user function keys To register the user function keys which are used in “PROGRAM”... - Page 130 10. “PROGRAM” mode Fig. 4-10-31 Registering “FUNCTION” program (2) PROGRAM >DIR <FUNCTION> Name Line Byte RW/RO TEST1 2 *TEST2 PARTS100 FUNCTION INFO 5) Press the (EDIT) key to enter “PROGRAM>EDIT” mode. A cursor appears on the first line. 6) Enter a command statement for registering function keys in the following format. The command statement format differs between the “PROGRAM”...
- Page 131 10. “PROGRAM” mode When registering function keys for I/O commands in “MANUAL” mode *M_F<n>:’<character string> <I/O statement 1> <I/O statement 2> <n> ....... Function key number to be registered (n=1 to15) <character string> ..Character string to be assigned to the function key (displayed on the screen).
-
Page 132: Resetting An Error In The Selected Program
10. “PROGRAM” mode 10.7 Resetting an error in the selected program If an error “9.1 Program destroyed” occurs in the selected program data, this function resets the error and allows you to continue editing. [Procedure] 1) Press the (ERR. RST) key in “PROGRAM” mode. F 13 A confirmation message appears on the guideline. -
Page 133: Manual" Mode
11. “MANUAL” mode Point data and shift data coordinates can be defined and edited in “MANUAL” mode. The initial “MANUAL” mode screens are shown in Fig. 4-11-1, Fig. 4-11-2 and Fig. 4- 11-3. Fig. 4-11-1 “MANUAL” mode (one-robot setting) r SHIFT/HAND w Manual movement q Mode hierarchy /coordinate units... - Page 134 11. “MANUAL” mode q Mode hierarchy Shows the current mode hierarchy. When the highest mode (“MANUAL” in this case) is highlighted it means the servomotor power is on. When not highlighted it means the servomotor power is off. w Manual movement speed Shows the robot movement speed selected for manual operation.
- Page 135 11. “MANUAL” mode Valid keys and submenu descriptions in “MANUAL” mode are shown below. Valid keys Menu Function Jog key Moves the robot manually. Switches to the point data processing screen. POINT Switches to the pallet data processing screen. PALLET Increases manual movement speed for the selected robot group in VEL+ steps.(1→5→20→50→100 %)
-
Page 136: Manual Movement
11. “MANUAL” mode 11.1 Manual movement WARNING The robot starts to move when a Jog key is pressed. To avoid In “MANUAL” mode, you can manually move the robot with the Jog keys as explained danger, do not enter the robot below. - Page 137 11. “MANUAL” mode 1) When "X" is displayed (When not in "Tool coordinate" mode) When a Jog key is pressed, the robot arm tip moves in the corresponding direction on the Cartesian coordinates. If auxiliary axis setting is made, then the robot moves only along the corresponding axis.
- Page 138 11. “MANUAL” mode If robot movement beyond the +/- soft limits is attempted with the Jog keys, the error message “2.1: Over soft limit” appears and the robot does not move. Likewise, if robot movement beyond the shift coordinate range is attempted, the error message “2.11: Exceeded shift coord.
-
Page 139: Displaying And Editing Point Data
11. “MANUAL” mode 11.2 Displaying and editing point data Press the (POINT) key in “MANUAL” mode to enter “MANUAL>POINT” mode. This mode allows you to display and edit the point data. NOTE One point is made up of data from 6 axes (x, y, z, r, a, b). When two robots (main and sub Note that the hand system flag can be set as an extended function for the point data set robots) are specified, the point data... -
Page 140: Point Data Input And Editing
11. “MANUAL” mode Valid keys and submenu descriptions in “MANUAL>POINT” mode are shown below. Valid keys Menu Function Cursor key Specifies the point data and scrolls the screen. (↑/↓) Page key Switches to other screens. ( / ) Enters point data with keys. EDIT Enters point data by teaching. -
Page 141: Restoring Point Data
11. “MANUAL” mode 3) Use the keys to enter the – SPACE point data. Enter a space to separate between the data for x, y, z, r, a, b. The data input formats are as follows. • To enter the data in joint coordinates (“pulse” units) Enter an integer of up to 8 digits. -
Page 142: Point Data Input By Teaching
11. “MANUAL” mode 11.2.2 Point data input by teaching NOTE Point data teaching cannot be The current position of the robot can be obtained as point data by teaching. performed when return-to-origin is incomplete. Perform point teaching When no auxiliary axis is used: after performing absolute reset. - Page 143 11. “MANUAL” mode 4) When point data is already allotted to the currently selected point number, a confirma- tion message appears on the guideline when the (TEACH) key is pressed. Fig. 4-11-12 Point data teaching (with no auxiliary axis [3]) MANUAL>POINT>TEACH 50%[MG][S0H0X] ————————————x———————y———————z———————r———...
- Page 144 11. “MANUAL” mode (AXIS ←) or (AXIS →) key to select the 2) Use the cursor (↑/↓) keys, F 14 F 15 axes to perform point teaching. As shown below, the point number at the left end should be highlighted when teaching on all axes.
- Page 145 11. “MANUAL” mode CAUTION 4) When the axis arrives at the target point, press the (TEACH) key. To perform teaching at a point on the Teaching is performed so that the current robot position data is allotted to the Cartesian coordinates (millimeter currently selected point.
-
Page 146: Point Data Input By Direct Teaching
11. “MANUAL” mode Fig. 4-11-20 Point data teaching (with auxiliary axis [8]) When teaching on auxiliary axis MANUAL>POINT 100%[MG][S0H0X] ————————————x———————y———————z———————r——— = 100.00 250.00 15.00 30.00 = 220.00 150.00 115.00 86.86 = 400.00 200.00 15.00 -30.00 NOTE COMNT: Point data teaching cannot be [POS] 212.43 152.31... -
Page 147: Copying Point Data
11. “MANUAL” mode NOTE 2) Enter the point number to jump to, and press the key. Valid point numbers are from 0 to A jump is made so that the point data is displayed from the designated point 9999. number. Fig. -
Page 148: Erasing Point Data
11. “MANUAL” mode NOTE 2) Use the keys to enter the point number range – Valid point numbers are from 0 to for the copy source and the point number for the copy destination in the following 9999. format and press the key. -
Page 149: Point Data Trace
11. “MANUAL” mode NOTE 2) Use the keys to specify the point number range in the – Valid point numbers are from 0 to 9999. following format and press the key. “(erase start number) - (erase end number)” For example, to erase the data between P30 and P34, enter “30-34” and press the key. -
Page 150: Point Comment Input And Editing
11. “MANUAL” mode 11.2.8 Point comment input and editing NOTE Press the (COMMENT) key in “MANUAL>POINT” mode. F 12 • Point comments can be entered for The data display on the screen does not change (same as “MANUAL>POINT” mode). point numbers having no data. The 5-digit area on the left shows point numbers, with the currently selected point num- •... -
Page 151: Point Data Input By Teaching
11. “MANUAL” mode 11.2.8.1 Point comment input and editing [Procedure] NOTE • For point comments, it is advisable 1) In “MANUAL>POINT>COMMENT” mode, use the cursor (↑/↓) keys to select the to enter a character string that is easy to understand. point to edit or enter a comment. -
Page 152: Jump To A Point Comment
11. “MANUAL” mode 11.2.8.3 Jump to a point comment [Procedure] 1) Press the (JUMP) key in “MANUAL>POINT>COMMENT” mode. NOTE Valid point numbers are from 0 to The message “Enter point no. >” appears on the guideline. 9999. Fig. 4-11-29 MANUAL>POINT>COMMENT 50%[MG][S0H0X] ————————————x———————y———————z———————r———... -
Page 153: Copying A Point Comment
11. “MANUAL” mode 11.2.8.4 Copying a point comment Point comments can be copied under another point number. [Procedure] 1) Press the (COPY) key in “MANUAL>POINT>COMMENT” mode. The message “Copy(####-####,####)>“ appears on the guideline. NOTE Valid point numbers are from 0 to 9999. -
Page 154: Erasing Point Comments
11. “MANUAL” mode 11.2.8.5 Erasing point comments Point comments already entered can be deleted. [Procedure] 1) Press the (ERASE) key in “MANUAL>POINT>COMMENT” mode. The message “Erase(####-####)>” appears on the guideline. NOTE Valid point numbers are from 0 to 9999. 2) Use the keys to specify the point number range in the –... -
Page 155: Point Comment Search
11. “MANUAL” mode 11.2.8.6 Point comment search Point comments already entered can be located. [Procedure] 1) Press the (FIND) key in “MANUAL>POINT>COMMENT” mode. F 11 NOTE The message “Character string >” appears on the guideline. A point comment can be up to 15 characters. -
Page 156: Point Data Error Reset
11. “MANUAL” mode 11.2.9 Point data error reset If an error “9.2 Point data destroyed” occurs in the point data, this function resets the error and allows you to continue editing. [Procedure] 1) Press the (ERR. RST) key in “MANUAL>POINT” mode. F 13 A confirmation message appears on the guideline. -
Page 157: Displaying, Editing And Setting Pallet Definitions
11. “MANUAL” mode 11.3 Displaying, editing and setting pallet definitions Press the (PALLET) key in “MANUAL” mode to enter “MANUAL>PALLET” mode. This mode allows you to display, edit and set pallet definitions. However, the standard coordinates must be set when a SCARA robot is used. Refer to “11.9 Setting the standard coordinates”... - Page 158 11. “MANUAL” mode Valid keys and submenu descriptions in “MANUAL>PALLET” mode are shown below. Valid keys Menu Function Cursor key Specifies the pallet definition number. (↑/↓) Page key Switches to other screens. ( / ) Edits pallet definitions. EDIT Sets the pallet definition point by teaching. METHOD Increases manual movement speed for the selected robot group in steps.
-
Page 159: Editing Pallet Definitions
11. “MANUAL” mode 11.3.1 Editing pallet definitions [Procedure] 1) In “MANUAL>PALLET” mode, select the pallet number with the cursor (↑/↓) keys. 2) Press the (EDIT) key to enter “MANUAL>PALLET>EDIT” mode. 3) Use the cursor (↑/↓) keys to move the cursor to the position you want edit. 4) Use the keys to enter the desired value. -
Page 160: Point Setting In Pallet Definition
11. “MANUAL” mode 11.3.1.1 Point setting in pallet definition NOTE • Each pallet is generated with 5 In “MANUAL>PALLET>EDIT” mode, a screen like that shown below is displayed. points for pallet definition. • These 5 points should be defined Fig. 4-11-41 in order from P[1] to P[5]. -
Page 161: Editing The Point In Pallet Definition
11. “MANUAL” mode 11.3.1.1.1 Editing the point in pallet definition NOTE • Each pallet is generated (outlined) [Procedure] with 5 points, so always specify these 5 points for pallet definition. 1) Press the (EDIT) key in “MANUAL>PALLET>EDIT>POINT” mode. • Point data in the pallet definition must be entered in “mm”... -
Page 162: Pallet Definition By Teaching
11. “MANUAL” mode 11.3.2 Pallet definition by teaching [Procedure] NOTE Pallets cannot be defined by teaching if 1) Select the pallet number in “MANUAL>PALLET” mode with the cursor (↑/↓) return-to-origin is incomplete. Perform keys. teaching after performing absolute reset. 2) Press the (METHOD) key to enter “MANUAL>PALLET>METHOD”... - Page 163 11. “MANUAL” mode 7) Enter the number of points NY and NZ (only when “3-D” is selected) as in step 6). 8) A confirmation message then appears after setting the number of points. Press the (YES) key to determine the setting. Press the (NO) key if you want to cancel the setting.
-
Page 164: Copying A Pallet Definition
11. “MANUAL” mode 11.3.3 Copying a pallet definition [Procedure] 1) Select the pallet number in “MANUAL>PALLET” with the cursor (↑/↓) keys. 2) Press the (COPY) key and then enter the pallet number where you want to copy the currently selected pallet definition. Fig. -
Page 165: Deleting A Pallet Definition
11. “MANUAL” mode 11.3.4 Deleting a pallet definition [Procedure] 1) Select the pallet number in “MANUAL>PALLET” mode with the cursor (↑/↓) keys. 2) Press the (ERASE) key. NOTE Pallet definition cannot be deleted if A confirmation message then appears asking if the currently selected pallet the currently selected pallet is definition is to be deleted. -
Page 166: Changing The Manual Movement Speed
11. “MANUAL” mode 11.4 Changing the manual movement speed Manual movement speed of the selected robot group can be set anywhere within the range from 1 to 100%. Movement speed in “MANUAL” mode is set separately from the “AUTO” mode movement speed. One-fifth of the maximum speed in “AUTO” mode is equal to the maximum movement speed in “MANUAL”... -
Page 167: Displaying, Editing And Setting Shift Coordinates
11. “MANUAL” mode 11.5 Displaying, editing and setting shift coordinates Press the (SHIFT) key in “MANUAL” mode to enter “MANUAL>SHIFT” mode. This mode allows you to display, edit and set shift coordinates. However, the standard coordinates must be set when a SCARA robot is used. Refer to “11.9 Setting the standard coordinates”... - Page 168 11. “MANUAL” mode Upon entering “MANUAL>SHIFT” mode, a screen like that shown in Fig. 4-11-51, Fig. 4-11-52 or Fig. 4-11-53 appears. The currently selected shift coordinate number is highlighted. Fig. 4-11-51 “MANUAL>SHIFT” mode (one-robot setting) MANUAL>SHIFT 50% [MG][S1H0X] ————————————x———————y———————z———————r——— 0.00 0.00 0.00 0.00...
- Page 169 11. “MANUAL” mode Valid keys and submenu descriptions in “MANUAL>SHIFT” mode are shown below. Valid keys Menu Function Cursor key Specifies the shift coordinate number. (↑/↓) Page key Switches to other screens. ( / ) EDIT Edits the shift coordinates. Sets the shift coordinates range.
-
Page 170: Editing Shift Coordinates
11. “MANUAL” mode 11.5.1 Editing shift coordinates [Procedure] 1) In the “MANUAL>SHIFT” mode, select a shift coordinate number with the cursor (↑/↓) keys 2) Press the (EDIT) key to enter “MANUAL>SHIFT>EDIT” mode. 3) Use the cursor (←/→) key to move the cursor to the position you want to change. 4) Use the keys to enter the –... -
Page 171: Restoring Shift Coordinates
11. “MANUAL” mode 11.5.1.1 Restoring shift coordinates [Procedure] During shift coordinate data editing, pressing the (UNDO) key reverses the last data input and restores the preceding data. This function is enabled only on lines that are not yet complete. 11.5.2 Editing the shift coordinate range By setting the shift coordinate range, the robot operating area can be restricted to the desired range on each shift coordinate. - Page 172 11. “MANUAL” mode 2) Press the (RANGE) key to enter the “MANUAL>SHIFT>RANGE” mode. A cursor for editing the shift coordinate range appears. Fig. 4-11-56 Editing shift coordinate range (1) MANUAL>SHIFT>RANGE 50% [MG][S1H0X] ————————————x———————y———————z———————r——— Range of shift coorinate [mm/deg] 0.00 0.00 0.00 0.00 0.00...
-
Page 173: Restoring A Shift Coordinate Range
11. “MANUAL” mode 11.5.2.1 Restoring a shift coordinate range [Procedure] During editing of shift coordinate range data, pressing the (UNDO) key reverses the last data input and restores the preceding data. This function is enabled only on lines that are not yet complete. 11.5.3 Shift coordinate setting method 1 This method sets the shift coordinate data by performing teaching at 2 points and then... - Page 174 11. “MANUAL” mode 3) Use the Jog keys to move the robot arm tip to teach point 1. (Position it accurately.) WARNING The robot starts to move when a Jog key is pressed. To avoid danger, do not enter the robot 4) Press the key, and the current position is then obtained as “1st P”.
-
Page 175: Shift Coordinate Setting Method 2
11. “MANUAL” mode 11.5.4 Shift coordinate setting method 2 This method sets the shift coordinate data by performing teaching at 2 points and then entering the coordinate values of those 2 points The Z value of teach point 1 becomes the Z value of the shift coordinate. Fig. - Page 176 11. “MANUAL” mode 4) Press the key to obtain the current position as “1st P”. An edit cursor appears at the head of the “1st P” line. Fig. 4-11-64 Shift coordinate setting MANUAL>SHIFT>METHOD2 50% [MG][S0H0X] NOTE ————————————x———————y———————z———————r——— Enter all point data (x, y, z) (x, y). If Enter the point data [mm] omitted, “0”...
-
Page 177: Displaying, Editing And Setting Hand Definitions
11. “MANUAL” mode 11.6 Displaying, editing and setting hand definitions Press the (HAND) key in “MANUAL” mode to enter “MANUAL>HAND” mode. This mode allows you to display, edit and set hand definitions. However, the standard coordinates must be set when a SCARA robot is used. Refer to “11.9 Setting the standard coordinates”... - Page 178 11. “MANUAL” mode Fig. 4-11-66 Hand definition screen (two-robot setting [1]) Main robot group is selected: MANUAL>HAND 50/50% [MG][S0H1X] ————————————1———————2———————3———————4——— 0.00 0.00 0.00 100.00 0.00 90.00 100.00 100.00 8000 100.00 100.00 [POS] 600.00 0.00 0.00 0.00 EDIT VEL+ VEL- Fig. 4-11-67 Hand definition screen (two-robot setting [2]) Sub robot group is selected: MANUAL>HAND 50/50%...
- Page 179 11. “MANUAL” mode Movement of each robot type and the parameter contents are shown below. (1) SCARA robots 1) Hand attached to 2nd arm a. Robot movement • Imaginary 2nd arm of hand “n” moves to a specified point as if it were the actual 2nd arm.
- Page 180 11. “MANUAL” mode 2) Hand attached to R-axis a. Robot movement Hand “n” moves towards a specified point while changing its movement direction. The direction to be changed is set for the specified point with an R value. Obstacles can therefore be avoided by changing the R value. b.
- Page 181 11. “MANUAL” mode (2) Cartesian robots 1) Hand attached to 2nd arm a. Robot movement • Hand “n” moves to a specified point. b. Parameter descriptions <1st parameter>: Specify the X-axis offset amount of hand “n” with a real number. (unit: mm) <2nd parameter>: Specify the Y-axis offset amount of hand “n”...
- Page 182 11. “MANUAL” mode 2) Hand attached to R-axis a. Robot movement Hand “n” moves towards a specified point while changing its movement direction. The direction to be changed is set for the specified point with an R value. Obstacles can therefore be avoided by changing the R value. b.
-
Page 183: Editing Hand Definitions
11. “MANUAL” mode 11.6.1 Editing hand definitions [Procedure] 1) Press the (EDIT) key in “MANUAL>HAND” mode. 2) Use the cursor (↑/↓) keys to select the hand definition you want to edit. An edit cursor appears at the left end of the selected hand definition line. Fig. -
Page 184: Restoring Hand Definitions
11. “MANUAL” mode 11.6.1.1 Restoring hand definitions [Procedure] 1) During hand definition editing, pressing the (UNDO) key reverses the last data input and restores the preceding data. This function is enabled only on lines that are not yet complete. 11.6.2 Hand definition setting method 1 NOTE •... - Page 185 11. “MANUAL” mode 5) Use the Jog keys to move the robot working point to point 2. NOTE (Position it accurately.) • When teach point 1 is obtained, the Z direction shift value is automatically determined. • If the key was pressed 6) Press the key to enter the teaching value.
-
Page 186: Changing The Display Units
11. “MANUAL” mode 11.7 Changing the display units The units used to indicate the current position on the MPB screen can be switched to either "pulses" and "mm". If hand data for the R-axis is selected (hand definition is made), then "Tool coordinate"... -
Page 187: Absolute Reset
11. “MANUAL” mode 11.8 Absolute reset Absolute reset is an operation to find the origin position, when the position detector in the motor cannot identify the origin position (called “origin incomplete” from now on). Movement commands in robot language cannot be executed if the origin is incomplete. Always perform absolute reset if the origin is incomplete. -
Page 188: Checking Absolute Reset
11. “MANUAL” mode 11.8.1 Checking absolute reset Check the status of absolute reset on each axis of the robot controller. [Procedure] 1) Press (RST.ABS) in “MANUAL” mode to enter “MANUAL>RST.ABS” mode. F 13 Fig. 4-11-81 This screen shows the following information. MANUAL >RST.ABS 50% [MG] [SOHOJ]... -
Page 189: Absolute Reset On Each Axis
11. “MANUAL” mode 11.8.2 Absolute reset on each axis NOTE When the mark method is used as the This section explains how to perform absolute reset of each axis using the robot controller. origin detection method, absolute reset The absolute reset method differs depending on the following settings for the “Origin is impossible unless the machine reference is between 44 to 56%. - Page 190 11. “MANUAL” mode Absolute reset position and "0" pulse position WARNING The robot starts to move slightly When absolute reset is performed at position A, position B (machine reference 38%) is when absolute reset is reset as the "0" pulse position. This means that the robot will move to the "0" pulse performed while the servo is on.
- Page 191 11. “MANUAL” mode 2) In Servo-ON WARNING The robot starts to move when a Use the Jog keys or (ADJ.+) and (ADJ.-) keys to move the selected Jog key or movement key is pressed. To avoid danger, do not axis to a position where absolute reset is possible. Set so that the machine reference enter the robot movement range.
- Page 192 11. “MANUAL” mode 4) If the servo is on when performing absolute reset, the robot will move to the "0" pulse WARNING position after reset. The robot starts to move slightly when absolute reset is performed while the servo is on. 5) When all axes have returned to their origins, the dashed line (- - - -) on the message To avoid danger, do not enter the robot movement range.
- Page 193 11. “MANUAL” mode 2. When the stroke end or sensor method is used as the origin detection method When the selected axis uses the stroke end or sensor method, the servo must be turned on to perform return-to-origin. [Procedure] 1) In “MANUAL>RST. ABS” mode, press the (M1) to (M4) keys to enter “MANUAL>RST.ABS”...
-
Page 194: Absolute Reset On All Axes
11. “MANUAL” mode 11.8.3 Absolute reset on all axes This section explains how to perform absolute reset on all axes of the robot controller. The sequence for performing absolute reset of the axes is given below. 1. First, perform absolute reset at the current position, on all axes that use the mark method. - Page 195 11. “MANUAL” mode Absolute reset position and "0" pulse position WARNING The robot starts to move when When absolute reset is performed at position A, the position B (machine reference 38%) absolute reset is performed. To is reset as the "0" pulse position. This means that the robot will move to the "0" pulse avoid danger, do not enter the robot movement range.
- Page 196 11. “MANUAL” mode 2) The axis using the mark method appears highlighted on the LCD screen. WARNING The robot starts to move when a Use the cursor (↑/↓) keys to select the axis. Jog key or movement key is pressed. To avoid danger, do not Use the Jog keys or the (ADJ.+) and (ADJ.-) keys to move the...
- Page 197 11. “MANUAL” mode 5) When absolute reset ends correctly on all axes using the mark method, a confirmation message appears on the guideline if axes using the stroke end or sensor methods are present. Press the (YES) key to perform absolute reset on axes using the stroke end or sensor method.
-
Page 198: Setting The Standard Coordinates
11. “MANUAL” mode 11.9 Setting the standard coordinates The standard coordinates set for SCARA robots are treated as Cartesian coordinates using the X-axis rotating center as the coordinate origin. The following operations and functions are enabled on SCARA robots by setting the standard coordinates. - Page 199 11. “MANUAL” mode The following parameters are automatically set when the standard coordinates are entered. CAUTION When setting the standard coordinates, note the following points. 1) “Arm length [mm]” • Always perform teaching with the same hand system carefully M1= ###.## ..X-axis arm length (distance to rotation center X-axis and Y-axis) and accurately.
- Page 200 11. “MANUAL” mode Fig. 4-11-100 X-axis offset pulse X-axis arm length Y-axis arm length CAUTION When two robots (main and sub robots) are specified, check the Y-axis offset pulse R-axis offset pulse currently selected robot group on the MPB. To switch the robot group, use the ROBOT key ( LOWER MODE...
-
Page 201: Setting The Standard Coordinates By 4-Point Teaching
11. “MANUAL” mode 11.9.1 Setting the standard coordinates by 4-point teaching Fig. 4-11-102 P [ 3 ] P [ 4 ] NOTE • Separate the teach points from each other as much as possible. • Setting might be impossible if one side is less than 50mm. - Page 202 11. “MANUAL” mode NOTE 2) Use the Jog keys to move the robot arm tip to teach point P[1] and press the key. Standard coordinates are calculated based on the teach points and input point data, so perform teaching and 3) Perform teaching at point P[2] as in step 2).
-
Page 203: Setting The Standard Coordinate By 3-Point Teaching
11. “MANUAL” mode 11.9.2 Setting the standard coordinate by 3-point teaching NOTE Separate the teach points from each other as much as possible. Fig. 4-11-106 P[2] P[3] P[1] Precondition: All 3 points P[1], P[2] and P[3] must be on a straight line, with P[2] set at the midpoint between P[1] and P[3]. - Page 204 11. “MANUAL” mode 3) Perform teaching at points P[2] and P[3] as in step 2). 4) Use the (+X) to (-Y) keys to set the direction from P[1] to P[3]. Fig. 4-11-109 MANUAL>COORDI>3POINTS 50% [MG][ Press F.key to get Direction +———————————+———>...
-
Page 205: Setting The Standard Coordinates By Simple Teaching
11. “MANUAL” mode 11.9.3 Setting the standard coordinates by simple teaching NOTE Position the XY arms as accurately as possible, so that they are exactly set in Fig. 4-11-112 a straight line including the rotation center of the R-axis. +Y direction +X direction [Procedure] 1) In “MANUAL>COODI”... - Page 206 11. “MANUAL” mode 4) Enter the Y arm length and press the key. Fig. 4-11-115 MANUAL >COORDI>SIMPLE 50% [MG][ ————————————x———————y———————z———————r——— Enter the length of Y Arm [mm] [1-1000] Enter >175.00_ 5) A message for checking the arm length and offset pulse value appears on the guideline.
-
Page 207: Executing The User Function Keys
11. “MANUAL” mode 11.10 Executing the user function keys NOTE • When using the user function keys, it is necessary to make a program User function keys allow you to perform various tasks easily when needed. For example, named “FUNCTION” and then assigning operation of an air-driven unit connected to an output port to a function key will write command statements for prove useful when performing point teaching in “MANUAL”... -
Page 208: System" Mode
Version display Shows the version number of software currently installed in the robot controller. In the case of the RCX142-T, a letter "T" is displayed at the end of the software version number. e Message line If an error occurs, the error message appears here. - Page 209 12. “SYSTEM” mode i Other expanded configurations CAUTION • See “7. I/O connections” in Chapter When expansion boards are installed into the option slot of the controller, the board 3 for a definition of NPN and PNP type and mode setting appear here. specifications.
-
Page 210: Parameters
12. “SYSTEM” mode 12.1 Parameters This section explains various parameters relating to the controller setting and robot op- eration. There are 4 types of parameters: robot parameters and axis parameters for robot operation, controller setting parameters and option board parameters. [Procedure] 1) Press the (PARAM) key in “SYSTEM”... - Page 211 12. “SYSTEM” mode Valid keys and submenu descriptions in “SUSTEM>PARAM” mode are shown below. Valid keys Menu Function Sets robot parameters for robot operation. ROBOT Sets axis parameters for robot operation. AXIS Sets other parameters for setting the controller. OTHERS Sets parameters for option boards.
-
Page 212: Robot Parameters
12. “SYSTEM” mode 12.1.1 Robot parameters On the MPB screen each robot parameter appears in the following format. Main group parameters Sub group parameters MG=<value> SG=<value> Main robot parameters Sub robot parameters MR=<value> SR=<value> Fig. 4-12-4 Robot parameter setting (one-robot setting) SYSTEM>PARAM>ROBOT V8.35 1.Tip weight[kg]... - Page 213 12. “SYSTEM” mode 1. Tip weight [kg] /WEIGHT This parameter sets the tip weight of robot (workpiece weight + tool weight) in kg units. However, set the tip weight in 0.1 kg units when the currently set robot is YK120X, YK150X, YK180X or YK220X. The maximum value is set when the parameters are initialized.
- Page 214 12. “SYSTEM” mode 2. Origin sequence /ORIGIN This parameter sets a sequence for performing absolute reset and return-to-origin on each axis of the robot. The numbers 3 1 2 4 5 6 are set automatically when the parameters are initialized. NOTE Enter axis numbers of the robot in the sequence for performing return-to-origin.
- Page 215 12. “SYSTEM” mode 3. R-axis orientation /RORIEN On SCARA robots, this parameter sets whether or not to maintain the R-axis direction (orientation) when moving manually across the XY axes. The R direction (orienta- tion) is automatically set when the parameters are initialized. If the R-axis direction has been set (held) and the arm tip is moved in the X or Y directions, the R-axis automatically rotates to maintain its direction.
- Page 216 12. “SYSTEM” mode 4. Armtype at PGM reset/ARMTYP On SCARA robots, it is necessary to set left-handed or right-handed system when moving along XY coordinates or converting point data. This parameter is used to set the initial hand system when the program is reset. The right-handed system is selected when the parameters are initialized.
-
Page 217: Axis Parameters
12. “SYSTEM” mode 12.1.2 Axis parameters Each axis parameter is displayed in the following format on the MPB screen. Main robot axis setting Sub robot axis setting M?=<value> S?=<value> Main auxiliary axis setting Sub auxiliary axis setting m?=<value> s?=<value> Fig. 4-12-10 Axis parameter setting (one-robot setting) SYSTEM>PARAM>AXIS V8.35 1.Accel coefficient[%]... - Page 218 12. “SYSTEM” mode 1. Accel coefficient [%] /ACCEL This parameter sets acceleration in “AUTO” mode in a range from 1 to 100% during movement by robot movement command. This is automatically set to 100% when the parameters are initialized. If the tip weight (workpiece weight + tool weight) is set correctly, then the actual acceleration is internally set in the control to be 100% at maximum performance.
- Page 219 12. “SYSTEM” mode 2. Decel. rate [%]/DECRAT This parameter sets the deceleration rate in a range from 1 to 100% during movement NOTE by robot movement command. This parameter value is a rate to the acceleration. A This parameter value is a rate to the acceleration.
- Page 220 12. “SYSTEM” mode 3. +Soft limit [pulse] /PLMT+ 4. -Soft limit [pulse] /PLMT- These parameters set the plus (+) soft limits and minus (-) soft limits that determine the range the robot can move. Soft limits inherent to each axis are automatically set when the parameters are initialized.
- Page 221 12. “SYSTEM” mode 5. Tolerance [pulse] /TOLE This parameter sets the tolerance range of the target position where robot movement ends. This is set to a value unique to each axis when initialized. Positioning on an axis is judged to be complete when the robot axis enters within the specified tolerance range.
- Page 222 12. “SYSTEM” mode 6. Out position [pulse] /OUTPOS During PTP movement in a program, the next command can be executed when the robot enters the range specified by the Out position for the target position. This parameter sets the Out position range. When initialized, this is set to a value unique to each axis.
- Page 223 12. “SYSTEM” mode 7. Arch position [pulse] /ARCH When an arch motion command (optional PTP operation) is executed, arch movement begins when the robot enters the arch position range set by this parameter for the target position. This parameter is set to a value unique to each axis when initialized. When the axis specified for arch movement starts PTP movement toward the specified position and enters the arch position range, the other axes start to move.
- Page 224 12. “SYSTEM” mode 8. Origin speed [pulse/ms] /ORGSPD This parameter sets the return-to-origin movement speed in pulses per millisecond. This speed is set to a value unique to each axis when initialized. [Procedure] 1) Select “8. Origin speed [pulse/ms]” in “SYSTEM>PARAM>AXIS” mode. 2) Press the (EDIT) key.
- Page 225 12. “SYSTEM” mode 9. Manual accel [%] /MANACC This parameter sets the acceleration in a range from 1 to 100% during robot manual movement. The manual acceleration is automatically set to 100 when the parameters are initialized. If the tip weight (workpiece weight + tool weight) is set correctly, then the actual acceleration is automatically determined internally in the controller to obtain optimum performance at 100% [Procedure]...
- Page 226 12. “SYSTEM” mode 10.Origin shift [pulse] /SHIFT This parameter is used to correct the origin position error when the motor has been replaced for some reason or the robot origin position has shifted due to mechanical shocks. This parameter is set to 0 when initialized. To correct the origin position error, enter the number of pulses required to move the origin back to the correct position.
- Page 227 12. “SYSTEM” mode 11.Arm length [mm] /ARMLEN This parameter sets the X, Y axis arm length on SCARA robots. This is automatically determined according to the current robot type when initialized. The arm length is also determined automatically when standard coordinates are set. On XY robots and MULTI type robots, setting the axis length also automatically de- termines the weight of each axis.
- Page 228 12. “SYSTEM” mode 12.Offset pulse /OFFSET On SCARA robots, this parameter sets the offset pulses when the X, Y, R axes are at 0 pulses. When initialized, this is set to a value unique to each robot type that is cur- rently set.
- Page 229 12. “SYSTEM” mode 13.Axis tip weight [kg] /AXSTIP This parameter sets the weight of each axis tip (workpiece weight + tool weight) in kilogram units on MULTI type robots or auxiliary axes. A maximum value is set when the parameters are initialized. The maximum weight is automatically determined according to the currently used axis type.
- Page 230 Fig. 4-12-27 Setting the “Origin method” SYSTEM>PARAM>AXIS V8.35 14.Origin method M1=SENSOR M2=SENSOR M3=TORQUE M4=MARK CAUTION • YAMAHA can accept no liability SENSOR TORQUE MARK from problems arising due to changing the return-to-origin method without consulting 4) Press one of the (SENSOR), (TORQUE) or (MARK) keys.
- Page 231 ––– CAUTION 4) Press the (---) or (+++) key. • YAMAHA can accept no liability from problems arising due to changing the return-to-origin 5) Repeat the above steps 3) and 4) if necessary. direction without consulting YAMAHA beforehand. • Return-to-origin will be...
- Page 232 1) Select “16. Motor direction” in “SYSTEM>PARAM>AXIS” mode. 2) Press the (EDIT) key. CAUTION 3) Select the axis with the cursor (↑/↓) keys. • YAMAHA can accept no liability from problems arising due to Fig. 4-12-29 Setting the “Motor direction” changing the axis polarity without consulting YAMAHA beforehand.
-
Page 233: Other Parameters
12. “SYSTEM” mode 12.1.3 Other parameters When changing other parameters on the MPB, use the descriptions in this section. Fig. 4-12-30 Editing other parameters SYSTEM>PARAM>OTHERS V8.35 1.Display language(JPN/ENG) ENGLISH 2.Data display length 6char 3.Parameter display unit PULSE 4.DO cond. on EMG HOLD 5.Watch on STD.DIO DC24V VALID... - Page 234 12. “SYSTEM” mode 2. Data display length/DATLEN This parameter sets the number of digits to display such as for point data. This is automatically set to “6char” (6 digits) when the parameters are initialized. [Procedure] 1) Select “2. Data display length” in “SYSTEM>PARAM>OTHERS” mode. 2) Press the (EDIT) key.
- Page 235 12. “SYSTEM” mode 4. DO cond. on EMG /EMGCDO This parameter sets whether or not to hold output of the DO/MO/LO/TO/SO ports when an emergency stop signal is input to the controller. This is automatically set to “HOLD” when the parameters are initialized. [Procedure] 1) Select “4.
- Page 236 12. “SYSTEM” mode 6. Incremental Mode control /INCMOD This parameter sets whether to have origin incomplete status every time power to this controller is turned on. This is automatically set invalid when the parameters are initialized. [Procedure] 1) Select “6. Incremental Mode control” in “SYSTEM>PARAM>OTHERS” mode. 2) Press the (EDIT) key.
- Page 237 12. “SYSTEM” mode 8. DI noise filter/SCANMD This parameter sets whether to cancel external input signals (dedicated input signals, general-purpose input signals) that might appear like noise in the form of short pulses. When this parameter is set to "VALID", the on and off periods of input signals must be longer than 25msec since the controller does not respond to any signal input shorter than 25msec.
- Page 238 12. “SYSTEM” mode 9. TRUE condition / EXPCFG NOTE This parameter is supported by This parameter selects the operation when the conditional expression, which is used controllers of Ver. 8.63 onwards. for the STOPON option in an IF (including ELSEIF), WHILE to WEND, WAIT, MOVE, or DRIVE statement, is a numeric expression.
- Page 239 12. “SYSTEM” mode 10.Unit select / PTUNIT NOTE • This parameter is supported by This parameter selects the point data unit system to be used when the controller is controllers of Ver. 8.63 onwards. started. For incremental specification robots and semi-absolute specification robots, •...
- Page 240 12. “SYSTEM” mode 11.Error output (DO & SO) / ERPORT NOTE • This parameter is supported by If an error has occurred in the controller, that error can be output by turning on a controllers of Ver. 8.63 onwards. general-purpose output DO and SO, except for those with an error group number •...
- Page 241 12. “SYSTEM” mode 12.MOVEI/DRIVEI start position /MOVIMD NOTE • This parameter is supported by This parameter setting is used when a relative motion operation is stopped by an controller Ver.8.66 and later. In interlock or emergency stop, etc., and specifies whether motion is to occur to the earlier versions, relative motion to a new target position referenced to original target position, or to a new target position referenced to the current position,...
- Page 242 12. “SYSTEM” mode 13.Skip undefined parameters CAUTION If this parameter is set to "VALID", There are cases where new parameters are added according to the software upgrading then misspellings in the parameter for robot controllers. If you attempt to load the parameter file containing these new file cannot be detected.
-
Page 243: Parameters For Option Boards
(OP. BRD) key in "SYSTEM>PARAM” mode to enter the option CAUTION OP.2 and OP.4 cannot be used with the board parameter setting mode. RCX142-T. The option boards installed in the controller are displayed in order on the MPB screen. Fig. 4-12-44 SYSTEM>PARAM>OP.BRD... -
Page 244: Option Dio Setting
12. “SYSTEM” mode 12.1.4.1 Option DIO setting NOTE Setting to "VALID" is recommended so The following parameter for option DIO (NPN or PNP specifications) boards is used to that the 24V supply for the option enable or disable monitoring of the DC 24V supply input. board is monitored during operation. -
Page 245: Serial I/O Setting
12. “SYSTEM” mode 12.1.4.2 Serial I/O setting NOTE • Set the Board status parameter to For serial I/O boards (CC-Link/DeviceNet/PROFIBUS), there are 3 parameters (4 "INVALID" when not using serial parameters for DeviceNet only) to be set, including the parameter to enable or disable the I/O boards. - Page 246 12. “SYSTEM” mode 2) Select the parameter with the cursor (↑/↓) keys. Fig. 4-12-50 SYSTEM>PARAM>OP.BRD>SELECT V8.63 1.board condition VALID 2.remote cmd / IO cmd(SI05) VALID 3.Output MSG to SOW(1) INVALID 4.IO size Large EDIT JUMP 3) Press the (EDIT) key. Fig.
-
Page 247: Setting The Network Parameters
12. “SYSTEM” mode 12.1.4.3 Setting the network parameters CAUTION When making the Ethernet settings to When using Ethernet, you set four parameters including the parameter to enable or disable use TELNET, you will need to set any the Ethernet board. other parameters than those shown on the right. - Page 248 12. “SYSTEM” mode 3) The currently set parameters are displayed. CAUTION Changes you made to the IP address When changing the "Board condition" parameter, press (INVALID) to and subnet mask are enabled after restarting the robot controller. When disable the Ethernet unit or press (VALID) to enable the Ethernet unit.
-
Page 249: Communication Parameters
12. “SYSTEM” mode 12.2 Communication parameters Set the following parameters for communication procedures when using the RS-232C interface. There are 8 kinds of communication parameters. 1. Communication mode 2. Data bit 3. Baud rate 4. Stop bit 5. Parity 6. Termination code 7. - Page 250 12. “SYSTEM” mode Valid keys and submenu descriptions in “SYSTEM>CMU” mode are shown below. Valid keys Menu Function Cursor key Moves the cursor up and down. (↑/↓) Page key Switches to other screens. ( / ) Edits the parameter. EDIT Moves the cursor to the designated parameter.
- Page 251 12. “SYSTEM” mode 2. Data bits This parameter sets the data bit length. [Procedure] 1) Select “2. Data bits” in “SYSTEM>CMU” mode. NOTE Katakana letters (Japanese phonetic) cannot be sent if data bit length was 2) Press the (EDIT) key. set to 7 bits.
- Page 252 12. “SYSTEM” mode 4. Stop bit This parameter sets the stop bit length. [Procedure] 1) Select “4. Stop bit” in “SYSTEM>CMU” mode. NOTE Set to 2 bits if communication errors frequently occur. 2) Press the (EDIT) key. The function key menu changes. Fig.
- Page 253 12. “SYSTEM” mode 6. Termination code This parameter sets the line feed code. [Procedure] 1) Select “6. Termination code” in “SYSTEM>CMU” mode. 2) Press the (EDIT) key. The function key menu changes. Fig. 4-12-61 Setting the “Termination code” SYSTEM>CMU V8.35 3.Baud rate 9600 4.Stop bit...
- Page 254 12. “SYSTEM” mode 8. RTS/CTS control This parameter sets whether to control the data flow using RTS/CTS signal. [Procedure] NOTE 1) Select “8. RTS/CTS CONTROL> in “SYSTEM>CMU “ mode. Data omissions may occur if data flow control is not performed. Make use of data flow control as much as possible.
-
Page 255: Option Parameters
12. “SYSTEM” mode 12.3 OPTION parameters The OPTION parameters are used to set expanded controller functions. These parameters consist of 4 types: parameters for area check output, parameters relating to SAFE mode, parameters relating to the serial I/O, and parameters relating to double-carrier type robots. [Procedure] 1) In “SYSTEM”... -
Page 256: Setting The Area Check Output
12. “SYSTEM” mode 12.3.1 Setting the area check output NOTE • If the port used for area check This function checks whether the current robot position is within an area specified by the output is the same as the output area check output parameter’s point data, and outputs the result to the specified port. - Page 257 12. “SYSTEM” mode [Procedure] 1) Press (POS.OUT) in “SYSTEM>OPTION” mode to enter the area check output mode. Fig. 4-12-66 Selecting the area check output number V8.63 SYSTEM>OPTION>POS.OUT 1.Output of area1 2.Output of area2 3.Output of area3 4.Output of area4 SELECT 2) Select an area check output number with the cursor (↑/↓) keys and press the (SELECT) key.
- Page 258 12. “SYSTEM” mode 1. Area check output on/off This parameter sets whether or not to use the area check output function. [Procedure] 1) Select “1. Output of area n” in “SYSTEM>OPTION>POS.OUT>SELECT” mode. NOTE • Select the robot for the area check.
- Page 259 12. “SYSTEM” mode 3) Select the output port with the (20) through (27) keys. 4) Press the key to quit the setting. To continue selecting other items, use the cursor (↑/↓) keys. 3. Comparison point No. 1 4. Comparison point No. 2 Set the point numbers for determining the area to perform area check.
- Page 260 12. “SYSTEM” mode 5. Condition for area check output NOTE • This parameter is supported by Selects the condition that allows the area check output to turn on, from either when controllers of Ver. 8.63 onwards. On the robot is within a specified area or when outside it. earlier version controllers, the area check output turns on when the robot [Procedure]...
-
Page 261: Setting The "Service" Mode
YAMAHA prior Parameter settings made here are only valid until the controller power is turned off, unless to shipping. - Page 262 12. “SYSTEM” mode [Procedure] 1) Press (SERVICE) in “SYSTEM>OPTION” mode. The message, “Enter password” appears on the guideline. Enter “SAF” here and press the key. Fig. 4-12-73 Entering the "SERVICE" mode setting password SYSTEM>OPTION V8.35 Enter password >_ 2) The following screen appears when the correct password is entered. Fig.
- Page 263 12. “SYSTEM” mode 1. “SERVICE” mode level Set the service mode level by referring to the table below. Description Hold to Run function AUTO mode operation Level 0 Disabled Allowed NOTE The settings made here are only valid Level 1 Enabled Allowed until the controller power is turned...
- Page 264 12. “SYSTEM” mode 2. Operating speed limits in “SERVICE” mode Specify the maximum robot operating speed. Description Sets robot operation within 3 % of maximum operating speed. <3% <100% Sets no limit on robot operating speed. NOTE The settings made here are only valid [Procedure] until the controller power is turned off.
- Page 265 12. “SYSTEM” mode 3. Operating device in “SERVICE” mode Specify the operating device to use. Description NOTE Only MPB operation is allowed. The settings made here are only valid MPB/DI until the controller power is turned Allows MPB and dedicated input. off.
-
Page 266: Saving The "Service" Mode Parameters
12. “SYSTEM” mode 12.3.2.1 Saving the “SERVICE” mode parameters WARNING In “SERVICE” mode, changing To save the parameter settings for “SERVICE” mode, follow the procedure below. the settings from their default The parameter settings made here are only valid until the controller power is turned off, values is likely to increase hazards to the robot operator unless you save those settings. -
Page 267: Sio Settings
12. “SYSTEM” mode 12.3.3 SIO settings NOTE • Output results might be incorrect The serial I/O unit allows the master station sequencer (PLC) to send and receive parallel if the SIO specified port is the port ON/OFF data in the robot controller I/O unit, regardless of the robot program. This same as the port used by the program. - Page 268 12. “SYSTEM” mode 1. Direct connection from SI n ( ) to DO n ( ) NOTE Output results might be incorrect if the The serial port input can be directly connected to parallel port output. The relation SIO specified port is the same as the between parallel and serial ports that can be set is as follows.
- Page 269 12. “SYSTEM” mode 2. Direct connection from DI n ( ) to SO n ( ) NOTE Output results might be incorrect if the Parallel port input can be directly connected to serial port output. The relation be- SIO specified port is the same as the tween serial and parallel ports that can be set is as follows.
-
Page 270: Double-Carrier Setting
12. “SYSTEM” mode 12.3.4 Double-carrier setting NOTE The anti-collision function for double This controller has a function to prevent two carriers (sliders) from colliding with each- carriers is supported by controllers of other, when the two carriers are installed on the same axis of double-carrier type robots. Ver. -
Page 271: Setting The Double-Carrier Parameters
12. “SYSTEM” mode 12.3.4.2 Setting the double-carrier parameters [Procedure] 1) Press the (W.CARRIER) in "SYSTEM>OPTION" mode. Fig. 4-12-86 Double-carrier parameter setting (1) SYSTEM>OPTION>W.CARRIER V8.58 1.Stroke[mm] 0.00 2.Carrier1 3.Carrier2 4.Control mode EDIT JUMP Valid keys and submenu descriptions in this mode are shown below. Valid keys Menu Function... - Page 272 12. “SYSTEM” mode 2) Enter the stroke in "mm" units and press . Up to 2 decimal places are allowed. Refer to the drawing below to determine the stroke. Fig. 4-12-88 Stroke setting Stroke Origin position Origin position Point where one carrier is closest to the other 2.
- Page 273 12. “SYSTEM” mode 4. Control mode setting Select the double-carrier functions. [Procedure] 1) Select "4. Control mode" and press (EDIT). Fig. 4-12-90 Double-carrier parameter setting (4) SYSTEM>OPTION>W.CARRIER>EDIT V8.58 1.Stroke[mm] 650.00 2.Carrier1 3.Carrier2 4.Control mode WARNING The robot moves as follows according to the control mode setting. Valid keys Menu Function...
-
Page 274: Initialization
12. “SYSTEM” mode 12.4 Initialization When initializing the parameter data you entered, follow the descriptions in this section. [Procedure] 1) Press the (INIT) key in “SYSTEM” mode. The initialization screen appears. Fig. 4-12-91 Initialization screen SYSTEM>INIT V8.35 PARAM MEMORY CLOCK 2) Select the item to initialize with the (PARAM) to (CLOCK) keys. -
Page 275: Initializing The Parameters
12. “SYSTEM” mode 12.4.1 Initializing the parameters To initialize the "robot" parameters, "axis" parameters and "other" parameters, follow the procedure below. The “Display language (JPN/ENG)" setting among "other" parameters is not changed by initialization. [Procedure] NOTE 1) Press the (PARAM) key in “SYSTEM>INIT” mode. •... -
Page 276: Initializing The Memory
12. “SYSTEM” mode 12.4.2 Initializing the memory This initializes the program, point data, shift coordinates, hand definitions and pallet defi- nitions. Before initializing, make sure that the currently input data is no longer needed. [Procedure] 1) Press the (MEMORY) key in “SYSTEM>INIT” mode. Fig. -
Page 277: Initializing The Communication Parameters
12. “SYSTEM” mode Valid keys and submenu descriptions in “SYSTEM>INIT>MEMORY” mode are shown below. Valid keys Menu Function Deletes the program data. PROGRAM Deletes the point data. POINT Initializes the shift coordinate data. SHIFT Initializes the hand definition data. HAND Deletes/initializes all data (program, point, shift coordinates, hand definition, pallet definition, point comment). -
Page 278: Clock Setting
12. “SYSTEM” mode 12.4.4 Clock setting A clock function is provided in the controller for setting the date and time. [Procedure] CAUTION The clock used in the controller might 1) Press the (CLOCK) key in “SYSTEM>INIT” mode. differ from the correct time. If this happens, set the correct time. -
Page 279: System Generation
To protect the equipment against adversely effect robot operation such accidents, save the initial parameter data when shipped from YAMAHA and the or create operator hazards. parameter data from system upgrades onto an external PC storage device by way of the Always consult YAMAHA if RS-232C. -
Page 280: Self Diagnosis
12. “SYSTEM” mode 12.5 Self diagnosis This function makes a check of the controller and displays the error history and battery voltages. [Procedure] 1) In “SYSTEM” mode, press the (DIAGNOS) key to enter “SYSTEM>DIAGNOS” mode Fig. 4-12-98 Self diagnosis SYSTEM>DIAGNOS V8.35 CHECK HISTRY... -
Page 281: Error History Display
12. “SYSTEM” mode 12.5.2 Error history display To display past errors that occurred, follow the procedure below. A maximum of 500 items may be stored in the error history. [Procedure] 1) Press the (HISTRY) key to enter “SYSTEM>DIAGNOS> HISTRY” mode. Fig. -
Page 282: Displaying The Total Operation Time
12. “SYSTEM” mode 12.5.3 Displaying the total operation time Use the following procedure to check the total controller operation time. [Procedure] 1) Press the (TOTAL) key. Fig. 4-12-101 Displaying the total operation time SYSTEM >DIAGNOS>TOTAL V8.35 Total operation time (04/07/20, 12:05) YEAR DAY HOUR MIN Power-on time 0/ 14/ 10: 34... -
Page 283: Backup Processes
12. “SYSTEM” mode 12.6 Backup processes The various data in the controller's internal memory can be backed up in the internal flash ROM. [Procedure] 1) Press the (BACKUP) key in the "SYSTEM" mode. Fig. 4-12-103 Backup SYSTEM>BACKUP V8.35 RAM CARD FROM Valid keys and submenu descriptions in "SYSTEM>BACKUP"... -
Page 284: Loading Files
12. “SYSTEM” mode 12.6.1.1 Loading files The various data backed up in the controller's internal flash ROM can be loaded back into the controller's internal memory. NOTE [Procedure] If the data in the internal memory is destroyed for any reason, it can be 1) Press the (LOAD) key in the "SYSTEM>BACKUP>FROM"... -
Page 285: Saving Files
12. “SYSTEM” mode 12.6.1.2 Saving files NOTE If the data in the internal memory is The data in the controller's internal memory are saved as ALL files on the flash ROM. The destroyed for any reason, it can be data cannot be saved separately. If data is already saved, the new data cannot be saved restored by loading the backup data from the internal flash ROM. -
Page 286: Monitor" Mode
13. “MONITOR” mode The “MONITOR” mode displays the I/O status regardless of the current mode and level. The “MONITOR” mode display is overlapped onto the screen during normal operation. So the robot controller can still be operated even with the monitor screen displayed. [Procedure] 1) Press the key. - Page 287 13. “MONITOR” mode 3) Press the key again to display other monitor screens. DISPLAY Pressing the key shifts the monitor screen in the following sequence. DISPLAY DI monitor → DO monitor → MO monitor → LO/TO monitor → SI monitor → SO monitor →...
- Page 288 13. “MONITOR” mode Fig. 4-13-6 Current command monitor display MANUAL>POINT 50% [MG][S0H0J] _ _ _ _ _ _ _ _ _ _ _ _ _ _ _ _ x _ _ _ _ _ _ _ _ y _ _ _ _ _ _ _ _ z _ _ _ _ _ _ _ _ _ r _ _ _ Current monitor(100% = Max torque) D1 = D5 =...
-
Page 289: Utility" Mode
14.“UTILITY” mode The “UTILITY” mode can be entered from any other mode regardless of the mode level. [Procedure] 1) Press the ) key. UTILITY LOWER NOTE The “UTILITY” mode screen is displayed. The current internal controller temperature is displayed on the right end of the 3rd line. -
Page 290: Canceling Emergency Stop; Motor Power And Servo On/Off
14. “UTILITY” mode 14.1 Canceling emergency stop; Motor power and servo on/off 14.1.1 Canceling emergency stop Emergency stop must be cancelled to turn the servo on and operate the robot again in the following cases. (1) When the emergency stop button was released after pressing the emergency stop button. -
Page 291: Motor Power And Servo On/Off
14. “UTILITY” mode 14.1.2 Motor power and servo on/off This is usually used with the motor power turned on. This operation is performed after emergency stop has been cancelled or when turning the servo on/off temporarily in order to perform direct teaching. [Procedure] 1) Press the (MOTOR) key in “UTILITY”... -
Page 292: Enabling/Disabling The Sequence Execution Flag
14. “UTILITY” mode 14.2 Enabling/disabling the sequence execution flag To enable or disable execution of sequence programs, proceed as follows. [Procedure] 1) Press the (SEQUENC) key in “UTILITY” mode. 2) To enable execution of sequence programs, press the (ENABLE) key. To disable execution of sequence programs, press the (DISABLE) key. -
Page 293: Changing The Arm Type
14. “UTILITY” mode 14.3 Changing the arm type To set the hand type on SCARA robots that move using Cartesian coordinate data, follow the procedure below. The right-handed system is selected when the parameters are initialized. (Arm type can be changed only for SCARA robots.) [Procedure] 1) Press the (ARMTYPE) key in “UTILITY”... -
Page 294: Resetting The Output Ports
14. “UTILITY” mode 14.4 Resetting the output ports This resets the general-purpose output ports DO2() to DO27()/MO2() to MO27()/LO0()/ TO0()/SO2() to SO27()/SOW(2) to SOW(15). [Procedure] 1) Press the (RST.DO) key in “UTILITY” mode. A confirmation message appears on the guideline. Fig. -
Page 295: Changing The Execution Level
14. “UTILITY” mode 14.5 Changing the execution level Program execution levels can be set as shown in the table below. However, the following NOTE commands are usable only when return-to-origin is complete. Execution level is automatically set to “LEVEL 0” in the following cases. Movement commands : MOVE, MOVE2, MOVEI, MOVEI2, DRIVE, 1. -
Page 296: Changing The Execution Level
14. “UTILITY” mode 14.5.1 Changing the execution level To change the execution level, proceed as follows. [Procedure] 1) Press the ) key twice to enter “UTILITY” mode, then press UTILITY LOWER (EXECUTE) key. Fig.4-14-9 UTILITY Date,Time : 04/07/23,12:36:37 (36°C) Execut level: LEVEL7 Access level: LEVEL0 EXECUTE ACCESS RST.DO... -
Page 297: Displaying The Help Message
14. “UTILITY” mode 14.5.2 Displaying the Help message See the help message as needed. [Procedure] 1) Press the (HELP) key. F 15 The first page of the Help screen appears. Press the (NEXT P.) key or cursor (↓) key to refer to the next page or press (PREV. -
Page 298: Changing The Access Level (Operation Level)
14. “UTILITY” mode 14.6 Changing the access level (operation level) NOTE Once the robot system is installed, anyone can change its program and point data. How- Access level is automatically set to ever, unauthorized changing of such data can be a source of trouble. “LEVEL 0”... -
Page 299: Changing The Access Level
14. “UTILITY” mode 14.6.2 Changing the access level NOTE Change the access level as needed. The online command (@ACCESS) [Procedure] from the RS-232C allows changes to the access level regardless of the 1) Set the access level with the (LEVEL0) to (LEVEL3) keys. - Page 300 MEMO...
- Page 301 Chapter 5 Two-robot setting Contents 1. Explanation of two-robot setting ............5-1 Two-robot setting .................. 5-1 System configuration example .............. 5-2 2. Operations and data when using the two-robot setting ....5-3 "AUTO" mode ..................5-3 2.1.1 Changing the automatic movement speed ..........5-3 2.1.2 Executing the point trace ................
- Page 302 MEMO...
-
Page 303: Explanation Of Two-Robot Setting
(MOVEI2) commands are invalid for these axes. Moreover, the usable robot language varies for each group. For details, see "3.1 Robot languages used in the two-robot setting". Fig. 5-1-1 Axis configuration example (RCX142, SXYx 2 axis spec. × 2 robots) Main robot axes Sub robot axes... -
Page 304: System Configuration Example
1. Explanation of two-robot setting System configuration example Configuration example 1 Example: SXYx + SXYx MXYx + MXYx Fig. 5-1-2 System configuration example BA TT Configuration example 2 Example: NXY-W Fig. 5-1-3 System configuration example BA TT... -
Page 305: Operations And Data When Using The Two-Robot Setting
2. Operations and data when using the two-robot setting The operations, data types and enabled functions unique to the two-robot setting are explained in this section. This explanation consists of excerpts from Chapter 4 "Operation" and Chapter 10 "Troubleshooting" which relate to two-robot setting operations. Although portions of those chapters appear in this explanation, be sure to also refer to the above chapters for details. -
Page 306: Executing The Point Trace
2. Operations and data when using the two-robot setting 2) Use the (VEL+), (VEL-), (VEL++), (VEL--) keys to F 10 change the speed for the currently selected group. 2.1.2 Executing the point trace NOTE For details concerning executing the The point trace is executed in a group-specific manner. point trace, also see "9.7 Executing Before executing this function, be sure to verify the currently selected group. -
Page 307: Manual" Mode
2. Operations and data when using the two-robot setting "MANUAL" mode The robot to be operated must be selected when performing the following operations in the "MANUAL" mode: • Manual movement • Point data input by direct teaching • Input by point data direct teaching •... -
Page 308: Manual Movement
2. Operations and data when using the two-robot setting 2.2.2 Manual movement NOTE For manual movement details, also see Manual movement is executed in a group-specific manner. Before executing this function, "11.1 Manual movement" in Chapter 4. be sure to verify the currently selected group. The selected group can be changed by the procedure described below. - Page 309 2. Operations and data when using the two-robot setting Fig. 5-2-10 "mm" units (X) example (Two-robot setting: Sub group selected) Subject group display SG (Sub group is selected) MANUAL 50/ 50%[SG][S0H4X] ————————————————————————————————————————— Current position *Mx= 0.00 *My= 0.00 *Sx= 0.00 *Sy= 0.00 POINT PALLET...
-
Page 310: Point Data
2. Operations and data when using the two-robot setting Fig. 5-2-12 Robot motion in "mm" units (X) (ex) Main group Sub group q With the main group selected, press #1+ , #1- to move the tip of the robot arm in the X-direction (orthogonal coordinates). w With the main group selected, press #2+ , #2- to move the tip of the robot arm in the Y-direction (orthogonal coordinates). - Page 311 2. Operations and data when using the two-robot setting 2.2.3.1 Point data input by teaching NOTE • For details concerning Point data Point data input by direct teaching consists of registering the currently selected group's input by direct teaching, also see coordinate values as point data.
-
Page 312: Pallet Definition
2. Operations and data when using the two-robot setting 5) When the axis reaches the target point, press the (TEACH) key. The specified point is "taught" as the current position of the selected group. Point data teaching inputs are made in the currently selected coordinate system format. 6) If a point data exists for the specified point number, a confirmation message displays at the guidance line when the (TEACH) key is pressed. -
Page 313: Pallet Definition By Teaching
2. Operations and data when using the two-robot setting 2.2.4.1 Setting the point in pallet definition by teaching NOTE For details concerning Setting the Setting the point in pallet definition by teaching consists of registering the currently selected point in pallet definition by teaching, group's coordinates as point data. -
Page 314: Changing The Manual Movement Speed
2. Operations and data when using the two-robot setting 2.2.5 Changing the manual movement speed NOTE For details concerning changing the Manual movement speed settings are made in a group-specific manner. manual movement speed, also see "11.4 Changing the manual movement [Procedure] speed"... -
Page 315: Shift Coordinates
2. Operations and data when using the two-robot setting 2.2.6 Shift coordinates NOTE For shift coordinate details, also see When in the two-robot setting, the same shift data is used by both robots. However, shift "11.5 Displaying, editing and setting numbers are specified in a robot-specific manner. - Page 316 2. Operations and data when using the two-robot setting [Ex.2] S1 = 50.00 100.00 0.00 0.00 S3 = 0.00 150.00 0.00 0.00 If the main group's shift number is set as "S1", and the sub group's shift number is set as "S3", the main group's point data operation position is shifted by the amount of the "S1"...
-
Page 317: Shift Coordinates Setting Method 1
2. Operations and data when using the two-robot setting 2.2.6.1 Shift coordinates setting method 1 NOTE For "Shift coordinates setting method The "Shift coordinates setting method 1" function allows shift coordinate data to be set by 1" details, also see "11.5.3 Shift teaching 2 points, and then entering the coordinate direction. -
Page 318: Shift Coordinates Setting Method 2
2. Operations and data when using the two-robot setting 2.2.6.2 Shift coordinates setting method 2 NOTE For "Shift coordinates setting method The "Shift coordinates setting method 2" function allows shift coordinate data to be set by 1" details, also see "11.5.4 Shift teaching 2 points, and then entering that 2-point shift coordinate value. -
Page 319: Hand Definition
2. Operations and data when using the two-robot setting 2.2.7 Hand definition NOTE For hand definition details, also see In the two-robot setting, the same hand data is used by both robots. Hand definition numbers "11.6 Displaying, editing and setting H0 to H3 can be used at the main robot, and H4 to H7 can be used at the sub robot. - Page 320 2. Operations and data when using the two-robot setting Fig. 5-2-29 Shift coordinate setting method (Two-robot setting: Sub group selected) Subject group display SG (Sub group is selected) MANUAL >HAND 50% [SG] [S0H4X] —————————————1————————2————————3————————4——— 0.00 0.00 0.00 0.00 0.00 0.00 0.00 0.00 0.00...
-
Page 321: Absolute Reset
2. Operations and data when using the two-robot setting 2.2.8 Absolute reset NOTE For "Absolute reset" details, also see The "absolute reset" function is used to teach the origin position when the motor's position "11.8 Absolute Reset" in Chapter 4. sensor cannot identify the origin position (a condition hereafter referred to as "origin incomplete"). -
Page 322: Absolute Reset On Each Axis (Mark Method)
2. Operations and data when using the two-robot setting 2.2.8.2 Absolute reset on each axis (Mark Method) NOTE For absolute reset (mark method) on This function performs an absolute reset only at the specified mark method axis. Return- each axis, also see "11.8.2 Absolute to-origin methods are not possible when performing Return-to-origin methods using the reset on each axis"... -
Page 323: Absolute Reset On Each Axis (Stroke End Method / Sensor Method)
2. Operations and data when using the two-robot setting 4) When all axes have returned to their origins, the dashed line (- - - -) on the message line changes to a solid line (——), and return-to-origin is now complete. 2.2.8.3 Absolute reset on each axis (Stroke end method / sensor method) NOTE... -
Page 324: Absolute Reset On All Axes
2. Operations and data when using the two-robot setting 2.2.8.4 Absolute reset on all axes NOTE For "Absolute reset on all axes" This function performs an absolute reset on all the controller axes. This absolute reset is details, also see "11.8.3 Absolute reset performed in the following axis order: on all axes"... - Page 325 2. Operations and data when using the two-robot setting 4) When the absolute reset is completed normally for all "mark method" axes, a NOTE message displays on the guidance line if "stroke end method / sensor method" axes In the two-robot setting, Return-to- origin s are performed in the main exist.
-
Page 326: System" Mode
2. Operations and data when using the two-robot setting "SYSTEM" mode The "SYSTEM" mode screen format for the two-robot setting varies slightly from that of the one-robot setting. Screen Reference Section "SYSTEM" mode initial screen 2.3.1 "SYSTEM" mode initial screen format Robot parameters screen 2.3.2 Robot parameters screen format Axis parameters screen... -
Page 327: Robot Parameters Screen Format
2. Operations and data when using the two-robot setting 2.3.2 Robot parameters screen format NOTE For "robot parameters screen format" The SYSTEM>PARAM>ROBOT mode's robot parameter format for the two-robot setting details, also see 12.1.1 "Robot is shown below. Parameters" in Chapter 4. Fig. -
Page 328: Setting The Area Check Output
2. Operations and data when using the two-robot setting 2.3.4 Setting the area check output NOTE • For "Setting the area check The area check output function performs area checks based on the robot's current position output" details, also see "12.3.1 and the point data area specified by the area check output parameters. -
Page 329: Double-Carrier Collision Prevention
The following conditions must be satisfied in order to use the double-carrier collision prevention. q Either of the carriers (arms) must approach the other carrier (arm) when moving in its plus direction as follows. If this is not the case, please contact your YAMAHA representative. "+" direction for carrier 2 "+"... - Page 330 2. Operations and data when using the two-robot setting [Procedure] Although the following explanation applies to a double-carrier type robot, the same settings are used for a double-arm type robot. 1) Establish the SYSTEM>OPTION>W.CARRIER mode. 2) Specify the settings. 1. Stroke setting With carrier-B at its origin position, this "stroke"...
- Page 331 2. Operations and data when using the two-robot setting 2. Carrier 1 setting 3. Carrier 2 setting The collision prevention settings are specified in a carrier-specific manner. 2-1) Use the cursor up/down (↑/↓) keys to select "2. Carrier 1" or "3. Carrier 2", then press the (EDIT) key.
- Page 332 2. Operations and data when using the two-robot setting 2-2) Use the function keys to select the collision prevention function's control content. Refer to the above table for menu item meanings. Fig. 5-2-48 Control mode setting SYSTEM>OPTION>W.CARRIER V8.66 1.Stroke[mm] 650.00 2.Carrier1 3.Carrier2 4.Controll mode...
-
Page 333: Error Message Displays
2. Operations and data when using the two-robot setting Error message displays NOTE For error message details, also see "1.1 Robot controller error messages" When an error occurs, an error message displays at the message line (2nd line) of the in Chapter 10. -
Page 334: Programming
3. Programming Robot languages used in the two-robot setting NOTE • For details regarding each robot language, refer to the RCX Series The commands which can be used in the robot languages for robot operation and coordinate Programming Manual. control, etc., vary according to the group. The main commands and functions are listed •... - Page 335 Chapter 6 Parallel I/O interface Contents 1. Standard I/O interface overview ............6-1 Power supply ..................6-1 Connector I/O signals ................6-2 Connector pin numbers ................ 6-3 Typical input signal connection ............6-4 Typical output signal connection ............6-5 1.5.1 Dedicated outputs ..................
- Page 336 MEMO...
-
Page 337: Standard I/O Interface Overview
1. Standard I/O interface overview The robot controller has a standard I/O interface for compatibility with customer systems. CAUTION A description of each I/O terminal and its connection is given here. Connect these I/O See "7. I/O connections" in Chapter 3 for a definition of NPN and PNP terminals correctly and efficiently. -
Page 338: Connector I/O Signals
1. Standard I/O interface overview Connector I/O signals Remarks I/O No. Signal name CAUTION I/O command execution trigger input DI05 • See "7. I/O connections" in Servo ON DI01 Chapter 3 for a definition of NPN Sequence control DI10 and PNP specifications. Interlock DI11 •... -
Page 339: Connector Pin Numbers
1. Standard I/O interface overview Connector pin numbers STD. DIO Connection side Solder side Connector type: MR-50LM An STD. DIO connector is supplied with the controller. -
Page 340: Typical Input Signal Connection
1. Standard I/O interface overview Typical input signal connection NPN specifications CAUTION See "7. I/O connections" in Chapter DC24V (P.COM DI) 3 for a definition of NPN and PNP specifications. DI 01 DI 10 DI 11 DI 12 DI 17 DI 20 DI 21 DI 22... -
Page 341: Typical Output Signal Connection
1. Standard I/O interface overview Typical output signal connection 1.5.1 Dedicated outputs CAUTION See "7. I/O connections" in Chapter NPN specifications 3 for a definition of NPN and PNP specifications. COMMON DO 01a DO 01b DO 02a DO 02b DO 03a DO 03b DO 10 DO 14... -
Page 342: General-Purpose Outputs
1. Standard I/O interface overview 1.5.2 General-purpose outputs CAUTION NPN specifications • When an inductive load (solenoid, relay, etc.) is used, always connect a diode in DC24V parallel as a surge killer. • Never short the DO output to DC 24V (NPN specifications) since DO 20 to DO27 this will damage the internal... -
Page 343: Dedicated Input Signal Description
1. Standard I/O interface overview Dedicated input signal description NOTE 1. DI01 Servo-ON input If two or more dedicated inputs are supplied simultaneously or the pulse Use to cancel emergency stop and turn on the servo power (servo-on). (However, the width of input signals is too short, the emergency stop input signal contacts must be closed.) input signals might not be recognized. - Page 344 1. Standard I/O interface overview 7. DI15 Program reset input DI15 is used to reset the program. When a signal is input to DI15 while the program is stopped in “AUTO” mode, the robot program is reset. At this point, all general-purpose outputs and variables are cleared.
-
Page 345: Dedicated Output Signal Description
1. Standard I/O interface overview Dedicated output signal description 1. DO01a CPU_OK output: contact A (normally open) This is always on during normal controller operation. In the following cases this output turns off and CPU operation stops. • Serious malfunction •... - Page 346 1. Standard I/O interface overview In case (3) Since the CPU has stopped, the alarm cannot be turned off and operation cannot be reset unless the power supply is turned on again. In case (4) When a battery abnormality is detected, the alarm cannot turn off until the power supply is turned on again.
-
Page 347: Dedicated I/O Signal Timing Chart
1. Standard I/O interface overview Dedicated I/O signal timing chart 1.8.1 Controller power ON, servo ON and emergency stop CAUTION It will take about 3 seconds for the controller to issue the CPU_OK CPU_OK output: DO(01)a output after the power is turned on. Servo-ON output: DO(02)a Alarm output: DO(03)a Emergency stop input... -
Page 348: Absolute Reset
1. Standard I/O interface overview 1.8.2 Absolute reset Conditions: MANUAL mode and servo ON CPU_OK output: DO(01)a Servo-ON output: DO(02)a Return-to-origin complete output: DO(11) Interlock input: DI(11) off Absolute reset input: DI(17) off Move Robot axis status Stop a ) b ) c ) d ) e ) f ) g ) h ) i ) j ) k ) -
Page 349: Switching To Auto Mode, Program Reset And Execution
1. Standard I/O interface overview 1.8.3 Switching to AUTO mode, program reset and execution AUTO mode output: DO(10) Return-to-origin complete output: DO(11) Robot program-in-progress output: DO(13) Program reset status output: DO(14) Interlock input: DI(11) Program start input: DI(12) AUTO mode input: DI(13) Program reset input: DI(15) b ) c ) g ) h ) -
Page 350: Stopping Due To Program Interlocks
1. Standard I/O interface overview 1.8.4 Stopping due to program interlocks AUTO mode output: DO(10) Return-to-origin complete output: DO(11) Robot program-in-progress output: DO(13) Interlock input: DI(11) Program start input: DI(12) d ) e ) f ) g ) 100ms or more Program execution a) Program start input turns on. -
Page 351: General-Purpose I/O Signals
1. Standard I/O interface overview General-purpose I/O signals 1.9.1 General-purpose input signals CAUTION These are a total of 16 signals consisting of DI20 to DI27 and DI30 to DI37. If the "DI noise filter" parameter is These general-purpose inputs are available to the user and can be connected to components set to "VALID"... -
Page 352: Option I/O Interface Overview
2. Option I/O interface overview The option I/O interface of the controller is expandable to a maximum of 4 units (RCX142) or 2 units (RCX142-T) for compatibility with customer systems. A description of each I/O terminal and its connec- tion is given here. Connect these I/O terminals correctly and efficiently. -
Page 353: Id Settings
2. Option I/O interface overview ID settings Use the DIP switch on the option I/O interface unit (adjacent to OPT. DIO connector) to set the ID. Fig. 6-2-1 DIP switch OPT. DIO connector The DI/DO ports are assigned based on these ID. ( ■ : switch lever) DIP switch Input port No. -
Page 354: Connector I/O Signals
2. Option I/O interface overview Connector I/O signals I/O No. Signal name Remarks CAUTION ID=1 ID=2 ID=3 ID=4 ID=1 ID=2 ID=3 ID=4 See "7. I/O connections" in Chapter P.COM DI P.COM DI + common 3 for a definition of NPN and PNP specifications. -
Page 355: Connector Pin Numbers
2. Option I/O interface overview Connector pin numbers OPT. DIO Connection side Solder side Connector type: MR-50LM An OPT. DIO connector is supplied with the controller. -
Page 356: Typical Input Signal Connection
2. Option I/O interface overview Typical input signal connection CAUTION NPN specifications See "7. I/O connections" in Chapter 3 for a definition of NPN and PNP P.COM DI External power specifications. supply is used. External power supply N.COM DI Typical output signal connection NPN specifications External power supply is used. -
Page 357: General-Purpose Output Signal Reset (Off)
2. Option I/O interface overview 2.7.3 General-purpose output signal reset (off) All the general-purpose output signals are reset in the following cases. 1) When (RST.DO) is selected in “UTILITY” mode. 2) When any of the following operations is performed while no sequencer program is executed. -
Page 358: Ratings
3. Ratings 1. Input NPN specifications CAUTION See "7. I/O connections" in Chapter DC input (positive common type) Method 3 for a definition of NPN and PNP Photocoupler insulation method specifications. Input power DC 24V±10%, 10mA/point Response time 20ms Min. (during on/off) PNP specifications DC input (negative common type) Method... -
Page 359: Caution Items
4. Caution items 1. When using a dual-lead proximity sensor as an input signal, check whether or not it is within input signal specifications. If the sensor has a high residual voltage during on and off, this might cause possible malfunctions. 2. - Page 360 MEMO...
- Page 361 1. SAFETY I/O interface overview ............7-1 Power ....................7-1 Connector I/O signals ................7-1 Connector terminal numbers ..............7-2 Emergency stop input signal connections ..........7-3 1.4.1 RCX142 ....................7-3 1.4.2 RCX142-T ....................7-6 Dedicated input signal connections ............7-9 Input signal description ............... 7-10...
- Page 362 MEMO...
-
Page 363: Power
1. SAFETY I/O interface overview The robot controller is provided with SAFETY I/O interfaces for compatibility with the system used by the customer. A description of the I/O terminals and connection methods are explained below. Connect the I/O terminals correctly for effective operation. The SAFETY I/O interface contains an emergency stop input and one dedicated input point. -
Page 364: Connector Terminal Numbers
1. SAFETY I/O interface overview Connector terminal numbers Connection side Solder side... -
Page 365: Emergency Stop Input Signal Connections
1. SAFETY I/O interface overview Emergency stop input signal connections 1.4.1 RCX142 Connections using the standard MPB programming box with external emergency CAUTION stop circuit External emergency stop and the Emergency stop switch MPB emergency stop button are MPB connector... - Page 366 1. SAFETY I/O interface overview Connections using the MPB-E2 (MPB compatible with an enable switch) with external emergency stop circuit (PNP specifications) Emergency Enable stop switch switch CAUTION MPB connector External emergency stop and the MPB emergency stop button are disabled when pin 13 and pin 14 are directly shorted to each other on the SAFETY connector.
- Page 367 1. SAFETY I/O interface overview 2. When the service key switch contact is open: The enable switch is operable at this point. a. In normal operation, EMG 24V is connected to EMG RDY via the MPB-E2 emer- gency stop switch, enable switch and SAFETY connector, and turns on the control- ler internal motor power relay.
-
Page 368: Rcx142-T
1. SAFETY I/O interface overview 1.4.2 RCX142-T Connections using the standard MPB programming box with external emergency CAUTION stop circuit External emergency stop and the Emergency stop switch MPB emergency stop button are MPB connector disabled when pin 13 and pin 14 are directly shorted to each other on the SAFETY connector. - Page 369 1. SAFETY I/O interface overview Connections using the MPB-E2 (MPB compatible with an enable switch) with external emergency stop circuit (PNP specifications) Emergency Enable stop switch switch CAUTION MPB connector External emergency stop and the MPB emergency stop button are disabled when pin 13 and pin 14 are directly shorted to each other on the SAFETY connector.
- Page 370 1. SAFETY I/O interface overview 2. When the service key switch contact is open: The enable switch is operable at this point. a. In normal operation, EMG 24V is connected to EMG RDY via the MPB-E2 emer- gency stop switch, enable switch and SAFETY connector, and the controller checks that emergency stop is released.
-
Page 371: Dedicated Input Signal Connections
1. SAFETY I/O interface overview Dedicated input signal connections CAUTION See "7. I/O connections" in Chapter 3 for a definition of NPN and PNP specifications. NPN specifications P.COMDI for STD.DIO DI02 NOTE Protective Connect DC 24V and ground for STD. circuit DIO. -
Page 372: Input Signal Description
1. SAFETY I/O interface overview Input signal description CAUTION See "7. I/O connections" in Chapter 3 for a definition of NPN and PNP specifications. 1. DI02 SERVICE mode input Service mode input can only be used on robot controllers with SAFE mode enabled. When the DI02 contact is open (OFF), the robot controller service mode is set for exclusive control for operating levels, operating speed limits and operating devices conforming to the service mode parameter settings. - Page 373 Chapter 8 RS-232C interface Contents 1. Communication overview ..............8-1 2. Communication function overview ..........8-2 3. Communication specifications ............8-3 Connector ..................... 8-3 Transmission mode and communication parameters ......8-4 Communication flow control ..............8-5 3.3.1 Flow control during transmit ..............8-5 3.3.2 Flow control during receive ..............
- Page 374 MEMO...
-
Page 375: Communication Overview
1. Communication overview The robot controller can communicate with external devices in the following 2 modes using the RS- 232C interface. These modes can be used individually or jointly in a variety of applications. (1) Data communication is performed by communication commands in robot language (SEND command). -
Page 376: Communication Function Overview
2. Communication function overview There are 2 types of robot controller communication modes, “ONLINE” and “OFFLINE”. (1) “OFFLINE” mode In “OFFLINE” mode, the communication between the robot and external unit is executed with SEND commands in the program. • SEND command (robot → external unit) SEND <source file>... -
Page 377: Communication Specifications
3. Communication specifications Connector The RS-232C interface connector is located on the front panel of the robot controller as shown below. RCX142 MOTOR OP.1 OP.3 MODEL. SER. NO. MANUFACTURED FACTORY AUTOMATION EQUIPMENT MADE IN JAPAN CAUTION READ INSTRUCTION MANUAL BATT OP.2... -
Page 378: Transmission Mode And Communication Parameters
3. Communication specifications 3.Connection cable examples a. Cable capable of hardware busy control Controller External device b. Cable not using control wires Controller External device * For signal wire layout on the external device, refer to the instruction manual for that NOTE 1) Termination code device. -
Page 379: Communication Flow Control
3. Communication specifications Communication flow control Software flow control (XON/XOFF) and hardware flow control (RTS/CTS) methods can be selected by specifying the communication parameters. 3.3.1 Flow control during transmit NOTE 1) Transmission stops when XON/XOFF and CTS indicate whether the other party can receive data. transmission is disabled in either of XON/XOFF or RTS/CTS flow Flow Control... -
Page 380: Other Caution Items
3. Communication specifications Other caution items 1) The controller allows receiving data as long as the receive buffer has a free area. The receive buffer is cleared in the following cases. • When the power was turned off and turned back on. •... - Page 381 Fig. 8-3-1 Problems caused by poor connections Improper ground wire connection might cause electrical shock if connector metal parts are touched. External device * RCX142 series AC100 to 200V Connector metal parts Potential Malfunction or breakdown might Ground wire was not at ground...
-
Page 382: Character Code Table
3. Communication specifications Character code table HEX. XO N " STO P XO F F & EO F < > Note 1: The above character codes are written in hexadecimal. Note 2: SP indicates a blank space. Note 3: Only capital letters can be used for robot language. Small letters are used for program comments and so on. -
Page 383: Connecting To A Pc
3. Communication specifications Connecting to a PC The following are examples of connecting to a PC using the YAMAHA communication cable. 1) Using the PC's COM port CAUTION RCX142 MOTOR OP.1 OP.3 MODEL. There is no problem with reversing SER. NO. - Page 384 MEMO...
- Page 385 Chapter 9 Specifications Contents 1. Controller basic specifications ............9-1 RCX142 basic specifications ..............9-1 RCX142-T basic specifications .............. 9-2 2. Controller basic functions ..............9-3 3. Robot controller external view ............9-4 RCX142 external view ................9-4 RCX142-T external view ............... 9-5...
- Page 386 MEMO...
-
Page 387: Controller Basic Specifications
Setting by accel coefficient and decel. rate parameters (1% steps) Acceleration/deceleration (Can be changed by programming.) setting Zone control (Optimum speed setting matching SCARA robot arm position) YAMAHA BASIC conforming to JIS B8439 (SLIM Program language language) Multitask 8 tasks maximum Sequence program 1 program... -
Page 388: Rcx142 Basic Specifications
Acceleration/deceleration Setting by accel coefficient and decel. rate parameters (1% steps) (Can be changed by programming.) setting Zone control (Optimized speed for arm position) YAMAHA BASIC conforming to JIS B8439 (SLIM Program language language) Multitask 8 tasks maximum Sequence program... -
Page 389: Controller Basic Functions
2. Controller basic functions Function Description AUTO mode (Major functions: program execution, step execution, etc.) PROGRAM mode (Major functions: program creation and editing, etc.) Operation modes MANUAL mode (Major functions: jog movement, point data teaching, etc.) SYSTEM mode (Major functions: parameter editing, data initializing, etc.) UTILITY mode (Major functions: motor power supply control, etc.) Array declaration commands (DIM statement) Assignment commands (Numeric assignment statement, character string... -
Page 390: Robot Controller External View
READ INSTRUCTION MANUAL BATT OP.2 OP.4 RGEN STD.DIO SAFETY ACIN 200-230V~ 50-60Hz MAX.2500VA 44.8 27.6 Fig. 9-3-1-2 RCX142 with RGU-2 option installed 139.5 15.5 (20) RCX142 MOTOR OP.1 OP.3 RGU-2 MODEL. SER. NO. MANUFACTURED FACTORY AUTOMATION EQUIPMENT MADE IN JAPAN SANYODENKI... -
Page 391: Rcx142 External View
3. Robot controller external view RCX142-T external view Fig. 9-3-2-1 139.5 15.5 (20) RCX142 MOTOR OP.1 OP.3 MODEL. SER. NO. MANUFACTURED FACTORY AUTOMATION EQUIPMENT MADE IN JAPAN 注意 SANYODENKI CAUTION 取扱説明書参照 READ INSTRUCTION MANUAL BATT OP.2 OP.4 RGEN STD.DIO SAFETY... -
Page 392: Mpb Basic Specifications And External View
4. MPB basic specifications and external view MPB basic specifications and external view Model Liquid crystal display (40 characters × 8 lines) Display screen DC ±12V Power 1500V × 1 microsecond Noise resistance Operating Ambient temperature: 0 to 40°C, humidity: 35 to 85% environment (no condensation), storage temperature: -10 to 65°C W189 ×... - Page 393 Chapter 10 Troubleshooting Contents 1. Error Messages ................10-1 Robot controller error messages ............10-1 [ 0] Warnings and messages ................10-3 [ 1] Warnings (error history entry) ..............10-5 [ 2] Robot operating area errors ............... 10-5 [ 3] Program file operating errors ..............10-9 [ 4] Data entry and edit errors ................
- Page 394 MEMO...
-
Page 395: Error Messages
1. Error Messages Robot controller error messages When an error occurs, an error message appears on the message line (2nd line) of the MPB screen. Error messages comprise the following elements. 12.1: Emg.stop on Message Error classification No. Error No. Error group No. - Page 396 • Turn the power ON again in “UTILITY” mode to reset. DO 02a (SERVO ON) = OFF DO 03a (ALARM) = ON CAUTION When an error cannot be cancelled, *4 … System backup battery defect contact your YAMAHA sales dealer. • Replace battery to reset. DO 03a (ALARM) = ON...
-
Page 397: 0] Warnings And Messages
1. Error Messages [ 0] Warnings and messages : Undefined error Code : &H0000 Meaning/Cause : Undefined system error. Action : Contact our company. : Origin incomplete * If the cause of the Origin incomplete error can be pinpointed, an error code will be attached in parentheses at the end. - Page 398 1. Error Messages : Program suspended by “HOLD” Code : &H0006 Meaning/Cause : Program execution was interrupted by a HOLD command. Action : Press the key to cancel hold condition and start running START the program from the next command. : Turn on power again Code : &H0007...
-
Page 399: 1] Warnings (Error History Entry)
1. Error Messages 0.16 : Changed SERVICE mode input Code : &H0010 Meaning/Cause : Status of service mode inputs (DI02, SI02) was changed. Action : --- 0.17 : Can't edit while STD.DIO DC24V on Code : &H0011 Meaning/Cause : Setting to disable the DC 24V monitoring function of STD.DIO was attempted even though DC 24V was being supplied at STD.DIO connector. - Page 400 1. Error Messages : Std. coord. doesn't exist Code : &H0202 Meaning/Cause : Setting of standard coordinates is incomplete. Action : 1. Set the standard coordinates. 2. Set the parameter arm length and offset pulse. : Coordinate cal. failed Code : &H0203 Meaning/Cause : a.
- Page 401 1. Error Messages 2.10 : Exceeded movable range Code : &H020A Meaning/Cause : Area is outside the movable range of movement path. Action : 1. Set movement points correctly. 2. Specify movement path to be within the movable range. 2.11 : ? exceeded shift coord. range Code : &H020B Meaning/Cause : Shift coordinate range ? value was exceeded.
- Page 402 1. Error Messages 2.23 : Cannot move (RIGHTY to LEFTY) Code : &H0217 Meaning/Cause : a. Interpolation movement shifting from the right-handed sys- tem to the left-handed system was executed with a SCARA robot. Action : 1. Check the current hand system and point data hand system flag.
-
Page 403: 3] Program File Operating Errors
1. Error Messages 2.27 : W. carrier deadlock Code : &H021B Meaning/Cause : Failed to move the double carrier axis and a deadlock occurred, because the target positions of both carriers will interfere with each other. Action : Check the robot program. [ 3] Program file operating errors : Too many programs Code... - Page 404 1. Error Messages : Cannot find strings Code : &H0309 Meaning/Cause : Could not find specified character string during search. Action : If needed change the character string and try searching again. 3.10 : Object program doesn’t exist Code : &H030A Meaning/Cause : The object program name is not registered.
-
Page 405: 4] Data Entry And Edit Errors
1. Error Messages 3.17 : Cannot erase current program Code : &H0311 Meaning/Cause : Currently selected program cannot be deleted. Action : 1. Cancel deletion of program. 2. Change the specified program. 3.18 : Duplicated Breakpoint Code : &H0312 Meaning/Cause : Setting of breakpoint was attempted on line already set with break- points. - Page 406 1. Error Messages : Data error Code : &H0502 Meaning/Cause : Data entered in wrong format. Action : Input the data in the correct format. : Number error Code : &H0503 Meaning/Cause : a. Mistake in the number entry. b. Expression value is wrong. Action : 1.
- Page 407 1. Error Messages 5.10 : Too many characters Code : &H050A Meaning/Cause : a. Character string was defined in excess of 75 characters. b. Addition to the character string total exceeds 75 characters. Action : 1. Change to character string count of 75 characters or less. 2.
- Page 408 1. Error Messages 5.17 : WHILE without WEND Code : &H0511 Meaning/Cause : There is no WEND statement corresponding to WHILE statement. Action : 1. Delete the WHILE statement. 2. Add a WEND statement corresponding to the WHILE state- ment. 5.18 : NEXT without FOR Code : &H0512...
- Page 409 1. Error Messages 5.24 : END SUB without SUB Code : &H0518 Meaning/Cause : a. There is no SUB statement corresponding to END SUB statement. b. END SUB command was executed without SUB command. Action : 1. Delete the END SUB statement. 2.
- Page 410 1. Error Messages 5.32 : Undefined user function Code : &H0520 Meaning/Cause : Undefined function was called. Action : Set definition for undefined function. 5.34 : Too many dimensions Code : &H0522 Meaning/Cause : An array exceeding 3 dimensions was defined. Action : Change array to within 3 dimensions.
- Page 411 1. Error Messages 5.41 : Illegal command outside proce. Code : &H0529 Meaning/Cause : Command cannot be executed outside of procedure (between SUB to END SUB statements). Action : Delete command that cannot be executed outside of procedure. 5.42 : Illegal command inside IF Code : &H052A Meaning/Cause : Cannot execute command between IF to ENDIF...
- Page 412 1. Error Messages 5.48 : END SELECT without SELECT Code : &H0530 Meaning/Cause : There is no SELECT statement corresponding to END SELECT statement. Action : 1. Delete the END SELECT statement. 2. Add a SELECT statement corresponding to the END SE- LECT statement.
-
Page 413: 6] Robot Language Execution Errors
1. Error Messages 5.55 : ELSEIF without ENDIF Code : &H0537 Meaning/Cause : There is no ENDIF statement corresponding to ELSEIF statement. Action : 1. Delete the ELSEIF statement. 2. Add an ENDIF statement corresponding to the ELSEIF statement. [ 6] Robot language execution errors : Illegal command Code : &H0601... - Page 414 1. Error Messages : RETURN without GOSUB Code : &H0607 Meaning/Cause : RETURN command was executed without executing the GOSUB command. Action : Confirm execution of GOSUB command. : END SUB without CALL Code : &H0608 Meaning/Cause : END SUB command was executed without executing CALL com- mand.
- Page 415 1. Error Messages 6.14 : Task number error Code : &H060E Meaning/Cause : a. Task number is outside the range 2 to 8. b. START, CUT, SUSPEND or RESTART command was ex- ecuted for task 1 (main task). c. START, CUT, SUSPEND or RESTART command was ex- ecuted for its own task.
- Page 416 1. Error Messages 6.21 : Same point exists Code : &H0615 Meaning/Cause : a. Same points exist for 1 of 3 points of an MOVE C command. b. Same points are consecutively on the path of PATH motion. Action : 1. Change the MOVE C command to 3 different points. 2.
- Page 417 1. Error Messages 6.28 : PATH without END Code : &H061C Meaning/Cause : PATH START was executed without executing PATH END. Action : Execute PATH END to end the path setting and then execute PATH START. 6.29 : No PATH data Code : &H061D Meaning/Cause : No path is set for PATH motion.
-
Page 418: 9] Memory Errors
1. Error Messages 6.35 : Expression value error Code : &H0623 Meaning/Cause : The expression value is other than -1 and 0 even though condi- tional expression is a numeric expression. Action : 1. Set the expression value correctly. 2. Change the "TRUE condition" parameter setting. [ 9] Memory errors : Program destroyed Code... - Page 419 1. Error Messages : POS.OUT data destroyed Code : &H0908 Meaning/Cause : Part or all of the POS.OUT data was destroyed. Action : Initialize the POS.OUT data. : Pallet data destroyed Code : &H0909 Meaning/Cause : Part or all of the pallet definition data was destroyed. Action : Initialize the pallet definition data.
-
Page 420: System Setting Or Hardware Errors
1. Error Messages 9.38 : Sequence object memory full Code : &H0926 Meaning/Cause : Sequence object program exceeded its memory capacity. Action : Compress the source size of sequence program, so that the object program size is reduced. 9.39 : Sequence object destroyed Code : &H0927 Meaning/Cause : Part or all of the sequence object program has been destroyed. - Page 421 1. Error Messages 10.8 : Cannot set auxiliary axis Code : &H0A08 Meaning/Cause : Setting of axis that cannot be set as an auxiliary axis was at- tempted. The following axes cannot be set as an auxiliary axis. • SCARA type robot axes •...
-
Page 422: I/O And Option Board Errors
1. Error Messages 10.21 : Sys. backup battery low voltage Code : &H0A15 Meaning/Cause : a. System backup battery voltage is low. b. System backup battery is disconnected from CPU board. Action : 1. Replace system backup battery. 2. Connect system backup battery securely to CPU board. Dedicated output : *4 10.22 : STD.DIO DC24V power low Code... - Page 423 1. Error Messages 12.3 : Arm locked Code : &H0C03 Meaning/Cause : Movement of an arm was attempted while the arm lock variable LO was ON. Action : Clear the arm lock variable LO. 12.11 : CC-Link communication error Code : &H0C0B Meaning/Cause : a.
- Page 424 1. Error Messages 12.17 : DeviceNet hardware error Code : &H0C11 Meaning/Cause : a. Breakdown in DeviceNet compatible unit. Action : 1. Replace the DeviceNet compatible unit. 12.18 : Incorrect DeviceNet setting Code : &H0C12 Meaning/Cause : a. The MacID or communication speed setting is incorrect. Action : 1.
- Page 425 1. Error Messages 12.32 : DO1 DC24V disconnected Code : &H0C20 Meaning/Cause : a. DC 24V not being supplied to DO1 section of OPT.DIO unit. b. Drop in DC 24V supply voltage to DO1 section of OPT.DIO unit. c. OPT.DIO connector is not connected. Action : 1.
-
Page 426: Mpb Errors
1. Error Messages 12.41 : EtherNet link error Code : &H0C29 Meaning/Cause : TELENET is disconnected. a. The cable is broken or disconnected. b. Communicating with a client was off for more than the time specified by the "7. timeout [min]" parameter for EtherNet. c. -
Page 427: Rs-232C Communication Errors
1. Error Messages 13.2 : MPB parity error Code : &H0D02 Meaning/Cause : Abnormal data was entered in communication with MPB. Action : 1. Install the MPB correctly. 2. Install the MPB in a good operating environment. (Do not install near sources of noise.) 13.11 : MPB version mismatch Code : &H0D0B... - Page 428 1. Error Messages 14.12 : CMU is not ready Code : &H0E0C Meaning/Cause : Could not sent data from controller because receive prohibit status of other party continued for more than 10 seconds. Action : 1. Replace the communications cable. 2.
-
Page 429: Memory Card Errors
1. Error Messages 14.26 : Illegal command,SERVICE mode Code : &H0E1A Meaning/Cause : Unable to execute since operation is in SERVICE mode. Action : 1. Cancel SERVICE mode. 2. Change the exclusive control setting so it can be used in SERVICE mode. - Page 430 1. Error Messages 15.12 : Disk full Code : &H0F0C Meaning/Cause : Write failed. No space is available on memory card. (File con- tents cannot be guaranteed.) Action : 1. Use a new memory card. 2. Delete unnecessary files. 15.13 : Unformatted media Code : &H0F0D Meaning/Cause : a.
-
Page 431: Motor Control Errors
1. Error Messages 15.24 : Media hardware error Code : &H0F18 Meaning/Cause : a. Memory card is defective b. Error occurred in controller. Action : 1. Replace the memory card. 2. Replace the controller. 15.27 : Data read error Code : &H0F1B Meaning/Cause : Failed to load file. - Page 432 1. Error Messages 17.3 : Over current Code : &H1103 Meaning/Cause : a. Short in motor cable. b. Malfunction occurred in motor. Action : 1. Replace the motor cable. 2. Replace the motor. Dedicated output : *2 17.4 : Over load Code : &H1104 Meaning/Cause : a.
- Page 433 1. Error Messages 17.6 : P.E.counter overflow Code : &H1106 Meaning/Cause : a. Robot drive section mechanically locked. b. Motor acceleration is excessive. c. System generation setting is wrong. d. Motor cable wiring is broken or wiring is incorrect. e. Electromagnetic brake for holding vertical axis is defective. f.
- Page 434 1. Error Messages 17.17 : Mode error Code : &H1111 Meaning/Cause : Driver unit is in abnormal control mode status. Action : Contact our company with details on the problem. Dedicated output : *2 17.18 : DPRAM data error Code : &H1112 Meaning/Cause : 2 tries at loading the dual port RAM failed.
- Page 435 1. Error Messages 17.24 : Can not reserve parameter Code : &H1118 Meaning/Cause : Data for driver unit from the CPU unit was not received by driver unit. Action : 1. Turn the power off and then on again. 2. Replace the controller. 17.28 : Dual P.E.
- Page 436 1. Error Messages 17.35 : Axis weight over Code : &H1123 Meaning/Cause : The weight (sum of work weight + axis weight) on a particular robot axis exceeded the maximum payload of that axis. Action : 1. Redo the system generation. 2.
- Page 437 1. Error Messages 17.82 : CS read error Code : &H1152 Meaning/Cause : Readout check of resolver electrical angle information failed twice Action : 1. Perform absolute reset. 2. Replace the motor. 3. Replace the controller. 17.83 : Backup position data error 1 Code : &H1153 Meaning/Cause : Backup position information did not match the resolver angle...
-
Page 438: Major Software Errors
1. Error Messages 17.93 : Position backup counter overflow Code : &H115D Meaning/Cause : Position information lost when motor speed (rotation) exceeded 4096 when controller power was cut off. Action : 1. Do not rotate motor more than necessary when the controller power is being cut off. -
Page 439: Major Hardware Errors
1. Error Messages 21.11 : System error (EmgHalt) Code : &H150B Meaning/Cause : Software error occurred. Action : Contact our company with details of this problem. 21.12 : System error (RTOS) Code : &H150C Meaning/Cause : Software error occurred. Action : Contact our company with details of this problem. - Page 440 1. Error Messages 22.3 : DC24V power low Code : &H1603 Meaning/Cause : a. DC 24V power supply malfunctioned and the voltage dropped. b. Electromagnetic brake for vertical axis is defective. c. Wiring for electromagnetic brake of vertical axis is wrong. d.
- Page 441 1. Error Messages 22.12 : Abnormal temperature Code : &H160C Meaning/Cause : Controller internal temperature rose to 60°C or more. Action : 1. Improve the operating environment. 2. Check if the cooling fan is operating correctly. 3. Replace the controller. Dedicated output : *1 22.13 : Bus interface overtime Code...
- Page 442 1. Error Messages 22.42 : OPT.2 interface overtime Code : &H162A Meaning/Cause : 1. Failed to acquire access privilege for interface with option board connected to option slot 2. Action : 1. Replace the option board connected to option slot 2. : 2.
-
Page 443: Mpb Error Messages
1. Error Messages MPB Error Messages When a hardware error or a software error occurs in the MPB, the following messages are highlighted (shown with reversed background) on the guideline of the lowest line of the screen. M P B T R A P ! ! Contents : Undefined operation code was executed. - Page 444 1. Error Messages M P B T r a n s m i t E r r o r ! ! ( T i m e O u t E r r o r ) Contents : Transmitting to controller is impossible. Cause : a.
-
Page 445: Troubleshooting
Please contact our company with details of the problem that occurs. Report the following items in as much detail as possible. Item Description • Controller model name and serial No. example: RCX142 + regenerative unit • Robot model name + serial No. What happened example: YK250X • Controller version No. -
Page 446: Acquiring Error Information
2. Troubleshooting Acquiring error information Error history (log) information is stored inside the robot controller. The following 2 methods are available for checking this information. 2.2.1 Acquiring information from the MPB [Procedure] 1) Press the (DIAGNOS) key in “SYSTEM” mode. 2) To check controller error status, press the (DIAGNOS) key. -
Page 447: Troubleshooting Checkpoints
2. Troubleshooting Troubleshooting checkpoints 1. Installation and power supply Symptom Possible cause Check items Corrective action Controller won't turn on • Power not supplied. • Check power input terminal • Connect power input terminal even with power supplied. connection (L/N/GND). correctly. - Page 448 2. Troubleshooting 2. Robot operation Symptom Possible cause Check items Corrective action Controller turns on but • Interlock signal. • Check standard I/O interface • Connect the standard I/O can't execute program and connector (for interlock signal) interface connector for manual movement.
- Page 449 2. Troubleshooting 3. I/O operation Symptom Possible cause Check items Corrective action Won't operate even when • No DC24V supply. • Check that DC 24V is supplied • Supply DC 24V. dedicated input signal is from standard I/O interface supplied. connector.
- Page 450 All rights reserved. No part of this publication may be reproduced in any form without the permission of YAMAHA MOTOR CO., LTD. Information furnished by YAMAHA in this manual is believed to be reliable. However, no responsibility is assumed for possible inaccuracies or omissions.