Miele KFN 14943 SD ED Operating And Installation Instructions
Fridge-freezer combination
Hide thumbs
Also See for KFN 14943 SD ED:
- Operating and installation instructions (68 pages) ,
- Installation instructions manual (19 pages) ,
- Operating and installation manual (64 pages)

Related Manuals for Miele KFN 14943 SD ED


Summary of Contents for Miele KFN 14943 SD ED
- Page 1 Operating and Installation Instructions Fridge-Freezer Combination KFN 14943 SD ed en - CA To prevent accidents and machine damage read these instructions before installation or use. M.-Nr. 07 589 450...
-
Page 2: Table Of Contents
Using the refrigerator efficiently ........ - Page 3 Freezing and storing food ......... . 30 Maximum freezing capacity.
-
Page 4: Description Of The Appliance
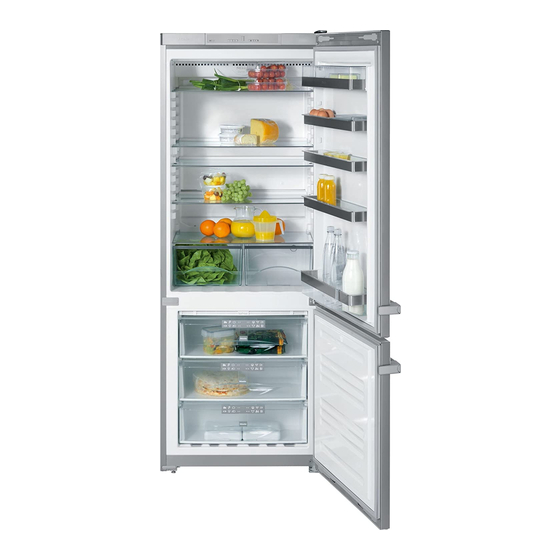
Description of the appliance a ON button for the whole appliance and ON/OFF button for switching the refrigerator and freezer sections on and off individually b DynaCool button c Super Cool / Super Freeze button d Button to set the... - Page 5 a Fan b Interior lighting c Butter and cheese compartment d Bottle shelf e Egg tray / serving shelf f Retainer for the Active AirClean filter g Shelves h Condensate channel and drain hole i Fruit and vegetable drawers j Bottle divider* k Bottle shelf l Freezer drawers with freezer calendar...
-
Page 6: Caring For The Environment
Caring for the environment Disposal of packing materials The cardboard box and packing materials are biodegradable and recyclable. Please recycle. Ensure that any plastic wrappings, bags, etc., are disposed of safely and kept out of the reach of babies and young children. -
Page 7: Warning And Safety Instructions
This appliance complies with all applicable safety laws and regulations. However, improper use can result in personal injury and material damage. Read the operating instructions carefully before operating the appliance for the first time. They contain important information on the installation, safety, operation and care of your appliance. -
Page 8: Technical Safety
A damaged appliance may endanger your safety! If the connection cable is damaged it must be replaced by a Miele approved service technician to protect the user from danger. This appliance contains the coolant Isobutane (R600a), a natural gas that is environmentally friendly but flammable. - Page 9 NOT on the cord. – the respective breaker of the house wiring system is off. Defective components should only be replaced with genuine Miele original spare parts only. Only with these parts does the manufacturer guarantee that they comply with the safety requirements.
- Page 10 This could cause sparking. Danger of explosion! High proof alcohol should be stored upright in tightly closed bottles in the refrigerator section. Danger of explosion! Do not store cans or bottles in the freezer section that contain carbonated beverages or liquids that could freeze.
- Page 11 The steam could reach the electrical components and cause a short circuit. Warning and Safety Instructions Disposing of your old refrigerator / freezer Before disposing of your old fridge/freezer, first make the door latch or lock unusable. This will prevent children from accidentally locking themselves in and endangering their lives.
-
Page 12: How To Save Energy
(approx. 20 °C (68 F)). At a medium setting of 2 to 3. Cellar compartment 8 to 12 °C (46 to 54 F) Refrigerator section 4 to 5 °C (39 to 41 F) Freezer section -18 °C (-2 F) Open the door only when necessary, and for as short a time as possible. -
Page 13: Switching The Appliance On And Off
The appliance will now start cooling, and the interior light of the refrigerator will come on when you open the door. Allow the appliance to run for a few hours before placing food in it. -
Page 14: Switching The Appliance Off
Switching the appliance ON and OFF Use this button to switch back and forth between the refrigerator section and the freezer section. If you want to select the freezer section (e. g. to check the temperature), ^ tap the button to switch from the refrigerator section to the freezer section;... -
Page 15: The Settings Mode
That section is now switched off, while the other section remains on. To switch a section back on again, ^ select the section you wish to switch on; the corresponding symbol lights up yellow. ^ Touch the ON/OFF button until the temperature display lights up, or ^ switch the appliance off and then back on again. -
Page 16: Turning The Button Sound On And Off
Switching the appliance ON and OFF Turning the button sound on and off If you prefer the buttons to be silent when touched, you can turn the button sound off. ^ Touch the X button and keep your finger on the button. ^ Now tap the ON/OFF button once (WITHOUT releasing the X button!). -
Page 17: Switching Off For Extended Periods Of Time
^ Whenever you finish changing a setting, tap the ON/OFF button to confirm. ^ Keep tapping the X button until c is displayed. ^ Tap the ON/OFF button. You have left the settings mode. When the safety lock is activated, the safety lock indicator show in the temperature display. -
Page 18: The Correct Temperature
(room temperature range), and should not be used outside this range..in the refrigerator We recommend a temperature of 39°F (4°C) in the middle of the appliance..in the freezer... -
Page 19: Setting The Temperature
Temperature ranges The temperature can be selected within the following ranges: – In the refrigerator section, from 36 to 52°F (2°C to 11°C). – In the freezer section, 8 to -15°F (-16° to -26°C). The ambient temperature in the room... -
Page 20: Changing The Brightness Of The Temperature Display
The correct temperature Changing the brightness of the temperature display You can adjust the brightness of the temperature display to suit the lighting conditions of the room. ^ Touch the X button and keep your finger on the button. ^ Now tap once on the ON/OFF button (WITHOUT releasing the X button!). -
Page 21: Alarm
The appliance is equipped with an alarm system to ensure that the temperature in the freezer section does not rise unnoticed and to avoid energy being wasted if the door is left open. Switching the alarm system The alarm system is always active. It does not need to be switched on manually. -
Page 22: Door Alarm
Alarm Door alarm If one of the appliance doors is left open for longer than approx. 2 minutes, the alarm signal will sound. The alarm off button lights up red and the symbol of the temperature section with the open door flashes. Once the appliance door is shut, the alarm stops and the displays go out. -
Page 23: Super Cool, Super Freeze And Dynacool
Super Cool, Super Freeze and DynaCool Super Cool The Super Cool function can be used to rapidly reduce the temperature in the refrigerator section to its lowest setting (depends on the room temperature). Switching Super Cool ON Super Cool is particularly recommended for the fast chilling of large amounts of fresh food or drinks. -
Page 24: Super Freeze
Super Cool, Super Freeze and DynaCool Super Freeze For best results, switch on the Super Freeze function before putting fresh food into the freezer. Fresh food will be frozen quickly, so that the nutritional value, vitamins, appearance and taste are maintained. Exceptions: –... -
Page 25: Dynacool
(see "Using the refrigerator efficiently"). If you are placing a large amount of the same type of food in the refrigerator at one time (e.g. for a party), it is a good idea to switch on the DynaCool function. -
Page 26: Using The Refrigerator Efficiently
Coldest area The coldest area in the refrigerator section is directly above the fruit and vegetable drawers. Use these cold areas in the refrigerator for all highly perishable foods, such as: – fish, meat, poultry, – deli meats, store-bought meals, –... -
Page 27: Adjusting The Interior Fittings
Moving the shelves The shelves in the refrigerator section can be adjusted according to the height of the food. ^ Lift the shelf, pull it forwards slightly, lift the recess over the support ribs and move the shelf up or down. -
Page 28: Moving The Serving Shelf / Bottle Shelf
Adjusting the interior fittings Moving the serving shelf / bottle shelf ^ Lift the hanging container up and out of the stainless steel support frame. ^ Push the stainless steel support frame up and remove it by pulling it forward. ^ Replace the stainless steel support frame at the desired location. -
Page 29: Adjusting The Bottle Divider
Adjusting the bottle divider (may vary by model) The bottle divider can be moved to the left or right. This holds the bottles more securely in position when the door is opened and closed. The bottle divider can be removed completely (e.g. -
Page 30: Freezing And Storing Food
Freezing and storing food Maximum freezing capacity To ensure that fresh food placed in the freezer freezes through to the core as quickly as possible, the maximum freezing capacity must not be exceeded. The maximum freezing capacity within a 24-hour period is listed on the data plate, as "Freezing capacity ...kg/24 h". -
Page 31: Home Freezing
Home freezing Only freeze food that is fresh and in good condition! Hints for home freezing – The following types of food are suitable for home freezing: fresh meat, poultry, game, fish, vegetables, herbs, fresh fruit, dairy products, baked goods, leftovers, egg yolks, egg whites and most pre-cooked meals. -
Page 32: Before Placing Food In The Freezer
Freezing and storing food Before placing food in the freezer ^ When freezing more than 2 kg of fresh food, switch on the Super Freeze function ahead of time (see Super Freeze). This will protect the food that is already in the freezer with an added boost of cold. -
Page 33: Defrosting Frozen Foods
– in the microwave, – in a regular oven, using the "fan" or "defrost" setting, – at room temperature, – in the refrigerator (as it thaws, the frozen food will help cool the other food in the refrigerator), – in a steam oven. -
Page 34: Using The Cool Pack
Freezing and storing food Using the cool pack The cool pack prevents the temperature in the freezer from rising too quickly in the event of a power outage. Place the cool pack in the upper drawer, directly on top of the food. The cool pack will be at its most effective after it has been in the freezer for approximately 24 hours. -
Page 35: Automatic Defrosting
The refrigerator defrosts automatically. During normal operation, condensate and frost can build up on the rear wall of the refrigerator and drawers. You do not need to remove this, as it will defrost and evaporate automatically with the heat generated by the appliance. -
Page 36: Cleaning And Care
For all stainless steel surfaces, use a suitable stainless steel cleaner (available through Miele Customer Service). Make sure that no water gets into the electronics or into the lighting. Do not let any cleaning water get into the condensate drain hole. -
Page 37: Cleaning The Ventilation Slits
Cleaning and care After cleaning ^ Replace all the parts of the refrigerator section. ^ Return food to the refrigerator section, close the doors, plug in the power cord and switch on the appliance. ^ Switch on the Super Freeze function to cool down the freezer section quickly. -
Page 38: Active Charcoal Filter
If you do not have any new active charcoal filters, you can order new ones from your Miele dealer. You can change the active charcoal filters at a later date. If you are bothered by the red active... - Page 39 – if necessary, change the active charcoal filters earlier (and reset the timer), – put additional active charcoal filters (with retainer) in the appliance. Active AirClean filters and retainers are available from your Miele dealer or from Miele Customer Service.
-
Page 40: Troubleshooting
^ Check whether the circuit breaker of the house wiring system is switched off. If so, contact Miele Customer Ser- vice..the door to the freezer section cannot be opened and closed several times in succession? This is no cause for concern. - Page 41 . . . the active charcoal filter change display lights up red? ^ Change the active charcoal filters. If necessary, order replacement filters from your Miele dealer.."nA" appears in the temperature display? The temperature has risen too high at some point during the past few hours or days because of a power outage.
- Page 42 ^ Clean the condensate channel and the drain hole. If a malfunction cannot be corrected using this troubleshooting guide, please contact Miele Customer Ser- vice. To prevent cold from escaping, open the appliance doors as little as possible until the malfunction has...
-
Page 43: Noises
Normal noises Brrrrr... Blubb, blubb... Click... Sssrrrrr... Please bear in mind that a certain amount of noise is unavoidable (from the compressor, and the coolant circulating through the system). Noises that you can easily rectify Rattling, vibrating What causes them? Humming noise made by the motor (compressor). -
Page 44: After Sales Service
After sales service In the event of a fault which you cannot easily fix yourself, please contact the Miele Technical Service Department at the address on the back of this booklet. When contacting the Technical Service Department, please quote the model... -
Page 45: Electrical Information
If there are any questions regarding the electrical connection of this appliance to the power supply, please consult a licensed electrician or call the Miele Technical Service. V 1-800-565-6435 Electrical information The appliance is supplied with a... -
Page 46: Installation Information
Installation information Do not place any devices that produce heat (such as a toaster or microwave) on top of the appliance. This would increase the energy consumption of the appliance! This fridge/freezer should not be placed side-by-side with a second model. -
Page 47: Adjustments
Adjustments ^ Use the wrench provided to adjust the feet as needed, so that the appliance is level. ^ If necessary, unscrew the foot a from the hinge bracket in order to support the appliance door. Installation information... -
Page 48: Appliance Dimensions
Installation information Appliance dimensions KFN 14943 SD ed 2020... -
Page 49: Changing The Door Hinging
The appliance comes with right-hand hinging. If left-hand door hinging is preferred, then follow these instructions to change the door hinge: You will need the following tools: – a crosstip screwdriver, – a flathead screwdriver, – various sizes of Torx screwdrivers, –... - Page 50 Changing the door hinging Before changing the hinging, remove any items of food from the shelves in the appliance door. Removing the top soft-close mechanism: ^ Open the top door of the appliance. ^ Loosen the panel a from the soft-close mechanism: From below, slide a flathead screwdriver into the recesses, then slowly and carefully...
- Page 51 ^ Remove the cover d. Now the soft-close mechanism and the appliance are no longer connected. ^ Remove the panel a. ^ Push the shock absorber arm f as far as possible towards the handle side. ^ Loosen the three screws g on the soft-close mechanism and the spacer.
- Page 52 Changing the door hinging Caution! The top door of the appliance is no longer secured as soon as the hinge bracket is removed when following the instructions below! ^ Close the top door of the appliance. ^ Loosen the screws m on the top hinge bracket n and remove the hinge bracket by pulling up.
- Page 53 ^ Push the pin e up and out. Now the soft-close mechanism and the appliance are no longer connected. ^ Remove the panel a. ^ Push the shock absorber arm f as far as possible towards the handle side. ^ Loosen the three screws g on the soft-close mechanism and the spacer.
- Page 54 Changing the door hinging ^ Lift the plugs l out of the door bearing bushing in the appliance door and place it on the other side. Mounting the bottom door of the appliance: ^ Remove the cover a towards the front.
- Page 55 ^ Put the bearing pin i in the middle of the appliance through the hinge bracket k into the bottom door of the appliance. Mounting the bottom soft-close mechanism: ^ Remove the cover a from the panel b, turn it 180° and replace it on the other side.
- Page 56 Changing the door hinging ^ Hang the panel b on the shock absorber arm d. ^ Pull the shock absorber arm d towards the hinge bracket and insert the pin e from the top so that the square rests in the recess. ^ Put on the cover f in such a way that it engages.
- Page 57 Mounting the top soft-close mechanism: ^ Remove the cover a from the panel b, turn it 180° and replace it on the other side. ^ Hook the spacer on the handle side into the retainer (A). ^ Hook the soft-close mechanism into the retainer (B) on the appliance side.
- Page 58 Changing the door hinging ^ Remove the securing device g. ^ Place the panel b onto the soft-close mechanism from above, engaging it at the bottom first and then at the top. ^ Close the top door of the appliance. Remounting the door handles: The following instructions must be followed when attaching the door...
-
Page 59: Aligning The Appliance Doors
The appliance doors can be aligned with the appliance housing afterwards. In the following figure, the appliance door is not closed so that the individual steps can be seen more clearly. Align the bottom door in the bottom hinge bracket via the outer, elongated holes: ^ Remove the middle screw a from the hinge bracket. -
Page 60: Installing The Appliance
Installing the appliance a adapter cabinet b appliance c kitchen cabinet d wall The appliance can be installed in any fitted kitchen. To match the appliance to the height of the fitted kitchen, a suitable adapter cabinet a can be installed over the appliance. - Page 64 Subject to change without notice / 4709 M.-Nr. 07 589 450 / 01 KFN 14943 SD ed...