
Related Manuals for Raritan Dominion SX II


Summary of Contents for Raritan Dominion SX II
- Page 1 Dominion SX II Administrators Guide 2.0.0 Copyright © 2015 Raritan, Inc. DSX2-v2.0.0.-0A-E August 2015 255-60-0005-00...
- Page 2 Raritan, Inc. © Copyright 2015 Raritan, Inc. All third-party software and hardware mentioned in this document are registered trademarks or trademarks of and are the property of their respective holders.
-
Page 3: Table Of Contents
Contents CS03 Certification - DSX2-16 and DSX2-48 Chapter 1 Features and Benefits Package Contents .......................... 8 SX II Models ........................... 9 SX II Appliance Diagram ........................ 9 Supported Serial Devices ......................10 SX II Access Clients ........................11 Chapter 2 Configure SX II for the First Time Default Login Information ...................... - Page 4 Standalone Raritan Serial Console Requirements ..............48 Set Windows OS Variables and Install Standalone Raritan Serial Console (RSC) ..48 Set Linux OS Variables and Install Standalone Raritan Serial Console (RSC) for Linux . 51 Setting UNIX OS Variables ....................52 Launching RSC on Windows Systems ................
- Page 5 Contents Configure SNMP Traps from the Remote Console ............126 Configure Event Management - Destinations ..............130 Enable SMTP Notifications from the Remote Console ............ 131 Configure and Test SMTP Server Settings ..............132 Configure Modem Settings from the Remote Console ............ 134 Power Supply Setup ......................
- Page 6 Contents Chapter 7 Connect a Rack PDU to SX II and Configure Power Control Options Connecting the SX II to the PX2 Serial Port ................234 Connecting the SX II to the PX2 FEATURE Port ..............235 Appendix A Specifications SX II Dimensions and Physical Specifications ................
- Page 7 CS03 Certification - DSX2-16 and DSX2-48 To avoid potentially fatal shock hazard and possible damage to Raritan equipment: • Do not use a 2-wire power cord in any product configuration. • Test AC outlets at your computer and monitor for proper polarity and grounding.
-
Page 8: Chapter 1 Features And Benefits
Chapter 1 Features and Benefits Next-Generation Console Server The Dominion SX II is Raritan's next-generation Serial Console Raritan's Next-Generation Serial Server (also known as Terminal Server) that provides IT and network Console Server administrators secure IP access and control of serial devices, anytime, anywhere. - Page 9 Dual stack IPv4 and Models IPv6 networking. The Dominion SX II has four USB 2.0 ports, three on the back panel Five USB Ports and one on the front panel. These are available for local keyboard/mouse, 3G/4G cellular modem and for automatic configuration via USB drive.
- Page 10 Telephone modem access for emergency access, business Access continuity and disaster recovery. With the Dominion SX II, you get multiple types of local access Innovative At-the-Rack Access at-the-rack. This includes: (1) Traditional RJ45 serial port, (2) Mini-USB port for laptop connection, and (3) DVI & USB-based KVM console for connection to a rackmount keyboard tray or even a KVM switch.
- Page 11 US-ASCII (ISO 646); ISO 8859-1 (Latin-1); ISO 8859-15 (Latin-9); UTF-8 and others. Raritan rack PDU's (PX, PX2, PX3, RPC) can be connected to the Remote Power Control of Raritan Dominion SX II for remote power control of the equipment connected PDU’s (With Power Control...
- Page 12 TACACS protocols. This allows Dominion SX II to use pre-existing Directory username/password databases for security and convenience. SecureID is supported via RADIUS for added security. Customers can upload to the Dominion SX II digital certificates (self- Upload Customer-Provided SSL signed or certificate authority provided) for enhanced authentication Certificates and secure communication.
- Page 13 Multiple User Interfaces freedom to use the interface best suited for the job at hand. This includes remote access via Raritan or third party serial client via CLI, Raritan graphical user interface (GUI), at-the-rack access or via CommandCenter. Convenient direct port access methods available.
- Page 14 Chapter 1: Features and Benefits Easy to Install and Manage The SX II offers complete CLI administration and management via Full CLI-based Configuration and SSH, Telnet and web-based user interface. Two script-based Management automatic configuration methods are available for a fast installation and for subsequent configuration changes.
-
Page 15: Package Contents
Chapter 1: Features and Benefits Raritan CommandCenter® Management and Scalability Like the rest of the Dominion series, Dominion SX II features Raritan’s CommandCenter complete CommandCenter Secure Gateway integration, Centralized Management allowing users to consolidate all Dominion SX II and other... -
Page 16: Sx Ii Models
Chapter 1: Features and Benefits SX II Models The following SX II models are available. Models with an M include an internal modem in addition to the standard features that are provided on all SX II models. For a list of standard features, see Introduction (see... -
Page 17: Supported Serial Devices
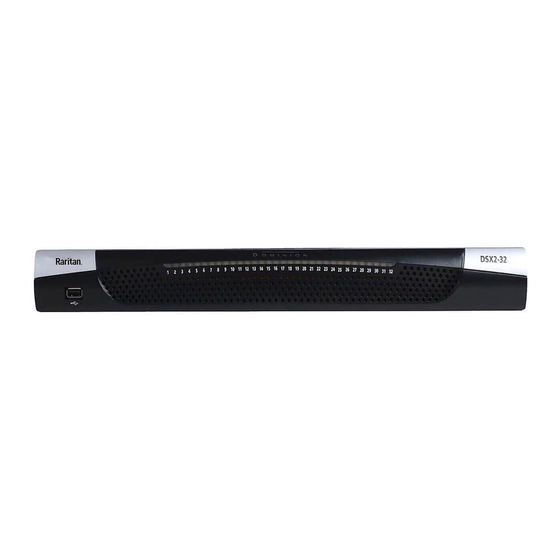
Chapter 1: Features and Benefits Appliance diagram key USB port LED port indicators Power status (Note SX II 48 port models have their power status located above the front-panel USB port.) Supported Serial Devices • Routers • LAN switches • Rack PDUs •... -
Page 18: Sx Ii Access Clients
Chapter 1: Features and Benefits SX II Access Clients Raritan Serial Console (RSC) (RSC) Access RSC by connecting from the Remote Console or use standalone RSC to access targets directly. Raritan Serial Console (RSC) Help (on page 47) Direct Port Access Direct Port Access allows users to bypass having to use the SX II's Login dialog and Port Access page. -
Page 19: Chapter 2 Configure Sx Ii For The First Time
IP netmask - 255.255.255.0 • Username - admin (all lowercase) • Password - raritan (all lowercase) Important: For backup and business continuity purposes, it is strongly recommended you create a backup administrator username and password. Keep the information in a secure location. - Page 20 Press the Enter key on your keyboard. 3. When the Login prompt appears, enter the default username admin and password raritan. Use all lowercase letters. 4. You are prompted to change the default password. Do so now, and be sure to remember this password for future login. When creating a password via CLI, it cannot begin with a space or end with a space.
-
Page 21: Set Terminal Emulation On A Target
Chapter 2: Configure SX II for the First Time 10. Enter top to return to the top level prompt. 11. Next, enter config and then enter ports at the next prompt. You can now configure each server port that has a target device connected to it. -
Page 22: Set The Cli Escape Sequence
The console sub-mode should be displayed when the default escape key sequence ^] is pressed. Raritan recommends that you do not use [ or Ctrl-[. Either of these may cause unintended commands, such as invoking the Escape Command unintentionally. This key sequence is also triggered by the arrow keys on... -
Page 23: Chapter 3 Access And Use Remote Console Features
Chapter 3 Access and Use Remote Console Features The Remote Console is a browser-based interface accessed when you log in to SX II via a network connection. Administrator Functions in the Remote Console Administrators perform SX II configuration and maintenance functions from the Remote Console, such as configuring network access, adding and managing users, managing device IP addresses and so on. -
Page 24: Allow Pop-Ups
Chapter 3: Access and Use Remote Console Features Allow Pop-Ups Regardless of the browser you are using, you must allow pop-ups in order to launch the SX II Remote Console. Security Warnings and Validation Messages When logging in to SX II, security warnings and application validation message may appear. -
Page 25: Java Validation And Access Warning
When logging in to SX II, Java prompts you to validate SX II, and to allow access to the application. Raritan recommends installing an SSL certificate in each SX II device in order to reduce Java warnings, and enhance security. SSL Certificates... -
Page 26: Additional Security Warnings
Chapter 3: Access and Use Remote Console Features Additional Security Warnings Even after an SSL certificate is installed in the SX II, depending on your browser and security settings, additional security warnings may be displayed when you log in to SX II. It is necessary to accept these warnings to launch the SX II Remote Console. -
Page 27: Connect A Laptop To Sx Ii Using A Cross-Over Cable (Optional)
Note: Check the pin definition of the RJ45 port on the target. It should match the pin definition on SX II. If needed, connect a Raritan Nulling Serial Adapter to the serial port on your target, then plug a standard Cat5 cable into the adapter. -
Page 28: Installing A Certificate
Chapter 3: Access and Use Remote Console Features Installing a Certificate You may be prompted by the browser to accept and validate the SX II's SSL certificate. Depending on your browser and security settings, additional security warnings may be displayed when you log in to SX II. It is necessary to accept these warnings to launch the SX II Remote Console. - Page 29 Chapter 3: Access and Use Remote Console Features Note: If you are not prompted by the browser, manually select Tools > Internet Options to open the Internet Options dialog. 1. Click the Content tab. 2. Click Certificates. The Certificate Import Wizard opens and walks you through each step.
-
Page 30: Example 2: Add The Sx Ii To Trusted Sites And Import The Certificate
Chapter 3: Access and Use Remote Console Features Example 2: Add the SX II to Trusted Sites and Import the Certificate In this example, the SX II's URL is added as a Trusted Site, and the Self Signed Certificate is added as part of the process. 1. - Page 31 Chapter 3: Access and Use Remote Console Features Next, import the Certificate. 1. Open an IE browser, then log in to SX II. 2. Click More Information on the first Java ™ security warning. 3. Click View Certificate Details on the More Information dialog. You are prompted to install the certificate.
-
Page 32: Converting A Binary Certificate To A Base64-Encoded Der Certificate (Optional)
Chapter 3: Access and Use Remote Console Features Converting a Binary Certificate to a Base64-Encoded DER Certificate (Optional) SX II requires an SSL certificate in either Base64-Encoded DER format or PEM format. If you are using an SSL certificate in binary format, you cannot install it. However, you can convert your binary SSL certificate. - Page 33 Chapter 3: Access and Use Remote Console Features 3. Click "Copy to File...". 4. The Certificate Export Wizard opens. Click Next to start the Wizard. 5. Select "Base-64 encoded X.509" in the second Wizard dialog. 6. Click Next to save the file as a Base-64 encoded X.509. You can now install the certificate on your SX II.
-
Page 34: Log In To Sx Ii
Chapter 3: Access and Use Remote Console Features Log In to SX II 1. Launch a supported web browser. 2. Enter the SX II HTTP, HTTPS or DNS address provided to you by your Administrator. Note: You are always redirected to the IP address from HTTP to HTTPS. -
Page 35: Sx Ii Port Access Page
Chapter 3: Access and Use Remote Console Features SX II Port Access Page After a successful login, the Port Access page opens listing all ports along with their status and availability. -
Page 36: Sx Ii Left Panel
Chapter 3: Access and Use Remote Console Features Ports are numbered from 1 up to the total number of ports available for the SX II. For example, Port_1 - Port_64, Port_1 - Port_32. "SerialPort"_"Port #" are what make up the default name the physical port until a name is configured for the port. - Page 37 Chapter 3: Access and Use Remote Console Features Information Description Displayed when? State The current state of the application, either idle or Always active. If idle, the application tracks and displays the amount time the session has been idle. Your IP The IP address used to access SX II.
- Page 38 Chapter 3: Access and Use Remote Console Features Collapse the left panel and then expand it again by clicking on the blue arrow located along the right edge of the panel.
-
Page 39: Enable Favorites
Chapter 3: Access and Use Remote Console Features Enable Favorites Enable the Favorites feature and display a list of favorite, frequently accessed SX II devices by clicking Enable in the Favorite Devices section of the left panel of the SX II interface. Accept security warnings if they are displayed. -
Page 40: Discover Devices Product Subnet
The SX II Remote Console automatically discovers the SX II devices, and any other Raritan device, in the subnet of the SX II. To discover devices on the device subnet: 1. Choose Manage > Discover Devices - SX II Subnet. - Page 41 Chapter 3: Access and Use Remote Console Features To add devices to your Favorites List: 1. Select the checkbox next to the device name/IP address. 2. Click Add. To access a discovered device: • Click the device name or IP address for that device. A new browser opens to that device.
-
Page 42: Chapter 4 Access Targets
From the Port Access page, use the Port Action menu to connect, disconnect, or control power of targets and power strips that are connected to SX II. Once connected, you can manage a target with the Raritan Serial Console (RSC). See Raritan Serial Console (RSC) Help (on page 47). - Page 43 Strip" on page 41) You can then connect via Raritan Serial Console (RSC). When you connect to a target, the RSC opens in a new window. See Raritan Serial Console (RSC) Help. Alternatively, you can connect via Direct Port Access, if SX II is configured for Direct Port Access.
-
Page 44: Connect To A Target
Connect to a Target Creates a new connection to the target device. From the SX II Remote Console, Raritan Serial Console (RSC) opens in a new window and you manage the target from there. If you are connected to the target from the Local Console port, you access the target via command line interface. -
Page 45: Disconnect From A Target Or Power Strip
Disconnect menu option is available in the Port Action menu. Clicking on the Disconnect option disconnects from a target or power strip, and closes the Raritan Serial Console (RSC) window. You can also click the X icon on the window or use the Exit menu option. -
Page 46: Power On A Target Or Power Strip
This option is visible only when there are one or more power associations to the target, and when you have permission to manage the target's power. You can also perform these actions through Raritan Serial Console (RSC) and command line interface. See Raritan Serial Console (RSC) -
Page 47: Power Off A Target Or Power Strip
• you have permission to manage the power You can also perform these actions through Raritan Serial Console (RSC) and command line interface. See Raritan Serial Console (RSC) -
Page 48: Power Cycle A Target Or Power Strip
• you have permission to manage the power You can also perform these actions through Raritan Serial Console (RSC) and command line interface. See Raritan Serial Console (RSC) - Page 49 Chapter 4: Access Targets Connect a keyboard tray or KVM console to the DVI-D and USB ports. Connect a laptop to the Mini-USB Admin port.
- Page 50 1280x1024@60Hz. Note that you can connect to targets using the Remote Console and manage them using Raritan Serial Console (RSC). See Raritan Serial Console (RSC) Help (on page 47) and...
-
Page 51: Command Line Interface Protocols
Chapter 4: Access Targets Send a break to the connected target. admin > [portname] > sendbreak Lock write access to this port. admin > [portname] > writelock Unlock write access to this port. admin > [portname] > writeunlock Query Power status of this port. admin >... -
Page 52: Command Line Interface Partial Searches
Chapter 4: Access Targets Command Line Interface Partial Searches Enter the first few characters of command and press the Tab key on your keyboard in order to locate a specific command. The command line interface (CLI) completes the entry if the characters form an exact match. -
Page 53: Command Line Interface High-Level Commands
Chapter 4: Access Targets Command Line Interface High-Level Commands The CLI is menu based. Some commands move to a menu with a different command set. The following common commands can be used at all levels of the command line interface (CLI): •... -
Page 54: Chapter 5 Raritan Serial Console (Rsc) Help
Chapter 5 Raritan Serial Console (RSC) Help Use Raritan Serial Console (RSC) to connect to serial targets from the SX II Remote Console. Alternatively, install RSC as a standalone-client. The RSC stand-alone client uses the SX II IP address and the target's port number to connect directly to the target, so you do not have to connect to the Remote Console and then connect to the target. -
Page 55: Standalone Raritan Serial Console Requirements
Chapter 5: Raritan Serial Console (RSC) Help Standalone Raritan Serial Console Requirements The following requirements must be met to support the Raritan Serial Console (RSC): • Minimum 1 GHz PC with 512 MB RAM. • ™ Java See SX II release notes for the required version. - Page 56 Chapter 5: Raritan Serial Console (RSC) Help 3. In the System variables section, click New. 4. Write down the installed Java path. 5. In the Variable value block field of the New System Variable dialog, add JAVA_HOME to the Variable name block and the Java path you wrote down earlier.
- Page 57 4. Click Next. The installation path page opens. 5. Change the path, if desired. 6. Click Next. The installation progress page opens. Note: The standalone version of RSC is available from the Raritan Support website: http://www.raritan.com/support/sup_upgrades.aspx (http://www.raritan.com/support/sup_upgrades.aspx)
-
Page 58: Set Linux Os Variables And Install Standalone Raritan Serial Console (Rsc) For Linux
PATH to include it by adding the following lines: export JAVA_HOME=/home/username/j2sdk1.6/ export PATH=$PATH:$JAVA_HOME/bin 3. Save the file. You must have administrative privileges to install Raritan Serial Console (RSC). 1. Log in to your Linux ™ machine. 2. Download, or copy from a known location, the RSC-installer.jar installation file. -
Page 59: Setting Unix Os Variables
Chapter 5: Raritan Serial Console (RSC) Help Setting UNIX OS Variables ™ ™ To check the latest JRE version on Sun Solaris 1. Launch a terminal window on the Sun Solaris desktop. 2. Type java-version in the command line and press Enter. The ™... -
Page 60: Launching Rsc On Windows Systems
1. Double-click the shortcut or use Start Programs to launch the standalone Raritan Serial Console (RSC). The RSC Login connection properties dialog appears. 2. Enter the Dominion SX II IP address, account information, and the desired target (port). 3. Click Start. RSC opens with a connection to the port. - Page 61 Chapter 5: Raritan Serial Console (RSC) Help Change the default Idle Timeout setting and then launch the RSC. See Login Limitations (on page 163) for details on changing the Idle Timeout setting. Access Emulator Options 1. Select the Emulator drop-down menu to display a list of options.
- Page 62 Chapter 5: Raritan Serial Console (RSC) Help Note: An Administrator can set Terminal emulation settings using Setup > Port Configuration. 1. Choose Emulator > Settings. The Settings screen displays the General tab with the default settings. 2. The Main Menu Shortcut default is None; accept this, or choose one of the following from the Main Menu Shortcut drop-down menu: ...
- Page 63 Chapter 5: Raritan Serial Console (RSC) Help 1. Choose Emulator > Settings and click the Display tab. 2. Click Default to accept the Default settings, and then click Ok to close the Display Settings window. To change the settings, follow these steps: a.
- Page 64 Chapter 5: Raritan Serial Console (RSC) Help c. The default font property is Monospace, or you can choose a font from the GUI Font Properties scrolling list. Note: For Simplified Chinese characters, RSC supports EUC-CN encoding system. 3. Choose the following from their respective drop-down menus: ...
- Page 65 Chapter 5: Raritan Serial Console (RSC) Help Korean Chinese Bulgarian 6. Click Ok to close the Display Settings window. If you changed the Language setting, the RSC changes to that language when the Display Settings window is closed.
- Page 66 Chapter 5: Raritan Serial Console (RSC) Help Get Write Lock Write lock prevents other users from taking the write access while you are using it. 1. To get write lock, choose Emulator > Get Write Lock. 2. If Get Write Lock is not available, a request rejected message appears.
-
Page 67: Edit
Chapter 5: Raritan Serial Console (RSC) Help 2. A check mark appears in the Write Access column after the name of the User who has Write Access to the console. 3. Click Close to close the Connected Users window. Exit 1. -
Page 68: Start And Stop Logging
• Use Ctrl+V to paste text. Start and Stop Logging When you start Raritan Serial Console (RSC), the Logging indicator on the status bar indicates whether logging is on or off. Start Logging The Start Logging function allows you to collect raw console data from the target device and save it to a file on your computer. - Page 69 Chapter 5: Raritan Serial Console (RSC) Help 3. Click Save after selecting or creating a file. Stop Logging • Choose Tools > Stop Logging.
-
Page 70: Send A Text File
Chapter 5: Raritan Serial Console (RSC) Help The logging stops. Send a Text File 1. Select Tools > Send Text File. A Send Text File screen appears. 2. Open the directory of the Text file. 3. Click on or enter the file name of the text file. -
Page 71: Toggle Power
Chapter 5: Raritan Serial Console (RSC) Help When you click Open, Raritan Serial Console (RSC) sends whatever file you selected directly to the port. If there is currently no target connected, nothing is visible on the screen. ®... -
Page 72: Power On A Target
Power On a Target Use this option to power on a target from Raritan Serial Console (RSC). This option is visible only when there are one or more power associations to the target, and when you have permission to manage the target's power. -
Page 73: Power Off A Target
2. Click Yes when prompted to confirm. Power Off a Target Use this option to power off a target from Raritan Serial Console (RSC). This option is visible only when there are one or more power associations to the target, and when you have permission to manage the target's power. -
Page 74: Power Cycle A Target
Chapter 5: Raritan Serial Console (RSC) Help 2. Click Yes when prompted to confirm. Power Cycle a Target Power cycling allows you to turn a target off and then back on through the outlet it is plugged into. This option is visible only when - •... - Page 75 Chapter 5: Raritan Serial Console (RSC) Help 2. Click Yes when prompted to confirm.
-
Page 76: Chat
Chapter 5: Raritan Serial Console (RSC) Help Chat When using browser access over SSL, an interactive chat feature called Chat allows you and other users on the same port to communicate. The maximum length of a chat message is 300 characters. -
Page 77: Help And About
Chapter 5: Raritan Serial Console (RSC) Help Help and About Help Topics include online assistance for operating the Raritan Serial Console (RSC) and release information about RSC. Help Topics • Choose Help > Help Topics. Help is displayed in a secondary window. -
Page 78: Chapter 6 Sx Ii Administration
You can control Raritan PX rack PDU outlets (power strips) and Baytech rack PDU power strip outlets that are connected to SX II. For information on setting up a PX, see the Raritan PX Online Help. For details on how to connect a PX to SX II, see... - Page 79 Chapter 6: SX II Administration If no power strips are connected to SX II, a message stating "No power strips found" is displayed in the Powerstrip Device section of page. If power strips are down or cannot be reached, the message "Cannot communicate with power strip or outlet number not match, please check!"...
- Page 80 Chapter 6: SX II Administration The currently selected powerstrip's outlet names, their current state, and their associated ports, if applicable, are displayed below the powerstrip information. Use the On, Off and Cycle buttons on the page to control each of the powerstrip's outlets.
- Page 81 SX II Port Configuration page. A special Raritan cable or CSCSPCS -1 Rev.0C adapter is required to connect an SX II port to the Feature port of rack PDU. Only Raritan rack PDUs are supported.
- Page 82 Chapter 6: SX II Administration 4. change the port name, if needed. 5. Click OK. SX II attempts to communicate with the power strip. If communication is successful, the port is configured as a power port. Note: If the power strip is in not in support mode, a communication failure occurs.
-
Page 83: Configure And Manage Users And Groups From The Remote Console
Chapter 6: SX II Administration 2. Associate the active target to the disconnected power port. This will break the disconnected target's power association. 3. Finally, associate the active target to the correct power port. Configure and Manage Users and Groups from the Remote Console Note: These functions can also be performed using command line interface. - Page 84 Chapter 6: SX II Administration User group Users belong to a group and groups have privileges. Organizing the various users of your SX II into groups saves time by allowing you to manage permissions for all users in a group at once, instead of managing permissions on a user-by-user basis.
- Page 85 Chapter 6: SX II Administration Any newly created user is automatically put in this group until they are assigned to another group. • Individual Group An individual group is essentially a "group" of one. That is, the specific user is in its own group and not affiliated with other groups. Use an individual group when you need a user account can have the same rights as a group.
- Page 86 Chapter 6: SX II Administration User profiles serve two purposes: • To provide users with a username and password to log in to SX II. • To associate the user with a user group. The user group determines which functions and ports the user can access. SX II is shipped with one user profile built in, the Admin user.
- Page 87 Chapter 6: SX II Administration 2. Type a descriptive name for the new user group into the Group Name field. Set Group Permissions 3. Select the permissions to assign to the group. Device Access While Under CC-SG Management - Allows users and user groups with this permission to directly access the SX II while it is under CC-SG management.
- Page 88 Chapter 6: SX II Administration User authentication is performed based on SX II authentication settings. Note: The Admin user group has this permission by default. Device Settings - Network settings, date/time settings, port configuration, event management (SNMP, Syslog), and so on. ...
- Page 89 Chapter 6: SX II Administration 4. Select the access permissions the group has to server ports and power control. The default is Deny. Select each port individually, or use the checkboxes at the bottom of the page to apply permissions to all ports. ...
- Page 90 Chapter 6: SX II Administration This feature limits a user's access to the SX II by allowing you to assign them to a group that can only access the device through specific IP addresses. This feature applies only to users belonging to the specific group. This is unlike the IP Access Control List feature that applies to all access attempts to the device.
- Page 91 Chapter 6: SX II Administration 3. Choose the action from the Action drop-down list. 4. Click Insert and then click OK. If the rule number you just typed equals an existing rule number, the new rule is placed ahead of the exiting rule and all rules are moved down in the list.
- Page 92 Chapter 6: SX II Administration 4. Type a password in the Password field, and then type it again in the Confirm Password field. Required The password is case sensitive. Note: If the strong password feature is enabled, there are other password requirements.
- Page 93 Chapter 6: SX II Administration Add SSH Client Certificates for Users Note: This function can also be performed using command line interface. Configure User Authorization and Authentication Services Using CLI (on page 200). If needed, SSH (Secure Shell) Client Authentication keys can be added to a user.
- Page 94 Chapter 6: SX II Administration Edit or Deactivate a User Note: This function can also be performed using command line interface. Configure and Manage Users and User Groups Using CLI page 197). 1. Choose User Management > User List. The User List page opens. It looks exactly like the New User page.
- Page 95 Chapter 6: SX II Administration View Users by Port The User By Ports page lists all authenticated local and remote users and ports they are being connected to. • If the same user is logged on from more than one client, their username appears on the page for each connection they have made.
- Page 96 Disconnect a User from a Port You can disconnect a user from a specific port without logging them off of SX II. For example, if a user is connected to Serial Port 1 via Raritan Serial Console (RSC), you can disconnect them from the port.
- Page 97 Chapter 6: SX II Administration Log a User Off of SX II (Force Logoff) If you are an administrator or have user management permissions, you are able to log off any authenticated user who is logged on to SX II. Users can also be disconnected at the port level.
-
Page 98: Configure User Authentication From The Remote Console
Chapter 6: SX II Administration Configure User Authentication from the Remote Console SX II requires users be authenticated to access the appliance. Authentication is the process of verifying that a user is who he says he is. Once a user is authenticated, the user's group is used to determine his system and port permissions. - Page 99 Chapter 6: SX II Administration Enable Local User Authentication Users are validated based on their username and password from a local database. Note that if a remote authentication is enabled but the user is not found, SX II checks the local authentication database as well. 1.
- Page 100 Chapter 6: SX II Administration Enable LDAP/LDAPS Authentication Note: When configuring the LDAP server, the query string format on the server should contain the name of the group configured on SX II. You can use the Lightweight Directory Access Protocol (LDAP) to authenticate SX II users instead of local authentication.
- Page 101 Chapter 6: SX II Administration Server Configuration 3. In the Primary LDAP Server field, type the IP address or host name of your LDAP/LDAPS remote authentication server. 4. Optional In the Secondary LDAP Server field, type the IP address or host name of your backup LDAP/LDAPS server (up to 256 characters).
- Page 102 LDAP database you want to begin searching for user information. An example base search value might be: cn=Users,dc=raritan,dc=com. Consult your authentication server administrator for the appropriate values to enter into these fields. Complete this field if your LDAP server only allows administrators to search user information using the Administrative User role.
- Page 103 Chapter 6: SX II Administration 10. The default Secure LDAP Port is 636. Either use the default port or specify another port. This field is only used when the Enable Secure LDAP checkbox is selected. 11. Select the "Enable LDAPS Server Certificate Validation" checkbox to use the previously uploaded root CA certificate file to validate the certificate provided by the server.
- Page 104 Enable RADIUS Authentication Note: When configuring the RADIUS server, the Filter-ID format for the users on the server should have the following format "raritan:G{GroupOnSX}:D{DialbackNumber}". You can use Remote Authentication Dial-In User Service (RADIUS) to authenticate SX II users instead of local authentication.
- Page 105 Chapter 6: SX II Administration 10. Choose the Global Authentication Type from among the options in the drop-down list: PAP - With PAP, passwords are sent as plain text. PAP is not interactive. The user name and password are sent as one data package once a connection is established, rather than the server sending a login prompt and waiting for a response.
- Page 106 12. Click the Add... button. The RADIUS attributes list appears. 13. Select Filter-Id Name and click the Add button. Click Add in the Attribute values section. Type the attribute value: Raritan:G{Admin}. 14. Click OK. 15. The value in G{} is the name of a group locally on the SX II, in this...
- Page 107 1234567890 is the phone number for dial back. The value Raritan:G{Admin} must match with the local group on the SX II. The SX II comes from the factory with the default Admin group.
- Page 108 Chapter 6: SX II Administration 2. Click Add/Remove Windows Components. 3. Highlight Networking Services then click the Details... button. 4. Select the Internet Authentication Service checkbox and then click 5. Click Next> and continue with the wizard steps. IAS Active Directory Access If using a Domain Controller, set IAS to access the Active Directory ®...
- Page 109 RADIUS Attribute: Filter-ID Attribute Type: String Attribute Value: Raritan:G{Serial_Admin} (where Serial_Admin is group name created locally on SX II). Case sensitive. • Configure Session Conditions (Date and Time) (Required) - Policy Elements > Session Conditions > Date and Time •...
- Page 110 Chapter 6: SX II Administration Attribute Data NAS-IP-Address (4) The IP address for the SX II. User-Name (1) The user name entered at the login screen. Acct-Session-ID (44) Session ID for accounting. User-Password(2) The encrypted password. Accounting-Request(4) Acct-Status (40) Start(1) - Starts the accounting. NAS-Port-Type (61) VIRTUAL (5) for network connections.
- Page 111 Chapter 6: SX II Administration 2. Click the TACACS+ radio button to enable the TACACS+ section of the page. The section expands. If it does not, click the section header to expand it. 3. Under Primary TACACS+, type the IP address of the TACACS+ server and the port on which it is listening (default is 49) in the IP Address and Port fields.
- Page 112 SX II policies and user group privileges that are applied locally to AD user groups. IMPORTANT: If you are an existing Raritan, Inc. customer, and have already configured the Active Directory server by changing the AD schema, the SX II still supports this configuration and you do not need to perform the following operations.
- Page 113 Your remote RADIUS server can provide these user group names by returning an attribute, implemented as a RADIUS FILTER-ID. The FILTER-ID should be formatted as follows: Raritan:G{GROUP_NAME} where GROUP_NAME is a string denoting the name of the group to which the user belongs.
-
Page 114: Configure Sx Ii Network Settings From The Remote Console
Chapter 6: SX II Administration Configure SX II Network Settings from the Remote Console The configuration settings described in Initial SX II Configuration from the Remote Console (on page 19) are the same that apply when making any changes. Reset Network Settings to Factory Defaults 1. -
Page 115: Enable Auto Script From The Remote Console For Use With Tftp Or A Usb Stick
Chapter 6: SX II Administration Enable Auto Script from the Remote Console for Use with TFTP or a USB Stick Use this feature to copy the same settings to each of your SX IIs. To do this, a configuration script file with the SX II's settings is created. Example Script config localport... - Page 116 Chapter 6: SX II Administration • Save the file to USB stick. The file can then be brought to each appliance and used to configure it. 1. Access and configure the SX II you want to create a configuration file from.
- Page 117 Chapter 6: SX II Administration 3. Click OK to create the script. A success message is displayed on the page. Enable automatic script configuration via TFTP server: 1. Select the "Enable Automatic Script Configuration via TFTP Stick" checkbox. 2. The TFTP Auto Script Settings section is enabled. 3.
- Page 118 Chapter 6: SX II Administration Retrieve TFTP IP Address via DHCP - Note that to do this, IP auto configuration must set to DHCP and enabled on the SX II. See Disable or Enable DHCP in SX II. Set TFTP IP Address Manually - enter the IP address in the field provided.
- Page 119 Chapter 6: SX II Administration 4. Create a script file named <Device_Type>_<Serial_Number_Of_Device>.autoscript containing all of the scripts that need to be executed on the appliance to configure it. 5. Copy all above files to the top directory of the USB stick. 6.
-
Page 120: Configure Device Settings From The Remote Console
Chapter 6: SX II Administration Configure Device Settings from the Remote Console Enable SSH Access (Optional) SSH is enabled by default. For information on required open ports and port protocols, see Port Access Protocol Requirements (on page 238). Note that SSH can be disabled or enabled via Remote Console or command line interface (CLI). - Page 121 Chapter 6: SX II Administration Enable Telnet (Optional) Due to the lack of security, the username, password and all traffic is in clear-text on the wire. Telnet must be enabled before it can be used; is disabled by default. Note that Telnet can be disabled or enabled via Remote Console or command line interface (CLI).
- Page 122 Chapter 6: SX II Administration Change HTTP and HTTPS Port Settings If needed, change HTTP and/or HTTPS ports used by SX II. For example, if you are using the default HTTP port 80 for another purpose, changing the port ensures the appliance does not attempt to use it. For information on required open ports and port protocols, see Port Access Protocol Requirements...
- Page 123 Chapter 6: SX II Administration Change the TCP Discovery Port SX II discovery occurs over a single, configurable TCP Port. The default is Port 5000, but you can change it to use any TCP port except 80 and 443. To access SX II from beyond a firewall, your firewall settings must enable two-way communication through the default Port 5000 or a non- default port configured on this page.
- Page 124 Chapter 6: SX II Administration Enable Direct Port Access Direct Port Access allows users to bypass having to use the SX II's Login dialog and Port Access page. There are three methods to access ports directly. Note that Direct Port Access can be configured via Remote Console or command line interface (CLI).
- Page 125 Chapter 6: SX II Administration 3. Locate the port in the table below the checkboxes, then enter the IP address you want to assign to the port. 4. Click OK to apply the settings. Enable Direct Port Access via Username for SSH/Telnet This feature provides the ability to access DPA through a username and port combination without requiring a unique IP address or TCP port.
- Page 126 Chapter 6: SX II Administration IP Forwarding and Static Routes Enable IP forwarding, or create static routes if SX II has two LAN ports or is configured for modem access. To enable IP forwarding: 1. Select Device Settings > Static Routes. The Static Routes page opens.
- Page 127 Chapter 6: SX II Administration The Route fields are displayed. 3. Select the one you want to configure from the drop-down menu in the Interface field. LAN1 = eth0 LAN2 = eth1 4. Type the IP address, subnet mask, and gateway of the destination host in the Destination, Mask, and Gateway fields.
- Page 128 Chapter 6: SX II Administration To delete a static route: 1. Select Device Settings > Static Routes. The Static Routes page opens. 2. Go the Static Routes List and select the checkbox next to the route you want to delete. 3.
-
Page 129: Configure Date And Time Settings From The Remote Console
Chapter 6: SX II Administration Note: IPv6 addresses cannot exceed 80 characters in length for the host name. • Click Reset to Defaults at the bottom of the page to remove the setting. Configure Date and Time Settings from the Remote Console Use the Date/Time Settings page to specify the date and time for the SX II. - Page 130 Chapter 6: SX II Administration 6. Click OK.
-
Page 131: Configure Snmp Agents From The Remote Console
Chapter 6: SX II Administration Configure SNMP Agents from the Remote Console SNMP-compliant devices, called agents, store data about themselves in Management Information Bases (MIBs) and return this data to the SNMP managers. See Viewing the SX II MIB (on page 130) for information on viewing the SX II MIB. - Page 132 Chapter 6: SX II Administration Community - the appliance's community string Community Type - grant either Read-Only or Read-Write access to the community users Note: An SNMP community is the group to which appliances and management stations running SNMP belong. It helps define where information is sent.
-
Page 133: Configure Snmp Traps From The Remote Console
Chapter 6: SX II Administration Configure SNMP Traps from the Remote Console Simple Network Management Protocol (SNMP) is a protocol governing network management and the monitoring of network devices and their functions. SNMP provides the ability to send traps, or notifications, over a network to gather information. - Page 134 Chapter 6: SX II Administration Trap Description networkFailure An Ethernet interface of the product can no longer communicate over the network. networkParameterChanged A change has been made to the network parameters. networkParameterChangedv2 A change has been made to network parameters when working in dual LAN isolation mode.
- Page 135 Chapter 6: SX II Administration Trap Description userConnectionLost A user with an active session has experienced an abnormal session termination. userDeleted A user account has been deleted. userForcedLogout A user was forcibly logged out by Admin userLogin A user has successfully logged into the SX II and has been authenticated.
- Page 136 Chapter 6: SX II Administration 4. Complete the following fields for SNMP v1/v2c (as needed): Destination IP/Hostname - the IP or hostname of the SNMP destination. Up to five (5) SNMP trap destinations can be created. Note: IPv6 addresses cannot exceed 80 characters in length for the host name.
-
Page 137: Configure Event Management - Destinations
Chapter 6: SX II Administration Next, configure where the SNMP trap events are sent and logged. Destinations are configured on the Event Management - Destination page. See Configuring Event Management - Destinations. SX II supports SNMP logging for SNMP v1/v2c and/or v3. SNMP v1/v2c defines message formats and protocol operations when SNMP logging is enabled. -
Page 138: Enable Smtp Notifications From The Remote Console
Chapter 6: SX II Administration Tip: Enable or disable entire categories by checking or clearing the Category checkboxes, respectively. 3. Click OK. To reset to factory defaults: • Click Reset To Defaults. WARNING: When using SNMP traps over UDP, it is possible for the SX II and the router that it is attached to fall out of synchronization when the SX II is rebooted, preventing the reboot completed SNMP trap from being logged. -
Page 139: Configure And Test Smtp Server Settings
Chapter 6: SX II Administration 2. Go to the SMTP Settings panel and select the Enable SMTP Server checkbox. 3. Type the email address of the SMTP subscriber in the New Email Subscriber Address field and then click Add. 4. Click OK. Configure and Test SMTP Server Settings Enter the information required for a connection to your SMTP server on the SMTP Server Settings page. - Page 140 Chapter 6: SX II Administration 4. Click Apply. Configu It is important that the SMTP server information be accurate so that the SX II appliance can send messages using that SMTP server. This test sends an email using the settings displayed on the page in the SMTP Settings pane.
-
Page 141: Configure Modem Settings From The Remote Console
Chapter 6: SX II Administration Configure Modem Settings from the Remote Console Configure modem settings for SX II models with internal, analog modems on the Modem Settings page. You can also configure modem settings via command line interface. See Configure a Modem Using CLI page 204). - Page 142 Chapter 6: SX II Administration Note: The Enable Broadband Modem feature is specific to use of an external, wireless modem. See Connect and Enable Global Access to an External Modem (see "Connect and Enable Global Access to an External Broadband Modem"...
- Page 143 Chapter 6: SX II Administration Dialback occurs when the originator of a call is immediately called back in response to the first dial-in. 6. Click OK to commit your changes or click Reset to Defaults to return the settings to their defaults. Assign User Groups Modem Access Permissions...
- Page 144 Chapter 6: SX II Administration • If needed, assign users to a group with Modem Access permissions. Modem Access permission is assigned to a user group on the Group page, and the user is then assigned to the group on the User page. For more information, see Configure and Manage Users and Groups from the Remote Console...
- Page 145 Chapter 6: SX II Administration GX440 must have at least ALEOS Software Version 4.4.1.014 Raritan has tested this configuration with the Verizon Wireless MC7750 Radio Module using firmware version 3.05.10.13. Connect the External, Wireless Modem USB Connection Use either a Micro A or Micro B to USB Type A cable to connect the GX440 to the SX II.
- Page 146 Chapter 6: SX II Administration For security reasons, Raritan recommends you change the default Admin account username to a new name before using the GX440.. Assign User Groups Modem Access Permissions Following are settings applied in SX II. • Modem Access permission is assigned to a user group on the Group page, and the user is then assigned to the group on the User page.
- Page 147 Chapter 6: SX II Administration Use this feature to enable or disable access to an external GX440 modem. Broadband is disabled by default. Since this is a global-level feature, it is disabled for all users. Once it is enabled, only users who belong to a user group with Modem Access permissions can access SX II via the GX440 modem.
- Page 148 Chapter 6: SX II Administration The connection event is logged in the SX II audit log. Once the devices are on and the connection is active, the gateway IP address is displayed in the Remote Console in the left panel under the Network section.
-
Page 149: Power Supply Setup
Chapter 6: SX II Administration Power Supply Setup SX II provides dual power supplies, and can automatically detect and provide notification regarding the status of these power supplies. When both power supplies are used, SX II automatically detects them and notifies you of their status. Additionally, both the Powerln1 and Powerln2 Auto Detect checkboxes are automatically selected on the Power Supply Setup page. - Page 150 Chapter 6: SX II Administration 2. If you are plugging power input into power supply number one (left- most power supply at the back of the unit), then select the Powerln1 Auto Detect option. 3. If you are plugging power input into power supply number two (right- most power supply at the back of the unit), then select the Powerln2 Auto Detect option.
-
Page 151: Configure Local Port Settings From The Remote Console
Chapter 6: SX II Administration Configure Local Port Settings from the Remote Console Configure Local Console port settings on this page. Some changes you make to the settings on the Local Port Settings page restart the local terminals. If a local terminal restart occurs when a setting is changed, it is noted here. - Page 152 Chapter 6: SX II Administration US Portuguese (Portugal) US/International Norwegian (Norway) United Kingdom Swedish (Sweden) French (France) Danish (Denmark) German (Germany) Belgian (Belgium) German (Switzerland) Hungarian Simplified Chinese ...
-
Page 153: Changing The Default Gui Language Setting From The Remote Console
Chapter 6: SX II Administration Changing the Default GUI Language Setting from the Remote Console The SX II web-based interface defaults to English, but also supports the following localized languages. These languages are not applied to the Local Console. • Japanese •... - Page 154 Chapter 6: SX II Administration If needed, make changes to the default timestamp interval and/or the logging update frequency. Timestamp represents the interval between two timestamp messages. Enter a time in seconds between 0 – 99999. Note that entering 0 disables timestamps for port logging.
- Page 155 Chapter 6: SX II Administration Enable the Port Log Local File to capture data for each port locally on SX Log files are stored on SX II's internal flash drive. For 8 and 16 port models, there is 2GB internal flash drive. All other models have 8GB flash drive.
- Page 156 Chapter 6: SX II Administration This feature sends event log messages to a remote Syslog server. The messages from the SX II appliance are sent to the LOCAL0 channel of the Syslog server for more efficient parsing. Since all messages are sent from the LOCAL0 channel on the syslog server, all port output resides in the same file.
- Page 157 Chapter 6: SX II Administration You must also enable port logging. For more information on port logging, see Enable Port Logging. Note: The NFS server must have the exported directory with write permission for the port logging to work. 1. Select the Enable NFS checkbox to enable NFS logging. 2.
-
Page 158: Manage Port Logging - Local Files From The Remote Console
Chapter 6: SX II Administration If the re-mount succeeds, logging continues; otherwise, further logging events are inhibited. Manage Port Logging - Local Files from the Remote Console To delete log files: 1. Select checkbox for log files. 2. Click "Delete Log File". -
Page 159: Configure Ports From The Remote Console
Chapter 6: SX II Administration To retrieve a log file: • Click the Download link for a log file's "OutputFile" or "InputFile". Note that power string data is not saved in port log files. For information on configuring local log files for ports, see Configure Port Logging - Settings (see... - Page 160 Chapter 6: SX II Administration Configure Powerstrips 1. If you selected Power Strip, change the Power Strip Name and click OK. If a power strip is detected, you are returned to the Port Configuration page. 2. Select the port again to edit it and its outlet names, if desired. Outlet names default to the outlet number.
- Page 161 Port Access page. To use this feature, you need Raritan remote rack PDU(s). 3. Select the Power Strip Name and associate an name with each of the power strip's outlets by selecting from the Outlet Name drop- down.
- Page 162 Chapter 6: SX II Administration 5. To allow direct port access to the target's port, enter the port's IP address, and the SSH port and Telnet port. Configure Port Settings Configure the remaining port settings, as needed or required. 1. Select the terminal emulation type from the drop-down menu in the Emulation field.
- Page 163 Chapter 6: SX II Administration 2. Set Encoding if you want Raritan Serial Console (RSC) to always use a specific character encoding for this port. Encoding overrides the global RSC setting for the port to whatever value you set. The choices are: DEFAULT,US-ASCII,ISO8859-1, ISO8859-15,UTF- 8, Shift-JIS, EUC-JP, EUC-CN, EdUC-KR.
- Page 164 14. Type the character in the Escape Character field. The default for the SX II is ] (closed bracket). Raritan recommends that you do not use [ or Ctrl-[. Either of these may cause unintended commands, such as invoking the Escape Command unintentionally.
- Page 165 Chapter 6: SX II Administration 17. Click OK. Apply Settings to Other Ports...
- Page 166 Chapter 6: SX II Administration Once finished, you can apply the same port settings to other ports. 1. Select the ports from the Apply Serial Port Settings To Other Ports" section of the page by selecting them individually or using the selection buttons at the bottom of the page.
- Page 167 Chapter 6: SX II Administration Port Keyword List Port keywords work as a filter. You can create port keywords and associate them with - • Events • Local/remote syslog messages • SNMP traps If a keyword is detected - • A corresponding message is logged in a local/NFS port log.
- Page 168 Chapter 6: SX II Administration The Serial Alert event is selected from the Event Management - Destinations page. 1. Choose Device Settings > Port Keywords. The Port Keyword List page opens.
- Page 169 Chapter 6: SX II Administration 2. Click Add at the bottom of list on the page. The Keyword page opens. 3. Type a keyword in the Keyword field. 4. Select the Port(s) you want to associate with that keyword. 5. Click Add to add them to the Selected box. 6.
-
Page 170: Configure Security Settings From The Remote Console
Chapter 6: SX II Administration Configure Security Settings from the Remote Console Login Limitations Using login limitations, you can specify restrictions for single login, password aging, and the logging out idle users. Login limitations are configured on the Security Settings page. •... - Page 171 Chapter 6: SX II Administration The Idle Timeout field is used to set the amount of time (in minutes) after which an idle user will be logged out. This field is enabled when the Log Out Idle Users option is selected. Up to 365 minutes can be entered as the field value •...
- Page 172 Chapter 6: SX II Administration Lockout Time - The amount of time for which the user will be locked out. The valid range is 1 - 1440 minutes and the default is 5 minutes. Note: Users in the role of Administrator are exempt from the timer lockout settings.
- Page 173 Chapter 6: SX II Administration To enforce this use of a special character, select "Enforce at least one printable special character". "Number of restricted passwords based on history" enforces the number of prior passwords that cannot be repeated. The range is 1-12 and the default is 5.
- Page 174 Chapter 6: SX II Administration RC4 - Secures user names, passwords and data using the RSA RC4 encryption method. This is a 128 - bit Secure Sockets Layer (SSL) protocol that provides a private communications channel between the SX II device and the Remote PC during initial connection authentication.
- Page 175 Chapter 6: SX II Administration Enable Local Admin Password Reset - Resets the local administrator password only. The password is reset to raritan. Disable All Local Resets - No reset action is taken. Resets the local administrator password only. The password is reset to raritan.
- Page 176 Chapter 6: SX II Administration FIPS 140-2 Support Requirements The SX II supports the use of FIPS 140-2 approved encryption algorithms. This allows an SSL server and client to successfully negotiate the cipher suite used for the encrypted session when a client is configured for FIPS 140-2 only mode.
- Page 177 Chapter 6: SX II Administration Enable FIPS 140-2 For government and other high security environments, enabling FIPS 140-2 mode may be required. The SX II uses an embedded FIPS 140-2-validated cryptographic module running on a Linux ® platform per FIPS 140-2 Implementation Guidance section G.5 guidelines.
- Page 178 Chapter 6: SX II Administration Firewall The SX II has a firewall function to provide protection for the IP network and to control access between the internal router and LAN 1, LAN 2, and the modem interfaces. 1. Choose Security > Firewall. The Firewall page opens, displaying the existing IPTables rules.
- Page 179 Chapter 6: SX II Administration 4. Enter a rule in the IPTables Rule field the click Apply. Add as many rules as are needed. 5. Click Save. The rule is displayed on the screen. 6. You can delete some or all of the default rules if you choose to. SSL Certificates SX II uses the Secure Socket Layer (SSL) protocol for any encrypted network traffic between itself and a connected client.
- Page 180 Chapter 6: SX II Administration a. Common name - The network name of the SX II once it is installed on your network (usually the fully qualified domain name). The common name is identical to the name used to access the SX II with a web browser, but without the prefix “http://”.
- Page 181 Chapter 6: SX II Administration d. A confirmation dialog is displayed. Click OK to close it. e. Reboot the SX II to activate the self-signed certificate. To generate a CSR to send to the CA for certification: a. Click Create. b.
- Page 182 Chapter 6: SX II Administration back! In case you deleted it by mistake, you have to repeat the three steps as described above. To avoid this, use the download function so you will have a copy of the CSR and its private key. Converting a Binary Certificate to a Base64-Encoded DER Certificate (Optional) SX II requires an SSL certificate in either Base64-Encoded DER format...
- Page 183 Chapter 6: SX II Administration 3. Click "Copy to File...". 4. The Certificate Export Wizard opens. Click Next to start the Wizard. 5. Select "Base-64 encoded X.509" in the second Wizard dialog. 6. Click Next to save the file as a Base-64 encoded X.509. You can now install the certificate on your SX II.
- Page 184 Chapter 6: SX II Administration Security Banner SX II provides you with the ability to add a security banner to the SX II login process. This feature requires users to either accept or decline a security agreement before they can access the SX II. The information provided in a security banner will be displayed in a Restricted Service Agreement dialog after users access SX II using their login credentials.
- Page 185 Chapter 6: SX II Administration b. Upload the information from .txt file by selecting the Restricted Services Banner File radio button and using the Browse feature to locate and upload the file. Click OK. Once the file is uploaded, the text from the file will appear in the Restricted Services Banner Message text box.
-
Page 186: Configure Maintenance Settings From The Remote Console
Chapter 6: SX II Administration Configure Maintenance Settings from the Remote Console Audit Log A log is created of SX II system events. The audit log can contain up to approximately 2000 lines worth of data before it starts overwriting the oldest entries. To avoid losing audit log data, export the data to a syslog server or SNMP manager. - Page 187 Chapter 6: SX II Administration 5. To page through the audit log, use the [Older] and [Newer] links.
- Page 188 Chapter 6: SX II Administration Device Information Selection Maintenance > Device Information to view information specific to your SX II. This is useful for support. Backup and Restore From the Backup/Restore page, you can backup and restore the settings and configuration for your SX II. In addition to using backup and restore for business continuity purposes, you can use this feature as a time-saving mechanism.
- Page 189 Chapter 6: SX II Administration 2. Click Backup. A File Download dialog appears that contains an Open button. Do not click Open. In IE 7 (and later), IE is used as the default application to open files, so you are prompted to open the file versus save the file. To avoid this, you must change the default application that is used to open ®...
- Page 190 Chapter 6: SX II Administration Full Restore - A complete restore of the entire system. Generally used for traditional backup and restore purposes. Protected Restore - Everything is restored except appliance- specific information such as IP address, name, and so forth. With this option, you can setup one SX II and copy the configuration to multiple SX II appliances.
- Page 191 Chapter 6: SX II Administration 1. Choose Maintenance > Firmware Upgrade. The Firmware Upgrade page opens. 2. Click the Show Latest Firmware link to locate the appropriate Raritan firmware distribution file (*.RFP) on the Raritan website on the Firmware Upgrades web page.
- Page 192 Chapter 6: SX II Administration Upgrade History The SX II provides information about upgrades performed on the SX II and attached devices. • Choose Maintenance > Upgrade History to view the upgrade history. Information is provided about the SX II upgrade(s) that have been run, the final status of the upgrade, the start and end times, and the previous and current firmware versions.
- Page 193 Chapter 6: SX II Administration To reboot your SX II: 1. Choose Maintenance > Reboot. The Reboot page opens. 2. Click Reboot. You are prompted to confirm the action. Click Yes to proceed with the reboot.
- Page 194 Chapter 6: SX II Administration Reset the SX II Using the Reset Button on the Appliance On the back panel of the appliance, there is a Reset button. It is recessed to prevent accidental resets, so you need a pointed object to press this button.
-
Page 195: Configure Diagnostic Options From The Remote Console
Chapter 6: SX II Administration 4. While continuing to hold the Reset button, power the SX II device back on. Continue holding the Reset button until you hear a beep that is about one second long. Once the device is successfully reset, two (2) beeps are emitted from the appliance. - Page 196 Chapter 6: SX II Administration 4. Select the interface in the Network Interface drop-down box to ping on a specified interface. Optional Trace Route to Host Page Trace route is a network tool used to determine the route taken to the provided hostname or IP address.
- Page 197 Chapter 6: SX II Administration 5. Select the interface in the Network Interface drop-down box to trace route on a specified interface. Optional...
- Page 198 Chapter 6: SX II Administration Execute a Diagnostics Script and Create a Diagnostics File Note: This page is for use by Raritan Field Engineers or when you are directed by Raritan Technical Support. Use this feature to download diagnostic information from the SX II to the client machine.
- Page 199 Chapter 6: SX II Administration 4. To create a diagnostics file to send to Raritan Technical Support, click Save to File and save the file locally from the Save As dialog. 5. Email this file as directed by Raritan Technical Support.
- Page 200 Chapter 6: SX II Administration Network Interface Page The SX II provides information about the status of your network interface. To view information about your network interface: • Choose Diagnostics > Network Interface. The Network Interface page opens. The following information is displayed: •...
- Page 201 Chapter 6: SX II Administration Statistics - Produces a page similar to the one displayed here. Interfaces - Produces a page similar to the one displayed here.
-
Page 202: Administering Sx Ii Using Command Line Interface
Chapter 6: SX II Administration Route - Produces a page similar to the one displayed here. Administering SX II Using command line interface This section is specific to tasks performed using command line interface. For information on performing tasks in the SX II Remote Console, see Administering SX II from the Remote Console (on page 71). -
Page 203: Configure Power Strips Using Cli
Chapter 6: SX II Administration Command Description Parameters new password password Create a new password, if needed. Configure Power Strips Using CLI Note: These functions can also be managed from the Remote Console. Configure Power Strips from the Remote Console (on page 71). -
Page 204: Configure And Manage Users And User Groups Using Cli
Chapter 6: SX II Administration Command Description Parameters <port number> - SX port number to unassociate Remove a power outlet unassociate association from a SX II <powerstrip name> - Name of power strip to access port. <outlet number> - Outlet number on power strip to unassociate ... - Page 205 Chapter 6: SX II Administration Command Description Parameters pcshare <true | false> PC-Share Access - Indicate whether users in the group are allowed to access a port that already has users connected to it if the port access mode is set to Share. Permitted (true), denied (false).
- Page 206 Chapter 6: SX II Administration Command Description Parameters <group name> - Group to display. Shows the details of existing showgroup user groups. If there is no group specified, the command displays all groups in the system. <group name> - Group to delete. deletegroup Deletes an existing user group.
-
Page 207: Configure User Authorization And Authentication Services Using Cli
Chapter 6: SX II Administration Command Description Parameters See addgroup parameters. edituser Update information for a specified user. user <loginname> - User to delete Delete a specified user. deleteuser user <loginname> - User to display showuser Displays the details for an existing user. - Page 208 Chapter 6: SX II Administration Command Description Parameters Set the authentication mode. mode <local|ldap|radius|tacacs> authmode LDAP Configuration The LDAP configuration menu offers commands to set up LDAP and LDAPS. Enter admin > Config > Authentication > ldap to access the menu.
- Page 209 Raritan Update RADIUS users to use the new attribute in the users file, which is usually located at /etc/raddb/. Raritan-Vendor-Specific = "G{Administrator}" Note: If a filter ID and a vendor specific attribute are present, the vendor specific attribute is used.
- Page 210 Chapter 6: SX II Administration Command Description Parameters ip <ipaddress | hostname> - IP Address Access to configure the primary primaryradius RADIUS settings. secret <value> - RADIUS authentication secret authport <value> - RADIUS authentication port acctport <value> - RADIUS accounting port ...
-
Page 211: Configure A Modem Using Cli
Chapter 6: SX II Administration Command Description Parameters ip <ipaddress | hostname> - IP Address secondarytacac Used to configure the secondary TACACS+ settings. secret <value> - TACACS+ authentication secret port <value> - TACACS+ port timeout <value> - TACACS+ timeout (in seconds) ... -
Page 212: Run An Autoconfiguration Script Using Cli
• On the Remote RADIUS Server, the user's configuration should contain the following line. Filter-Id = "raritan:G{<local user group>}:D{<number for dialback>}" The LDAP server user's configuration should contain the dialback number in the attribute that is configured as the 'dialback search string' on SX II. -
Page 213: Configure Network Settings Using Cli
Chapter 6: SX II Administration Command Description Parameters provided by DHCP or manually set tftp address <ipaddress | hostname> - TFTP server address enable <true/false> - enable (true), disable autoconfigusb Set/Get Automatic Script via USB (false) Configuration. Enter admin > to access the menu. Command Description Parameters... - Page 214 Chapter 6: SX II Administration Command Description Parameters enable <true/false> - Ethernet failover enable Used to enable and ethernetfailover (true), disable (false) disable the ability to failover from one LAN to another. ipauto <none | dhcp> - Enable DHCP as ip Configure network interface configuration...
-
Page 215: Configure Device Settings Using Cli
Chapter 6: SX II Administration Command Description Parameters dest <dest> - Destination staticrouteadd Add a static route. if <lan1 | lan2> - Interface (lan1/lan2) prefix <prefix> - IPv6 prefix length mask <mask> - IPv4 mask gateway <gateway> - Gateway ... - Page 216 Chapter 6: SX II Administration Command Description Parameters enable <true | false> - Enable or disable Telnet Enable or disable Telnet telnet access, enable (true), disable (false) access. port <value> - Telnet server tcp listen port Due to the lack of security, the username, password and all traffic is in clear-text on the wire.
-
Page 217: Configure Snmp Traps And Alerts Using Cli
Note: SNMP traps can also be configured from the Remote Console. Configure SNMP Traps from the Remote Console (on page 126). SX II supports sending SNMP alerts to a predefined SNMP server. The Raritan SNMP MIB can be found in Viewing the SX II MIB (on page 130). - Page 218 Chapter 6: SX II Administration Command Description Parameters dest <ipaddress | hostname>- Destination Add trap recipients. addv3 IP/hostname A recipient is an IP address with an port <port number> - Destination port optional space- separated port name <name> - Security name number.
-
Page 219: Configure Date And Time Settings Using Cli
Chapter 6: SX II Administration Command Description Parameters enable <true|false> - SNMP V3 Agent, snmpv3agent Configure an SNMPv3 agent. enable (true), disable (false) name <security name> - Security name authproto <MD5 | SHA> - SNMP auth protocol ... -
Page 220: Change The Default Gui Language Setting Using Cli
Chapter 6: SX II Administration Command Description Parameters Used to find the number timezonelist code that corresponds to your time zone. enable <true | false> - enable or disable the use of Use this command if you are NTP, enable (true), disable (false) synchronizing SX II with an NTP server. -
Page 221: Configure Smtp Events And Notifications Using Cli
Chapter 6: SX II Administration Configure SMTP Events and Notifications Using CLI Note: This setting can also be configured from the Remote Console. Enable SMTP Notifications from the Remote Console (on page 131). Use the log > smtp menu to access to the options that can be used to configure the SMTP server and destination email addresses. -
Page 222: Configure Port Logging Settings Using Cli
If the event log file size exceeds the available flash memory on your SX II model, the event is not saved. To avoid this, Raritan recommends you set the file size to greater than 1024 but less than 10000000. Note: Each SX II has a different amount of available flash memory. - Page 223 Chapter 6: SX II Administration Command Description Parameters event <index of event> - Event Index, use 'eventlist' eventdest Event configuration. to see index and current configurations audit <true | false> - Audit Logging, enable (true), disable (false) snmp <true | false> - SNMP Logging, enable (true), disable (false) ...
- Page 224 Chapter 6: SX II Administration Command Description Parameters enable <true|false> - Logging of port data to remote Configure the logging of port nfsportlog NFS server, enable (true), disable (false) data. primaryip <primaryip> - Primary Portlog Syslog Server secondaryip <secondip> - Secondary Portlog Syslog Server ...
-
Page 225: Configure Ports Using Cli
Chapter 6: SX II Administration Command Description Parameters enable (true), disable (false) port <number> - Ports to delete log of serialportlogdel Delete serial port log file. port <number> - Ports to modify serialportlogview View serial port log file. Decrypt Encrypted Log on Linux-based NFS Server ®... - Page 226 (escapemode=none) as escape sequence; for example, Ctrl- => escapemode=control, escapechar= escapechar char-Escape character Raritan recommends that you do not use or Ctrl- as the Escape command. Either of these may cause unintended commands, such as opening a menu, instead of invoking the Escape Command.
- Page 227 Chapter 6: SX II Administration Command Description Parameters example, config port 1 exitstring logout (execute logout on exit) config port 1 exitstring #0 (disable exit string for the port). The delay is the amount of time to wait after writing the command to the target. Number in seconds up to 60.
- Page 228 Chapter 6: SX II Administration Command Description Parameters escapechar - Escape character encoding - <DEFAULT/US-ASCII/ISO- 8859-1/ISO-8859-15/UTF-8/Shift-JIS/EUC- JP/EUC-CN/EUC-KR> - Target encoding type telnet - TCP port assigned for DPA via Telnet (1..65535) multiwrite <true/false> - Port set in multiple writer mode ...
-
Page 229: Configure The Local Port Using Cli
Chapter 6: SX II Administration In both cases above, port 1 will have an IP assigned as 10.0.13.200, while port 2 will have 10.0.13.201, port 3 10.0.13.203, and so on. The following example configures DPA port settings for SSH and Telnet by TCP port. -
Page 230: Configure Security Settings Using Cli
Chapter 6: SX II Administration Command Description Parameters (true), disable (false) auth <common|none> - Local User Authentication: common-(Local/LDAP/RADIUS/TACACS+); none- (No authentication) (common/none) ignorecc <true/false> - Ignore CC managed mode on local port, enable (true), disable (false) kbd - Keyboard Type Configure Security Settings Using CLI Note: These settings can also be configured from the Remote Console. - Page 231 Chapter 6: SX II Administration Command Description Parameters statement can be configured using the (default 21) above command maintained on an path <path to file> - Path to Banner external FTP site. file to retrieve user <FTP username> - FTP Username ...
- Page 232 Chapter 6: SX II Administration Command Description Parameters and examples Save IP Tables (v4 and v6) to iptables-save make firewall rules persistent. Enter admin > Security > loginsettings to access the menu and menu options. Command Description Parameters idletimeout Specify the amount of idle time enable <true | false>...
- Page 233 Chapter 6: SX II Administration Command Description Parameters userblocking Configure user lockout mode - parameters. <disabled/timer_lockout/deactivate_userid > Set User Blocking mode (disabled/timer_lockout/deactivate_userid) timerattempts <timerattempts> - Timer Lockout Attempts lockouttime <lockouttime> - Timer Lockout Time deactivateattempts <value> - Deactivate UserID Attempts Enter admin >...
- Page 234 Chapter 6: SX II Administration Command Description Parameters Generate certificate signing bits <1024 | 2048> - Bit Strength of generatecsr request. Certificate Key name <name> - Common Name (CN) country <code> - 2 Character ISO Country Code (C) state <state> - State/Province (ST) locality <locality>...
-
Page 235: Configure Maintenance Settings Using Cli
Chapter 6: SX II Administration Command Description Parameters View the certificate signing request viewcsrkey key. Delete the current certificate deletecsr signing request. Addressing Security Issues Consider doing the following in order to enhance security for console servers. SX II supports each of these, but they must be configured prior to general use. - Page 236 Chapter 6: SX II Administration Command Description Parameters Provides information about the SX deviceinfo II appliance such as build and so Displays a list of all users who are userlist logged in, as well as their source IP addresses and any ports to which they are connected.
- Page 237 Chapter 6: SX II Administration Command Description Parameters address <ipaddress | hostname> - Get the audit log and store on FTP auditlogftp Address of FTP Server server. port <FTP port> - Port of FTP server (1..65535) path <path name> - FTP server path for audit log file.
-
Page 238: Configure Diagnostic Settings Using Cli
Chapter 6: SX II Administration Command Description Parameters user <loginname> - Close all sessions Log a user off SX II (terminate their logoff for the specified user by name. session). session <id | all> - Close the session by identifier number or all sessions (ID/all) ... - Page 239 Chapter 6: SX II Administration Command Description Parameters Network Interface Info netif type <stats | interfaces | route> - stats interfaces Get Network Statistics netstat route ip <ipaddress | hostname> - IP Address/Hostname Ping a remote system to ping to Ping ensure it is reachable.
- Page 240 Chapter 6: SX II Administration Command Description Parameters vflag <vflag> - Verbose flag (timestamp/module/thread/fileline) verbose <on|off> - Verbose control (on/off) module <module> - Module name viewstats View module status...
-
Page 241: Chapter 7 Connect A Rack Pdu To Sx Ii And Configure Power Control Options
1. Connect an ASCSDB9F adapter to the PX2 DB9 console/modem port. Note: The adapter is purchased from Raritan. It does not come with PX or SX II appliances. 2. Plug a Cat5 cable into the ASCSDB9F adapter, then plug the other... -
Page 242: Connecting The Sx Ii To The Px2 Feature Port
Chapter 7: Connect a Rack PDU to SX II and Configure Power Control Options 3. Power on the PX2 (if it is not already). The command line interface (CLI) interface appears. PX appliance SX II Connecting the SX II to the PX2 FEATURE Port In this configuration, the PX is managed from the SX II interface like any other powerstrip. - Page 243 Chapter 7: Connect a Rack PDU to SX II and Configure Power Control Options You can now add the PX as a managed power strip to the SX II. See Configure Power Strips from the Remote Console (on page 71) Configure Power Strips Using CLI (on page 196).
-
Page 244: Appendix A Specifications
Appendix A Specifications In This Chapter SX II Dimensions and Physical Specifications ........237 Supported Remote Connections ............237 Supported Number of Ports and Remote Users per SX II Model ..238 Maximum Number of Users Session ............. 238 Maximum Number of Support Users Per Port ........238 Port Access Protocol Requirements ............ -
Page 245: Supported Number Of Ports And Remote Users Per Sx Ii Model
Appendix A: Specifications • TCP/IP • HTTP • HTTPS • RADIUS • LDAP/LDAPS • • Telnet • TACACS+ • • SNTP Supported Number of Ports and Remote Users per SX II Model Model Number of ports SX2-04 and SX2-04M SX2-08 and SX2-08M SX2-16 and SX2-16M SX2-32 and SX2-32M SX2-48 and SX2-48M... - Page 246 Port 5000 This port is used to discover other Dominion devices and for communication between Raritan devices and systems, including CC-SG for devices that CC-SG management is available. By default, this is set to Port 5000, but you may configure it to use any TCP port not currently in use.
- Page 247 Appendix A: Specifications Protocol Port Communication direction RADIUS Port 1812 Outgoing If SX II is configured to remotely authenticate user logins via the RADIUS protocol, port 1812 is used and must be open. However, but the system can also be configured to use any port of your designation.
-
Page 248: Sx Ii Port Pins
Appendix A: Specifications You may have to open additional ports when NFS logging, using LDAP servers, and so forth. These ports may vary from installation-to-installation depending on network topologies, virtual Local Area Networks (VLANs), and firewall configurations. Contact your network administrator for site-specific information and settings. -
Page 249: Sx2 Port Ranges
Appendix A: Specifications DCE Mode on Serve Port pin 2 Input pin 3 Input pin 4 Ground pin 5 Ground pin 6 Output pin 7 Output pin 8 Output SX2 Port Ranges The port range for internal port configuration - CSC, HTTP, HTTPS, SSH, Telnet, DPA SSH , DPA Telnet - is 1 to 64510. -
Page 250: Default User Session Timeouts
Appendix A: Specifications SX II network speed setting SX II: 10/Full SX II: 10/Full 10/Half Communica Communica Communicat 10/Half tion tion Switch: Switch: 10/Full 10/Full 10/Half SX II: 10/Half 10/Half Communica Communica Communicat 10/Full tion tion Switch: 10/Half Legend: Does not function as expected Supported Functions;... -
Page 251: Sx Ii Supported Local Port Dvi Resolutions
Appendix A: Specifications SX II Supported Local Port DVI Resolutions Following are the resolutions supported when connecting to a DVI monitor from the SX II local port. • 1920x1080@60Hz • 1280x720@60Hz • 1024x768@60Hz (default) • 1024x768@75Hz • 1280x1024@60Hz • 1280x1024@75Hz •... -
Page 252: Target Cable Connection Distances And Rates
When you physically disconnect a target from a port on an SX II, the port channel's LED turns off. • When you log in to SX II and connect to a target via either Raritan Serial Console (RSC), SSH or the Local Console, the port channel's LED blinks. -
Page 253: Appendix B Updating The Ldap Schema
Appendix B Updating the LDAP Schema In This Chapter Returning User Group Information ............246 Setting the Registry to Permit Write Operations to the Schema ... 247 Creating a New Attribute ............... 247 Adding Attributes to the Class ............... 248 Updating the Schema Cache.............. -
Page 254: Setting The Registry To Permit Write Operations To The Schema
Appendix B: Updating the LDAP Schema Setting the Registry to Permit Write Operations to the Schema To allow a domain controller to write to the schema, you must set a registry entry that permits schema updates. To permit write operations to the schema: 1. -
Page 255: Adding Attributes To The Class
Appendix B: Updating the LDAP Schema 3. Click New and then choose Attribute. When the warning message appears, click Continue and the Create New Attribute dialog appears. 4. Type rciusergroup in the Common Name field. 5. Type rciusergroup in the LDAP Display Name field. 6. - Page 256 Appendix B: Updating the LDAP Schema 2. Scroll to the user class in the right pane and right-click it. 3. Choose Properties from the menu. The user Properties dialog appears. 4. Click the Attributes tab to open it. 5. Click Add.
-
Page 257: Updating The Schema Cache
Appendix B: Updating the LDAP Schema 6. Choose rciusergroup from the Select Schema Object list. 7. Click OK in the Select Schema Object dialog. 8. Click OK in the User Properties dialog. Updating the Schema Cache To update the schema cache: ®... - Page 258 Appendix B: Updating the LDAP Schema 3. Go to the directory where the support tools were installed. Run adsiedit.msc. The ADSI Edit window opens. 4. Open the Domain. 5. In the left pane of the window, select the CN=Users folder.
- Page 259 Appendix B: Updating the LDAP Schema 6. Locate the user name whose properties you want to adjust in the right pane. Right-click the user name and select Properties. 7. Click the Attribute Editor tab if it is not already open. Choose rciusergroup from the Attributes list.
-
Page 260: Appendix C Faqs
Appendix C FAQs Dominion SX II Overview... - Page 261 SX. The exact price difference varies model by model. Some SX II models are even less expensive than the current SX models! The Dominion SX II will replace the current What are the end-of-life plans Dominion SX. In the 4th quarter of 2015,...
- Page 262 Appendix C: FAQs Dominion SX II Overview continue software support for the current SX for two years from the end-of-sales announcement date; after that there will be no more firmware releases for the current SX. CommandCenter support will likely continue past the end-of- support date.
- Page 263 DTE pinout (Pin/ Signal): 1/RTS, 3/TXD, the SX II's local admin port? 4/GND, 5/GND, 6/RXD, 8/CTS. You can connect to a DB9 port on a laptop using the Raritan ASCSDB9F RJ-45(female) to DB9 (female) adapter with a Cat5 cable.
- Page 264 In addition the modem itself has a firewall capability. The Dominion SX II provides multiple types How can I access the SX II when I am of at-the-rack access. To connect to a in the data center? laptop or PC you can connect to its RJ45 serial port or USB mini-B port.
- Page 265 CLI. Dominion SX release 3.0 or higher supports What code-sets does the terminal VT100/VT220/VT320 and ANSI with the emulator in Dominion SX II support? following code-sets: default, US-ASCII, ISO- 8859-1, ISO-8859-15, UTF-8, Shift-JIS, EUC-JP, EUC-CN, and EUC-KR. A group of users can simultaneously access How many serial devices can be all the serial devices connected to a SX II.
- Page 266 To connect to RJ45 console ports, a regular Cat5 cable can be Are adapters required? used with no adapter. Raritan also sells male and female DB9 and DB25 adapters for devices with these types of serial ports. Adapters are also available to connect to Raritan PX intelligent Rack PDU's.
- Page 267 Appendix C: FAQs Installation, Management & Configuration...
- Page 268 SX II. The SX II SNMP MIB is available from the Where can I get a copy of the Dominion SX II Support Page on raritan.com. It SNMP MIB for Dominion SX? is also available from the Event Management - Settings page on the web GUI.
- Page 269 Appendix C: FAQs Security Yes, the Dominion SX II has rock-solid security Is the Dominion SX II secure? with military grade security features such as 256 bit AES encryption with a FIPS 140-2 mode and encryption module. The SX II has a long list of security features and each release is tested with a vulnerability scanner.
- Page 270 Appendix C: FAQs User Interface & Documentation The Dominion SX II Graphical User Interface is What type of web-based user similar to the other Dominion products, providing interface does the Dominion SX II a common look-and-feel across the Dominion SX have? II, KX, KSX and KX2-101-V2.
-
Page 271: Appendix D Sx Ii Support
SX II Online Help SX II online help is considered your primary help resource. Raritan Serial Console (RSC) help is provided as part of SX II online help. To use online help, Active Content must be enabled in your browser. -
Page 272: Contact The Documentation Team With Feedback
Contact the Documentation directly with any questions or feedback related to the online help or user guides . Email us at documentation@raritan.com, or directly from online help by doing one of the following - Use the "Send Feedback" feature in online help: •...