Table of Contents
Advertisement
Quick Links
Download this manual
See also:
User Manual
Advertisement
Table of Contents

Related Manuals for Brother P-touch D450


Summary of Contents for Brother P-touch D450
- Page 1 Read this User’s Guide before you start using your P-touch. Keep this User’s Guide in a handy place for future reference. Please visit us at http://support.brother.com/ where you can get product support and answers to frequently asked questions (FAQs). www.brother.com...
- Page 2 INTRODUCTION Thank you for purchasing the P-touch D450. This manual contains various precautions and basic procedures for using this labeller. Read this manual carefully before using and keep in a handy place for future reference. Declaration of Conformity (Europe Only) Brother Industries, Ltd.
- Page 3 Any trade names and product names of companies appearing on Brother products, related documents and any other materials are all trademarks or registered trademarks of those respective companies. BROTHER is either a trademark or a registered trademark of Brother Industries, Ltd.
-
Page 4: Table Of Contents
INTRODUCTION Contents Safety Precautions....................4 General Precautions ....................6 GETTING STARTED..............7 Unpacking Your P-touch ..................7 LCD Display & Keyboard ..................7 Power Supply and Tape cassette ................9 When using AC adapter (AD-E001) ............... 9 When using six new AA alkaline batteries (LR6) or fully charged Ni-MH batteries (HR6) .................. - Page 5 INTRODUCTION Setting Frames ....................22 Setting Label Attributes ([Length]/[Cut Option]/[Tab Length]) ......23 Using Auto-Format Layouts ................. 24 Using Templates................... 24 Using Block Layouts ..................27 Creating a Barcode Label ..................29 Setting Barcode Parameters and Entering Barcode Data ......29 Editing and Deleting a Barcode ..............
- Page 6 INTRODUCTION APPENDIX ................44 Specifications....................... 44 System Requirements ..................45...
-
Page 7: Safety Precautions
INTRODUCTION Safety Precautions To prevent injury and damage, important notes are explained using various symbols. The symbols and their meanings are as follows: Indicates a potentially hazardous situation which, if not WARNING avoided, may result in death or serious injuries. Indicates a potentially hazardous situation which, if not CAUTION avoided, may result in minor or moderate injuries. - Page 8 AC adapter and generating heat. remove the batteries, and contact Do not touch metal parts around Brother customer service. the print head immediately after printing. When the P-touch is not being used, store it out of the reach of children.
-
Page 9: General Precautions
• When power is disconnected for two minutes, all text, format settings and any text files saved in the memory will be cleared. • You can also use Heat Shrink Tube in this model. Check the Brother website (http://www.brother.com/) for further information. You cannot print frames, pre-set P-touch templates, or use certain font settings when using Heat Shrink Tube. -
Page 10: Getting Started
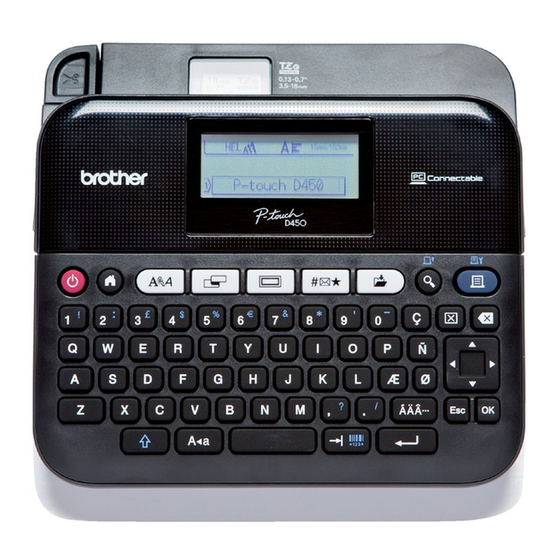
GETTING STARTED Unpacking Your P-touch Carton Contents P-touch Starter Tape Cassette AC adapter USB Cable User’s Guide LCD Display & Keyboard 2 3 4 5 6 19 20 The default language is [English] Unpacking Your P-touch... - Page 11 GETTING STARTED Caps mode 20. Preview 2-7. Style guidance 21. Print Tape width x Label length 22. Clear Block number 23. Backspace 10. Line number 24. Cursor 11. Cursor 25. OK 12. Return mark 26. Escape 13. Power 27. Accent 14.
-
Page 12: Power Supply And Tape Cassette
GETTING STARTED Power Supply and Tape cassette When using AC adapter (AD-E001) Insert the plug on the adapter cord into the AC adapter socket on the side of the machine. Insert the plug into the nearest standard electrical outlet. When using six new AA alkaline batteries (LR6) or fully charged Ni-MH batteries (HR6) Make sure the poles are pointing in the correct directions. -
Page 13: Insert A Tape Cassette
GETTING STARTED • Dispose of the battery at an appropriate collection point, not in the general waste stream. In addition, be sure to observe all applicable federal, state, and local regulations. • When storing or discarding the battery, cover both ends of the battery with cellophane tape, to prevent it from short-circuiting. -
Page 14: Turning Power On/Off
GETTING STARTED Turning Power On/Off Press ( ) to turn the P-touch on. Press ( ) again to turn the P-touch off. NOTE Your P-touch has a power saving function that automatically turns itself off if no key is pressed within a certain time under certain operating conditions. -
Page 15: Back Light
GETTING STARTED Back Light The default setting is [On]. [Settings] ) or ( [Backlight] ) or [On/Off] ) or ( NOTE • Power can be saved when the back light is turned off. • The back light is turned off automatically if there is no operation. It can be turned back on by pressing any key. -
Page 16: Create A Label By Connecting Your P-Touch To A Pc
P-touch. In addition, the software can be upgraded to the latest version. To download and install printer drivers and software such as the P-touch Editor 5.1 on your computer, visit our installer download website (www.brother.com/inst/). How to use the P-touch... -
Page 17: Creating A Label
Printer drivers and software are also available to download individually from the list of available printer drivers and software on our support website below: Brother support website Please visit our support website at http://support.brother.com/ You can find the following information: • Software downloads • User Guides •... -
Page 18: Editing A Label
EDITING A LABEL Entering and Editing Text Entering Text from the Keyboard [Create Label] ) or ( Enter the character. Adding a New Line Move the cursor to the end of the current line and press ( Line 1 Line 2 Label image NOTE •... -
Page 19: Inserting A Tab
Example: Enter “B” The P-touch displays a list of words printed beginning with the letter “B” such as “Brother” Select the desired word Press display the entire word that is too long to display on the list of words. To return to... -
Page 20: Deleting Text Reminder Memory
EDITING A LABEL Deleting Text Reminder Memory [Settings] ) or ( [Text Reminder] ) or [Clear Memory] ) or ( The message [Clear All Text Reminder Memory?] appears ) or ( Changing the Text Reminder Setting [Settings] ) or ( [Text Reminder] ) or [ON/OFF]... -
Page 21: Entering Accented Characters
EDITING A LABEL Category Symbols Sign Electrical Datacom/AV Business Professional Event Vehicle Personal Nature/Earth Pictograph Entering Accented Characters Enter the character Select accented character ) or Entering Accented Characters... -
Page 22: Setting Character Attributes ([Font]/[Size]/[Width]/[Style]/[Line]/[Align])
EDITING A LABEL Accented Character List Character Accented Characters Character Accented Characters Setting Character Attributes ([Font]/[Size]/[Width]/ [Style]/[Line]/[Align]) You can set character attributes by label or by each line, both before and after entering text. Setting Character Attributes by Label Select an attribute ) or ( Set a value for the attribute... - Page 23 EDITING A LABEL NOTE • ( ) displayed on the left side of the character attribute that appears when you press ( ) and ( ) indicates that you are now applying the attribute for that specific line only. • When different attribute values are set for each line, the value will be displayed as ***** when you press ( ), select an attribute...
- Page 24 EDITING A LABEL Attribute Value Result Attribute Value Result Size Auto When Auto is Size 18 pt selected, the text is automatically adjusted to print in the largest size available in the font settings for each tape width. 6 pt 24 pt 9 pt 36 pt...
-
Page 25: Setting Auto Fit Style
EDITING A LABEL Setting Auto Fit Style When [Size] is set to [Auto] and [Length] is set to a specific length, you can reduce the text size to fit within the label length. When [Text Size] is selected, the total text size is modified to fit within the label. When [Text Width] is selected, the text width will be reduced to the size of x 1/2 setting. -
Page 26: Setting Label Attributes ([Length]/[Cut Option]/[Tab Length])
EDITING A LABEL Frames Setting Label Attributes ([Length]/[Cut Option]/ [Tab Length]) Length : [Length] can be set within the range 30 - 300 mm. When [Auto] is selected, the length of the label is automatically adjusted based on the amount of text entered. Cut Option : Refer to “Setting Tape Cutting Options”... -
Page 27: Using Auto-Format Layouts
EDITING A LABEL Using Auto-Format Layouts Using Templates Simply select a layout from the templates, enter the text and apply formatting as desired. Example - Asset Tag: [Auto Format] ) or ( [Templates] ) or [Asset Management] ) or ( [Asset Tag] ) or ( Enter the text... - Page 28 EDITING A LABEL Templates Category Value Details Asset Tag (18 x 70 mm) Asset Bin Box Management (18 x 76 mm) Equipment Label (18 x 58 mm) Binder Spine (18 x 219 mm) File Folder Tab (12 x 82 mm) File/Cabinet Divider Tab (Hanging Folder)
- Page 29 EDITING A LABEL Category Value Details SD Card Label (12 x 25 mm) USB Flash Memory (9 x 25 mm) Media CD Case Spine 1 (6 x 113 mm) CD Case Spine 2 (3.5 x 113 mm) Flag 1 (12 x 90 mm) Flag 2 Cable Labeling (12 x 90 mm)
-
Page 30: Using Block Layouts
EDITING A LABEL Using Block Layouts Simply select a layout from the block layouts, enter the text and apply formatting as desired. [Auto Format] ) or ( [Block Layouts] or ( Select a tape width ) or ( Select a block layout ) or ( Enter the text... - Page 31 EDITING A LABEL Block Layouts Attribute Value Details 2LineA 2LineB 3Line 1+2LineA 18mm 1+2LineB 1+3Line 1+4Line 1+5Line 2LineA 2LineB 12mm 3Line 1+2Line Using Auto-Format Layouts...
-
Page 32: Creating A Barcode Label
EDITING A LABEL Attribute Value Details 2LineA 2LineB 1+2Line 1+2Line Creating a Barcode Label NOTE • The P-touch is not designed exclusively for creating barcode labels. Always check that barcode labels can be read by the barcode reader. • For best results, print barcode labels in black ink on white tape. Some barcode readers may not be able to read barcode labels created using coloured tape or ink. -
Page 33: Barcode Settings
EDITING A LABEL Barcode Settings Attribute Value CODE39, CODE128, EAN-8, EAN-13, Protocol GS1-128 (UCC/EAN-128), UPC-A, UPC-E, I-2/5 (ITF), CODABAR Small Width Large Under# (characters printed below barcode) C.Digit (check digit) (only available for the CODE39, I-2/5 and CODABAR protocols) Special Character List CODE39 CODABAR Special Character... -
Page 34: Editing And Deleting A Barcode
EDITING A LABEL CODE128, GS1-128 (UCC / EAN-128) Special Character (SPACE) FNC3 FNC2 FNC4 FNC1 Editing and Deleting a Barcode To edit barcode parameters and barcode data, position the cursor to the left of the barcode mark on the data entry screen and then open the Barcode Setup screen by pressing ( ) and ( To delete a barcode from a label, position the cursor to the right of the... -
Page 35: Label Printing
LABEL PRINTING Previewing Labels You can preview the text before printing. Press to scroll the preview to the left, right, top or bottom. Press ( ) to change the magnification of the preview. NOTE To scroll the preview to the left, right, top or bottom corners, press ) and Printing Labels To cut off the label, press the tape cutter lever on the upper left corner of... -
Page 36: Numbering Printing
LABEL PRINTING Numbering Printing ) + ( [Number] ) or ( Select start point ) or ( Select end point ) or ( Select the number of labels to be printed ), ( ) or ( Select the highest number you wish to be printed when setting the number. - Page 37 LABEL PRINTING Setting Description Example • Select this setting when printing several labels with minimum margins. • Feed the tape before using 4 mm the cutter. Otherwise a part of the text may be cut off. Do not try to pull the tape since Chain this may damage the tape cassette.
-
Page 38: Adjusting The Label Length
LABEL PRINTING Setting Description Example • Select this setting when • When multiple copies are printed one using special tape. time: • When using Fabric Tapes or Heat Shrink Tube, set [Special tape] for [Cut Option] before printing. 23.9 mm 4 mm 4 mm After printing, remove the... -
Page 39: Printing From The Label Collection
LABEL PRINTING NOTE Adjusting Label Length by 1 level increases total label length by approximately 1%. Printing from the Label Collection Printing a label from the label collection stored in the P-touch [Label Collection] ) or ( Select a category ) or ( Select a label ) or (... -
Page 40: Downloading A New Label Collection Category
Downloading a new Label Collection Category Using the P-touch Update Software, additional label collection categories can be downloaded to your P-touch. To download the new label collection categories, please visit the Brother Solutions Center at: http://support.brother.com Printing from the Label Collection... -
Page 41: Using The File Memory
USING THE FILE MEMORY Saving Label Files You can save up to 50 labels and recall them for printing at a later date. A maximum of 280 characters can be saved per file. You can also edit and overwrite saved labels. Type text and format label Select a file ) or (... -
Page 42: Resetting & Maintaining Your P-Touch
RESETTING & MAINTAINING YOUR P-TOUCH Resetting the P-touch You can reset the internal memory of your P-touch when you want to clear all saved label files, or if the P-touch is not operating correctly. Resetting the Data Using the home key [Settings] ) or ( [Reset]... -
Page 43: Maintenance
RESETTING & MAINTAINING YOUR P-TOUCH To reset all the labels and customised settings: Turn off the P-touch. Press and hold down ( ) and ( While holding down ( ) and ( ), press ( ) once and then release ) and ( NOTE Release (... -
Page 44: Cleaning The Print Head
RESETTING & MAINTAINING YOUR P-TOUCH Cleaning the Print Head Streaks or poor quality characters on printed labels Print head generally indicates that the print head is dirty. Clean the print head using a cotton swab or the optional print head cleaning cassette (TZe-CL4). NOTE •... -
Page 45: Troubleshooting
TROUBLESHOOTING What to do when... Problem Solution The screen ‘locks’, • Refer to “Resetting the P-touch” on page 39 and reset or the P-touch does the internal memory to the initial settings. If resetting the not respond P-touch does not solve the problem, disconnect the normally. -
Page 46: When An Error Message Appears On The Display
TROUBLESHOOTING Problem Solution A tape jam which • Please contact Brother customer service. cannot be cleared keeps occurring. I do not know the • The version number and other information for the version number of firmware can be confirmed by pressing the following... -
Page 47: Appendix
Maximum wet bulb temperature: 27 °C humidity *1 Visit us at http://support.brother.com/ for the latest information about recommended batteries. *2 Actual character size may be smaller than maximum print height. *3 When using the P-touch only. When connected to a PC, 1 hour. -
Page 48: System Requirements
Monitor Windows SVGA, high colour or higher graphics card Macintosh 256 colours or more Please see the Brother Solutions Center (http://support.brother.com) for the latest compatible OS. Contact Information Contact may differ by country. See the website at http://www.brother.eu/ System Requirements... - Page 49 LAF396001A...