Advertisement
Quick Links
Download this manual
See also:
User Manual
This Quick Installation is meant to help you install the product quickly and easily. For detailed instructions
on installation and configuration, and further setup options, please consult the User Guide.
Instant Etherfast
®
Series
U U S S B B V V P P N N & &
USBVPN1
F F i i r r e e w w a a l l l l A A d d a a p p t t e e r r
Package Contents
2
•
USB VPN & Firewall Adapter (1)
•
6 ft Cat5e Ethernet Cable (2)
•
Setup CD-ROM with User Guide (3)
•
Quick Installation guide
•
Registration Card
3
1
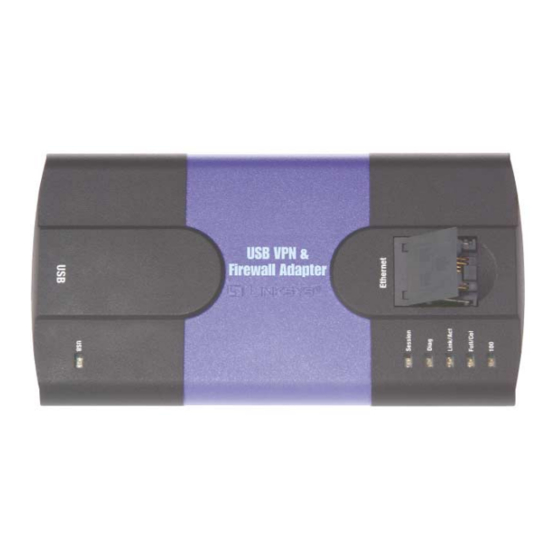
Install the USB VPN & Firewall
Adapter
A. Before you begin, make sure that all of your hardware is powered off, including the
Adapter, PCs, cable or DSL modem, and/or Router.
B. Connect one end of the USB cable to the USB port on the Adapter and the other
end of the USB cable to a USB port on your PC.
C. Connect one end of an Ethernet cable to the Ethernet port on the Adapter, and the
other end to an Ethernet port (LAN port) on a Router. If you are not using a Router,
you can connect it directly to a cable or DSL modem.
D. Turn on the PC, cable or DSL modem and/or Router.
• The USB LED will light up green as soon as the Adapter is connected correctly to
the PC.
• The Diag LED will light up red for a few seconds when the Adapter goes through
its self-diagnostic test. This LED will turn off when the self-test is complete.
The Adapter's hardware installation is now complete.
Install the Driver for the
USB VPN & Firewall Adapter
The next step is to install the driver for the USB VPN & Firewall Adapter. The instruc-
tions vary for each operating system, so proceed to the operating system that is used
on your PC.
Windows XP
A. If you haven't already, start your
computer.
B. Windows XP will automatically
detect the Adapter connected to your
computer and display the Welcome
to the Found New Hardware Wizard
screen. Select Install the software
automatically
(Recommended),
and insert the Setup CD into the CD-
B
ROM drive. Then click the Next but-
ton.
C. Windows may inform you that it is
searching for the driver.
D. Then, it will notify you that the driv-
er has not passed Windows Logo
testing. This is normal, and it has
been verified that the Adapter does
work with Windows XP. Click the
Continue Anyway button.
D
E. Windows may inform you that it is
installing the software.
F. The Completing the Found New
Hardware Wizard screen will appear.
Click the Finish button. Then
remove the Setup CD from the CD-
ROM drive.
Congratulations! The installation of
the USB VPN and Firewall Adapter's
F
driver is complete.
For more information about networking under Windows XP, refer to your
Windows 2000
A. If you haven't already, start your
computer.
B. Windows 2000 will automatically
detect the Adapter connected to your
PC. When the Welcome to the Found
New
Hardware
Wizard
screen
appears, insert the Setup CD into
your CD-ROM drive, and click the
B
Next button.
C. Select Search for a suitable driver
for my device (recommended).
Click the Next button.
D. When the Locate Driver Files screen
appears, select CD-ROM drives and
Windows will find the driver on the
CD. Click the Next button to contin-
ue.
C
E. The Driver Files Search Results
screen will appear when Windows
has found the driver. Click the Next
button to continue.
F. You may be informed that a digital
signature has not been found. This is
normal, and it has been verified that
the Adapter does work with Windows
2000. Click the Yes button to contin-
D
ue.
Continued on Back
W W W . L I N K S Y S . C O M
Advertisement

Related Manuals for Linksys Etherfast USBVPN1 Series


Summary of Contents for Linksys Etherfast USBVPN1 Series
-
Page 1: Windows 2000
A. Before you begin, make sure that all of your hardware is powered off, including the Adapter, PCs, cable or DSL modem, and/or Router. B. Connect one end of the USB cable to the USB port on the Adapter and the other This Quick Installation is meant to help you install the product quickly and easily. -
Page 2: Windows 98Se
Setup CD-ROM. You can also call or email for further support. 24-hour Technical Support 800-326-7114 (toll-free from US or Canada) E-mail Support support@linksys.com Website http://www.linksys.com or http://support.linksys.com FTP Site ftp://ftp.linksys.com W W W . L I N K S Y S . C O M...