Advertisement
Quick Links
3-860-701-01 (2)
Short Wave
Short Wave Active Antenna
Operating Instructions
Mode d'emploi
Bedienungsanleitung
(siehe Rückseite)
XXXXX
XXXXX
XXXXX
AN-LP1
Sony Corporation © 1997 Printed in Japan
A
a
b
8
9
1
2
3
4
5
6
7
B
C
D
POWER
OFF/STANDBY ON
FREQ SELECT
1000kHz
4
E
D
(
)
1
POWER
ON
POWER
2
FREQ SELECT
FREQ SELECT
• SW (
)
(x 1000 kHz)
•
75mb
3850 kHz 4050 kHz
4
60mb
4700 kHz 5100 kHz
5
49mb
5900 kHz 6250 kHz
6
•
41mb
7100 kHz 7400 kHz
7
31mb
9400 kHz 10000 kHz
10
25mb
11500 kHz 12150 kHz
12
(
A
)
22mb
13500 kHz 13900 kHz
14
19mb
15000 kHz 15700 kHz
16
a
16mb
17450 kHz 18000 kHz
16
1
15mb
18850 kHz 19100 kHz
20
2
13mb
21450 kHz 21950 kHz
20
3
POWER
4
POWER
•
5
FREQ SELECT
6
•
DX/LOCAL
DX
7
b
8
9
•
SW (
)
FM
MW LW
MW/LW
B
(
)
1
POWER
OFF/STANDBY
2
3
ICF-SW1000T ICF-SW7600G
EXT ANT
3
(R6)
(EIAJ)
40
POWER
OFF/STANDBY
POWER
2
ICF-SW100S
POWER
POWER
ON
(
C
)
ICF-SW10 ICF-SW77
ICF-SW10 ICF-SW77
1
(
E
)
2
1
2
3
3
4
4
•
•
•
English
WARNING
To prevent fire or shock hazard, do not expose
the unit to rain or moisture.
To avoid electrical shock, do not open the
cabinet. Refer servicing to qualified personnel
only.
•
For the customers in the U.S.A.
•
You are cautioned that any changes or
modifications not expressly approved in this
•
40
manual could void your authority to operate
this equipment.
0
•
INFORMATION
•
This equipment has been tested and found to
comply with the limits for a Class B digital
•
device, pursuant to Part 15 of the FCC Rules.
These limits are designed to provide reasonable
•
protection against harmful interference in a
residential installation. This equipment
generates, uses, and can radiate radio frequency
•
energy and, if not installed and used in
accordance with the instructions, may cause
harmful interference to radio communications.
However, there is no guarantee that interference
will not occur in a particular installation. If this
equipment does cause harmful interference to
radio or television reception, which can be
determined by turning the equipment off and on,
the user is encouraged to try to correct the
interference by one or more of the following
measures:
—Reorient or relocate the receiving antenna.
—Increase the separation between the
equipment and receiver.
•
—Connect the equipment into an outlet on a
circuit different from that to which the
receiver is connected.
•
—Consult the dealer or an experienced
radio/TV technician for help.
•
1
Before You Begin
Thank you for choosing the Sony active antenna!
The active antenna will give you many hours of
reliable service and listening pleasure.
Please read these instructions thoroughly before
operating the active antenna, and retain them for
future reference.
Features
• An active antenna for better Short Wave
reception.
• A built-in amplifier that makes the reception
like it is used at outdoors.
• A compact size that is easy to carry.
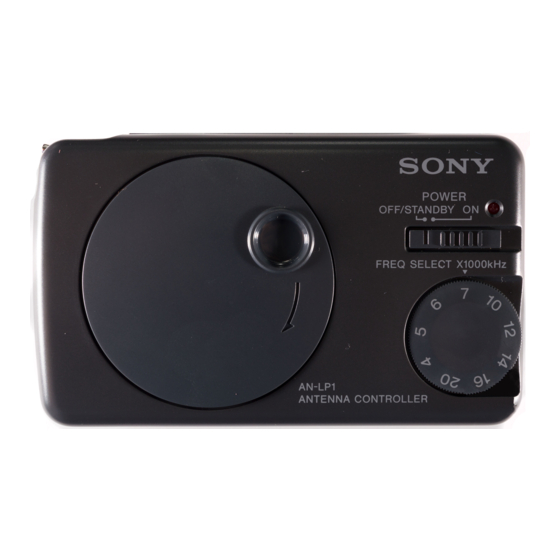
Location and Function
of Controls
(see Fig. A)
a
Antenna controller
1 Cord winder
2 Long cord
•
1
3 POWER switch
90
4 POWER lamp
•
5 FREQ SELECT control
6 Battery compartment
7 Short cord
b
Antenna module
8 Clip
9 Suction cup
6
Inserting the Batteries
(see Fig. B)
To insert the batteries into the antenna controller.
1
Open the battery compartment lid.
2
Insert two R6 (size AA) batteries with
correct polarity.
3
Close the lid.
Battery life on dry batteries
Sony R6 (size AA) dry batteries
approx. 40 hours
DC 3V
3
2
When to replace the batteries
When the batteries become weak, the POWER
:
lamp dims. Replace both batteries with new
490 480 17.8 mm
ones. When the batteries get exhausted, the
:
POWER lamp goes off with the operation.
205 180 17.8 mm
Notes on the batteries
( /
/
) (EIAJ*
1
)
• Do not charge the dry batteries.
• Do not carry the dry batteries with coins or
120 72 29.5 mm
other metalic objects. It can generate heat if the
/
/
positive and negative terminals of the batteries
) EIAJ)
are accidentally contacted by a metallic object.
• When you are not going to use the unit for a
92g
long time, remove the batteries to avoid
damage from battery leakage and corrosion.
149g
)
(1)
Setting Up
(see Fig. C)
(1)
(1) *
Place the antenna module by the window or
3
3
(2) *
where the reception is well. Then connect the
(1) *
4
antenna controller, antenna module and radio.
1
Unfold the antenna module slowly.
When unfolding the antenna module, be
careful not to hit yourself with it or your
surroundings (other people and non-durable
1
*
EIAJ
items).
2
Pull out the long cord with a double pin
2
*
ICF-SW1000TS ICF-SW7600GS
plug from the antenna controller until it
stops and connect it to the antenna
3
*
module.
3
Attach the antenna module to a glass
4
*
ICF-SW1000TS ICF-SW7600GS
window or the curtain.
4
Take out the short cord with a single
pin plug from the antenna controller
and connect it to external antenna jack
of the radio.
Notes
• Do not use the unit at outdoors.
• You may not get best reception if the long cord
of the antenna controller is kept near the radio.
Keep the long cord as far away from the radio
as possible.
• Keep the radio and antenna controller away
from the TV, telephone, personal computer and
flourescent lamps to avoid noise interference.
Français
Operating the Active
AVERTISSEMENT
Antenna
(see Fig. D)
Afin d'éviter tout risque d'incendie ou
d'électrocution, gardez l'appareil à l'abri de la
1
pluie ou de l'humidité.
Set the POWER switch on the antenna
N'ouvrez jamais le boîtier de l'appareil, sous
controller to ON.
risque d'électrocution. Confiez l'entretien
POWER lamp will be lit.
exclusivement à un personnel qualifié.
2
Adjust the FREQ SELECT control.
Avant propos
Band
Frequency
FREQ SELECT
Meter
range
control
(x 1000 kHz)
Merci d'avoir choisi cette antenne amplifiée
Sony!
75mb
3850 kHz~4050 kHz
4
Elle vous procurera de nombreuses heures
60mb
4700 kHz~5100 kHz
5
d'écoute agréable en toute fiabilité.
49mb
5900 kHz~6250 kHz
6
Veuillez lire attentivement ce mode d'emploi
41mb
7100 kHz~7400 kHz
7
avant d'utiliser l'antenne et le conserver à toutes
31mb
9400 kHz~10000 kHz
10
fins utiles.
25mb
11500 kHz~12150 kHz
12
22mb
13500 kHz~13900 kHz
14
19mb
15000 kHz~15700 kHz
16
Caractéristiques
16mb
17450 kHz~18000 kHz
16
15mb
18850 kHz~19100 kHz
20
• Antenne amplifiée pour une meilleure
réception des ondes courtes.
13mb
21450 kHz~21950 kHz
20
• Amplificateur intégré assurant une réception
comme en extérieur.
Notes on the Radio
• Antenne de forme compacte, facile à
• For details on radio operation, refer to its
transporter.
instructions manual.
• Set the DX/LOCAL switch of the radio to DX
when using the active antenna.
Nomenclature
Note
(voir Fig. A)
• This active antenna is only for SW (Short
a
Pilote d'antenne
Wave). When you receive FM, MW or LW be
1 Rembobineur
sure to unplug this active antenna. If you leave
2 Cordon long
the active antenna plugged in to the radio, the
3 Interrupteur d'alimentation (POWER)
telescopic antenna and the ferrite bar antenna
4 Témoin d'alimentation (POWER)
will not operate.
5 Sélecteur de fréquence (FREQ SELECT)
6 Logement des piles
To turn off the antenna controller
7 Cordon court
Set the POWER switch to OFF/STANDBY.
b
Module d'antenne
8 Attache
When using ICF-SW1000T or
9 Ventouse
ICF-SW7600G with the active
antenna
When the antenna controller is connected to the
Mise en place des
EXT ANT jack of the radio, the power supply of
the antenna controller is linked to the power
piles
(voir Fig. B)
supply of the radio. Set the POWER switch of the
antenna controller to OFF/STANDBY.
Pour insérer les piles dans le pilote d'antenne.
1
Ouvrez le couvercle du logement des
When using ICF-SW100S/SW100E
piles.
with the active antenna
2
Insérez deux piles R6 (format AA) en
The power supply of the antenna controller is
linked to the power supply of the radio, but this
respectant la polarité.
may not work properly. Set the POWER switch of
3
Fermez le couvercle.
the antenna controller to ON.
Autonomie des piles
Using ICF-SW10 or ICF-SW77 with
Avec des piles sèches Sony R6 (format AA),
the active antenna
l'autonomie est d'environ 40 heures.
We do not recommend using ICF-SW10 or ICF-
SW77 with this antenna.
Remplacement des piles
Please consult your nearest Sony dealer.
Quand les piles sont faibles, le témoin POWER
devient sombre. Remplacez alors les deux piles
par des neuves. Quand les piles sont épuisées, le
After use
(see Fig. E)
témoin POWER s'éteint et l'antenne cesse de
fonctionner.
1
Disconnect the antenna module,
antenna controller and radio.
Remarques à propos des piles
2
• Ne pas recharger une pile sèche.
Reel up the long cord.
• Ne pas porter de pile sèche avec des pièces de
3
Wrap the short cord to the antenna
monnaie ou d'autres objets métalliques. Le
contact des bornes positive et négative avec
controller and set it in place.
un objet métallique peut générer de la chaleur.
4
Twist and fold the antenna module and
• Si vous prévoyez de ne pas utiliser la radio
then put it in the carrying case.
pendant un certain temps, enlevez les piles
pour éviter tout dommage dû à une fuite de
l'électrolyte des piles et à la corrosion.
Precautions
Installation
• Do not leave the unit in the location near heat
source, or in a place subject to direct sunlight,
(voir Fig. C)
excessive dust, or mechanical shock.
• Use the unit within a temperature range of 0˚C
Installez le module d'antenne près d'une fenêtre
to 40˚C (32˚F to 104˚F).
où dans un endroit où la réception est de bonne
• Do not use the unit where there is high
qualité. Raccordez ensuite le pilote d'antenne, le
humidity like the bathroom.
module et la radio.
• When you are not going to use the unit for a
long period of time, remove the batteries to
1
avoid damage from battery leakage and
Dépliez avec précaution le module
corrosion.
d'antenne.
• Do not wash the antenna module.
Quand vous dépliez le module, veillez à ne
• When folding the antenna module, do not bend
pas vous frapper ou à frapper autre chose
it by force or break it.
(personnes ou objets).
• When you are not going to use the unit for a
long period of time, put it away.
2
Sortez le cordon le plus long à double
fiche du pilote d'antenne jusqu'à l'arrêt
et raccordez-le au module.
Specifications
3
Fixez le module d'antenne à une fenêtre
Power requirements:
ou à des rideaux.
DC 3 V, two R6 (size AA) batteries
4
Sortez le cordon le plus court à une
Dimensions (w/h/d):
fiche du pilote d'antenne et raccordez-
Antenna Module
In use: Approx. 490 x 480 x 17.8 mm
le à la prise d'antenne extérieure de la
(19
3
/
x 19 x
23
/
in.)
radio.
8
32
Folded: Approx. 205 x 180 x 17.8 mm
(8
1
/
x 7
1
/
x
23
/
in.)
8
8
32
Remarques
Antenna Controller
• Ne pas utiliser l'appareil en extérieur.
Approx. 120 x 72 x 29.5 mm
• La réception ne sera peut-être pas optimale si le
(4
3
/
x 2
7
/
x 1
3
/
in.) incl. projecting parts
4
8
16
cordon du pilote d'antenne reste près de la
Mass:
radio. Dans la mesure du possible, mettez-le à
Antenna Module
l'écart de la radio.
Approx. 92 g (3.3 oz.)
• Installez le pilote d'antenne et la radio à l'écart
Antenna Controller
d'un téléviseur, téléphone, ordinateur ou d'une
Approx. 149 g (5.3 oz.) incl. batteries
lampe fluorescente pour éviter toute
Supplied accessories:
interférence.
Carrying case (1)
Batteries (2)*
Utilisation de
Design and specifications are subject to change
without notice.
l'antenne amplifiée
(voir Fig. D)
* World model only
1
Réglez l'interrupteur POWER du pilote
d'antenne sur ON.
Le témoin POWER s'allume.
2
Ajustez le sélecteur FREQ SELECT.
Bande
Plage de fréquences
Sélecteur
métrique
FREQ SELECT
(x 1000 kHz)
75mb
3850 kHz~4050 kHz
4
60mb
4700 kHz~5100 kHz
5
49mb
5900 kHz~6250 kHz
6
41mb
7100 kHz~7400 kHz
7
31mb
9400 kHz~10000 kHz
10
25mb
11500 kHz~12150 kHz 12
22mb
13500 kHz~13900 kHz 14
19mb
15000 kHz~15700 kHz 16
16mb
17450 kHz~18000 kHz 16
15mb
18850 kHz~19100 kHz 20
13mb
21450 kHz~21950 kHz 20
Remarques sur la radio
• Pour le fonctionnement détaillé de la radio,
reportez-vous au mode d'emploi fourni avec la
radio.
• Réglez le sélecteur DX/LOCAL de la radio sur
DX quand vous utilisez l'antenne amplifiée.
Remarque
• Cette antenne amplifiée est réservée à la
réception des ondes courtes.
Pour la réception des petites et grandes ondes
et en modulation de fréquence, veillez à
débranchez l'antenne active. Si vous la laissez
branchée sur la radio, l'antenne télescopique et
l'antenne-barre ne fonctionneront pas.
Pour arrêter le pilote d'antenne
Réglez l'interrupteur POWER sur
OFF/STANDBY.
Lorsque vous utilisez un
ICF-SW1000T ou ICF-SW7600G avec
l'antenne amplifiée
Quand le pilote d'antenne est raccordé à la prise
EXT ANT de la radio, l'alimentation du pilote
d'antenne est relié à l'alimentation de la radio.
Réglez l'interrupteur POWER du pilote
d'antenne sur OFF/STANDBY.
Lorsque vous utilisez un
ICF-SW100S ou SW100E avec
l'antenne amplifiée
L'alimentation du pilote d'antenne est reliée à
l'alimentation de la radio, mais cette liaison ne
fonctionne pas très bien. Réglez l'interrupteur
POWER d/u pilote d'antenne sur ON.
Utilisation de l'ICF-SW10 ou ICF-
SW77 avec l'antenne amplifiée
Il n'est pas conseillé d'utiliser l'ICF-SW10 ou
ICF-SW77 avec cette antenne.
Consultez votre revendeur Sony.
Après utilisation
(voir Fig. E)
1
Débranchez le module d'antenne, le
pilote et la radio.
2
Rembobinez d'abord le cordon le plus
long.
3
Entourez le cordon le plus court sur le
pilote d'antenne et fixez-le.
4
Repliez le module d'antenne puis
rangez-le dans son étui.
Précautions
• Ne pas laisser l'appareil près d'une source de
chaleur ou dans un endroit exposé au soleil, à
une poussière excessive ou à des chocs
mécaniques.
• Utilisez l'appareil dans une plage de
températures comprise entre 0°C et 40°C (32°F
et 104°F).
• Ne pas utiliser l'appareil dans un endroit très
humide comme dans une salle de bain.
• Si vous prévoyez de ne pas utiliser l'appareil
pendant longtemps, enlevez les piles pour
éviter les dommages dus à une fuite éventuelle
de l'électrolyte et à la corrosion.
• Ne pas laver le module d'antenne.
• Quand vous repliez le module d'antenne, ne
forcez pas car il pourrait se briser.
• Si vous prévoyez de ne pas utiliser l'appareil
pendant longtemps, rangez-le.
Spécifications
Alimentation
CC 3 V, deux piles R6 (format AA)
Dimensions (l/h/p)
Module d'antenne
Dépliée: Env. 490 x 480 x 17,8 mm
(19
3
/
x 19 x
23
/
po.)
8
32
Pliée: Env. 205 x 180 x 17,8 mm
(8
1
/
x 7
1
/
x
23
/
po.)
8
8
32
Pilote d'antenne
Env. 120 x 72 x 29,5 mm
3
7
3
(4
/
4
x 2
/
8
x 1
/
16
po.) saillies comprises
Poids
Module d'antenne
Env. 92 g (3,3 on.)
Pilote d'antenne
Env. 149 g (5,3 on.) piles comprises
Accessoires fournis:
Etui de transport (1)
Piles (2)*
La conception et les spécifications peuvent être
modifiées sans préavis.
* Modèle mondial uniquement
Advertisement

Related Manuals for Sony AN-LP1


Summary of Contents for Sony AN-LP1
- Page 1 When using ICF-SW1000T or Après utilisation 9 Ventouse ICF-SW7600G with the active FREQ SELECT Thank you for choosing the Sony active antenna! (voir Fig. E) antenna The active antenna will give you many hours of • SW ( When the antenna controller is connected to the reliable service and listening pleasure.
- Page 2 Antennensteuereinheit auf ON. Sie Wartungsarbeiten stets nur einem Fachmann. Die POWER-Lampe leuchtet auf. Stellen Sie den FREQ SELECT-Wähler Vor dem Betrieb ein. Wir beglückwünschen Sie zum Kauf dieser Sony Meter- Frequenzbereich FREQ SELECT Aktivantenne, und sind sicher, daß Sie lange Band Wähler...