Table of Contents
Advertisement
69565
69565
TABLE OF CONTENTS
Parts .................................
1 - 2
..............................
3
..............................
4 - 5
........................................
6
Using
the Controls
...........................
7 - 8
......................
9
............................
10
.............................
10
..........................
11
.................................
11
Dial ...........................
12- 14
...............................
15
......................................
16
......................................
17
Accessories
.............................................
18
..................
19
Feet ........................................
20
Feet ..........................
21
Zigzag
and Straight
Stitching
Needle
Plate .................................................
22
to Sew .....................................
23
Garment
Construction
Stitches
................................
24
..................................
25
............................
26 - 28
...................
29
.........................
30 - 32
...................
33
..................
: ...........
34 - 35
................................
36
..... 37
.........
39 - 40
Cleaning
Feed Dogs and Shuttle
................
41
Plate ....................
42
....................................
43
Plate ...........................
44
Parts List ........................................
45 - 46
Advertisement
Table of Contents

Related Manuals for Kenmore 1020


Summary of Contents for Kenmore 1020
-
Page 1: Table Of Contents
69565 69565 TABLE OF CONTENTS Knowing Your Sewing Machine Identifying Parts ... Connecting Machine Threading - Bobbin Top Thread Using the Controls Top Tension Control Adjusting Bobbin Tension Stitch Length Control Stitch Width Control Reverse Stitch Control Feed Dog Control Special Stitch Dial ... -
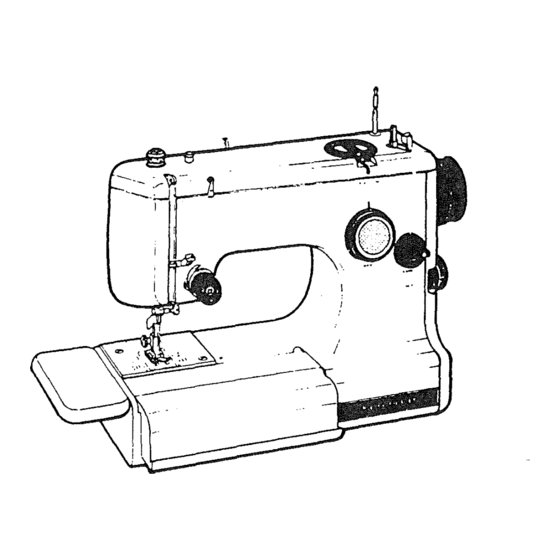
Page 2: Knowing Your Sewing Machine Identifying Parts
,--_1. Knowing Your Sewing FRONT VIEW ® ® ® ® ® ® Accessory Hinged Extension Needle Plate Zigzag Stitching Plate Presser Foot Thread Guide Thread Guide Thread Tension Regulator Thread Guide Face Cover Plate Machi 11. Thread Guide 12. Take-up 13. - Page 3 BACK VIEW ® ® Light and Power Switch Connector Hand Wheel Bobbin Winder Shaft Bobbin Winder Latch Thread Spool Bobbin Winder Tension Disc Thread Guide Presser Foot Lever Thread Cutter Needle Clamp Screw Feed Dogs...
-
Page 4: Connecting Machine
CONNECTING MACHINE ® 1. Lift hinged extension side of machine bed-plate. more sewing space, plate cover right edge as shown in Fig. 2. Turn accessory you as shown in Fig. 2. 3. Fig. 3. shows machine to sew with all the extensions place for maximum sewing... - Page 5 WINDING THE BOBBIN ® ® Draw thread from spool bobbin winder tension disc as shown in Fig. 1. Pull end of thread through bobbin place bobbin bobbin winder shaft with thread coming from the top of the bobbin, fitting notch bobbin over locking...
-
Page 6: Threading - Bobbin
THREADING THE BOBBIN ® 1. To remove bobbin case from shuttle, raise needle to its highest position. 2. Open bed plate cover, and remove accessory box. Pull open latch of bobbin Pull bobbin case straight shuttle. Insert bobbin into bobbin case mak- sure thread... -
Page 7: Top Thread
THREADING OF TOP THREAD Model 1050 Model1020, 1030, 1040, 1045 ® ®... -
Page 8: Top Tension Control
TOP TENSION CONTROL Model 1050 Probably the most important your top thread tension. The pressure on these discs is regulated the control. The higher There are many reasons one fabric upon stiffness of the fabric being sewn, as well It is best to test the stitching starting to make a garment. - Page 9 ADJUSTING TOP TENSIONS Upper thread too tight Upper thread too loose A perfect straight stitch will have threads locked between layers of fabric with top or bottom. Decrease Tension Increase Tension the two no loops on...
-
Page 10: Adjusting Bobbin Tension
ADJUSTING BOBBIN Bobbin tension requires adjusting tension. If the stitch is satisfactory loosen tension on both the top them as indicated Page When adjusting the tension on the bobbin a screwdriver. DECREASE TENSION INCREASE TENSION TENSIONS less frequently than seam is puckered, it may and bottom... -
Page 11: Stitch Length Control
STITCH LENGTH CONTROL The stitch length control located the length of the stitch you select. THE HIGHER THE NUMBER-THE The stitch setting you use will be determined you are sewing. A longer or more layers of fabric. The middle range of the control the most commonly used. -
Page 12: Reverse Stitch Control
REVERSE STITCH CONTROL It is best to begin and end seams is called back tacking. Back prevents raveling. When reverse stitching is needed, there during sewing. The fabric and seam will be fastened. FEED DOG CONTROL The feed control is located There are a few times... -
Page 13: Special Stitch Dial
SPECIAL STITCH DIAL There are certain types of utility sewing. This control enables task at hand. THE RED DOT SETTING The Red Dot setting illustrated either straight or simple zigzag. Dot and the Special Stitch stitch. For a simple zigzag stitch, setting, with... - Page 14 SPECIAL MENDING STITCH will find that much sewing is in the mending this reason have provided with a stitch for the tears. stitch shown is given in more detail next section under Mending. SPECIAL EDGE STITCH setting illustrated special edge finishing, combining fabrics...
- Page 15 OVERCAST STRETCH STITCH Overcast stretch stitching is made by using the stitch setting shown illustration above. Detaileg tions are given in the next section the book. STRETCH STITCH SETTING Stretch stitching is easily setting the dial to the setting above. Details stitch given...
-
Page 16: Pressure Regulator
OTHER ADJUSTMENTS In addition the obvious controls regulators and controls to aid you in using your PRESSURE REGULATOR Model1020, 1030, 1040, 1045 Push down outer ring pressure on the presser foot. increase pressure, push obtained. The pressure on the presser foot is regulated by turning the dial of this regulator which is situated in face cover plate (See Fig. -
Page 17: Sewing Light
SEWING LIGHT The light and power switch Fig. 1 provides the electric current motor as well as for the In order to operate the machine, switch must be on. To turn on the light, depress the upper side of the switch. If you are interrupted while... -
Page 18: Seam Guides
Cornering SEAM GUIDES Seam guides are printed of the needle plate your fabric. EXTENDING ABOVE SIDE NEEDLE Guide "ALL IMPORTANT" LINE. The corneripg guides when turning a square from fabric section of this book for directions. PRESSER FOOT LEVER To aid you in the fabrics under... -
Page 19: Needles
NEEDLES Use KENMORE needles. The size of the needle should conform size of the thread and both should suitable to the fabric (See next page). Never use a bent needle or one with a blunt point. Fig. 1. shows you the exact length your needle. -
Page 20: Needle, Thread, Fabric Chart
NEEDLE, THREAD, FABRIC THREAD SIZE Polyester Core/Cotton Wrap Fine Mercerized Cotton Polyester Synthetic Silk A 50 Mercerized Cotton Polyester Synthetic Silk A 50 Mercerized Cotton Mercerized Heavy Duty Polyester Synthetic Silk A Heavy Duty Mercerized Cotton Polyester Synthetic Silk A Silk Buttonhole Twist Polyester... -
Page 26: Plate
•,,, _ "_<,J Corned {,!-, FASTENING Be sure both threads under the presser foot. into fabric about beginning of seam. stitch control reverse until needle of seam. Release control seam. When you reach the end, turn the control clockwise over 1/2 inch of completed TURNING A SQUARE To turn... -
Page 27: Stretch Stitching
STRETCH STITCHING The stitches shown below are all for use with stretch are special stitches built in to the machine 1. Straight Stretch 2. Rick- Rack Stretch 3. Smocking Stretch 4. Elastic Stretch 5. Overcast Stretch STRAIGHT STRETCH STITCHING SETTINGS Special Stitch Dial - _t_J Stitch Width Control-... - Page 28 RICK-RACK STRETCH STITCHING SETTINGS Special Stitch Dial - III Stitch Width Control - 1 to 4 Stitch Length Control Zigzag Presser Foot stretch fabrics in any area that might use a zig zag stitch. This stitch can be used as a decorative top stitch as well.
- Page 29 OVERCAST STRETCH STITCHING SETTINGS Special Stitch Dial - Stitch Width Control - 3 to 4 Stitch Length Control Zigzag Presser Foot This is the same type of stitch the garment industry in making wear. It is used for seams of 3/8" 1/4".
-
Page 30: Special Finishing Stitches
SPECIAL FINISHING After the basic construction finishing touches to be done. Kenmore has been_designed done by hand. Closely spaced zigzag stitches stitch used for appliqueing, Whenever are using tension of the top thread the tension should If you are stitching... -
Page 31: Buttonhole Making
BUTTONHOLE MAKING SETTINGS Stitch Width Control Stitch Length Control - Red Zone Zigzag Presser Foot Use zigzag stitching plate. 1. Carefully mark position length of each buttonhole garment. Select the proper buttonhole guide foot spond with the length of button- hole. -
Page 32: Bar Tacking
Step 1 1. Set special stitch dial at r'l and beginning of the buttonhole. needle highest manually. 2. Set special stitch dial at "iq. presser foot aligns guide foot. The toe of the presser foot will guide foot. sewing Stop position as in Step 1. - Page 33 HINTS FOR PERFECT BUTTONHOLES presser foot buttonhole guide foot should be in this position at the start of the buttonhole The needle must be lowered marked line for the beginning buttonhole. See Fig. 1. When the full length of the hole is reached, the presser guide...
-
Page 34: Button Sewing, Bar Tacking
BUTTON SEWING SETTINGS Special Stitch Dial - Red Dot Feed Dogs- Down Zigzag Presser Foot Use zigzag stitching plate. 1. Align two holes of button of presser foot hold the button 2. Turn hand wheel neeclle point 3. Adjust stitch needle will enter... -
Page 35: Blind Hemming
BLIND HEMMING SETTINGS Special Stitch Dial- Stitch Width Control - 2 to 3 Stitch Length Control - 12 to 10 Zigzag foot or blindstitch guide Use zigzag stitching plate. After you have turned up the hem width desired, turn edge over stitch this... - Page 36 Fig. 3 Fabric placed in blindstitch Fig. 4 Stitching along fold with stitch. Fig. 5 Finished right garment. Place the fold of the hem in the two left guide. slots attachment guiding the fabric. Make certain that the zigzag stitch catches the fold of the hem adjusting slightly from left to right.
-
Page 37: Zipper Application
ZIPPER APPLICATION SETTINGS Special Stitch Dial - Red Dot Stitch Width Control - Red Dot Stitch Length Control - 12 to 10 Foot Zipper Use straight stitching plate. REGULAR ZIPPER foot is adjustable use on right or left side of the needle sewing regular... -
Page 38: Special Edge Stitch, Mending, Darning
.;._._._._._.;.:.:._ _.,:.:-:._._._,:.'-_,'-'.'.'.'.'.'-'-'.','.'. - -... - ...q; .* ,,.,- *., ,.,,,,, • ,, .>. -., *. ,..., * • .,,,.+.::,.:,.:,. ,,*.,.,*,,,,., [iiii!i!iiiiiii!!iiiiiiii!iiiii!!iii!!]iii[ii[i!i]i •..,, • • ...,,.. ,..., "i'_.:'2.1.2._.:.i.2,[,; '.'.'.'.'.'.'.'.'.','.'.'.'.'.','.'.'.'.'.'.'.'.'.- :::::-:::.:.:.:.:._ :.:.:.::.: :::::::::::::::::::::::::::::::::::::::::::::::::::::::::::::::::::::::::::::: SPECIAL EDGE STITCH SETTINGS Special Stitch Dial - Stitch Width Control- Stitch... -
Page 40: Checking Performance Problems
3. Checking Performance Problems PROBLEM Incorrect Improper Loose Pulling Irregular Light Stitches Loose Unevenly Nicks Nicks plate. Pulling Incorrect Breaking Needle Incorrect Loose Upper Bunching back under Thread starting Incorrect Light Using of thread. Puckering Bent Loose Fabric PROBABLE CAUSE Choose size needle. - Page 41 PROBLEM PROBABLE Incorrect Certain Bent or blunt Skipping Stitches Incorrect Tight Light Starting to stitch too fast. Improper threading. Tight upper thread tension. Incorrect size needle. Breaking Upper Thread Sharp eye in needle. Nicks or burrs on shuttle. Nicks or burrs at hole of needle plate.
-
Page 42: Caring For The Machine
Caring for the Machine lever--_ Shuttle Assembly Shuttle Race Cover onted hook Shuttle Shuttle Race CLEANING Fig. 1 Cleaning brush• To insure the best possible of your machine, keep the essential times• Using a small the lint that accumulates area and around Fig. -
Page 43: Oiling Under Arm Cover Plate
OILING UNDER COVER PLATE Remove arm cover plate to oil points indicated in top of machine head. To remove cover plate lift cover. -
Page 44: Oiling Underside
OILING UNDERSIDE Tilt machine head back and remove underside of machine. To remove (C), as shown bottom cover to oil points bottom cover, remove below. indicated screws (A), (B),... -
Page 45: Oiling Face Cover Plate
OILING IN FACE COVER PLATE Swing hinged face cover plate open and remove arm cover plate to oil points indicated in illustration. -
Page 46: Parts List
SEWING MACHINE Now that have purchased need ever exist repair parts Sears Service Center Simpsons-Sears Limited Stores. facts when call or visit. The model number of your your nomenclature plate Machine. See Section 1, page 3 for WHEN ORDERING REPAIR FOLLOWING INFORMATION: *MODEL...