Advertisement
Quick Links
1
2
3
4
5
6
7
8
9
10
11
ENGLISH
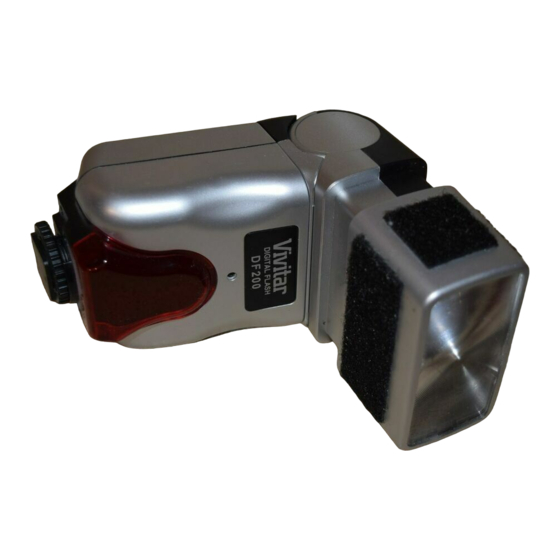
Parts Description
1.
Zoom Indicator
2.
Zoom Head
3.
Fresnel Lens
4.
Sensor
5.
Decorative Front Panel
6.
Locking Ring
7.
Mounting Base
8.
Battery Cover
9.
Ready indicator (orange LED)
10.
Flash On/Off and Mode Switch
11.
Hold Button
12.
Tilting Angle Scale
13.
Swivel Angle Scale
14.
Distance Table
15.
Detection Indicator (green LED)
16.
Power Ratio Switch
17.
Power-On indicator (red LED)
18.
Bracket (not shown in diagram)
CAUTION Read this section before use
§
The DF200 flash unit is designed to be used with any
digital camera with a built-in flash. The DF200 can be
used as a supplemental slave flash.
§
The DF200 flash unit contains high vol t age circuitry. To
avoid electrical shock or burn, do not attempt to dismantle
any part of the flash. If the external shell of the flash unit
12
is broken or cracked, do not touch the internal
mechanisms or circuitry even when the batteries are
removed.
13
§
When replacing the batteries, replace all of the battery
cells. With weaker cells, the flash unit will take longer to
recharge for the next shot.
§
The DF200 flash unit is neither weatherproof nor
14
waterproof. When using the DF200 in the rain or near
water, avoid any contact with water. The warranty does
not cover water damage. It is often impractical to repair
electrical components damaged by water.
15
Batteries
16
The DF200 flash unit uses four AA batteries. You may use
alkaline, NiCD, or NiMH rechargeable batteries. Manganese
batteries are not recommended, because of shorter life and
longer flash recharging time.
17
Replace the batteries if the Orange Ready LED Indicator
take s more than 30 seconds to illuminate after each flash
shot.
1
Advertisement

Related Manuals for Vivitar DF200


Summary of Contents for Vivitar DF200
- Page 1 Bracket (not shown in diagram) CAUTION Read this section before use § The DF200 flash unit is designed to be used with any digital camera with a built-in flash. The DF200 can be used as a supplemental slave flash.
- Page 2 4. If the flash will not be used for an extended period of time, using the ¼-20 thumbscrew and tighten securely. (Refer to remove all batteries from the flash to avoid possible the following section “Flash Photography with the DF200”.) damage from battery leakage. Turn the Flash On/Off Switch to the “1” position.
- Page 3 20/6 23/7 24/7 25/8 LED does not light up, switch off the DF200 and repeat the prior two -step procedure. Bounce Flash iv. After the DF200 has successfully detected your digital When you take a flash photograph, sometimes a strong camera’s flash, slide the DF200 switch (10) from “DETECT”...
- Page 4 Note Power Source 4 AA batteries (Alkaline, NiCd, or NiMH Recommended) We are continually upgrading the DF200 flash to meet market demands. As such, specifications may change and the Number of Flashes Approximate flashes/battery set product may vary slightly from the description provided in this - Alkaline 80 –...