Advertisement
®
Carpet Cleaner
Limpiadora de alfombras
Nettoyeur
# tapis
Owner's
Manual
Manual del Propietario
Guide de l'utifi'sateur
Model 473.85920 (U.S.A.}
Model 111.78400 (Canada)
CAUTION:
Read and follow all safety and
operating
instructions before first use of this
product.
PRECAUCI6N:
Lea y sigue todas las instruc-
ciones de segufidad
y uso antes de uar este
producto
pot primera
vez.
M_SE EN GARDE
: Lire et suivre toutes
les
instructions
de fonctionnement
avant d'utiliser
ce
produit.
Sears,
Roebuck
and Co., DI817WA,
Hoffman
Estates,
mL60179 U.S.A.
www.sears.com
Directions
for
use
It is a violation
of Federal
law to use this product
in a manner
inconsistent
with its labeling.
Instrucciones
de uso
El uso de este producto
de una manera
contraria
a su etiquetado
es una infracciOn
de la ley
federal
Directives
d'utifisation
fl est illegal d'utiliser
ce produit
d'une maniere
allant 9 I'encontre
des indications
de son
etiquetage.
Sears
Canada,
Inc.,
Toronto,
Ontario
MSB 2B8, Canada
R3 3°05
56518177
Printed
in U.S.A.
Advertisement
Table of Contents

Related Manuals for Kenmore 111.784


Summary of Contents for Kenmore 111.784
- Page 1 Carpet Cleaner Limpiadora de alfombras Nettoyeur # tapis CAUTION: Read and follow all safety and operating instructions before first use of this product. PRECAUCI6N: Lea y sigue todas las instruc- ciones de segufidad y uso antes de uar este producto pot primera vez.
- Page 2 Before Using YourNew Carpet C leaner ..2 Kenmore C arpet C leaner Warranty ..2 mmportant Safety instructions ... Carpet Cmeaner Features ..Assembly i nstructions... Handle Assembly ... Storing H ose and Tool... Operating i nstructions...
- Page 3 Les numeros de modele et de serie de votre nettoyeur a tapis sont situ6s sur ta plaque signalOique. Utiliser t'espace ci-dessous modele et de s_rie de votre nouveau nettoyeur a tapis Kenmore. Modele n" No de s_rie Date d'achat Conserver ce manuel et le regu de cuisse duns un endroit s¢cu-...
- Page 4 Do not run appliance over cord. Keep cord heated surfaces. Proper assembly and safe use of your carpet cleaner intended only for household use. Read this Owner's information. This guide contains special attention to these boxes and follow any instructions...
- Page 5 Su seguridad es importante para nosotros, riesgo de ineendios, choques ei_ctdcos, o dahos a[ usar su [impiadora precauciones de seguddad b_cicas inciuyendo 0sela s6lo en el interior. 0seia solamente en superficies humedecidas No la sumerja ¢on_ctela solamente a una toma de corriente con conexi6n a tierra ade- cuada.
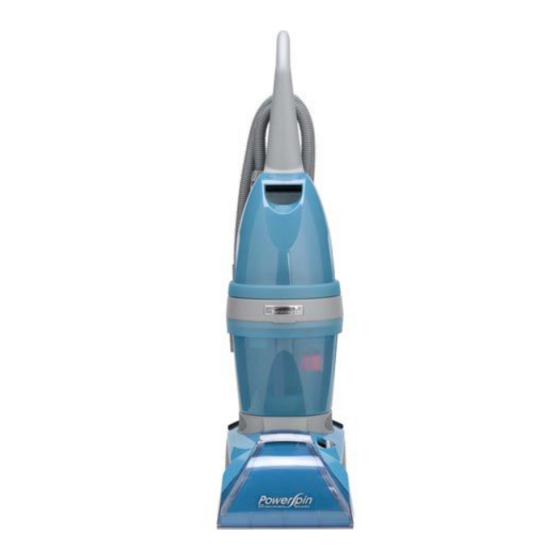
- Page 6 CARPET CLEANER FEATURES mtis important to know your carpet to assure its proper and safe use. Review before using your carpet cleaner. 1, Hand grip 2, Solution trigger 3. Upper handle 4. Solution tank remease latch 5. Solution tank 6. Recovery tank lid 7.
- Page 7 CARACTERiSTICAS DE LA LIMPIADORA DE ALFOMBRAS Es importante que conozca las caracteristicas de su limpiadora de alfombras su uso correcto y seguro, Repase_as antes de usar su limpiadora de atfombras. 1. Asidero de mano 2. Gatitlo para dispensar la soluci6n 3.
- Page 8 NOTE: In Canada, the use of a temporary adapter is not permitted by the Canadian Electrical Code. Before assembling your carpet cleaner, check to verify that you have received aH the components of your new Kenmore carpet cleaner. NOTE: A Phitlips screwdriver is needed for assembly.
- Page 9 (B) par un _ un dispositif de mise a la terre (G), tel que te : au Canada, te Code national de t'@tectricit@ temporaires. votre nettoyeur _ tapis Kenmore, sent indus avec votre appareS. : Un tournevis cruciforme est n_cessaire...
-
Page 10: Handle Assembly
With hose hook and cord hook to back of carpet cleaner, push upper handle (D) down onto lower handle (E). Push bolts into holes on front of handle. If bolts will not go through hole easily, handle is not pushed down. - Page 11 ENSAMBLADO DEL MANGO Saque el tanque para la soluci6n de timpieza (A) de la limpiadora de alfombras. Saque et extremo de ta manguera (B) del soporte para ta manguera (C). Retire el paquete con pernoe y tuercas con cinta adhesiva al mango superior.
- Page 12 Fill tank with hot tap water. Replace cap, making sure it is screwed on tJghtmy. Return detergent cup, flat side with lettering facing out, to cavity behind solution tank. Replace tank on carpet cleaner by positioning bottom first. Press on top of tank to secure latch in place.
-
Page 13: Instructions De Fonctionnement
Coioque el accesodo para tapiceria (P) sobre la proyecci6n (Q) en la parte posterior del mango superior y encajeio en su lugar. INSTRUCCIONESDE FUNCJONAMIENTO LLENE EL TANQUE PARA LA SOLUCJ6N Desenchufe _a Jimpiadora de alfombras riente electrica. Saque el tanque para la sotuci6n (A) presionando para soltar el tanque (B) y tevantandolo. -
Page 14: Empty Recovery Tank
Press down on front of lid to secure in place. Replace tank. Push latches (one on each side of tank) toward front of carpet cleaner to lock tank in place. Be sure both sides are properly latched. ON/OFF PEDAL and... -
Page 15: Pedal Para Soltar El Mango
VACiE EL TANQUE DE RECUPERACJ6N Desenchufe _a limpiadora de a_fombras de la toma de corriente eleetrica. Apagado automatico Cuando el tanque de recuperaci6n (tanque inferior) est6 Ileno, et mecanismo de apagado automatico apagara la succi6n de la limpiadora (la succi6n se reducira de manera evidente). La limpiadora de alfombras ya no recogera mas la sohci6n el sonido det motor sera notablemente mas agudo. -
Page 16: Select Tool
AFTER USING TOOL When finished using the hose and tool, remove water from the hose. Turn carpet cleaner on and hold end of hose up for several seconds. Do not press trigger. Remove solution (top) tank. Squeeze and hold trig= get over sink or drain to remove remaining solution from hose while the carpet cleaner is still on. - Page 17 TRANSPORTE _Para mover su limpiadora de alfombras de una habitaci6n a otra, cotoque et mango en la posici6n vertical trabada, inctine ta limpiadora hacia atras sobre las ruedas y empL% jeta hacia detante. SELECTOR DE ENCENDJDO DO DE LAS ESCOBILLAS Su timpiadora de alfombras tiene dos graduaciones escobittas del agitador.
- Page 18 Increased air circulation (open doors, turn on fans, etc.) will help carpet dry thoroughly to prevent the growth of mold or mildew. Vacuum thoroughly will reduce any shading left by the carpet cleaner's brushes. on wet car- (A) to release...
-
Page 19: Limpieza De Alfombras
GUARDE LA MANGUERA ACCESORiOS Desenchufe [a [impiadora de alfombras ente el_ctrica. Deslice la palanca para el modo de accesorios izquierda. 2. Enrotle la manguera alrededor det gancho superior para ta manguera (B) en el mango superior. Presione el cord6n en el clip (C). - Page 20 Then proceed with the next cleaning steps. Fill solution tank according to directions under "Operating Instructions". Use the recommended detergents in your carpet cleaner. _Disconnect carpet cleaner from electrical outlet. Place handle in upright position and remove hose from rack (A). Slide tool mode lever (B) to the right.
- Page 21 UMPIEZ.A DE TAPICERiA Compruebe el codigo de limpieza de la tela. Busque un c6di- go 'W' o 'We' en ta etiqueta del fabricante del mueble. Estos cedigos indican que puede usarse la limpiadora para atfombras para limpiar ta tapiceda. No use _a m_quina alfombras en tapiceria marcada...
- Page 22 ROUTmNECARE FOR YOUR CARPET CLEANER CLEAN THE NOZZLE Unplug carpet cleaner from emectrica{ outlet. Remove solution and recovery tanks to prevent possible leaks. _Lift up on top of nozzle and slide off cleaner. Wipe debris off nozzle and front of cleaner with a damp cloth.
-
Page 23: Entretien
CUJDADO RUTINARJO DE SU LIMPIADO_ RA DE ALFOMBRAS LIMPIE LA BOQUILLA Desenehufe la limpiadora de a_fombras corriente e_etriea. Saque los tanques de soluci6n y de recuperaci6n posibles fugas. Levante ta parte superior de la boquilla y deslicela para sacarla de la limpiadora. Limpie los residuos de la boquitta y la parte delantera de ta limpiadora con un paso hOmedo. - Page 24 Slide filter back in place. Empty solution tank and rinse thoroughly. Let air dry. Place empty solution tank on carpet cleaner. Turn carpet cleaner ON. Squeeze trigger and push carpet cleaner forward and back several times. This will clear any solution remaining inside the cleaner.
- Page 25 LJMPJE EL FJLTRO DE LAS ESCOBJLLAS Desenchufe la limpiadora de alfombras ente eJ_ctrica. Saque tos tanques de sotuci6n y de recuperaci6n posibles fugas. tnctine ta timpiadora hacia atras para que et mango descanse en el piso. _'_Apriete et marco del filtro (A) y tire de 61para sacado hasta que se detenga.
- Page 26 Brushes won't rotate Low suction in hose during tool use What to do Make sure the carpet cleaner is plugged in firmly. Check the fuse or breaker. Empty the recovery tank; it may be full and the automatic shut-off engaged.
- Page 27 IDENTIFICACI6N Y SOLUCI6N PROBLEMAS Use la I[sta siguiente para ayudar a resolver problemas teves. 6Cu_l es el problema? Lo que debe hacer La Hmpiadora de affombras no funciona Asegt_rese de que la fimpiadora est# bien enchufada. Revise el fusible o el disyuntor. Poca succi6n Vacte el tanque de recuperaci#n, puede estar Ileno y el apa-...
- Page 28 Agreements Congratulations on making a smart purchase. Your new Kenmore® product is designed and manufac- tured for years of dependable operation. But like all products, it may require preventative maintenance or repair from time to time. That's when having a Master Protection Agreement can save you money and aggravation.
- Page 29 Acuetdor "Master" de Protecci6n Felicitaciones por haber hecho una compra inteligente. Su nuevo producto Kenmore® ha sido disehado y fabdcado para ofrecerle muchos afios de servicio confiable. Pero como todos tos productos, es posible que requiera mantenimiento vo o reparaciones de vez en cuando.
- Page 32 Get it fixed, at your home or ours! For repair -- in your home -- of aH major brand appliances, garden equipment, no matter who made it, no matter who sold it! For the replacement owner's manuals that you need to doqt-yourself. For Sears professional and items like garage door openers and water heaters.