Makita EBH341U Original Instruction Manual
Petrol brushcutter
Hide thumbs
Also See for EBH341U:
- Original instruction manual (244 pages) ,
- Instruction manual (96 pages) ,
- Original instruction manual (188 pages)
Table of Contents
Advertisement
Available languages
Available languages
Quick Links
EBH341U/EBH341L
GB Petrol Brushcutter
F
Débroussailleuse thermique
D
Motorsense
I
Decespugliatore a benzina
NL Benzinebosmaaier
E
Desbrozadora
P
Roçadeira a gasolina
DK Benzindrevet buskrydder
GR Βενζινοκίνητο Θαμνοκοπτικό
EBH341U
ORIGINAL INSTRUCTION MANUAL
MANUEL D'INSTRUCTIONS ORIGINAL
ORIGINALBEDIENUNGSANLEITUNG
MANUALE DI ISTRUZIONI ORIGINALE
ORIGINELE GEBRUIKSAANWIJZING
MANUAL DE INSTRUCCIONES ORIGINAL
MANUAL DE INSTRUÇÕES ORIGINAL
ORIGINAL BRUGSANVISNING
ΑΡΧΙΚΟ ΕΓΧΕΙΡΙΔΙΟ ΟΔΗΓΙΩΝ
EBH341L
Advertisement
Chapters
Table of Contents

Related Manuals for Makita EBH341U


Summary of Contents for Makita EBH341U
- Page 1 EBH341U/EBH341L GB Petrol Brushcutter F Débroussailleuse thermique D Motorsense I Decespugliatore a benzina NL Benzinebosmaaier E Desbrozadora P Roçadeira a gasolina DK Benzindrevet buskrydder GR Βενζινοκίνητο Θαμνοκοπτικό ORIGINAL INSTRUCTION MANUAL MANUEL D’INSTRUCTIONS ORIGINAL ORIGINALBEDIENUNGSANLEITUNG MANUALE DI ISTRUZIONI ORIGINALE ORIGINELE GEBRUIKSAANWIJZING MANUAL DE INSTRUCCIONES ORIGINAL MANUAL DE INSTRUÇÕES ORIGINAL ORIGINAL BRUGSANVISNING ΑΡΧΙΚΟ...
- Page 2 Important: Read this instruction manual carefully before putting the Petrol Brushcutter into operation and strictly observe the safety regulations! Preserve instruction manual carefully! Important : Veuillez lire attentivement ce mode d'emploi avant d'utiliser la débroussailleuse thermique, et observez strictement les consignes de sécurité ! Veillez à...
-
Page 3: Table Of Contents
English Table of Contents Page Thank you very much for purchasing the MAKITA Petrol Brushcutter. We are pleased to recommend to you the MAKITA Petrol Brushcutter which is the Symbols .................3 result of a long development programme and many years of knowledge and Safety instructions ............4... -
Page 4: Safety Instructions
SAFETY INSTRUCTIONS General Instructions – To ensure correct operation, user has to read this instruction manual to make himself familiar with the handling of the Petrol Brushcutter. Users insufficiently informed will risk danger to themselves as well as others due to improper handling. - Page 5 Start the Petrol Brushcutter only in accordance with the instructions. – Do not use any other methods for starting the engine! – Use the Petrol Brushcutter and the tools only for such applications as specified. – Only start the Petrol Brushcutter engine, after the entire assembly is done. Operation of the device is only permitted after all the appropriate accessories are attached! –...
- Page 6 Cutting Tools Employ only the correct cutting tool for the job in hand. EBH341U, EBH341L with cutter blade, Nylon cutting head For cutting thick materials, such as weed, high grass, bushes, shrubs, underwood, thicket etc. (max. 2 cm dia. thickness). Perform this cutting work by swinging the Petrol Brushcutter evenly in half-circles from right to left (similar to using a scythe).
-
Page 7: First Aid
Authorized Service Agent. Use only genuine spare parts and accessories released and supplied by MAKITA. Use of non-approved accessories and tools means increased risk of accidents. MAKITA will not accept any liability for accidents or damage caused by the use of non-approved cutting tools and fixing devices of cutting tools, or accessories. -
Page 8: Technical Data
TECHNICAL DATA EBH341U, EBH341L EBH341U EBH341L Model Bike handle Loop handle Dimensions: length x width x height (without cutting blade) 1,810 x 620 x 500 1,810 x 330 x 275 Mass (without plastic guard and cutting blade) Volume (fuel tank) 0.65... -
Page 9: Designation Of Parts
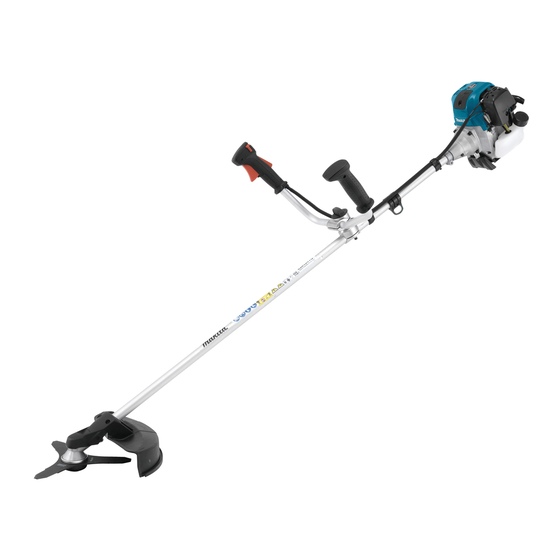
DESIGNATION OF PARTS EBH341U ⑤ ⑨ ④ ⑫ ⑪ ⑤ ⑦ ⑯ ⑫ ④ ⑩ ⑨ ⑩ ⑬ ⑦ ⑪ ⑮ ⑰ ⑬ ⑭ ⑮ EBH341L ⑭ ⑱ DESIGNATION OF PARTS Fuel Tank Rewind Starter Air Cleaner I-O Switch (on/off) -
Page 10: Mounting Of Handle
MOUNTING OF HANDLE CAUTION: Before doing any work on the Petrol Brushcutter, always stop the engine and pull the spark plug connector off the spark plug. Always wear protective gloves! CAUTION: Start the Petrol Brushcutter only after having assembled it completely. -
Page 11: Mounting Of Protector
MOUNTING OF PROTECTOR To meet the applicable safety provisions, only the tool/protector combinations as indicated in the table must be used. Be sure to use genuine MAKITA cutter blades or nylon cutting head. Protector for metal blades Metal blade – The cutter blade must be well polished, free of cracks or breakage. -
Page 12: Mounting Of Cutter Blade Or Nylon Cutting Head
MOUNTING OF CUTTER BLADE OR NYLON CUTTING HEAD Turn the machine upside down, and you can replace the cutter blade or nylon cutting head easily. – Insert the hex wrench through the hole in the gear case and rotate the receiver washer (4) until it is locked with the hex wrench. -
Page 13: Before Start Of Operation
BEFORE START OF OPERATION Inspection and refill of engine oil – Perform the following procedure, with the engine cooled down. – While keeping the engine level, remove the oil gauge, and confirm that the oil is filled within the upper and lower limit marks. When the oil is in short in such a way that the oil gauge touches the oil only by its tip, in particular with the oil gauge remaining inserted in the crankcase without screwing-in (Fig. - Page 14 REFUELING Handling of fuel It is necessary to handle fuel with utmost care. Fuel may contain substances similar to solvents. Refueling must be performed in a sufficiently ventilated room or in the open air. Never inhale fuel vapor, and keep fuel away from you. If you touch fuel repeatedly or for a long time, the skin becomes dry, which may cause skin disease or allergy.
-
Page 15: Correct Handling Of Machine
CORRECT HANDLING OF MACHINE Attachment of shoulder strap – Adjust the strap length so that the cutter blade will be Buckle kept parallel with the ground. For EBH341U NOTE: Be careful not to trap clothing, etc., in the buckle. EBH341U Detachment For EBH341L –... - Page 16 1) Release the throttle lever (2) fully, and when the engine rpm has lowered, set the I-O switch to STOP the engine STOP STOP will now stop. 2) Be aware that the cutting head may not stop immediately and allow it to slow down fully. STOP EBH341L EBH341U...
-
Page 17: Resharpening The Cutting Tool
Operation of Throttle Lever With the throttle lever main unit held by hand (with the lock-off lever pushed), pull the throttle lever and the engine rotation will be increased. Release the throttle lever, and the engine will run idle again. Release the hand from the throttle lever main unit, and the lock-off lever will return automatically so that the throttle lever will not be pulled by mistake. - Page 18 Replacing the nylon cord Pull up 1. Put off cover from housing, pressing two cover locking tabs located Cover oppositely on side of the housing. Locking Housing Window 2. Take off tap knob and spool from the housing. Spool Tab knob 3.
-
Page 19: Servicing Instructions
7. Put in the cutting lines through the slot of eyelets. 8. Put the cover onto the housing, aligning the tabs on cover and the windows on housing. Make sure the cover is secured exactly to the housing. Outer edge of cover locking tab and outer surface of the housing should be on Cover Locking Tab same circumference. - Page 20 In replacement, perform the following procedure. Fuel tank cap 1) Confirm that the tank cap is tightened securely. 2) Detach the oil gauge. Keep the oil gauge free from dust or dirt. Oil gauge 3) Place waste or paper near the oil refill port. Waste or paper 4) Detach the oil gauge, and drain oil, tilting the main unit toward the oil refill port.
- Page 21 0.7 mm - 0.8 mm (0.028”-0.032”) SUPPLY OF GREASE TO GEAR CASE – Supply grease (Shell Alvania 2 or equivalent) to the gear case through the Gear case grease hole every 30 hours. (Genuine MAKITA grease may be purchased from your MAKITA dealer.) Grease hole...
- Page 22 CLEANING OF FUEL FILTER Fuel filter (1) WARNING: INFLAMMABLES STRICTLY PROHIBITED House clamp Interval of Cleaning and Inspection: Monthly (every 50 operating hours) Fuel pipe Suction head in the fuel tank – The fuel filter (1) of the suction head is used to filler the fuel required by the carburetor.
-
Page 23: Storage
STORAGE WARNING: When draining the fuel, be sure to stop the engine and confirm that the engine cools down. Just after stopping the engine, it may still hot with possibility of burns, inflammability and fire. ATTENTION: When the machine is kept out of operation for a long time, drain up all fuel from the fuel tank and carburetor, and keep it at a dry and clean place. - Page 24 Operating time Before After Daily Shutdown/ Corres- 200h Item operation lubrication (10h) rest ponding P Inspect/clean Engine oil Replace Tightening parts Inspect (bolt, nut) Clean/inspect — Fuel tank Drain fuel Throttle lever Check function — Stop switch Check function Cutting blade Inspect Low-speed rotation Inspect/adjust...
-
Page 25: Troubleshooting
TROUBLESHOOTING Before making a request for repairs, check a trouble for yourself. If any abnormality is found, control your machine according to the description of this manual. Never tamper or dismount any part contrary to the description. For repairs, contact Authorized Service Agent or local dealership. State of abnormality Probable cause (malfunction) Remedy... -
Page 26: Symboles
Français Table des matières Page Merci pour votre achat de cette débroussailleuse thermique de MAKITA. Nous sommes ravis de vous proposer la débroussailleuse thermique de MAKITA, Symboles ..............26 résultat d’un long programme de développement et de nombreuses années Consignes de sécurité ..........27 d’expérience et de connaissances. -
Page 27: Consignes De Sécurité
CONSIGNES DE SÉCURITÉ Instructions générales – Pour vous assurer d’une utilisation correcte, lisez ce mode d’emploi pour vous familiariser avec le fonctionnement de la débroussailleuse thermique. Sans ces informations, vous risquez de vous mettre en danger ou de blesser d’autres personnes à cause d’une utilisation incorrecte. –... - Page 28 Ne démarrez la débroussailleuse thermique qu’en conformité avec les instructions. – N’utilisez pas d’autre méthode pour démarrer le moteur ! – Utilisez uniquement la débroussailleuse thermique et les outils pour les usages indiqués. – Ne démarrez le moteur de la débroussailleuse thermique qu’après que l’équipement ait été...
- Page 29 Outils de coupe Utilisez uniquement l’outil de coupe adapté au travail. EBH341U, EBH341L avec couteau, tête à fil en nylon Pour couper des matériels épais tels que de mauvaises herbes, de l’herbe haute, des taillis, des petits arbustes, du sous-bois, du fourré etc. (épaisseur max.
- Page 30 N’utilisez des pièces de rechange et des accessoires d’origine fournis par MAKITA. L’utilisation d’accessoires ou d’outils non approuvés augmente les risques d’accident. MAKITA n’acceptera aucune responsabilité pour des accidents ou des dommages causés par l’utilisation de dispositifs de coupe, d’appareils de montage de dispositifs de coupe ou d’accessoires.
-
Page 31: Données Techniques
DONNÉES TECHNIQUES DE L’EBH341U, EBH341L EBH341U EBH341L Modèle Poignée de vélo Poignée fermée Dimensions : longueur x largeur x hauteur (sans la lame de 1 810 x 620 x 500 1 810 x 330 x 275 coupe) Masse (sans la protection plastique et la lame de coupe) 0,65 Volume (réservoir d’essence) -
Page 32: Nomenclature Des Pièces
NOMENCLATURE DES PIÈCES EBH341U ⑤ ⑨ ④ ⑫ ⑪ ⑤ ⑦ ⑯ ⑫ ④ ⑩ ⑨ ⑩ ⑬ ⑦ ⑪ ⑮ ⑰ ⑬ ⑭ ⑮ EBH341L ⑭ ⑱ NOMENCLATURE DES PIÈCES Réservoir de carburant Démarreur à rappel Filtre à air Interrupteur E-S (marche/arrêt) -
Page 33: Montage De La Poignée
MONTAGE DE LA POIGNÉE ATTENTION : Avant de faire un travail quelconque sur la débroussailleuse thermique, il faut toujours arrêter le moteur et débrancher le connecteur des bougies. Portez toujours des gants de protection ! ATTENTION : Démarrez la débroussailleuse thermique après l’avoir entièrement montée. -
Page 34: Montage Du Dispositif De Protection
être utilisées. Utilisez toujours des couteaux ou têtes à fil de Dispositif de protection pour nylon d’origine MAKITA. Lame métallique les lames métalliques – Le couteau doit être bien aiguisé, et sans fissures ou cassures. Si le couteau heurte une pierre durant l’utilisation, arrêtez le moteur... -
Page 35: Montage Du Couteau Ou De La Tête À Fil En Nylon
MONTAGE DU COUTEAU OU DE LA TÊTE À FIL EN NYLON Tournez la machine la tête en bas pour pouvoir remplacer le couteau ou la tête à fil de nylon facilement. – Insérez la clé hexagonale à travers le trou dans la boîte d’engrenage et tournez la rondelle de réception (4) jusqu’à... -
Page 36: Avant De Commencer
AVANT DE COMMENCER Inspection et remplissage de l’huile du moteur – Suivez la procédure suivante, lorsque le moteur est froid. – En conservant le moteur à plat, retirez la jauge d’huile, puis confirmez que le niveau d’huile se situe entre les limites haute et basse. Lorsqu’il manque de l’huile et que seule la pointe de la jauge d’huile touche l’huile, notamment quand la jauge serte insérée dans le carter du moteur sans se visser (Illustration 1), versez de l’huile dans l’orifice du réservoir (Illustration 2). - Page 37 FAIRE LE PLEIN D’ESSENCE Maniement de l’essence Veillez à manipuler l’essence avec la plus grande attention. Elle peut contenir des substances similaires à des solvants. Pour faire le plein, placez-vous dans une pièce suffisamment ventilée ou à l’extérieur. N’inhalez jamais les vapeurs d’essence, et restez à distance du carburant. En cas de contact répété...
-
Page 38: Maniement Correct De La Machine
MANIEMENT CORRECT DE LA MACHINE Attachement du harnais – Réglez la longueur de sangle de sorte que le couteau soit Boucle gardé parallèle au sol. Pour EBH341U REMARQUE : Veillez à ne pas coincer vos vêtements etc. dans la boucle. EBH341U Détachement Pour EBH341L –... - Page 39 I-O sur la position STOP, et le STOP STOP moteur s’arrêtera. 2) Attention, il est possible que le couteau ne s’arrête pas immédiatement, laissez-le ralentir jusqu’à l’arrêt. STOP EBH341L EBH341U...
-
Page 40: Réaffûtage Du Couteau
Maniement du levier d’étranglement En tenant à la main le bloc principal du levier d’étranglement (avec le levier de verrouillage enfoncé), levez le levier d’étranglement pour augmenter la vitesse de rotation du moteur. Relâchez-le pour que le moteur repasse au ralenti. Relâchez la main du bloc principal du levier d’étranglement : le levier de verrouillage retournera automatiquement à... - Page 41 Remplacement du fil en nylon Tirez vers le 1. Enlevez le capot de son logement en appuyant sur les deux boutons de Bouton de haut verrouillage du capot situés de part et d’autre du bloc. verrouillage du capot Fente du bloc 2.
-
Page 42: Instructions D'entretien
7. Faites passer les fils de coupe à travers la fente des œillets. 8. Placez le capot dans le bloc en alignant les boutons de verrouillage du capot sur les fentes du bloc. Assurez-vous que le capot est solidement en Bouton de place dans le bloc. - Page 43 Alternativement, suivez la procédure suivante. Bouchon du réservoir d’essence 1) Assurez-vous que le bouchon du réservoir est bien serré. 2) Enlevez la jauge d’huile. Conservez la jauge d’huile à l’abri de la poussière et des saletés. Jauge d’huile 3) Placez du papier ou un carton à côté de l’orifice de remplissage d’huile. Papier ou carton 4) Enelvez la jauge d’huile et le filtre à...
- Page 44 – Mettez de la graisse (Shell Alvania 2 ou équivalent) dans le carter Boîte d’engrenage à travers l’orifice de graissage toutes les 30 heures. (de la d’engrenage graisse d’origine MAKITA peut être achetée chez votre revendeur MAKITA.) Orifice de graissage...
- Page 45 NETTOYAGE DU FILTRE À ESSENCE Filtre à essence (1) ATTENTION : FLAMMES STRICTEMENT INTERDITES Fixation Intervalle de nettoyage et d’inspection : tous les mois (toutes les 50 heures d’utilisatino) Tuyau d’alimentation Crépine d’aspiration dans le réservoir – Le filtre à essence (1) de la crépine d’aspiration est utilisé pour alimenter le carburant requis par le carburateur.
-
Page 46: Entreposage
ENTREPOSAGE ATTENTION : Pour vidanger l’essence, veillez à arrêter le moteur et à vous assurer que le moteur ait refroidi. Juste après l’arrêt du moteur, il peut encore être chaud et provoquer des brûlures ou un incendie. ATTENTION : Lorsque vous prévoyez de ne pas utiliser la machine pendant une longue période, vidangez le réservoir d’essence et le carburateur, et entreposez-le dans un endroit sec et propre. - Page 47 Temps d’utilisation Avant Après Journalière Arrêt/ P corres- 30 h 50 h 200 h utilisation lubrification (10 h) repos pondante Élément Inspecter/ nettoyer Huile du moteur Remplacez. Serrage des pièces Inspecter (boulon, écrou) Nettoyer/ — inspecter Réservoir de carburant Vidangez le carburant Vérifier —...
- Page 48 RÉSOLUTION DE PROBLÈMES Avant d’envoyez votre machine en réparation, vérifiez si vous pouvez régler le problème vous-même. Si vous trouvez un problème, contrôlez votre machine selon les descriptions de ce mode d’emploi. Ne démontez pas et de modifiez pas de pièce d’une manière contraire à la description.
- Page 49 Nederlands Inhoud Pagina Hartelijk dank voor uw aankoop van deze benzinebosmaaier van MAKITA. Met trots bevelen wij u deze benzinebosmaaier van MAKITA van harte aan als Symbolen..............95 resultaat van een langdurig ontwikkelingsprogramma en jarenlange kennis en Veiligheidsinstructies ...........96 ervaring. Lees deze handleiding met daarin nauwkeurige beschrijvingen van de diverse Technische gegevens ..........100...
- Page 50 VEILIGHEIDSINSTRUCTIES Algemene instructies – Voor een correcte gebruik dient de gebruiker deze gebruiksaanwijzing te lezen om zichzelf bekend te maken met de juiste manier van omgaan met de benzinebosmaaier. Gebruikers die onvoldoende geïnformeerd zijn, lopen de kans zichzelf en anderen in gevaar te brengen als gevolg van onjuist omgaan met de benzinebosmaaier.
- Page 51 Start de benzinebosmaaier alleen in overeenstemming met de instructies. – Gebruik geen enkele andere methode om de motor te starten! – Gebruik de benzinebosmaaier en de gereedschappen uitsluitend voor de beschreven toepassingen. – Start de motor van de benzinebosmaaier alleen nadat deze volledig is gemonteerd.
- Page 52 Snijgarnituren Gebruik uitsluitend het juiste snijgarnituur voor de geplande werkzaamheden. EBH341U en EBH341L met metalen snijblad of nylondraad-maaikop Voor het maaien van dik materiaal, zoals onkruid, hoog gras, struiken, heesters, kreupelhout, ondergroei, enz. (max. 2 cm diameter). U kunt maaien door de benzinebosmaaier gelijkmatig in halve cirkels van rechts naar links te zwaaien (op de manier waarop u een zeis gebruikt).
- Page 53 MAKITA. Het gebruik van niet-goedgekeurde accessoires en gereedschappen leidt tot een verhoogde kans op ongevallen. MAKITA aanvaardt geen enkele aansprakelijkheid voor ongevallen of schade veroorzaakt door het gebruik van niet-goedgekeurde snijgarnituren, bevestigingsmiddelen voor snijgarnituren of accessoires.
- Page 54 TECHNISCHE GEGEVENS - EBH341U, EBH341L EBH341U EBH341L Model Handgreep Beugelhandgreep Afmetingen: lengte x breedte x hoogte (zonder snijblad) 1.810 x 620 x 500 1.810 x 330 x 275 Gewicht (zonder kunststofbeschermkap en snijblad) Volume (brandstoftank) 0,65 Volume (olietank) Cilinderinhoud 33,5...
- Page 55 NAMEN VAN ONDERDELEN EBH341U ⑤ ⑨ ④ ⑫ ⑪ ⑤ ⑦ ⑯ ⑫ ④ ⑩ ⑨ ⑩ ⑬ ⑦ ⑪ ⑮ ⑰ ⑬ ⑭ ⑮ EBH341L ⑭ ⑱ NAMEN VAN ONDERDELEN Brandstoftank Trekstartinrichting Luchtfilter Stopschakelaar (stoppen - bedrijf) Bougie Uitlaatdemper...
- Page 56 DE HANDGREEP MONTEREN LET OP: Voordat u werkzaamheden uitvoert aan de benzinebosmaaier, moet u altijd de motor uitschakelen en de bougiekap van de bougie aftrekken. Draag altijd veiligheidshandschoenen. LET OP: Start de benzinebosmaaier pas nadat deze geheel in elkaar is gezet. Voor gereedschappen met een fietsstuur-type handgreep –...
- Page 57 Verzeker u ervan uitsluitend originele snijbladen Beschermkap voor metalen of nylondraad-maaikoppen van MAKITA te Metalen snijblad snijblad gebruiken. – Het snijblad moet goed geslepen zijn en vrij zijn van barsten of breuken.
- Page 58 HET SNIJGARNITUUR MONTEREN Draai het gereedschap ondersteboven zodat u het metalen snijblad of de nylondraad-maaikop gemakkelijk kunt vervangen. – Steek de inbussleutel in de opening van het tandwielhuis en draai de ontvangerring (4) met de inbussleutel tot deze vergrendeld wordt. –...
- Page 59 VÓÓR HET BEGIN VAN HET WERK Controleren en bijvullen van de motorolie – Voer de volgende procedure uit bij koude motor. – Houd de motor horizontaal, verwijder de oliepeilstok en controleer of het oliepeil tussen de bovenste en onderste merktekens staat. Als het oliepeil zo laag staat dat alleen de punt van de peilstok de olie raakt, ook wanneer de oliepeilstok in het motorblok is gestoken zonder deze vast te draaien (zie afb.
- Page 60 BRANDSTOF BIJVULLEN Omgaan met brandstof Het is noodzakelijk uiterst voorzichtig om te gaan met brandstof. Brandstof kan stoffen bevatten die ook in oplosmiddelen voorkomen. Het bijvullen van brandstof moet gebeuren in een vertrek met een voldoende goede ventilatie of in de open lucht. Adem nooit brandstofdampen in en houd afstand tot de brandstof.
- Page 61 De schouderriem bevestigen – Pas de lengte van de schouderriem zo aan, dat het Gesp snijblad parallel aan de grond kan worden gehouden. Voor EBH341U OPMERKING: Wees voorzichtig dat uw kleding, enz., niet verstrikt raakt in de gesp. EBH341U Losmaken Voor EBH341L –...
- Page 62 1) Laat de gashendel (2) volledig los en, nadat het motortoerental is afgenomen, duw de stopschakelaar (1) naar de stand “STOP” om de motor uit te schakelen. STOP STOP 2) Bedenk dat het snijgarnituur wellicht niet onmiddellijk stopt en laat het volledig uitdraaien. STOP EBH341L EBH341U...
- Page 63 De gashendel bedienen Houd het gashendelhuis in uw hand vast (met de uit-vergrendelhendel ingeduwd) en knijp de gashendel in zodat het motortoerental toeneemt. Laat de gashendel los zodat het motortoerental afneemt. Laat het gashendelhuis los uit uw hand zodat de uit-vergrendelhendel automatisch terugveert en de gashendel niet per ongeluk kan worden ingeknepen.
- Page 64 De nylondaad vervangen Trek eraf 1. Druk de twee lippen op tegenovergestelde zijden van de behuizing in en Lip van trek de afdekking van de behuizing af. behuizing Opening in behuizing 2. Haal de stootknop en draadspoel uit de behuizingsnaaf. Draadspoel Stootknop 3.
- Page 65 7. Trek de nylondraden door de gleuf van de oogjes. 8. Plaats de afdekking op de behuizing, lijn de lippen op de afdekking uit met de openingen in de behuizing. Zorg ervoor dat de afdekking nauwkeurig op de behuizing wordt bevestigd. De buitenrand van de lip van de afdekking en Lip van behuizing het buitenoppervlak van de behuizing moeten even hoog liggen.
- Page 66 Volg de onderstaande procedure om de olie te verversen. Brandstofvuldop 1) Controleer of de brandstofvuldop stevig vastgedraaid is. 2) Draai de oliepeilstok los en trek hem eruit. Zorg ervoor dat de oliepeilstok schoon blijft. Oliepeilstok 3) Leg absorptiepapier rondom de olievulopening. Absorptiepapier 4) Draai de oliepeilstok los, trek hem eruit, en tap de olie af door de motor te kantelen zodat de olievulopening onder zit.
- Page 67 LET OP: Raak de bougiekap nooit aan terwijl de motor draait (gevaar op 0,7 mm - 0,8 mm elektrische schok door hoogspanning). (0,028”-0,032”) HET TANDWIELHUIS SMEREN – Breng elke 30 bedrijfsuren smeervet (Shell Alvania 2 of gelijkwaardig) aan Tandwielhuis in het tandwielhuis via de smeeropening. (Origineel MAKITA-smeervet kan worden aangeschaft bij uw MAKITA-dealer.) Smeeropening...
- Page 68 HET BRANDSTOFFILTER REINIGEN Brandstoffilter (1) WAARSCHUWING: STRENG VERBODEN VOOR Slangklem ONTBRANDBARE MATERIALEN Controle- en reinigingsinterval: Maandelijks (iedere 50 bedrijfsuren) Brandstofleiding Zuigkop in brandstoftank – Het brandstoffilter (1) op de zuigkop wordt gebruikt om de brandstof die door de carburator wordt aangezogen, te filteren. –...
- Page 69 OPSLAG WAARSCHUWING: Controleer of de motor is uitgeschakeld en afgekoeld voordat u begint met het aftappen van de brandstof. Vlak na het uitschakelen van de motor, is deze nog heet en kan brandwonden, ontbranding en brand veroorzaken. LET OP: Als het gereedschap gedurende een lange tijd niet gebruikt gaat worden, tapt u alle brandstof uit de brandstoftank en carburator, en slaat u het op een droge, schone plaats op.
- Page 70 Bedrijfsuren Voor Dagelijks Langdurige Na smeren 30 uur 50 uur 200 uur Zie pagina Item gebruik (10 uur) opslag Inspecteren/ reinigen Motorolie Vervang de bougie. Vastdraaien Inspecteren (bouten, moeren, enz.) Reinigen/ — inspecteren Brandstoftank Brandstof aftappen Werking Gashendel — controleren Werking Stopschakelaar controleren...
- Page 71 PROBLEMEN OPLOSSEN Alvorens een verzoek voor reparatie in te dienen, controleer u de storing zelf aan de hand van de onderstaande tabel. Als een probleem is gevonden, repareert u het gereedschap aan de hand van de beschrijvingen in deze gebruiksaanwijzing. Probeer nooit enig onderdeel te demonteren of repareren in strijd met de beschrijvingen.