Table of Contents
Advertisement
Quick Links
Advertisement
Table of Contents

Related Manuals for Hammerhead 2013 R 150


Summary of Contents for Hammerhead 2013 R 150
- Page 1 HAMMERHEAD R-150 2013 Owner’s Manual...
- Page 2 WELCOME INTRODUCTION Thank you for purchasing Hammerhead R 150 Utility Vehicle (UTV). We hope you will enjoy it. Before you start to operate the vehicle, please read through this owner’s manual carefully as it contains important safety and maintenance information. Failure...
-
Page 3: Table Of Contents
ONTENTS WELCOME INTRODUCTION .......................... 1 Warranty Information ............................ 2 IMPORTANT MANUAL INFORMATION ...................... 3 LOCATION OF WARNING DECALS ........................ 4 SAFETY INFORMATION ........................... 6 DESCRIPTION AND VEHICLE IDENTIFICATION .................... 9 CONTROL FUNCTIONS .......................... 12 PRE‐OPERATING CHECKS .......................... 20 OPERATION .............................. 25 DRIVING YOUR VEHICLE .......................... 29 PERIODIC MAINTENANCE AND ADJUSTMENT .................... 31 Troubleshooting ............................ 42 Cleaning and Storage ............................ 43 Specifications .............................. 46 2 ... - Page 4 Geason Enterprises, LLC dba Geason Powersports Emission Control System Warranty Statement YOUR WARRANTY RIGHTS AND OBLIGATIONS The U.S. Environmental Protection Agency and Geason Enterprises, LLC dba Geason Powersports (hereinafter “Geason Powersports”) are pleased to explain the emission control system warranty on your 2013 Off-Road ATV.
- Page 5 Geason Enterprises, LLC dba Geason Powersports Limited Warranty on Emission Control System YOUR WARRANTY RIGHTS AND OBLIGATIONS Geason Enterprises, LLC dba Geason Powersports (hereinafter “Geason Powersports”) warrants that each new 2013 and later Geason Powersports off-road vehicle: is designed, built and equipped so as to conform at the time of initial retail purchase with all applicable regulations of the United States Environmental Protection Agency, and;...
- Page 6 Geason Enterprises, LLC dba Geason Powersports Limited Warranty on Emission Control System No express emission control system warranty is given by Geason Powersports, except as specifically set forth herein. Any emission control system warranty implied by law, including any warranty of mechanability or fitness for a particular purpose, is limited to the express emission control system warranty terms stated in this warranty.
- Page 7 Modification to the vehicle, including the use of performance parts or non-original parts, will void the warranty in its entirety, unless express written approval stating that the warranty will not be voided is obtained from Hammerhead. Defective parts are...
- Page 8 Hammerhead Off-Road upon failure and are required to be held by the dealer for 30 days from the time of the initial repair date. The warranty does not cover damage or faults caused by misuse, negligence, alterations, accidents or any abnormal use including the use of non genuine parts, renting or leasing, competition or racing.
- Page 9 Hammerhead Off-Road Warranty Registration Form Registration Terms & Conditions: In order to activate the warranty, please follow the instructions below: Make a copy of the Bill of Sale Make a copy of Pre-Delivery Checklist Make a copy of Buyer-Safety Agreement...
- Page 10 Hammerhead Buyers Safety Agreement (1/2) ______Always read the owner’s manual carefully before riding and follow the operating procedures described in the owner’s manual. ______Pay close attention to all warnings contained in the manual and on all labels. ______These vehicles are designed for riders of ages 5 through 8 for 50cc, 9 through 15 for 80cc, 16 and older for 150cc, 18 and older for 250cc, 400cc, 500cc.
- Page 11 Hammerhead Buyers Safety Agreement (2/2) ______Always be careful when skidding or sliding. On extremely slippery surfaces such as ice, go slow and be very cautious in order to reduce the chance of skidding or sliding out of control. ______Never do wheelies, jumps or any stunts.
-
Page 12: Important Manual Information
IMPORTANT MANUAL INFORMATION Note: The operator, passenger, parents or guardian must read, study and understand all the items contained within this owners/operators manual before operating this vehicle. Failure to follow these instructions could endanger the personal safety of the operator, passenger and any Bystanders. FAILURE TO FOLLOW THE WARNINGS CONTAINED IN THIS MANUAL CAN RESULT IN SERIOUS INJURY OR DEATH. ! The safety alert symbol means ATTENTION! BECOME ALERT! YOUR SAFETY IS INVOLVED! ! WARNING Failure to follow WARNING instructions could result in severe injury ... - Page 13 LOCATION WARNING DECALS Read and understand all of the labels on your vehicle. They contain important information for safe and proper of your vehicle. Never remove any labels from your vehicle. If a label becomes difficult to read or comes off, a replacement label is available from your dealer. Operator Age Limitation Warning Seat Belt Warning WARNING This vehicle is not to be UNDER operated by anyone under 16 years of age.
- Page 14 Pre‐Operation Warning WARNING OBSERVE THE FOLLOWING INSTRUCTIONS Failure to understand and follow Warnings and Instructions for the safe use and maintenance of this product may result in Death or Injury! This information is contained in the Warning Labels, Owner's Manuals & Supplements, Safety Video, and Engine Manual supplied with the product.
-
Page 15: Safety Information
SAFETY INFORMATION This off‐highway utility vehicle handles differently from other vehicles including cars and ATVs. Where INJURY OR DEATH can result if you do not follow these instructions: Read this manual and labels carefully and follow the operating procedures described. This vehicle is designed to carry the driver and one passenger. Never carry passengers in the cargo bed. Always be sure the driver and passenger are wearing seat belts. Never give a ride to a passenger who is too small to reach and hold the handgrip on the enclosure. Always avoid operating the vehicle on any paved surfaces, including sidewalks, driveways, parking Lots, and streets. ... - Page 16 Always keep hands, arms, feet, and legs inside the vehicle at all times during operation. Keep your feet on the floorboard. Never hold onto the enclosure except when using the handgrip inside the enclosure. Otherwise, your hand could be injured if it is caught between the enclosure and an obstacle outside the vehicle. Always keep both hands on the steering wheel when driving. Never wrap your thumbs and fingers around the steering wheel. This is particularly important when driving in rough terrain. The front wheels will move right and left as they respond to the terrain, and this movement will be felt in the steering wheel. A sudden jolt could wrench the steering wheel around, and your thumbs or fingers could be injured if they are in the way of the steering wheel spokes. ...
- Page 17 Always check for obstacles before operating in a new area. Never operate the vehicle in fast flowing water or water deeper than the floorboards on this model. Remember that wet brakes may have reduced stopping ability. Test your brakes after leaving water. If necessary, apply them several times to let friction dry out the linings. Always be sure these are no obstacles or people behind you when you operate in reverse. When it is safe to proceed in reverse, go slowly. Do not brake abruptly when carrying loads in the cargo bed. ...
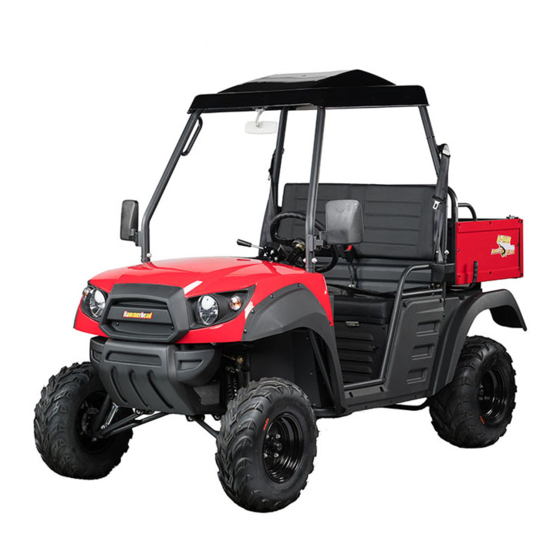
- Page 18 DESCRIPTION VEHICLE IDENTIFICATION Side View 1. Head lights 2. Front ABS Plastic Bumper 3. Front Tire 4. Brush Guards 5. Side Mirrors 6. ABS Plastic Top 7. Transmission Shifter 8. Steering Wheel 9. Cup Holder 10. Parking Brake 11. Seat Bottom (fold to access gas tank) 12. Seatbelts 13. Dump Bed Handle 14. Dump Bed 15. Dump Bed Latch 16. Tail Gate 17.
- Page 19 Inside View 21. Shifter Lever (F/N/R) 22. LCD Indicator (Speedometer, Turn 23. Glove Compartment 24. Brake Pedal 25. Throttle Pedal 26. Key Ignition 27. Hazard Warning Lights 28. Head Lights 29. Horn / Turn Signals 30. Auxiliary12V Plug 10 ...
- Page 20 Under the Seat 31. Vehicle Identification Plate 32. Gas Tank Cap 33. Gas Tank (unleaded gas only) 34. Engine 35. Battery Rear View 37. Taillights (Running Lights and Brake 38. Rear Axle 39. Electrical Box 40. Air Filter Assembly 41. Rear Brake System 42. Adjustable Rear Shocks 11 ...
- Page 21 CONTROL FUNCTIONS Main Switch Functions of respective switch position are as follows: OFF: All electrical circuits are switch off. The key can be removed in this position. ON: All electrical circuits are supplied with power, and the headlights and taillights comes on when the light switch is on. Ignition: The electric starter is engaged by turning and holding the key in this position. Release the key when the engine starts. ...
- Page 22 Indicator and warning lights. 1. Speed indicator in MPH. 2. Left turning light indicator 3. Headlight Indicator 4. Parking Brake Indicator 5. Right turning light indicator 6. Mileage odometer (miles) Control Panel 1. Hazard Lights Switch 2. Headlight switch (High/Low Beam) 3. Turning Light switch 4. Horn 5. Auxiliary Power Plug (12 Volts) Caution: Do not use the headlights with the engine turned off for an extended period of time. The battery may discharge to the point that the starter ...
- Page 23 Accelerator Pedal Press the accelerator pedal down to increase engine speed. Spring pressure returns the pedal to the rest position when released. Always check that the accelerator pedal returns normally before starting the engine. 1. Accelerator Pedal Brake Pedal Press the brake pedal to slow or stop the vehicle. This vehicle is equipped with front and rear disc brakes ...
- Page 24 Drive Select Lever The drive select lever is used to shift your vehicle into Forward, Neutral and Reverse position. (D,N,R). Always STOP the vehicle completely before select into a different drive. NOTE: Sometimes it may be difficult to select into Drive selector (Forward, Neutral, the drive that is because the gears might be Reverse) locked up in the transmission. Try to move the vehicle with your weight to unlock the gears. Fuel tank cap The Fuel tank is located underneath the vehicle’s seat ...
- Page 25 hips. Push down on the buckle end of the belt as you pull up on the shoulder part so the belt is snug across your hips. 4. Position the shoulder belt over your shoulder and across your chest. The shoulder belt should fit against your chest. If it is loose, pull the belt out all the way and then let it 1.
- Page 26 Glove Compartment To protect from damages, do not put metal products, like tools or sharply edged products directly in the glove compartment. If they must be stored, wrap them in appropriate cushion materials. Cargo Bed Cargo bed weight capacity is 250 Lbs. To open the tailgate, you need to unlatch two tailgate latches on either side of the tailgate. Do not put any extra weight on the tailgate as it might ...
- Page 27 2. Bed Handles load capacity is 250 Lbs. 3. Tailgate Latch 4. Tailgate ! WARNING POTENTIAL HAZARD Pinch Points WHAT CAN HAPPEN You or someone else could be pinched between the cargo bed and the frame when the bed is being lowered. HOW TO AVOID THE HAZARD Before closing the bed, be sure others are standing away from the vehicle. Keep hands and fingers away from the pinch points between the bed and the frame. ! WARNING POTENTIAL HAZARD Overloading the cargo bed WHAT CAN HAPPEN Could cause changes in vehicle handling which could lead to an accident HOW TO AVOID THE HAZARD Never exceed the stated maximum load limit for the cargo bed. Cargo should be properly distributed and securely attached. Reduce speed when carrying cargo. Allow greater distance for braking. ! WARNING 18 ...
- Page 28 POTENTIAL HAZARD Carrying a passenger in the cargo bed. WHAT CAN HAPPEN The passenger could fall, be thrown out, or be struck by objects in the cargo bed. HOW TO AVOID THE HAZARD Never carry a passenger in the cargo bed. The cargo bed is designed to carry cargo only. Rear shock absorber adjustment The spring preload can be adjusted to suit the operating conditions. You can reduce preload for a softer ride, or increase preload if frequent bottoming occurs. Adjust the spring preload as follows. 1. Spring preloaded adjusting ring To increase the spring preload, turn the 2.
-
Page 29: Pre-Operating Checks
PRE‐OPERATING CHECKS Before using this Vehicle, check the following Items: ITEM ROUTINE Brakes Check operation, free play, fluid level and fluid leakage. Fill with DOT 4 brake fluid if necessary. Parking Brake Check for proper operation, condition and free play Fuel Check fuel level. Fill with fuel if necessary. Engine Oil Check oil Level Fill with oil if necessary. Coolant reservoir Check coolant level. Fill with coolant if necessary Final Gear Oil Check for leakage Accelerator Pedal Check for proper accelerator pedal operation. Seat belts Check for proper operation and belt wear. Steering Check for proper operations. Fitting and fasteners Check all fittings and fasteners. Lights and switches Check for proper operation. Wheels and tires Check tire pressure, wear and damage. Axle Boots Check for damage. ... - Page 30 Failure to inspect the vehicle before operating. Failure to properly maintain the vehicle. WHAT CAN HAPPEN: Increase the possibility of an accident or equipment damage. HOW TO AVOID THE HAZARD: Always inspect your vehicle each time you use it to make sure vehicle is in safe operating condition. Always follow the inspection and maintenance procedures and schedules described in the Owner’s Manual. BRAKE PEDAL Check for correct brake pedal free play. If the brake pedal free play is incorrect, have a dealer adjust it. Check the operation of the brake pedal. It should move smoothly and three should be a firm feeling when the brake are applied. If not, have the vehicle inspected by a dealer. Brake Fluid Level Check the brake fluid level. Add fluid if necessary. Recommended Brake Fluid: DOT 4. Brake Fluid Leakage Check to see if any brake fluid is leaking out of the pipe joints or the brake fluid reservoir. Apply the brakes firmly for one minute. ...
- Page 31 Driving with improperly operating brakes. WHAT CAN HAPPEN: You could lose braking ability, which could lead to an accident. HOW TO AVOID THE HAZARD: Always check the brakes at the start of every ride. Do not operate the vehicle if you find any problem with the brakes. If a problem cannot be corrected by the adjustment procedures provided in this manual, have the vehicle inspected by a dealer. Fuel Make sure there is sufficient gasoline in the tank. Recommended fuel: Unleaded Gasoline ONLY Fuel Tank Capacity: 10L or 2.6 US Gallon Your engine has been designed to use regular unleaded gasoline with a pump octane number of ([R+M]/2) 86 or higher, or research octane number of 91 or higher. If knocking or pinging occurs, use a different brand of gasoline or premium unleaded fuel. Unleaded fuel will give you longer spark plug life and reduced maintenance cost. ! WARNING POTENTIAL HAZARD: ...
- Page 32 Do not overfill the fuel tank. Be careful not to spill fuel, especially on the engine or exhaust pipe. Wipe up any spilled fuel immediately. Be sure the fuel tank cap is closed securely. Engine Oil Make sure the engine oil is at the specified level. Add oil as necessary. CAUTION: Make sure that no foreign material enters the crankcase. Accelerator Pedal Check to see that the accelerator pedal operates correctly. It must operate smoothly and fully spring back to the idle position when released. Have a dealer repair as necessary for the proper operation. Seat belts Make sure that both seat belts are not frayed or damaged. The seat belt must move smoothly when pulled out and retract on its own when released. The latch plate should click securely into the buckle and release when the release button is pushed firmly. ...
- Page 33 Lights Check the headlights and tail/brake lights to make sure they are in working condition. Repair as necessary for proper operation. Switches Check the operation of all switches. Have a dealer repair as necessary for proper operation. Tires ! WARNING POTENTIAL HAZARD: Operating this vehicle with improper tire, or with improper or uneven tire pressure. WHAT CAN HAPPEN: Use of improper tires on this vehicle, or operation of this vehicle with improper or uneven tire pressure, may cause loss of control, increasing your risk of accident. ...
-
Page 34: Operation
OPERATION ! WARNING POTENTIAL HAZARD: Operating vehicle without being familiar with all controls WHAT CAN HAPPEN: Loss of control, which could cause an accident or injury. HOW TO AVOID THE HAZARD: Read the Owners manual carefully. If there is a control or function you do not understand, ask your dealer. Start a cold engine 1. Apply the brake. 2. Shift the drive select lever into the neutral position. NOTE: When the drive select lever is in the neutral position. The engine can be started in any gear if the brake is applied. However, it is recommended to shift into neutral before starting the engine. 3. - Page 35 Warming Up To get the maximum engine life, always warm up the engine before starting off. Never accelerate hard with a cold engine! To see whether or not the engine is warm, check if it responds to the throttle normally with the starter (choke) turned off. Caution: Before shifting, you must stop the vehicle and take your foot off the accelerator pedal, otherwise the transmission may be damaged. ...
- Page 36 backing. ! WARNING POTENTIAL HAZARD: Improperly operating in reverse WHAT CAN HAPPEN: You could hit an obstacle or person standing behind you, resulting in serious injury. HOW TO AVOID THE HAZARD: When you shift into reverse, make sure there are no obstacles or people behind you. When it is safe to proceed, go slowly. Parking When parking, stop the engine and shift the drive select lever into the neutral position. Apply the parking brake to help prevent the vehicle from rolling. Parking on a slope ! WARNING POTENTIAL HAZARD: Parking on a hill or other incline. WHAT CAN HAPPEN: The vehicle could roll out of control, increasing the chance of an accident. HOW TO AVOID THE HAZARD: Avoid parking on hills or other inclines. If you must park on an incline, apply the parking brake, and block the front and rear wheels with rocks or other objects. Do not park the vehicle at all on hills that are so steep you could not walk up them easily. 27 ...
- Page 37 1. Bring the vehicle to stop by applying the brakes. 2. Stop the engine. 3. With the brake applies, set parking brake by pulling up the parking brake lever. 28 ...
-
Page 38: Driving Your Vehicle
DRIVING YOUR VEHICLE Getting to know your vehicle This off‐highway utility vehicle will handle and maneuver differently from an ordinary passenger car or other vehicle. Before you begin to use your vehicle, be sure you have read this Owner’s Manual completely and understand the operation of the controls. Pay particular attention to the safety information and warning labels on the vehicle. ... - Page 39 Going Down Hill Check the terrain carefully before going down a hill. When possible, choose a path that lets you drive your vehicle straight downhill. Avoid sharp angles that could allow the vehicle to pitch or roll over. Carefully choose your path and drive no faster than you will able to react to obstacles that may appear. Riding over Rough Terrain Operating over rough terrain should be done with caution. Look for obstacles that could cause damage to the vehicle or could lead to a rollover or accident. Avoid jumping the vehicle as injury, loss of control, and damage to the vehicle could occur. Tip over warnings and recovery This vehicle CAN be rolled over in case of reckless driving, going too fast, jumping or making sharp turn. ! WARNING POTENTIAL HAZARD: Driving recklessly, going too fast, jumping vehicle or sharp turns. WHAT CAN HAPPEN: The vehicle could tip over and fall on driver or operators body parts. Injuries may lead to disfigurements and maimed bodies. ...
-
Page 40: Periodic Maintenance And Adjustment
PERIODIC MAINTENANCE ADJUSTMENT Periodic inspection, adjustment and lubrication will keep your vehicle in the safest and most efficient condition possible. Safety is an obligation of the vehicle owner. The most important points of vehicle inspection, adjustment and lubrication are explained on the following pages. ! WARNING POTENTIAL HAZARD: Servicing an engine while its running WHAT CAN HAPPEN: Moving Parts can catch clothing or parts of the body, causing injury. Electrical components can cause shocks or can start fires. HOW TO AVOID THE HAZARD: Turn off the engine when performing maintenance unless otherwise specified. Have a dealer perform service if you are not familiar with vehicle services. ... - Page 41 PERIODIC MAINTENANCE / LUBRICATION ITEM ROUTINE Which INITIAL EVERY ever Month 1 3 6 6 12 Comes First KM 320 1200 2400 2400 4800 (MI) (200) (750) (1500) (1500) (3000) Hours 20 75 150 150 300 Valves Check vales clearance adjust if YES ...
- Page 42 Fuel Line Check fuel hose for cracks or damage YES YES YES Replace if necessary Engine Oil Replace (warm engine before YES YES YES YES draining) Engine Oil Filter cartridge Replace YES YES YES Final Gear Oil Check oil level / oil leakage YES YES Front Brake Check operation / brake pad wear / YES ...
- Page 43 Wheels Check balance/damage/run out. YES YES YES YES Wheels bearing Check bearing assemblies for YES YES YES YES looseness/damage Replace if damaged. Front and Rear Check operation and for leakage YES YES Suspension Correct if necessary Steering System Check operation and for YES YES YES YES YES looseness/replace if necessary. ...
- Page 44 Engine Oil and Oil Filter Cartridge The Engine oil level should be checked before each operation. In addition, the oil must be changed and oil filter cartridge replaced at the intervals specified in the periodic maintenance and lubrication chart. Service Engine Crankcase Oil This vehicle comes with external oil cooler for the engine. Make sure to replace the oil cooler with authentic filter from your dealer. You must change the oil in the crankcase after the first 5 hours of operating of your new engine and after ...
- Page 45 condition. Do not over tighten the oil filter. 6) Replace the vehicle back on a flat surface to level the engine, and refill the crankcase with 30 oz of SAE 10W40 motor oil. 7) Check the oil level using the dipstick attached to the oil plug cap. Be sure to the check oil level before each use of the vehicle. 8) Add oil when necessary to keep the oil level between then bottom of the dipstick and the “O” mark. ...
- Page 46 Chain Lubrication To increase the chain life, it should be lubricated with a spray on type chain lubricant. Chain Adjustment Check the chain adjustment after the first two hours of use. Readjust if it has more than 1/2” flex. 1) Loose Nut #1 2) Adjust Nut #2. Turn Nut #2 clockwise in 1/2 turn increments, then turn Nut #1 until tight. Follow this procedure until chain is at proper tension. ...
- Page 47 Service Air Filter Service air filter every 20 hours of use 1) Remove cleaner cover by removing the Phillips head screws 2) Clean any excess dirt, oil or dust from the air cleaner box with a mild detergent and water 1. Air filter cleaner cover solution 2. Air filter element 3) Thoroughly dry the air box. 3. Air filter right Cover 4) Replace the air cleaner element. ...
- Page 48 5) Loosen adjustment nut #3 and #4, pulling the cable housing to draw #2 control cable right. 6) Realign nut #2 and #4 when the cable is properly tensioned. Front Wheel Replacement Do not disassemble the castle nuts when you replace the front wheels. It is only necessary to remove the four lug nuts to remove the wheel. Tighten the nuts after replacing the wheels. ...
- Page 49 adjust Dimension B by equally rotating the tie rods in or out with a 12mm wrench. 3) After adjusting to the desired length, tighten the lock nuts against the rod end. 4) Recheck the dimensions for proper alignment. Service Brake Fluid Level Insufficient brake fluid may let air enter the brake system, possibly causing the brakes to become ineffective. Before riding, check that the brake fluid is above the minimum level mark and replenish if necessary. A low brake fluid level may indicate worn brake pads or ...
- Page 50 4) Have a dealer inspect the brake system if the brake fluid level goes down. Brake fluid replacement Complete fluid replacement should be done by trained service personnel. Have a dealer replace the following components during periodic maintenance or when they are damaged or leaking. 5) Replace the oil seals every two years 6) Replace the brake hoses every four years. Battery The vehicle is equipped with a sealed type battery. Therefore it is not necessary to check the electrolyte or add distilled water in the battery. ...
-
Page 51: Troubleshooting
ROUBLESHOOTING Although vehicles receive a rigid inspection before shipment from the factory, trouble may occur during operation. Any problem in the fuel, compression, or ignition system can cause poor starting and loss of power. The troubleshooting chart describes quick, easy procedures for making checks. If your vehicle requires any repair, take it to a dealer. Your skilled technician at a dealership has the tools, experience and know‐how to properly service your vehicle. Use only genuine parts on your vehicle. 42 ... -
Page 52: Cleaning And Storage
LEANING AND TORAGE LEANING Frequent, thorough cleaning of your vehicle will not only enhance its appearance but will improve its general performance and extend the useful life of many components. 1. Before cleaning the vehicle: a. Block off the end of the exhaust pipe to prevent water entry. A plastic bag and strong rubber band may be used. b. - Page 53 ! WARNING POTENTIAL HAZARD Operation with wet brakes after washing. WHAT CAN HAPPEN Wet brakes may have reduced stopping ability, increasing the chance of an accident.
- Page 54 6. Tie a plastic bag over the exhaust pipe outlet to prevent moisture from entering. 7. If storing in a humid or salt‐air atmosphere, coat all exposed metal surfaces with a light film of oil. Do not apply oil to any rubber parts pr the seat covers. 8. Remove the battery and charge it. Store it in a dry place and recharge it once a month. Do not store the battery in an excessively warm or cold place (less than 0℃ (30°F) or more than 30℃ (30°F)). NOTE: Make any necessary repairs before storing the vehicle. 45 ...
-
Page 55: Specifications
PECIFICATIONS Dimensions Overall length 91 inch Overall width 51 inch Overall height 68 inch Wheel base 63 inch Ground clearance 8.6 inch Minimum turning radius 78 inch Basic weight 700 lbs. Engine Type Single cylinder oil & cooled 4 stroke Engine Displacement 150cc Bore x Stroke 57.4 x 57.8 Carburetor Deni Output Power 9.0 HP @ 7500 rpm 13 ft‐lbs @ 5500 rpm Starting ... - Page 56 Rear Suspension Spring over shock with 2.0” of travel Dry Weight 700 Lbs Capacities Maximum Bed Load 250 Lbs Climbing Angle 15‐20 Degree Fuel Tank 10 L / 2.6 Gal Engine Oil 36 Oz Battery 12 V 9 AH Top Speed 25‐28 MPH Total Vehicle Weight Capacity (including 800 Lbs passenger) 47 ...