Advertisement
Quick Links
- Installation Instructions
DFS8M
Wireless Optical Smoke Sensor with sounder
Introduction
The DFS8M is a wireless smoke
sensor designed for Domonial 7 and
7G panels. It features a sounder
for local signaling of alarms and is
used as an early warning device.
Smoke alarm location
A single smoke sensor will give some
protection if it is properly installed, but
most homes will require two or more to ensure that a reliable early
warning is given. For recommended protection, put one smoke sensor in
all rooms (apart from kitchen and bathroom) where fire is most likely to
break out.
If only one smoke sensor is installed, it should be located between the
sleeping area and the most likely sources of fire (living room, corridor for
example), but it should not be more than 7,5 meters from the door to any
room where a fire may start and block your escape from the house. Make
sure that it can be heard loudly enough in the bedroom to wake someone.
If your home has more than one floor, at least one Smoke Sensor should
be fitted on each level.
If the premise is one storey you should put your first Smoke Alarm in a
corridor or hallway between the sleeping and living areas. Place it as near
to the living area as possible, but make sure that it can be heard loudly
enough in the bedroom to wake someone.
Smoke alarm positioning
Smoke rises towards the ceiling, then spreads out horizontally,
therefore the ideal place to fix the sensor is in the middle of the room.
When installing smoke alarms keep at least 30cm from walls and corners.
Additionally, mount the unit at least 30cm from any light fitting or
decorative object which might prevent smoke or heat entering the Smoke.
With a sloping or peaked ceiling install a Smoke Alarm within 60cm of the
peak (measured vertically). If this height is less than 60cm for Smoke
Alarms the ceiling is regarded as being flat.
Locations to avoid
• Bathrooms, kitchens, shower rooms, garages or other rooms where the
smoke sensor may be triggered by steam, condensation, normal smoke
or fumes. Keep at least 6 meters away from sources of normal
smoke/fumes.
• Locate away from very dusty or dirty areas as dust build-up in the
chamber can impair performance. It can also block the insect screen
mesh and prevent smoke from entering the smoke detector chamber.
• Do not locate in insect infested areas. Small insects getting into the
smoke detector chamber can cause intermittent alarms.
• Places where the normal temperature can exceed 40°C or be below 0°C
(e.g. attics, furnace rooms, directly above ovens or kettles etc.) as the
heat/steam could cause nuisance alarms.
• Near a decorative object, door, light fitting, window moulding etc., that
may prevent smoke or heat from entering the Alarm.
• Surfaces that are normally warmer or colder than the rest of the room
(e.g. attic hatches). Temperature differences might stop smoke or heat
from reaching the unit.
• Next to or directly above heaters or air conditioning vents, windows, wall
vents etc. that can change the direction of airflow.
• In very high or awkward areas (e.g. over stairwells) where it may be
difficult to reach the alarm (for testing, hushing or battery replacement).
• Locate the unit at least 1m from dimmer controlled lights and wiring as
some dimmers can cause interference.
• Locate unit at least 1.5m from fluorescent light fittings as electrical
"noise" and/or flickering may affect the unit.
Installation Procedure
1. Select a location complying with the advice given in the paragraph
"S moke alarm location" and "S moke alarm positioning"
2. Remove the mounting plate from the sensor by twisting it in an anti-
clock- wise direction (see Figure 1a).
3. Place the mounting plate on the ceiling exactly where you want to
mount the sensor. With a pencil, mark the location of the two screw holes.
4. Take care to avoid any electrical wiring in the ceiling, drill holes using a
drill bit through the centre of the marked locations. Push the plastic screw
anchors into the drilled holes. Screw the mounting plate to the ceiling
(screws not supplied). Take care to protect the detection chamber from
dust during this operation.
5. Connect the battery to the battery snaps as shown in Figure 2
6. Register the device to the control panel by pressing the radio button (see
registration paragraph)
7. Carefully line up the unit on the base, using the marks, and twist on as
shown in Figure 3, then twisting it in a clock- wise direction (see Figure 1b).
8. Press the Test button to ensure that the alarm works as shown in Figure 4.
DFS8M
Line up marks on base & cover
& rotate to click on
Tamperproofing the Alarms
The smoke head can be made tamperproof to prevent unauthorised removal.
Break off the small pillar on the base as shown in figure 5. To remove the
smoke head from the ceiling it is now necessary to use a small screwdriver, to
release the catch (push catch towards the ceiling) and then twist off the
housing (see figure 6).
If necessary it is possible to further secure the smoke head by using a self
tapping screw (2 to 3mm diameter and 6 to 8mm long - not supplied), to firmly
lock the smoke head and its mounting plate together (see figure 7).
Attach the smoke head to the mounting plate. Line up the screw (not
supplied) on the "U" shaped recessed area shown in figure 7 and screw firmly
home.
To remove the smoke head from the ceiling, remove the screw first, and use a
small screwdriver, to release the catch (push catch towards the ceiling) and
then
- 1 -
Battery snaps
Figure 1a
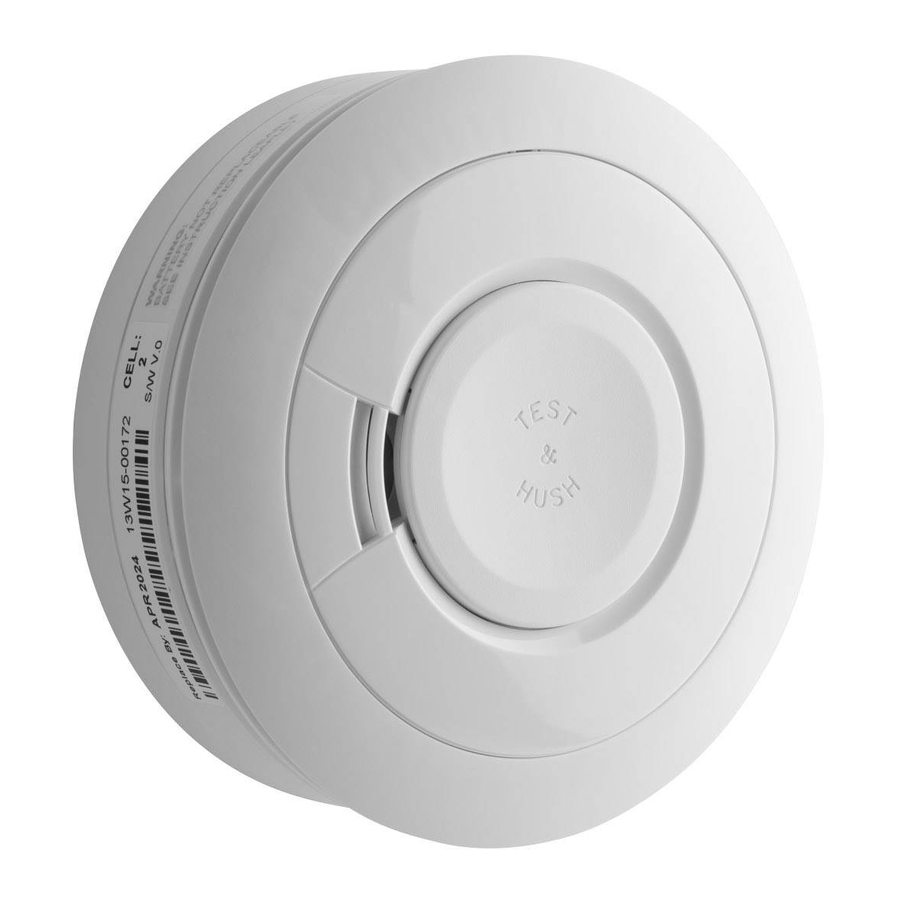
Smoke Sensor
Test button
Figure 1b
Mounting plate
Figure 3
twist off in an anti-clock- wise direction.
Break off small pillar
Figure 5
Figure 7
base
Figure 2
Smoke head
Figure 4
Push up catch & twist alarm anti-
clockwise to remove
Figure 6
Radio button
Advertisement

Related Manuals for Honeywell DFS8M


Summary of Contents for Honeywell DFS8M
-
Page 1: Installation Instructions
6. Register the device to the control panel by pressing the radio button (see registration paragraph) The DFS8M is a wireless smoke sensor designed for Domonial 7 and 7. Carefully line up the unit on the base, using the marks, and twist on as 7G panels. - Page 2 215g (with battery) “Test & Hush” button to Control Nuisance Alarms RF Range 1000m in open field The DFS8M has a combined “Test & Hush” button to help you control Battery 1 x 6LR61 9V Alkaline Battery nuisance/false alarms. or 1 x U9VL-J Lithium Battery 1.