Table of Contents
Advertisement
Advertisement
Table of Contents

Related Manuals for Orion Observer 70 EQ


Summary of Contents for Orion Observer 70 EQ
- Page 1 Manual orion ® observer 70 EQ ™ #9882 Equatorial Refractor Telescope customer support (800) 676-1343 E-mail: support@telescope.com corporate offices (831) 763-7000 89 Hangar Way, Watsonville, ca 95076 Providing Exceptional Consumer Optical Products Since 1975 IN 211 Rev. B 02/09...
-
Page 3: Table Of Contents
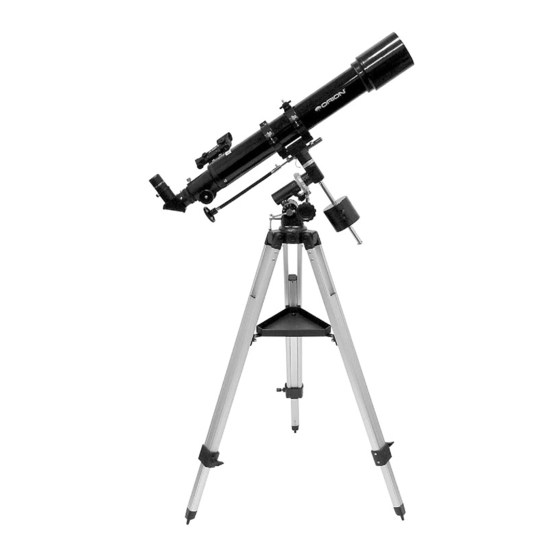
® elcome to the exciting world of amateur astronomy. Your new Observer 70 EQ Refractor is a quality optical instrument that will deliver countless hours of exciting stargazing, from magnified views of the Moon, star clusters, and nebulas to glimpses of Jupiter’s moons and Saturn’s rings. The Observer 70 includes everything you need to go from box to backyard in less than half an hour. - Page 4 70 refractor Figure 1. Observer 70 EQ Components...
-
Page 5: Tripod Legs
Basic components of Your telescope Figure 1 shows the fully assembled Observer 70 EQ. All the major components of the telescope are described and numbered to help you identify each part and understand its use. Refer back to this figure when assembling the telescope. - Page 6 observer 70 telescope tube Figure 2a. Optical tube components Figure 2b. Observer 70 focuser detail...
- Page 7 ® Details of the optical tube and components Figure 2a shows the details of the Optical Tube (1) and its various parts. The optical tube is shown attached to the mount for clar- ity. Figure 2b is a close up of the focuser with even more detail. objective lens Focus wheels This is the main optical component of the telescope.
- Page 8 70 tripod and Mount Figure 3a. Equatorial mount detail. Figure 3b. Observer 70 EQ tripod leg and mount attachment detail.
-
Page 9: Counterweight Shaft
Details of the tripod and Mount Figure 3a shows a close up of the telescope’s mount and tripod. Important features are pointed out for greater clarity and detail. Figure 3b shows close-up detail of the tripod legs (10) attached to the equatorial mount (5). Declination setting circle latitude lock t-bolt This circle will indicate where the telescope is pointing in... -
Page 10: Assembly
Figure 4a-d. Proper operation of the equatorial mount requires that the telescope tube be balanced on both the R.A. and Dec. axes. (a) With the R.A. lock lever released, slide the counterweights along the counterweight shaft until it just counterbalances the tube. (b) When you let go with both hands, the tube should not drift up or down. -
Page 11: Getting Started
Do You Wear Eyeglasses? If you wear eyeglasses, you may be able to keep Azimuth them on while you observe. In order to do this, your adjustment Thumbscrews wheel eyepiece must have enough “eye relief” to allow you to see the entire field of view with glasses on. You can Power try looking through the eyepiece first with your knob... -
Page 12: Focusing The Telescope
Figure 6. ring clamps on the tube rings (6) a few turns, until you can EZ Finder II slide the telescope tube forward and back inside the rings superimposes a (this can be aided by using a slight twisting motion on the tiny red dot on the optical tube while you push or pull on it) (Figure 4c). -
Page 13: Polar Alignment
Figure 8. ment is achieved by pointing the mount’s R.A. axis at Polaris Polar alignment of the Observer 70 EQ is easily done by pointing the telescope’s right ascension axis at Polaris (The (also called the North Star). It lies within 1° of the north celes- North Star). -
Page 14: Automatic Tracking
Finder II, use the slow-motion controls to center it. Now, look in the telescope’s eyepiece. If the EZ Finder II is properly So, the coordinates for the Orion Nebula listed in a star atlas aligned, the object should be visible somewhere in the field of will look like this: view. -
Page 15: Using Your Telescope
Figure 10a-d. These illustrations show the telescope pointed in the four cardinal directions (a) north, (b) south, (c) east, (d) west. Note that the tripod and mount have not been moved; only the telescope tube has been moved on the R.A. and Dec. axes. calibrating the right ascension setting circle polar alignment. - Page 16 If, when you look up at the sky with your naked eyes, the stars are twinkling noticeably, the seeing is bad and you will be lim- For example, the Observer 70 EQ, which has a focal length of ited to viewing with low powers (bad seeing affects images at 700mm, used in combination with the 25mm eyepiece, yields high powers more severely).
- Page 17 Figure 12. Magnification limits The 10mm and 25mm Explorer II eyepieces. Every telescope has a useful magnification limit of about 2X per millimeter of aperture. This comes to 140X for the Observer 70. Some telescope manufacturers will use misleading claims of excess magnification, such as “See distant galaxies at 640X!”.
-
Page 18: Care And Maintenance
C. The Planets ular star clusters, and a variety of different types of galaxies. Most deep-sky objects are very faint, so it is important that The planets don’t stay put like the stars, so to find them you you find an observing site well away from light pollution. Take should refer to Sky Calendar at our website (telescope.com), plenty of time to let your eyes adjust to the darkness. -
Page 19: Specifications
7. specifications Optical tube: Aluminum Objective lens diameter: 70mm Objective lens: Achromatic, air-spaced, fully coated Focal length: 700mm Focal ratio: f/10.0 Focuser: Rack and pinion, accepts 1.25" eyepieces and accessories Eyepieces: 25mm and 10mm Explorer II eyepieces, fully coated 1.25" Magnification with supplied eyepieces: 28x (with 25mm) and 70x (with 10mm) Tripod: Aluminum... - Page 20 Orion Telescopes & Binoculars will repair or replace, at Orion’s option, any warranted instrument that proves to be defective, provided it is returned postage paid to: Orion Warranty Repair, 89 Hangar Way, Watsonville, CA 95076. If the product is not registered, proof of purchase (such as a copy of the original invoice) is required.