JVC KV-MRD900 Instructions Manual
9-inch widescreen monitor with dvd player
Hide thumbs
Also See for KV-MRD900:
- Instructions manual (117 pages) ,
- Installation & connection manual (6 pages) ,
- Installation & connection manual (6 pages)
Table of Contents
Advertisement
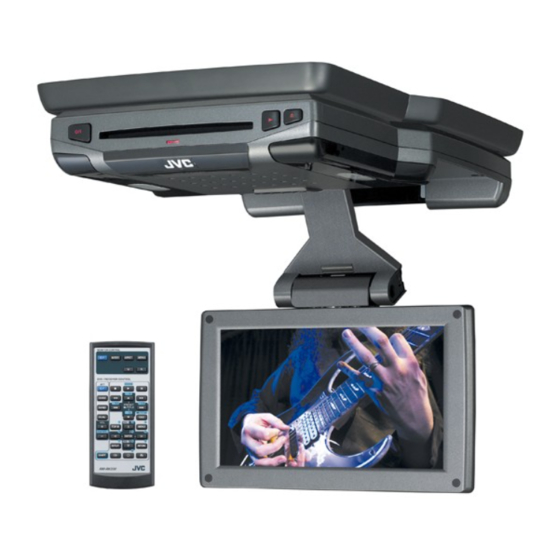
9-INCH WIDESCREEN MONITOR
WITH DVD PLAYER
MONITOR DE PANTALLA ANCHA DE 9 PULGADAS
CON REPRODUCTOR DVD
MONITEUR COULEUR A ECRAN LARGE DE 9 POUCES
AVEC LECTEUR DE DVD
• This system cannot receive television broadcasts. Use the separately sold TV tuner unit KV-C1000 for
optional television broadcast reception.
• Este sistema no puede recibir emisiones de televisión. Utilice la unidad de sintonizador de TV móvil
KV-C1000 vendido por separado para una recepción opcional de emisiones de televisión.
• Ce système ne peut pas recevoir les émissions de télévision. Utilisez le module de tuner de télévision
mobile KV-C1000 vendu séparément afin de pouvoir recevoir les émissions de télévision.
For installation and connections, refer to the separate manual.
Para la instalación y las conexiones, refiérase al manual separado.
Pour l'installation et les raccordements, référez-vous au manuel séparé.
INSTRUCTIONS
MANUAL DE INSTRUCCIONES
MANUEL D'INSTRUCTIONS
KV-MRD900
KV-MRD900
KV-MRD900
For customer Use:
Enter below the Model
No. and Serial No. which
are located on the top or
bottom of the cabinet.
Retain this information for
future reference.
Model No.
Serial No.
LVT1340-001A
[J]
Advertisement
Chapters
Table of Contents
Troubleshooting

Related Manuals for JVC KV-MRD900


Summary of Contents for JVC KV-MRD900
- Page 1 Para la instalación y las conexiones, refiérase al manual separado. Pour l’installation et les raccordements, référez-vous au manuel séparé. INSTRUCTIONS MANUAL DE INSTRUCCIONES MANUEL D’INSTRUCTIONS KV-MRD900 KV-MRD900 KV-MRD900 For customer Use: Enter below the Model No. and Serial No. which are located on the top or bottom of the cabinet.
- Page 2 WARNINGS • DO NOT INSTALL THE MONITOR IN A LOCATION WHICH OBSTRUCTS DRIVING, VISIBILITY, SAFETY DEVICE FUNCTION SUCH AS AIR BAGS OR WHICH IS PROHIBITED BY APPLICABLE LAWS AND REGULATIONS. • There may be legal regulations defining the permissible installation locations for the monitor which differ by country or by state.
- Page 3 Thank you for purchasing a JVC product. Please read all instructions carefully before operation, to ensure your complete understanding and to obtain the best possible performance from the unit. INFORMATION (For U.S.A.) This equipment has been tested and found to comply with the limits for a Class B digital device, pursuant to Part 15 of the FCC Rules.
-
Page 4: How To Forcibly Eject A Disc
How to reset your monitor This will reset the microcomputer. Your preset adjustments will also be erased. How to forcibly eject a disc If a disc cannot be recognized by the monitor or cannot be ejected... Monitor (for about 5 seconds while power is on) •... -
Page 5: Table Of Contents
Contents How to reset your monitor ... How to forcibly eject a disc ... How to read this manual ... Precautions ... 6 Widescreen monitor ... 7 Parts identification ... Remote controller — RM-RK230 Main elements and features ... Headphones — ... -
Page 6: Precautions
Precautions Cautions for handling the liquid crystal panel Do not expose the liquid crystal panel to direct sunlight. • Storage temperature range: –20°C to +80°C (–4°F to 176°F) +80°C –20°C –20°C to +80°C During the summer, temperatures can reach as high as 100°C (212°F). -
Page 7: Widescreen Monitor
Widescreen monitor (standby/on) button • Turns on the power if pressed. • Turns off the power if pressed and held. 2 Remote sensor 3 Dome light switch • See “To activate the door sensor” on page 4 IR transmitters 5 Dome lights 6 Arm lock lever 7 Reset button When you watch the screen at an angle, the picture might not be clear. -
Page 8: Remote Controller
Remote controller — Installing the lithium coin battery (CR2025) Before using the remote controller: • Aim the remote controller directly at the remote sensor on the monitor. Make sure there is no obstacle in between. Remote sensor • Do not expose the remote sensor to strong light (direct sunlight or artificial lighting). - Page 9 • DVD: (subtitle), Controllable only if your car receiver which is connected to this monitor is one of the JVC receivers. These buttons function as the number buttons when pressed with SHIFT button. Only when PBC is not in use.
-
Page 10: Ks-Hp2
Headphones — You can listen to the playback sounds with cordless headphones—KS-HP2. Installing the batteries Batteries (R03/AAA) — supplied only for CAUTIONS: • The supplied batteries are not rechargeable. DO NOT recharge them; otherwise, battery leakage or explosion may result. •... -
Page 11: Basic Operations
Basic operations Preparation Before operating the unit, make sure that all external components are correctly connected and installed. Open the liquid crystal panel. Press PUSH-OPEN until the liquid crystal panel is unlocked, then open the liquid crystal panel by both hands. CAUTION: •... - Page 12 Turn on the power. Monitor Remote control Select the playback source. MODE Each time you press the button, the playback source changes as follows: DISC AV 1 Operate the playback source you selected. To operate the built-in DVD player, see “Disc operations” on page 18. To operate the external components, refer to the manuals for the connected components.
-
Page 13: Adjustments
Adjustments You can make your own display or sound adjustments using the menu. • For the adjustable items, see the next page. The Remote controller—RM-RK230 has two MENU buttons. In this section, using MENU button at MONITOR CONTROL. Basic procedure Call up the menu. - Page 14 Adjustable items on the monitor menu BRIGHT: CONTRAST: TINT: COLOR: IR*: DIMMER: DVD SURROUND: WHITE LED: * Turn off the headphones before changing the “IR” setting. Adjust this if the picture is too bright or too dark. • Adjustable range: –10 to +11 •...
-
Page 15: Changing The Aspect Ratio
You can select an appropriate aspect ratio for the playback video signals. Basic procedure Each time you press the button, aspect ratio change. ASPECT Changeable aspect ratio When incoming 16:9 video signal: FULL: NORMAL: JUST: ZOOM: Changing the aspect ratio Pictures are fully shown on the screen. - Page 16 When incoming 4:3 video signal: FULL: NORMAL: JUST: ZOOM: Pictures are enlarged horizontally and are fully shown on the screen. Pictures are shown at the center of the screen. • The black bars will be shown at the left and right sides of the screen.
-
Page 17: Playable Discs
Playable discs Discs you can play You can play back the following discs—12 cm (4-3/4") and 8 cm (3-3/16")—on the built-in DVD player: • DVD Video: Recorded in NTSC color system with Region Code “1” (see below). – DVD-R/DVD-RW recorded in the DVD Video format can also be played (see page 33). -
Page 18: Disc Operations
Disc operations The disc type is automatically detected, and playback starts automatically (for DVD: automatic start depends on its internal program). If the current disc is an audio CD, CD Text, MP3/WMA, JPEG, or VCD without PBC, all tracks will be played repeatedly until you change the source or eject the disc. -
Page 19: Basic Operations
Operations To stop play temporarily To replay the previous scenes—One Touch Replay To stop playback • During play, on-screen guide icons appear on the monitor for a while (see page 35). To eject the disc You can eject the disc even when the monitor is turned off. Basic operations Next operation Playback pauses. - Page 20 To go to the next or previous chapters/tracks • For DVD: During play or pause To go back to the beginning of the current chapter/track, then the previous chapters/tracks. To fast-forward or reverse the chapter/track Reverses. * The search speed changes to x2 ] x10 for all discs (DVD, VCD, CD), but the information shown on the monitor is only for DVD/VCD.
-
Page 21: Dvd/Vcd/Jpeg Special Functions
DVD/VCD/JPEG special functions Selecting audio languages For DVD: You can select the language to listen to if the disc has multiple audio languages. ENGLISH ENGLISH Ex.: When the disc has 3 options For VCD: You can select the audio channel to play. -
Page 22: Disc Menu Operations
Disc menu operations Menu-driven playback is possible while playing back a DVD with menu-driven features or a VCD with the PBC (PlayBack Control). While playing a DVD A title list or disc menu will appear on the monitor. Select the item you want on the menu. -
Page 23: On-Screen Disc Operations
On-Screen disc operations About the On-Screen Bar You can check the disc information and use some functions through the on-screen bar. • For audio CD, CD Text, and MP3/WMA/ JPEG disc you can also use the control screen and list screen (see pages 26 and 27). -
Page 24: Basic On-Screen Bar Operations
Basic on-screen bar operations Display the on-screen bar. • For DVD/VCD: (twice) • For other discs: DVD -V TIME TITLE CHAP When a JPEG disc is loaded, skip to step 3. Select an item. Make a selection. • If pop-up menu appears... DVD -V TIME TITLE... - Page 25 You can play the first 15 seconds INTRO of all tracks in the disc, or in the current folder (only for MP3/ WMA). VCD (while PBC is not in use): (Canceled) INTRO MP3/WMA: INTRO TRACK INTRO FOLDER (Canceled) CD Text/audio CD: (Canceled) INTRO TRACK You can randomly play all tracks...
-
Page 26: Basic Control Screen Operations
Basic control screen operations You can search for and play the desired items through the control screen. For MP3/WMA/CD Text/audio CD: The control screen automatically appears on the monitor when you insert a disc. JPEG: Press TOP M (menu), MENU, or 7. Playback stops and the control screen appears. -
Page 27: List Screen Operations
List screen operations You can display the folder list/track list before starting play. On this list, you can confirm the contents and start playing a disc. Folder/track list screens Folder list (MP3/WMA/JPEG) Folder : 153/240 Track 154/198 fol130 fol140 fol150 fol141 fol151 fol131... -
Page 28: Dvd Setup Menu
DVD setup menu You can store the initial disc playback status. • While playing, no change can be made on the setup menu. • When shipped from the factory, the on-screen language is set to English. To change the language, see page 29. Basic setting procedure While stop... - Page 29 LANGUAGE menu Item MENU LANGUAGE Select the initial disc menu language. AUDIO LANGUAGE Select the initial audio language. SUBTITLE Select the initial subtitle language or erase the subtitle (OFF). ON SCREEN LANGUAGE Select the language for the setup menu and some indications shown on the monitor.
- Page 30 AUDIO menu Item DIGITAL AUDIO OUTPUT DOWN MIX D. (Dynamic) RANGE COMPRESSION Contents Select the signal format to be emitted through the DIGITAL OUT (Optical) terminal. For details, see page 36. • PCM ONLY : Select this when connecting an amplifier or a decoder incompatible with Dolby Digital, DTS, MPEG Audio, or connecting to a recording device.
-
Page 31: Maintenance
Maintenance To prevent damage to the exterior • Do not apply pesticides, benzine, thinner or other volatile substances to the monitor. The cabinet surface primarily consists of plastic materials. • Do not wipe with benzine, thinner or similar substances because this will results in discoloration or removal of the paint. -
Page 32: Language Codes
Language codes Code Language Afar Abkhazian Afrikaans Ameharic Arabic Assamese Aymara Azerbaijani Bashkir Byelorussian Bulgarian Bihari Bislama Bengali, Bangla Tibetan Breton Catalan Corsican Czech Welsh Bhutani Greek Esperanto Estonian Basque Persian Finnish Fiji Faroese Frisian Irish Scots Gaelic Galician Guarani Gujarati Hausa Hindi... -
Page 33: More About This Monitor
More about this monitor Basic operations Turning off the power • If you turn off the power while listening to a disc, disc play will start automatically, next time you turn on the power. Disc operations General • In this manual, words “track” and “file” are interchangeably used when referring to MP3/ WMA/JPEG files and their file names. - Page 34 • Do not use the following DVD-R/DVD-RW or CD-R/CD-RW: – Discs with stickers, labels, or protective seal stuck to the surface. – Discs on which labels can be directly printed by an ink jet printer. Using these discs under high temperatures or high humidities may cause malfunctions or damages to discs.
- Page 35 • Even if you try to pause the current picture, it may be skipped, then the next picture will pause. • This unit can recognize the total of 1100 files, 250 folders (maximum of 999 files per folder). Changing the source •...
- Page 36 About sounds reproduced through the terminals • Through the analog terminals (AV-OUT/cordless headphones): 2-channel signal is emitted. When playing a multi-channel encoded disc, multi-channel signals are downmixed. (AUDIO—DOWN MIX: see page 30.) • Through DIGITAL OUT (optical): Digital signals (Linear PCM, Dolby Digital, DTS, MPEG Audio) are emitted through this terminal.
-
Page 37: Troubleshooting
Troubleshooting What appears to be trouble is not always serious. Check the following points before calling a service center. Symptoms • Colored spots (red, blue and green) appear on the screen. • No picture appears and sound is not heard. •... - Page 38 Symptoms • Sound and picture are sometimes interrupted or distorted. • Disc cannot be played back. • Noise is generated. • A longer readout time is required. • Tracks cannot be played back as you have intended them to play. •...
-
Page 39: Specifications
Specifications WIDESCREEN MONITOR Screen: 9 inch liquid crystal panel Number of pixel: 336 960 pixels (480 vertical × 234 horizontal × 3) Drive method: TFT (Thin Film Transistor) active matrix format Cordless audio: Infrared audio transmitter L-channel: 2.3 MHz R-channel: 2.8 MHz Effective listening angle: 30˚... - Page 40 Having TROUBLE with operation? Please reset your unit Refer to page of How to reset your unit Still having trouble?? USA ONLY Call 1-800-252-5722 http://www.jvc.com We can help you! EN, SP, FR 0305MNMMDWJEIN © 2005 Victor Company of Japan, Limited...
- Page 41 The following parts are provided with this unit. After checking them, please set them correctly. Cordless headphones (supplied only with KV-MRD900) Auriculares inalámbricos (suministrados solamente con KV-MRD900) Casque d’écoute sans fil (fourni uniquement avec le KV-MRD900) KS-HP2 Widescreen monitor Monitor de pantalla ancha Moniteur à...
- Page 42 If you have any questions or require information regarding installation kits, consult your JVC car audio dealer or a company supplying kits. Detaching the dome light cover / Desmontaje de la cubierta de la luz del techo / Détachement du couvercle du plafonnier To mount the widescreen monitor, detach the dome light covers.
- Page 43 Before mounting the monitor to the ceiling: • Perform the required external connections first (see reverse page). • Wear goggles or protective eyewear to protect your eyes especially while drilling the holes. • Pay attention not to damage the car interior and its fittings and the ceiling of your car.
-
Page 44: Electrical Connections
NEGATIVA. Si su vehículo no posee este sistema, será necesario un inversor de tensión, que puede ser adquirido en los concesionarios de JVC de equipos de audio para automóviles. • Reemplace el fusible por uno con la corriente especificada. -
Page 45: External Components
LINE OUT or SUBWOOFER plugs of the car receiver. For KV-MRD900 / Para KV-MRD900 / Pour le KV-MRD900 See also “About sounds reproduced through the terminals” on page 36 of the INSTRUCTIONS. Consulte también “Acerca de los sonidos reproducidos a través de los terminales traseros” en la página 36 de las MANUAL DE INSTRUCCIONES. -
Page 46: Localizacion De Averias
VIDEO OUT 2nd AUDIO OUT 2nd AUDIO OUT Car receiver (ex. JVC KD-ADV6160) Receptor para automóvil (ej. JVC KD-ADV6160) Récepteur d’autoradio (ex. JVC KD-ADV6160) KV-C1000 Si vous souhaitez augmenter le niveau du casque d’écoute, augmentez d’abord le niveau de sortie de la prise 2nd AUDIO OUT sur l’autoradio, puis ajustez le niveau du casque d’écoute... - Page 47 9-ZOLL-BREITBILDMONITOR MIT DVD-PLAYER MONITEUR COULEUR A ECRAN LARGE DE 9 POUCES AVEC LECTEUR DE DVD 9-INCH BREEDBEELD-MONITOR MET DVD-SPELER KV-MRD900 • This system cannot receive television broadcasts. Use the separately sold TV tuner unit KV-C1001 for optional television broadcast reception.
- Page 48 WARNINGS • DO NOT INSTALL THE MONITOR IN A LOCATION WHICH OBSTRUCTS DRIVING, VISIBILITY, SAFETY DEVICE FUNCTION SUCH AS AIR BAGS OR WHICH IS PROHIBITED BY APPLICABLE LAWS AND REGULATIONS. • There may be legal regulations defining the permissible installation locations for the monitor which differ by country or by state.
- Page 49 Thank you for purchasing a JVC product. Please read all instructions carefully before operation, to ensure your complete understanding and to obtain the best possible performance from the unit. IMPORTANT FOR LASER PRODUCTS 1. CLASS 1 LASER PRODUCT 2. CAUTION: Do not open the top cover. There are no user serviceable parts inside the unit; leave all servicing to qualified service personnel.
-
Page 50: How To Reset Your Monitor
How to reset your monitor This will reset the microcomputer. Your preset adjustments will also be erased. How to forcibly eject a disc If a disc cannot be recognized by the monitor or cannot be ejected... Monitor (for about 5 seconds while power is on) •... - Page 51 Contents How to reset your monitor ... How to forcibly eject a disc ... How to read this manual ... Precautions ... 6 Widescreen monitor ... 7 Parts identification ... Remote controller — RM-RK230 Main elements and features ... Headphones — ...
- Page 52 Precautions Cautions for handling the liquid crystal panel Do not expose the liquid crystal panel to direct sunlight. • Storage temperature range: –20°C to +80°C +80°C –20°C –20°C to +80°C During the summer, temperatures can reach as high as 100°C. When the liquid crystal panel reaches high temperatures or low temperatures, chemical changes occur within the liquid crystal panel...
- Page 53 Widescreen monitor (standby/on) buttons • Turns on the power if pressed. • Turns off the power if pressed and held. 2 Remote sensor 3 Dome light switch • See “To activate the door sensor” on page 4 IR transmitters 5 Dome lights 6 Arm lock lever 7 Reset button When you watch the screen at an angle, the picture might not be clear.
-
Page 54: Rm-Rk230
Remote controller — Installing the lithium coin battery (CR2025) Before using the remote controller: • Aim the remote controller directly at the remote sensor on the monitor. Make sure there is no obstacle in between. • Do not expose the remote sensor to strong light (direct sunlight or artificial lighting). - Page 55 • DVD: (subtitle), Controllable only if your car receiver which is connected to this monitor is one of the JVC receivers. These buttons function as the number buttons when pressed with SHIFT button. Only when PBC is not in use.
-
Page 56: Main Elements And Features
Headphones — You can listen to the playback sounds with cordless headphones—KS-HP2. Installing the batteries Batteries (R03/AAA) — supplied only for CAUTIONS: • The supplied batteries are not rechargeable. DO NOT recharge them; otherwise, battery leakage or explosion may result. •... -
Page 57: Basic Operations
Basic operations Preparation Before operating the unit, make sure that all external components are correctly connected and installed. Open the liquid crystal panel. Press PUSH-OPEN until the liquid crystal panel is unlocked, then open the liquid crystal panel by both hands. CAUTION: •... - Page 58 Turn on the power. Monitor Remote control Select the playback source. MODE Each time you press the button, the playback source changes as follows: DISC AV 1 Operate the playback source you selected. To operate the built-in DVD player, see “Disc operations” on page 18. To operate the external components, refer to the manuals for the connected components.
-
Page 59: Adjustments
Adjustments You can make your own display or sound adjustments using the menu. • For the adjustable items, see the next page. The Remote controller—RM-RK230 has two MENU buttons. In this section, using MENU button at MONITOR CONTROL. Basic procedure Call up the menu. - Page 60 Adjustable items on the monitor menu BRIGHT: CONTRAST: TINT: COLOR: IR*: DIMMER: DVD SURROUND: NTSC/PAL: WHITE LED: * Turn off the headphones before changing the “IR” setting. Adjust this if the picture is too bright or too dark. • Adjustable range: –10 to +11 •...
-
Page 61: Changing The Aspect Ratio
You can select an appropriate aspect ratio for the playback video signals. Basic procedure Each time you press the button, aspect ratio change. ASPECT Changeable aspect ratio When incoming 16:9 video signal: FULL: NORMAL: JUST: ZOOM: Changing the aspect ratio Pictures are fully shown on the screen. - Page 62 When incoming 4:3 video signal: FULL: NORMAL: JUST: ZOOM: Pictures are enlarged horizontally and are fully shown on the screen. Pictures are shown at the center of the screen. • The black bars will be shown at the left and right sides of the screen.
-
Page 63: Playable Discs
Playable discs Discs you can play You can play back the following discs—12 cm and 8 cm—on the built-in DVD player: • DVD Video: Recorded in the PAL color system with Region Code “2” (see below). – DVD-R/DVD-RW recorded in the DVD Video format can also be played (see page 33). -
Page 64: Disc Operations
Disc operations The disc type is automatically detected, and playback starts automatically (for DVD: automatic start depends on its internal program). If the current disc is an audio CD, CD Text, MP3/WMA, JPEG, or VCD without PBC, all tracks will be played repeatedly until you change the source or eject the disc. -
Page 65: Basic Operations
Operations To stop play temporarily To replay the previous scenes—One Touch Replay To stop playback • During play, on-screen guide icons appear on the monitor for a while (see page 35). To eject the disc You can eject the disc even when the monitor is turned off. Basic operations Next operation Playback pauses. - Page 66 To go to the next or previous chapters/tracks • For DVD: During play or pause To go back to the beginning of the current chapter/track, then the previous chapters/tracks. To fast-forward or reverse the chapter/track Reverses. * The search speed changes to x2 ] x10 for all discs (DVD, VCD, CD), but the information shown on the monitor is only for DVD/VCD.
-
Page 67: Dvd/Vcd/Jpeg Special Functions
DVD/VCD/JPEG special functions Selecting audio languages For DVD: You can select the language to listen to if the disc has multiple audio languages. ENGLISH ENGLISH Ex.: When the disc has 3 options For VCD: You can select the audio channel to play. -
Page 68: Zoom In
Disc menu operations Menu-driven playback is possible while playing back a DVD with menu-driven features or a VCD with the PBC (PlayBack Control). While playing a DVD A title list or disc menu will appear on the monitor. Select the item you want on the menu. -
Page 69: On-Screen Disc Operations
On-Screen disc operations About the On-Screen Bar You can check the disc information and use some functions through the on-screen bar. • For audio CD, CD Text, and MP3/WMA/ JPEG disc you can also use the control screen and list screen (see pages 26 and 27). -
Page 70: Basic On-Screen Bar Operations
Basic on-screen bar operations Display the on-screen bar. • For DVD/VCD: (twice) • For other discs: DVD -V TIME TITLE CHAP When a JPEG disc is loaded, skip to step 3. Select an item. Make a selection. • If pop-up menu appears... DVD -V TIME TITLE... - Page 71 You can play the first 15 seconds INTRO of all tracks in the disc, or in the current folder (only for MP3/ WMA). VCD (while PBC is not in use): (Canceled) INTRO MP3/WMA: INTRO TRACK INTRO FOLDER (Canceled) CD Text/audio CD: (Canceled) INTRO TRACK You can randomly play all tracks...
-
Page 72: Basic Control Screen Operations
Basic control screen operations You can search for and play the desired items through the control screen. For MP3/WMA/CD Text/audio CD: The control screen automatically appears on the monitor when you insert a disc. JPEG: Press TOP M (menu), MENU, or 7. Playback stops and the control screen appears. - Page 73 List screen operations You can display the folder list/track list before starting play. On this list, you can confirm the contents and start playing a disc. Folder/track list screens Folder list (MP3/WMA/JPEG) Folder : 153/240 Track 154/198 fol140 fol150 fol130 fol131 fol141 fol151...
-
Page 74: Dvd Setup Menu
DVD setup menu You can store the initial disc playback status. • While playing, no change can be made on the setup menu. • When shipped from the factory, the on-screen language is set to English. To change the language, see page 29. Basic setting procedure While stop... - Page 75 LANGUAGE menu Item MENU LANGUAGE Select the initial disc menu language. AUDIO LANGUAGE Select the initial audio language. SUBTITLE Select the initial subtitle language or erase the subtitle (OFF). ON SCREEN LANGUAGE Select the language for the setup menu and some indications shown on the monitor.
- Page 76 AUDIO menu Item DIGITAL AUDIO OUTPUT DOWN MIX D. (Dynamic) RANGE COMPRESSION Contents Select the signal format to be emitted through the DIGITAL OUT (Optical) terminal. For details, see page 36. • PCM ONLY : Select this when connecting an amplifier or a decoder incompatible with Dolby Digital, DTS, MPEG Audio, or connecting to a recording device.
-
Page 77: Maintenance
Maintenance To prevent damage to the exterior • Do not apply pesticides, benzine, thinner or other volatile substances to the monitor. The cabinet surface primarily consists of plastic materials. • Do not wipe with benzine, thinner or similar substances because this will results in discoloration or removal of the paint. -
Page 78: Language Codes
Language codes Code Language Afar Abkhazian Afrikaans Ameharic Arabic Assamese Aymara Azerbaijani Bashkir Byelorussian Bulgarian Bihari Bislama Bengali, Bangla Tibetan Breton Catalan Corsican Czech Welsh Bhutani Greek Esperanto Estonian Basque Persian Finnish Fiji Faroese Frisian Irish Scots Gaelic Galician Guarani Gujarati Hausa Hindi... -
Page 79: More About This Monitor
More about this monitor Basic operations Turning off the power • If you turn off the power while listening to a disc, disc play will start automatically, next time you turn on the power. Disc operations General • In this manual, words “track” and “file” are interchangeably used when referring to MP3/ WMA/JPEG files and their file names. - Page 80 • Do not use the following DVD-R/DVD-RW or CD-R/CD-RW: – Discs with stickers, labels, or protective seal stuck to the surface. – Discs on which labels can be directly printed by an ink jet printer. Using these discs under high temperatures or high humidities may cause malfunctions or damages to discs.
- Page 81 • Even if you try to pause the current picture, it may be skipped, then the next picture will pause. • This unit can recognize the total of 1100 files, 250 folders (maximum of 999 files per folder). Changing the source •...
- Page 82 About sounds reproduced through the terminals • Through the analog terminals (AV-OUT/cordless headphones): 2-channel signal is emitted. When playing a multi-channel encoded disc, multi-channel signals are downmixed. (AUDIO—DOWN MIX: see page 30.) • Through DIGITAL OUT (optical): Digital signals (Linear PCM, Dolby Digital, DTS, MPEG Audio) are emitted through this terminal.
-
Page 83: Troubleshooting
Troubleshooting What appears to be trouble is not always serious. Check the following points before calling a service center. Symptoms • Colored spots (red, blue and green) appear on the screen. • No picture appears and sound is not heard. •... - Page 84 Symptoms • Sound and picture are sometimes interrupted or distorted. • The playback pictures cannot be shown correctly. • Disc cannot be played back. • Noise is generated. • A longer readout time is required. • Tracks cannot be played back as you have intended them to play.
-
Page 85: Specifications
Specifications WIDESCREEN MONITOR Screen: 9 inch liquid crystal panel Number of pixel: 336 960 pixels (480 vertical × 234 horizontal × 3) Drive method: TFT (Thin Film Transistor) active matrix format Cordless audio: Infrared audio transmitter L-channel: 2.3 MHz R-channel: 2.8 MHz Effective listening angle: 30˚... - Page 86 Having TROUBLE with operation? Please reset your unit Refer to page of How to reset your unit Haben Sie PROBLEME mit dem Betrieb? Bitte setzen Sie Ihr Gerät zurück Siehe Seite Zurücksetzen des Geräts Vous avez des PROBLÈMES de fonctionnement? Réinitialisez votre appareil Référez-vous à...
- Page 87 Gerät geliefert. Nach ihrer Überprüfung, die Teile richtig einsetzen. Cordless headphones (supplied only with KV-MRD900) Schnurloser Kopfhörer (nur mit KV-MRD900 mitgeliefert) Casque d’écoute sans fil (fourni uniquement avec le KV-MRD900) Draadloze hoofdtelefoon (alleen bijgeleverd bij de KV-MRD900) KS-HP2 Widescreen monitor Breitbildmonitor Moniteur à...
- Page 88 Neem bij vragen of voor meer bijzonderheden over inbouwpakketten contact op met uw JVC auto audiohandelaar of een dealer of een bedrijf dat inbouwpakketten levert. Installeren van de breedbeeld-monitor De installatiewijze verschilt afhankelijk van het type auto.
- Page 89 Before mounting the monitor to the ceiling: Vor der Installation des Monitors an der • Perform the required external connections first (see Decke: reverse page). • Schließen Sie die externen Anschlüsse zuerst an • Wear goggles or protective eyewear to protect your (siehe Rückseite).
- Page 90 Anlagen mit 12 V Gleichstrom und (–) Erdung vehicle does not have this system, a voltage inverter ausgelegt. Verfügt Ihr Fahrzeug nicht über diese is required, which can be purchased at JVC IN-CAR Anlage, ist ein Spannungsinverter erforderlich, der ENTERTAINMENT dealers.
- Page 91 SUBWOOFER am Fahrzeug-Receiver an. For KV-MRD900 / Für KV-MRD900 / Pour la KV-MRD900 / Voor KV-MRD900 See also “About sounds reproduced through the terminals” on page 36 of the INSTRUCTIONS. Siehe auch „Über von den Rückseitenbuchsen ausgegebenen Ton“ auf Seite 36 der BEDIENUNGSANLEITUNG.
-
Page 92: Problemen Oplossen
LINE IN VIDEO OUT 2nd AUDIO OUT 2nd AUDIO OUT Car receiver (ex. JVC KD-DV6101) Autoreceiver (z.B. JVC KD-DV6101) Récepteur d’autoradio (ex. JVC KD-DV6101) Autoradio-ontvanger (bijv. JVC KD-DV6101) KV-C1001 Voor het verhogen van het niveau van de hoofdtelefoon, moet u eerst het uitgangsniveau van de 2nd AUDIO OUT aansluiting van de receiver verhogen. - Page 93 9-INCH WIDESCREEN MONITOR WITH DVD PLAYER • This system cannot receive television broadcasts. Use the separately sold TV tuner unit KV-C1000 for optional television broadcast reception. • KV-C1000 For installation and connections, refer to the separate manual. INSTRUCTIONS KV-MRD900 KV-MRD900 LVT1342-003A [UT]...
- Page 94 WARNINGS • DO NOT INSTALL THE MONITOR IN A LOCATION WHICH OBSTRUCTS DRIVING, VISIBILITY, SAFETY DEVICE FUNCTION SUCH AS AIR BAGS OR WHICH IS PROHIBITED BY APPLICABLE LAWS AND REGULATIONS. • There may be legal regulations defining the permissible installation locations for the monitor which differ by country or by state.
- Page 95 Thank you for purchasing a JVC product. Please read all instructions carefully before operation, to ensure your complete understanding and to obtain the best possible performance from the unit. IMPORTANT FOR LASER PRODUCTS 1. CLASS 1 LASER PRODUCT 2. CAUTION: Do not open the top cover. There are no user serviceable parts inside the unit; leave all servicing to qualified service personnel.
- Page 96 How to reset your monitor This will reset the microcomputer. Your preset adjustments will also be erased. How to forcibly eject a disc If a disc cannot be recognized by the monitor or cannot be ejected... Monitor (for about 5 seconds while power is on) •...
- Page 97 Contents How to reset your monitor ... How to forcibly eject a disc ... How to read this manual ... Precautions ... 6 Widescreen monitor ... 7 Parts identification ... Remote controller — RM-RK230 Main elements and features ... Headphones — ...
-
Page 98: Precautions
Precautions Cautions for handling the liquid crystal panel Do not expose the liquid crystal panel to direct sunlight. • Storage temperature range: –20°C to +80°C +80°C –20°C –20°C to +80°C During the summer, temperatures can reach as high as 100°C. When the liquid crystal panel reaches high temperatures or low temperatures, chemical changes occur within the liquid crystal panel... -
Page 99: Widescreen Monitor
Widescreen monitor (standby/on) button • Turns on the power if pressed. • Turns off the power if pressed and held. 2 Remote sensor 3 Dome light switch • See “To activate the door sensor” on page 4 IR transmitters 5 Dome lights 6 Arm lock lever 7 Reset button When you watch the screen at an angle, the picture might not be clear. -
Page 100: Remote Controller
Remote controller — Installing the lithium coin battery (CR2025) Before using the remote controller: • Aim the remote controller directly at the remote sensor on the monitor. Make sure there is no obstacle in between. Remote sensor • Do not expose the remote sensor to strong light (direct sunlight or artificial lighting). - Page 101 • DVD: (subtitle), Controllable only if your car receiver which is connected to this monitor is one of the JVC receivers. These buttons function as the number buttons when pressed with SHIFT button. Only when PBC is not in use.
-
Page 102: Ks-Hp2
Headphones — You can listen to the playback sounds with cordless headphones—KS-HP2. Installing the batteries Batteries (R03/AAA) — supplied only for CAUTIONS: • The supplied batteries are not rechargeable. DO NOT recharge them; otherwise, battery leakage or explosion may result. •... -
Page 103: Basic Operations
Basic operations Preparation Before operating the unit, make sure that all external components are correctly connected and installed. Open the liquid crystal panel. Press PUSH-OPEN until the liquid crystal panel is unlocked, then open the liquid crystal panel by both hands. CAUTION: •... - Page 104 Turn on the power. Monitor Remote control Select the playback source. MODE Each time you press the button, the playback source changes as follows: DISC AV 1 Operate the playback source you selected. To operate the built-in DVD player, see “Disc operations” on page 18. To operate the external components, refer to the manuals for the connected components.
-
Page 105: Adjustments
Adjustments You can make your own display or sound adjustments using the menu. • For the adjustable items, see the next page. The Remote controller—RM-RK230 has two MENU buttons. In this section, using MENU button at MONITOR CONTROL. Basic procedure Call up the menu. - Page 106 Adjustable items on the monitor menu BRIGHT: CONTRAST: TINT: COLOR: IR*: DIMMER: DVD SURROUND: NTSC/PAL: WHITE LED: * Turn off the headphones before changing the “IR” setting. Adjust this if the picture is too bright or too dark. • Adjustable range: –10 to +11 •...
-
Page 107: Changing The Aspect Ratio
You can select an appropriate aspect ratio for the playback video signals. Basic procedure Each time you press the button, aspect ratio change. ASPECT Changeable aspect ratio When incoming 16:9 video signal: FULL: NORMAL: JUST: ZOOM: Changing the aspect ratio Pictures are fully shown on the screen. - Page 108 When incoming 4:3 video signal: FULL: NORMAL: JUST: ZOOM: Pictures are enlarged horizontally and are fully shown on the screen. Pictures are shown at the center of the screen. • The black bars will be shown at the left and right sides of the screen.
-
Page 109: Playable Discs
Playable discs Discs you can play You can play back the following discs—12 cm and 8 cm —on the built-in DVD player: • DVD Video: Recorded in the NTSC or PAL color system with Region Code “3” (see below). – DVD-R/DVD-RW recorded in the DVD Video format can also be played (see page 33). -
Page 110: Disc Operations
Disc operations The disc type is automatically detected, and playback starts automatically (for DVD: automatic start depends on its internal program). If the current disc is an audio CD, CD Text, MP3/WMA, JPEG, or VCD without PBC, all tracks will be played repeatedly until you change the source or eject the disc. -
Page 111: Basic Operations
Operations To stop play temporarily To replay the previous scenes—One Touch Replay To stop playback • During play, on-screen guide icons appear on the monitor for a while (see page 35). To eject the disc You can eject the disc even when the monitor is turned off. Basic operations Next operation Playback pauses. - Page 112 To go to the next or previous chapters/tracks • For DVD: During play or pause To go back to the beginning of the current chapter/track, then the previous chapters/tracks. To fast-forward or reverse the chapter/track Reverses. * The search speed changes to x2 ] x10 for all discs (DVD, VCD, CD), but the information shown on the monitor is only for DVD/VCD.
-
Page 113: Dvd/Vcd/Jpeg Special Functions
DVD/VCD/JPEG special functions Selecting audio languages For DVD: You can select the language to listen to if the disc has multiple audio languages. ENGLISH ENGLISH Ex.: When the disc has 3 options For VCD: You can select the audio channel to play. -
Page 114: Disc Menu Operations
Disc menu operations Menu-driven playback is possible while playing back a DVD with menu-driven features or a VCD with the PBC (PlayBack Control). While playing a DVD A title list or disc menu will appear on the monitor. Select the item you want on the menu. -
Page 115: On-Screen Disc Operations
On-Screen disc operations About the On-Screen Bar You can check the disc information and use some functions through the on-screen bar. • For audio CD, CD Text, and MP3/WMA/ JPEG disc you can also use the control screen and list screen (see pages 26 and 27). -
Page 116: Basic On-Screen Bar Operations
Basic on-screen bar operations Display the on-screen bar. • For DVD/VCD: (twice) • For other discs: DVD -V TIME TITLE CHAP When a JPEG disc is loaded, skip to step 3. Select an item. Make a selection. • If pop-up menu appears... DVD -V TIME TITLE... - Page 117 You can play the first 15 seconds INTRO of all tracks in the disc, or in the current folder (only for MP3/ WMA). VCD (while PBC is not in use): (Canceled) INTRO MP3/WMA: INTRO TRACK INTRO FOLDER (Canceled) CD Text/audio CD: (Canceled) INTRO TRACK You can randomly play all tracks...
-
Page 118: Basic Control Screen Operations
Basic control screen operations You can search for and play the desired items through the control screen. For MP3/WMA/CD Text/audio CD: The control screen automatically appears on the monitor when you insert a disc. JPEG: Press TOP M (menu), MENU, or 7. Playback stops and the control screen appears. -
Page 119: List Screen Operations
List screen operations You can display the folder list/track list before starting play. On this list, you can confirm the contents and start playing a disc. Folder/track list screens Folder list (MP3/WMA/JPEG) Folder : 153/240 Track 154/198 fol130 fol140 fol150 fol141 fol151 fol131... -
Page 120: Dvd Setup Menu
DVD setup menu You can store the initial disc playback status. • While playing, no change can be made on the setup menu. Basic setting procedure While stop... LANGUAGE MENU LANGUAGE AUDIO LANGUAGE SUBTITLE ON SCREEN LANGUAGE AUDIO DIGITAL AUDIO OUTPUT DOWN MIX D. - Page 121 LANGUAGE menu Item MENU LANGUAGE Select the initial disc menu language. AUDIO LANGUAGE Select the initial audio language. SUBTITLE Select the initial subtitle language or erase the subtitle (OFF). ON SCREEN LANGUAGE Select the language for the setup menu and some indications shown on the monitor.
- Page 122 AUDIO menu Item DIGITAL AUDIO OUTPUT DOWN MIX D. (Dynamic) RANGE COMPRESSION Contents Select the signal format to be emitted through the DIGITAL OUT (Optical) terminal. For details, see page 36. • PCM ONLY : Select this when connecting an amplifier or a decoder incompatible with Dolby Digital, DTS, MPEG Audio, or connecting to a recording device.
-
Page 123: Maintenance
Maintenance To prevent damage to the exterior • Do not apply pesticides, benzine, thinner or other volatile substances to the monitor. The cabinet surface primarily consists of plastic materials. • Do not wipe with benzine, thinner or similar substances because this will results in discoloration or removal of the paint. -
Page 124: Language Codes
Language codes Code Language Afar Abkhazian Afrikaans Ameharic Arabic Assamese Aymara Azerbaijani Bashkir Byelorussian Bulgarian Bihari Bislama Bengali, Bangla Tibetan Breton Catalan Corsican Czech Welsh Bhutani Greek Esperanto Estonian Basque Persian Finnish Fiji Faroese Frisian Irish Scots Gaelic Galician Guarani Gujarati Hausa Hindi... -
Page 125: More About This Monitor
More about this monitor Basic operations Turning off the power • If you turn off the power while listening to a disc, disc play will start automatically, next time you turn on the power. Disc operations General • In this manual, words “track” and “file” are interchangeably used when referring to MP3/ WMA/JPEG files and their file names. - Page 126 • Do not use the following DVD-R/DVD-RW or CD-R/CD-RW: – Discs with stickers, labels, or protective seal stuck to the surface. – Discs on which labels can be directly printed by an ink jet printer. Using these discs under high temperatures or high humidities may cause malfunctions or damages to discs.
- Page 127 • Even if you try to pause the current picture, it may be skipped, then the next picture will pause. • This unit can recognize the total of 1100 files, 250 folders (maximum of 999 files per folder). Changing the source •...
- Page 128 About sounds reproduced through the terminals • Through the analog terminals (AV-OUT/cordless headphones): 2-channel signal is emitted. When playing a multi-channel encoded disc, multi-channel signals are downmixed. (AUDIO—DOWN MIX: see page 30.) • Through DIGITAL OUT (optical): Digital signals (Linear PCM, Dolby Digital, DTS, MPEG Audio) are emitted through this terminal.
-
Page 129: Troubleshooting
Troubleshooting What appears to be trouble is not always serious. Check the following points before calling a service center. Symptoms • Colored spots (red, blue and green) appear on the screen. • No picture appears and sound is not heard. •... - Page 130 Symptoms • Sound and picture are sometimes interrupted or distorted. • The playback pictures cannot be shown correctly. • Disc cannot be played back. • Noise is generated. • A longer readout time is required. • Tracks cannot be played back as you have intended them to play.
-
Page 131: Specifications
Specifications WIDESCREEN MONITOR Screen: 9 inch liquid crystal panel Number of pixel: 336 960 pixels (480 vertical × 234 horizontal × 3) Drive method: TFT (Thin Film Transistor) active matrix format Cordless audio: Infrared audio transmitter L-channel: 2.3 MHz R-channel: 2.8 MHz Effective listening angle: 30˚... - Page 132 Having TROUBLE with operation? Please reset your unit Refer to page of How to reset your unit EN, CT 0305MNMMDWJEIN © 2005 Victor Company of Japan, Limited...
- Page 133 KV-MRD900 Installation/Connection Manual 安裝/連接手冊 °“√µ‘ ¥ µ— È ß /§Ÿ Ë ¡ ◊ Õ °“√µ‘ ¥ µ— È ß LVT1342-004A [A, U, UT] ENGLISH WARNING Installation requires some special knowledge. Do not install the monitor yourself. Consult a dealer having special knowledge of this kind for safe and reliable installation.
- Page 134 • The following illustration shows a typical installation. However, you should make adjustments corresponding to your specific car. If you have any questions or require information regarding installation kits, consult your JVC car audio dealer or a company supplying kits. Detaching the dome light cover / 拆開頂燈蓋子 / To mount the widescreen monitor, detach the dome light covers.
- Page 135 Before mounting the monitor to the ceiling: • Perform the required external connections first (see reverse page). • Wear goggles or protective eyewear to protect your eyes especially while drilling the holes. • Pay attention not to damage the car interior and its fittings and the ceiling of your car.
- Page 136 This unit is designed to operate on 12 V DC, NEGATIVE ground electrical systems. If your vehicle does not have this system, a voltage inverter is required, which can be purchased at JVC car audio dealers. • Replace the fuse with one of the specified ratings. If the fuse blows frequently, consult your JVC car audio dealer.
- Page 137 ¥Ÿ ‡ æ‘ Ë ¡ ‡µ‘ ¡ „π‡√◊ Ë Õ ß "‡°’ Ë ¬ «°— ∫ ‡ ’ ¬ ß∑’ Ë √È “ ßºË “ π¢— È « µË Õ ¥ô “ πÀ≈— ß " „πÀπÈ “ DIGITAL OUT AV-OUT KV-MRD900 AV2-INPUT Rear side 後側...
- Page 138 To disconnect the harness, unlock the harness using the screw driver or a similar tool, then pull out the harness. (Detach the dome light cover prior to this.) Parts list for installation and connection The following parts are provided with this unit. After checking them, please set them correctly.