Table of Contents
Advertisement
Advertisement
Table of Contents

Related Manuals for Baumatic BSIH64-ANZ


Summary of Contents for Baumatic BSIH64-ANZ
- Page 1 BSIH64-ANZ 60cm Induction Hob BSIH95-ANZ 90cm Induction Hob...
- Page 2 INSTALLATION INSTRUCTIONS AND USE AND MAINTENANCE RECOMMENDATIONS INDUCTION AND VITROCERAMIC HOBS BSIH 64-ANZ / 91102078 BSIH 95-ANZ / 91102079...
-
Page 3: Table Of Contents
Contents Introduction Page 4 User Guide Installation Positioning the hobs Fixing the hob Connecting the electricity Technical information Dimensions and characteristics Use and Maintenance Touch Control Panel User Instructions Pan detector Blocking cooktop sensors Stop Function Heat Sustainment Function Power Function Boil Control Function Safety shut off Timer function... -
Page 4: Introduction
Introduction Notes about the cookware to be used with your induction hob. The size of the base of the cookware to be used should be large enough to completely cover the cooking zone drawn on the glass. Depending on the type of cookware (material and size), the induction zones may work with smaller cookware. - Page 5 Guide to Using the Instructions Booklet Dear Customer, facturer brand ovens. We are delighted that you have put your For your safety, installation should be trust in us. carried out by an authorised technician and should comply with existing installa- We are confident that the new hob that you tion standards.
- Page 6 with fat or oil without being present, as magnetic base (material attracted by a these may catch fire. Never try to extin- magnet). guish a fire with water! in this event dis- connect the device and cover the flames Always use cookware with a flat, with a lid, a plate or a blanket.
-
Page 7: Installation
Installation INSTALLATION AND SETUP SHOULD fig. 1 Minimum distan- BE CARRIED OUT BY AN AUTHORISED ce to walls TECHNICIAN ACCORDING CURRENT INSTALLATION STANDARDS. Positioning the hobs To install these models, an opening with the dimensions shown in figure 1 should Important: minimum be cut into the unit's worktop. -
Page 8: Fixing The Hob
mo-ventilated oven, to ensure good opera- sary to remove the hob from its posi- tion, the glass could break when trying tion of the countertop. to detach it. A space should be left in front of the furni- ture for evacuation of hot air. The opening To attach the cooking countertop to the fur- should be at least 5 mm high. - Page 9 should be replaced by the manufacturer's official technical service. The input cable should not be in contact either with the body of the hob or with the body of the oven, if the oven is installed in the same unit. fig.
-
Page 10: Technical Information
Technical Information Technical data Class 3 Hob. Dimensions and characteristics BSIH 64- BSIH 95- Models Dimensions of the hob Height (mm) Length (mm) Width (mm) Dimensions for positioning in the kitchen unit Length (mm) (L) Width (mm) (W) Depth (mm) Configuration Induction Element 1,400 / 1,800* W... -
Page 11: Use And Maintenance
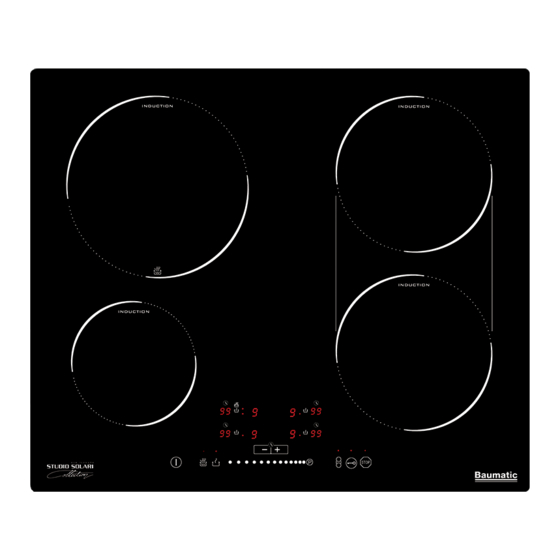
Use and Maintenance - Light (on): Plate selected (ready to be Touch control panel user used). instructions - No light (off): Plate not selected (can't be used). NOTE: * Visible only when in use. CONTROL PANEL ELEMENTS (see fig. 4) General on/off sensor. -
Page 12: Pan Detector
TURNING THE APPLIANCE ON 2 Use the cursor slider (2) to choose a cooking level between The first time the cooktop is plugged in (or after a power outage), the Block function As long as the plate is selected, in other will appear as activated (pilot light 10 on). -
Page 13: Blocking Cooktop Sensors
power level previously selected. Activating the Stop function The time for pan detection is 3 minutes. If Touch the Stop sensor (7) for one a pan is not placed within this time period, second. The pilot (11) lights up and the or the pan is unsuitable, the cooking zone power indicators will show the symbol shuts off. -
Page 14: Boil Control Function
2 On the cursor Slider, push directly on the plate indicator and the pilot (9) will turn position (5). The power level indica- on. In the timer for this plate, a moving tor will show the symbol P, and the plate segment will appear which indicates that will start to supply extra power. -
Page 15: Timer Function
When the "safety shut off" has occurred, function turns on even when the touch control is off! the power indicator of the corresponding plate will show an if there exists a burn risk. Otherwise, a will be shown. Take precaution and do not place objects on the touch control! Table 1 Timer function... -
Page 16: Total Zone Function
Disconnecting the clock will continue to run for a few minutes in order to cool the electronics. If you wish to stop the clock before the pro- Power surges in the network grammed time is up, this can be done at any time by simply adjusting its value to '--'. -
Page 17: Cleaning And Care
* Do not drag over the glass cookware with corners or edges that could damage the Never use aggressive cleaning products or glass. products that can scratch the surfaces (the * The glass will withstand bangs from large table below shows various common pro- cookware that does not have sharp ducts that may be used). - Page 18 Sticky stains that have been burned in can ments with your hands; carefully use tweezers or a knife with a sharp tip (See be removed by using a scraper with a razor blade. fig. 6). Rainbow colouring: caused by cookware fig.
-
Page 19: Environmental Considerations
alter its manuals in any way it deems necessary or useful while not altering their basic characteristics. Environmental considerations The symbol on the product or on its packaging indicates that this product may not be treated as household waste. Instead, it should be handed over to the applicable collection point for the recy- cling of electrical and electronic equip- ment. -
Page 20: If Something Doesn't Work
If something doesn't work Before calling the Technical Service, please check the following possible causes and solutions: Problem Possible cause Solution The induction zones don't get hot Make sure that the base of The cookware is inadequate the cookware is attracted by (it doesn't have a ferromagne- a magnet or use larger cook- tic base or it is too small). - Page 21 Fault Possible cause Possible solution The hob suddenly starts to bleep There is a cloth, container Remove any object covering or liquid on the Touch Con- the Touch Control and/or trol. clean any liquid that might have been spilt on it. The timer was activated Touch the clock sensor to deactivate the bleep.
- Page 22 Or any installation other than the one specified by Baumatic Ltd has been completed. IMPORTANT: The manufacturer operates a policy of continuous improvement and reserves the right to adjust and modify its...
- Page 23 1800 444 357 Website www.thinkappliances.com (NZ) Applico Ltd. Private Bag 92900 Onehunga, Auckland, New Zealand 1061 Website www.baumatic.co.nz (UK) United Kingdom Baumatic Ltd., Baumatic Buildings, 6 Bennet Road, Reading, Berkshire RG2 0QX United Kingdom Sales Telephone (0118) 933 6900 Website: www.baumatic.co.uk...