Samsung NX58F5700WS Installation Manual
Free-standing gas range
Hide thumbs
Also See for NX58F5700WS:
- User manual (240 pages) ,
- Installation manual (120 pages) ,
- Quick start manual (37 pages)
Table of Contents
Advertisement
Available languages
Available languages
NX58F5700WS
Free-Standing Gas
Range
installation manual
This manual is made with 100 % recycled paper.
ENGLISH
imagine
the possibilities
Thank you for purchasing this Samsung product.
To receive more complete service, please register
your product at
www.samsung.com/register
1-800-SAMSUNG (726-7864)
130521_(Install)_NX58F5700WS_DG68-00518A_EN+CFR.indb 1
04/06/2013 17:45:41
Advertisement
Table of Contents

Related Manuals for Samsung NX58F5700WS


Summary of Contents for Samsung NX58F5700WS
- Page 1 Range installation manual This manual is made with 100 % recycled paper. ENGLISH imagine the possibilities Thank you for purchasing this Samsung product. To receive more complete service, please register your product at www.samsung.com/register 1-800-SAMSUNG (726-7864) 130521_(Install)_NX58F5700WS_DG68-00518A_EN+CFR.indb 1 04/06/2013 17:45:41...
-
Page 2: Before You Begin
before you begin ABOUT THIS MANUAL READ THESE INSTRUCTIONS COMPLETELY AND CAREFULLY. Important note to the installer • Read all instructions contained in these installation instructions before installing the range. • Remove all packing materials from the oven compartments before connecting the electric and gas supply to the range. -
Page 3: Safety Instructions
safety instructions SAFETY SYMBOLS What the icons and signs in this user manual mean: You can be killed or seriously injured if you don¡¯t follow instructions. WARNING Minor injury or property damage can result if you don’t follow instructions. CAUTION Do NOT attempt. -
Page 4: Important Safety
IMPORTANT SAFETY INSTRUCTIONS WARNING: If the information in this manual is not followed exactly, a fire or explosion may result causing property damage, personal injury or death. – DO NOT store or use gasoline or other flammable vapors and liquids in the vicinity of this or any other appliance. –... - Page 5 To prevent accidental tipping of the range, attach an approved and packed anti-tip device to the floor. (See Install the Anti-Tip Device on page 31 in this manual.) check for proper installation by carefully tipping the range forward. The anti-tip device should engage and prevent the range from tipping over. If the range is pulled out away from the wall for any reason, make sure the anti- tip device is reengaged after the range has been pushed back into place.
- Page 6 Electrical/Mechanical Unplug or disconnect power before servicing. Do not tamper with the controls. Danger to Children Do not store any object of interest to children on the cooktop or backguard of the range. Children climbing on the range to reach items could be killed or seriously injured.
- Page 7 Never use your range for warming or heating a room. Doing so could result in carbon monoxide poisoning and/or overheating of the oven. Loose-fitting or hanging garments should not be worn while using this appliance. DO NOT STORE OR USE combustible materials, gasoline, or other flammable vapors or liquids in the vicinity of this appliance.
- Page 8 GAS WARNINGS If the information in this manual is not followed exactly, a fire or explosion may result, causing death, personal injury, or property damage. WARNING 1. DO NOT light a match, candle, or cigarette. 2. DO NOT turn on any gas or electric appliances. 3.
- Page 9 CALIFORNIA SAFE DRINKING WATER AND TOXIC ENFORCEMENT ACT The California Safe Drinking Water and Toxic Enforcement Act requires the Governor of California to publish a list of substances known to the state to cause birth defects or other reproductive harm and requires businesses to warn customers of potential exposure to such substances.
- Page 10 ELECTRICAL WARNINGS WARNING Comply with the following electrical instructions and requirements to avoid death, personal injury from electric shock, and/or property damage from fire: 1. Plug into a grounded 3-prong outlet. 2. DO NOT remove ground prong. 3. DO NOT use an adapter. 4.
-
Page 11: Grounding Instructions
GROUNDING INSTRUCTIONS Grounding a range with a cord connection: This appliance must be Earth grounded. In the event of a malfunction or breakdown, grounding will reduce the risk of electrical shock by providing a path for the electric current. This appliance is equipped with a cord having a grounding plug. - Page 12 Locate the range out of kitchen traffic paths and drafty locations to prevent poor air circulation. This appliance should be positioned in such a way that the power plug is accessible. Do not install in an area exposed to dripping water or outside weather conditions.
- Page 13 SURFACE BURNER WARNINGS Follow basic precautions when installing and using this range to reduce the risk of fire, electrical shock, injury, or death to persons, including. WARNING Use proper pan sizes. Avoid pans that are unstable or warped. Select cookware having flat bottoms large enough to cover the burner grates. To avoid spillovers, make sure cookware is large enough to contain your food.
- Page 14 Use a deep fryer thermometer whenever possible. This prevents overheating fryer beyond the smoking point. Use as little fryer as possible for shallow or deep-fat frying. Using too much fat can cause spillovers when food is added. Items should always be removed from the cooktop when they are done cooking.
- Page 15 OVEN WARNINGS NEVER cover any holes or passages in the bottom oven cover. NEVER cover an entire oven rack with aluminum foil or like material. Covering bottom WARNING cover and/or racks blocks airflow through the oven and could cause carbon monoxide poisoning.
-
Page 16: Electric Warming Drawer
ELECTRIC WARMING DRAWER OR LOWER STORAGE DRAWER WARNINGS The warming drawer is designed to keep hot cooked foods at a serving temperature. Always start with hot food. Cold or room-temperature foods cannot be heated, warmed, or cooked in the warming drawer. Do not touch the interior drawer surface or heating element. - Page 17 SELF-CLEANING OVEN WARNINGS Follow basic precautions when installing and using this range to reduce the risk of fire, electrical shock, injury, or death to persons, including: WARNING Do not leave children unattended near the range during a self-cleaning cycle. The outside surfaces of the range get hot enough to burn if touched. Stand away from the range when opening the oven door after a self-cleaning cycle.
-
Page 18: Table Of Contents
contents GAS RANGE COMPONENTS Overview Gas range specifications INSTALLATION Location requirements Gas requirements REQUIREMENTS Special gas requirements (Gas models sold in massachusetts) Electrical requirements TOOLS AND MATERIALS What’s in the box INSTALLATION Installing your gas range Step 1. Unpack the range INSTRUCTIONS Step 2. -
Page 19: Gas Range Components
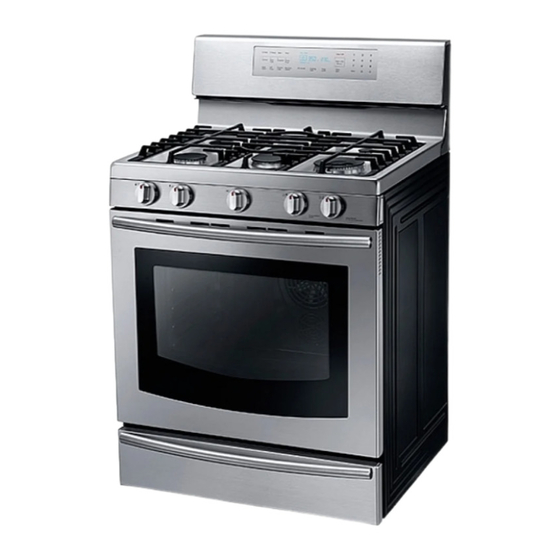
OVERVIEW MODEL NX58F5700WS Cooktop Burner Placement Control Panel And Digital Display Flat surface Concave line Common use Heavy-Duty continous cast Cooktop Burners (under grates) Grates Burner Locations and Output Ratings Location Output Rating (Natural Gas) Cooktop Burner... -
Page 20: Gas Range Specifications
RANgE SPECIFICATIONS MODEL NX58F5700WS Gas Free-Standing Range DESCRIPTION OVERALL DIMENSIONS in (W) x 45 in (H) x 23 in (D) 757 mm (W) x 1163 mm (H) x 602 mm (D) NET WEIgHT 231 lb (105 kg) ELECTRICAL Refer to the rating label. -
Page 21: Location Requirements
installation requirements LOCATION REQUIREMENTS Clearances and dimensions BEFORE YOU BEGIN to install this appliance, refer to the following information, dimensions, and clearances. Do not locate the range where it may be subject to strong drafts. Provide adequate clearances between the range and adjacent combustible surfaces. -
Page 22: Requirements 23 Gas Requirements
Minimum dimensions If overhead cabinets are provided, a range hood should also be provided that projects horizontally a minimum of 5 in (12.7 cm) beyond the front of WARNING the cabinets. This will dissipate any heat buildup in the overhead cabinets to prevent death, personal injury, and/or fire hazard. -
Page 23: Provide Adequate Gas Supply
gAS REQUIREMENTS Provide adequate gas supply This range is designed to operate at a pressure of 5 in (13 cm) of water column on natural gas or 10 in (25 cm) of water column on LP gas (propane or butane). Make sure you are supplying your range with the type of gas for which it is designed. -
Page 24: Special Gas Requirements
SPECIAL gAS REQUIREMENTS (gAS MODELS SOLD IN MASSACHUSETTS) COMMONWEALTH OF MASSACHUSETTS REQUIREMENTS: Gas leaks may occur in your system, creating a dangerous situation. WARNING – Gas leaks may not be detected by smell alone. – Gas suppliers recommend you purchase and install a UL-approved gas detector. - Page 25 gas models • All gas models are equipped with a power cord with an equipment-grounding conductor and a grounding plug. • A 120-Volt, 60-Hz, AC, approved electrical service with or 20-amp circuit breaker or time-delay fuse is required for all U.S. and Canadian models. •...
- Page 26 Usage situations where appliance power cord will be disconnected frequently Do not use an adapter plug in these situations because disconnecting of the power cord places undue strain on the adapter and leads to eventual failure of the adapter ground terminal. Where a standard two-prong wall receptacle is encountered, it is the personal responsibility and obligation of the customer to have it replaced with a three-prong (grounding) receptacle by a qualified electrician before using the appliance.
-
Page 27: Tools And Materials
WHAT’S IN THE BOX Parts supplied Surface burners and caps (5) Surface burner grates (3) (Model NX58F5700WS) Griddle Wok grate Anti-tip bracket kit Oven racks (2) Gliding rack (1) • Make sure you have received all of the supplied parts shown above. -
Page 28: Installation Instructions
installation instructions INSTALLINg YOUR gAS RANgE IMPORTANT: Please read the following instructions, as well as the Important Safety Instructions section at the front of this manual, completely and carefully BEFORE installing and/or operating the gas range. Improper installation, adjustment, service, or maintenance can cause personal injury or property damage. - Page 29 If the information in this manual is not followed exactly, a fire or explosion may result, causing death, personal injury, or property damage. WARNING – Do not store or use gasoline or other flammable vapors and liquids in the vicinity of this or any other appliance. –...
-
Page 30: Step 3. Convert To Lp Gas (Optional)
All new gas ranges are shipped from the factory set up to use natural gas. Any Samsung gas range can be converted to use LP gas. Refer to page 82 in the User Manual to contact a qualified service technician. -
Page 31: Step 4. Install The Anti-Tip Device
Step 4. Install the anti-tip device To reduce the risk of tipping, the appliance must be secured by properly installing the anti-tip device packed with the appliance. WARNING • All ranges can tip, resulting in personal injury. • A child or adult can tip the range and be killed. •... -
Page 32: Step 5. Plug In And Place
Step 5. Plug in and place BEFORE OPERATING OR TESTING, follow the grounding requirements on pages 24 ~ 26 in this manual. Improper connection WARNING of the grounding plug can result in a risk of electric shock. • All gas ranges come with a power cord. The power cord is connected to the rear of the range. -
Page 33: Step 7. Assemble The Surface Burners
3. If range is next to or between cabinets, make sure the cooktop (without the surface burner grates) is level with the countertops. 4. Position an oven rack in the center rack position. 5. Check the level of the range with a carpenter level using the two positions shown at right. -
Page 34: Step 8. Check The Ignition Of Surface Burners And Oven Burners
Place the left, center, and right surface burner grates on the cooktop. The edges of the grates should match up with the edges of the cooktop. Step 8. Check the ignition of surface burners and oven burners Check the operation of all cooktop and oven burners after the range has been installed and assembled, gas supply lines have been carefully checked for leaks, and electrical power cord has been plugged in. - Page 35 2. Press the number pads to change the temperature setting to the desired temperature setting. The selected cooking temperature and the Start indicator will blink on the display. 3. Press the START pad. The display will show a blinking •, along with 150 °, Bake, and the bake element icon, until the oven reaches that temperature;...
-
Page 36: Step 9. Final Installation Checklist
Step 9. Final installation checklist You have just completed installing your range. Make sure all controls are in the off position and the flow of ventilation air to the range is unobstructed. The following is a checklist to confirm your range is safely installed and ready for operation. Gas line has been properly connected to the range. -
Page 37: Adjusting The Oven Burner Air Adjustment Shutters
ADJUSTINg THE OVEN BURNER AIR ADJUSTMENT SHUTTERS All oven burners have an air adjustment shutter. The purpose of the shutter is to regulate the flow of air to the flames. Properly adjusted flames should burn adjustment shutter steadily with approximately 1-in of blue cone. - Page 38 To adjust flame low setting Identify which burner is exhibiting too high or too low of simmer rate via manifold panel graphics. 1. Rotate a knob to “LO” position and remove the knob from the valve stem while the flame is lit. Bypass screw 2.
- Page 39 memo 130521_(Install)_NX58F5700WS_DG68-00518A_EN+CFR.indb 39 04/06/2013 17:45:54...
- Page 40 (English) CANADA 1-800-SAMSUNG(726-7864) www.samsung.com/ca_fr (French) MEXICO 01-800-SAMSUNG(726-7864) U.S.A 1-800-SAMSUNG(726-7864) www.samsung.com Consumer Electronics U.S.A Mobile Phones 1-800-SAMSUNG(726-7864) Code No.: DG68-00518A 130521_(Install)_NX58F5700WS_DG68-00518A_EN+CFR.indb 40 04/06/2013 17:45:55...
- Page 41 Ce manuel est composé de papier 100 % recyclé. FRANÇAIS CANADIEN Un monde de possibilités Nous vous remercions d'avoir choisi ce produit Samsung. Afin de bénéficier du meilleur du service après- vente, enregistrez votre appareil sur le site suivant : www.samsung.com/register 1-800-SAMSUNG (726-7864) 130521_(Install)_NX58F5700WS_DG68-00518A_EN+CFR.indb 1...
-
Page 42: Avant De Commencer
avant de commencer A PROPOS DE CE MANUEL LISEZ ENTIÈREMENT ET ATTENTIVEMENT CES INSTRUCTIONS. Note importante destinée à l'installateur • Lisez l'intégralité des consignes d'installation avant d'installer la cuisinière. • Retirez tous les éléments d'emballage des compartiments du four avant de raccorder la cuisinière à... - Page 43 consignes de sécurité SYMBOLES DE SÉCURITÉ Signification des icônes et des symboles utilisés dans ce manuel : Vous pouvez être tué ou gravement blessé si vous ne respectez pas ces instructions. AVERTISSEMENT Si vous ne respectez pas ces instructions, cela peut provoquer des blessures mineures ou des dégâts matériels.
- Page 44 CONSIGNES DE SÉCURITÉ IMPORTANTES AVERTISSEMENT: Si vous ne respectez pas scrupuleusement les informations contenues dans ce manuel, vous risquez de provoquer un incendie ou un choc électrique et, par conséquent, des dégâts matériels, blessures ou accidents mortels. – N'entreposez et n'utilisez pas d'essence ou d'autres vapeurs et liquides inflammables à...
- Page 45 Pour éviter le basculement accidentel de la cuisinière, fixez au sol un dispositif anti-basculement approuvé et fourni. (Voir l'installation du dispositif anti- basculement à la page 31 de ce manuel.) Vérifiez que l'installation est correcte en basculant la cuisinière avec précaution vers l'avant. Veillez à ce que le dispositif anti-basculement soit en place afin d'empêcher la cuisinière de basculer.
- Page 46 électrique/Mécanique Débranchez la cuisinière ou mettez-la hors tension avant de procéder à la réparation. Ne modifiez pas les boutons de commande. Danger pour les enfants N'entreprosez pas d'objets susceptibles d'éveiller l'intérêt des enfants sur la table de cuisson ou sur le dosseret de la cuisinière. Les enfants risquent, en grimpant sur la cuisinière, de se blesser gravement, voire mortellement.
- Page 47 N'obstruez pas les conduits de ventilation du four. Nettoyez fréquemment les orifices de ventilation pour éviter qu'ils ne s'encrassent. N'utilisez jamais la cuisinière pour chauffer une pièce. Le non-respect de cette consigne peut entraîner une intoxication au monoxyde de carbone et/ou une surchauffe du four.
- Page 48 AVERTISSEMENTS CONCERNANT LE GAZ Si vous ne respectez pas scrupuleusement les informations contenues dans ce manuel, vous risquez de provoquer un incendie ou un choc électrique et, par AVERTISSEMENT conséquent, des dégâts matériels, blessures ou accidents mortels. 1. N'allumez PAS d'allumette, de bougie ou de cigarette. 2.
- Page 49 LOI CALIFORNIENNE RELATIVE AUX PRODUITS TOXIQUES ET À L'EAU POTABLE Conformément à la California Safe Drinking Water and Toxic Enforcement Act (Loi californienne relative aux produits toxiques et à l'eau potable), le gouverneur de la Californie est tenu de publier une liste des substances reconnues par l'État comme pouvant causer des malformations congénitales ou présentant d'autres dangers pour la reproduction et pour lesquelles les entreprises doivent avertir leurs clients d’une éventuelle exposition à...
- Page 50 MISES EN GARDE RELATIVES AVERTISSEMENT AUX RISQUES ÉLECTRIQUES Veillez à vous conformer aux consignes et recommandations suivantes concernant l'électricité afin d'éviter tout risque d'accident mortel et de blessure due à une électrocution et/ou de dégâts matériels dus à un incendie. 1.
- Page 51 CONSIGNES DE MISE À LA TERRE Mise à la terre de la cuisinière à l'aide d'un branchement du câble d'alimentation : Cet appareil doit être relié à la terre. La mise à la terre réduit le risque d'électrocution, car elle fournit au courant un chemin de sortie en cas de dysfonctionnement ou de panne.
- Page 52 Placez la cuisinière hors des chemins de passage de la cuisine et en dehors des courants d'air afin d'éviter une mauvaise circulation de l'air. Cet appareil doit être positionné de telle façon que la prise d'alimentation reste accessible. N'installez pas votre cuisinière dans un endroit où elle est exposée à des égouttements d'eau ou à...
- Page 53 AVERTISSEMENTS CONCERNANT LES BRÛLEURS DE SURFACE Suivez toutes les consignes de bases lorsque vous installez et utilisez votre cuisinière afin d'éviter tout risque d'incendie, d'électrocution, de blessures AVERTISSEMENT graves ou mortelles comme indiqué ci-dessous. Utilisez des plats de taille appropriée. Évitez des récipients instables ou déformés.
- Page 54 Utilisez un thermomètre à friture si possible. Cela évite que l'huile ou la graisse soit chauffée au-delà du point de fumée. Pour toute friture, utilisez le moins d'huile possible. L'utilisation excessive de matière grasse peut provoquer des éclaboussures lors de l'ajout des aliments. Retirez toujours tout objet de la table de cuisson lorsque vous cuisinez.
- Page 55 AVERTISSEMENTS CONCERNANT LE FOUR Ne couvrez JAMAIS les orifices ou passages sur le couvercle au fond du four. Ne couvrez JAMAIS entièrement une grille du four avec du papier aluminium ou tout autre matériau AVERTISSEMENT similaire. Si vous couvrez le couvercle au fond et/ou les grilles, la circulation de l'air à travers le four sera bloquée pouvant causer une intoxication au monoxyde de carbone.
- Page 56 AVERTISSEMENTS CONCERNANT LE TIROIR CHAUFFE-PLAT ÉLECTRIQUE OU LE TIROIR DE RANGEMENT INFÉRIEUR Le tiroir chauffe-plat sert à conserver les aliments cuits à température de consommation. Les aliments doivent être déjà chauds. Les aliments frois ou à température ambiante ne peuvent pas être cuits, réchauffés ou cuisinés dans le tiroir chauffe-plat.
- Page 57 Lorsque vous ouvrez la porte du four après un cycle d'auto-nettoyage, maintenez une certaine distance entre vous et la cuisinière. Le four sera TRÈS CHAUD et l'air chaud et la vapeur sortant du four pourraient provoquer des brûlures. Enlevez toutes les grilles et autres ustensiles du four avant de démarrer le cycle d'auto-nettoyage.
- Page 58 sommaire COMPOSANTS DE LA Présentation Spécifications de la cuisinière à gaz CUISINIÈRE CONDITIONS D'INSTALLATION Conditions d'emplacement Exigences en matière de gaz Exigences en matière de gaz spécifiques (modèles de gaz vendus dans le Massachusetts) Exigences en matière de raccordement électrique OUTILS ET MATÉRIEL Éléments de la boîte CONSIGNES D'INSTALLATION...
- Page 59 PRéSENTATION MODÈLE NX58F5700WS Emplacement du brûleur de la table de cuisson Tableau de commande et affichage numérique Surface plate Ligne concave Grilles en l'usage commun coulée continue Brûleurs de la table de cuisson (sous les grilles), épaisse...
- Page 60 SPéCIFICATIONS DE LA CUISINIÈRE À gAZ MODÈLE NX58F5700WS Cuisinière à gaz non encastrable DESCRIPTION DIMENSIONS gLOBALES po(l) x 45 po (H) x 23 po (P) 757 mm (l) x 1 163 mm (H) x 602 mm (P) POIDS NET 105 kg (231 livres) éLECTRIQUE...
- Page 61 conditions d'installation CONDITIONS D'EMPLACEMENT Dégagements et dimensions AVANT DE COMMENCER l'installation de cet appareil, reportez-vous aux informations suivantes, aux dimensions et aux dégagements. Ne placez pas la cuisinière à un endroit où elle serait exposée à de forts courants d'air. Maintenez une distance adéquate entre la cuisinière et les surfaces combustibles attenantes.
- Page 62 Dimensions minimales Si des meubles sont en hauteur, une hotte d'aspiration assurant une protection horizontale d'au moins 12.7 cm (5 po) au-delà de l'avant des meubles devrait AVERTISSEMENT être fournie. Ceci dissipera tout risque de surchauffe dans les meubles en hauteur et évitera ainsi tout accident mortel, blessure et/ou risque d'incendie.
- Page 63 EXIgENCES EN MATIÈRE DE gAZ Assurer une arrivée de gaz adéquate Cette cuisinière a été conçue pour fonctionner sous une pression de 13 cm (5 po) de colonne d'eau au gaz naturel ou de 25 cm (10 po) de colonne d'eau au GPL (propane ou butane). Assurez-vous d'alimenter votre cuisinière avec le type de gaz pour lequel elle a été...
- Page 64 EXIgENCES EN MATIÈRE DE gAZ SPéCIFIQUES (MODÈLES DE gAZ VENDUS DANS LE MASSACHUSETTS) EXIgENCES DU COMMONWEALTH DU MASSACHUSETTS : Des fuites de gaz peuvent se produire dans votre système, provoquant une situation dangereuse. AVERTISSEMENT – Les fuites de gaz peuvent ne pas être détectées seulement par l'odeur. –...
- Page 65 Modèles de cuisinières à gaz • Tous les modèles de cuisinières à gaz sont équipés d'un cordon d'alimentation disposant d'un conducteur de protection et d'une prise de mise à la terre. • Une installation électrique homologuée de 120 V, 60 Hz, CA avec un disjoncteur ou un fusible à...
- Page 66 Situations d'utilisation où le cordon d'alimentation de l'appareil sera débranché fréquemment N'utilisez pas une fiche intermédiaire dans ces cas-là car le débranchement du cordon d'alimentation applique une tension excessive sur l'adaptateur et peut entraîner une panne de la borne de mise à la terre de l'adaptateur. Lorsqu'une prise murale bipolaire standard est utilisée, il relève de la responsabilité...
- Page 67 éLéMENTS DE LA BOÎTE Pièces fournies Brûleurs de la surface de cuisson et chapeaux de brûleurs Grilles du brûleur de surface (3) (Modèle NX58F5700WS) Grille Wok grille Kit de support anti-basculement Grilles du four (2) Grisse en rack(1) •...
- Page 68 consignes d'installation INSTALLER VOTRE CUISINIÈRE À gAZ IMPORTANT : Veuillez lire attentivement les consignes suivantes dans leur totalité, ainsi que la section des consignes de sécurité importantes au début de ce manuel, AVANT d'installer ou de faire fonctionner la cuisinière à gaz. Une installation, un réglage, une manipulation ou un entretien incorrect peut entraîner des blessures ou des dégâts matériels.
- Page 69 Si vous ne respectez pas scrupuleusement les informations contenues dans ce manuel, vous risquez de provoquer un incendie ou un choc électrique et, par AVERTISSEMENT conséquent, des dégâts matériels, blessures ou accidents mortels. – N'entreposez et n'utilisez pas d'essence ou d'autres vapeurs et liquides inflammables à...
- Page 70 Toutes les nouvelles cuisinières à gaz sont livrées depuis l'usine, prête à fonctionner au gaz naturel. Toute cuisinière à gaz Samsung peut être convertie afin de fonctionner au GPL. Reportez-vous à la page 83 du manuel d'utilisation pour contacter un technicien qualifié.
- Page 71 étape 4 : Mettez en place le dispositif anti-basculement Afin de réduire les risques de basculement, fixez la cuisinière en installant correctement le dispositif anti-basculement fourni avec cette dernière. AVERTISSEMENT • Un enfant ou un adulte pourrait faire basculer la cuisinière et être tué. •...
- Page 72 étape 5 : Branchez et positionnez la cuisinière AVANT TOUT FONCTIONNEMENT OU TEST, respectez les conditions de mise à la terre des pages 24 à 26 de ce manuel. Tout AVERTISSEMENT raccordement non conforme de la prise de mise à la terre peut entraîner un risque d'électrocution.
- Page 73 3. Si la cuisinière se trouve à proximité ou entre des meubles, assurez- vous que la table de cuisson (sans les grilles du brûleur de surface) se trouve au même niveau que les plans de travail. 4. Placez une grille du four dans la position de la grille centrale.
- Page 74 3. Placez les grilles de la surface de cuisson gauche, centrale et droite sur la table de cuisson. Les bords des grilles doivent s'adapter aux bords de la table de cuisson. étape 8 : Vérifiez l'allumage des brûleurs de surface et des brûleurs du four Vérifiez que chaque table de cuisson et chaque brûleur du four fonctionnent après que la cuisinière a été...
- Page 75 2. Appuyez sur le pavé numérique afin de modifier le réglage de la température et d'appliquer le réglage de température souhaité. La température de cuisson et l'indicateur Start (Démarrer) clignotent à l'écran. 3. Appuyez sur le bouton START (DÉMARRER). L'affichage montrera un • clignotant, avec une température de 150 °, Bake (cuisson traditionnelle), et le symbole de l'élément de cuisson traditionnelle, jusqu'à...
- Page 76 Etape 9. Vérification finale de l'installation L'installation de votre cuisinière est à présent terminée. Assurez-vous que toutes les commandes sont sur la position off (arrêt) et que la circulation d'air de la ventilation n'est pas obstruée. Ci-dessous une liste de contrôle permettant de confirmer que votre cuisinière est correctement installée et prête à...
- Page 77 RégLAgE DES VOLETS D'AIR DU BRÛLEUR DU FOUR Tous les brûleurs du four ont des volets d'air. Le volet d'air sert à réguler le débit d'air des flammes. Des flammes réglées correctement Volet de devraient brûler constamment avec un cône réglage bleu d'environ 1 po.
- Page 78 Ajuster le réglage de la flamme faible Identifiez quel brûleur a une vitesse de mijotage trop grande ou trop basse à travers le schéma du panneau répartiteur. 1. Faites tourner un bouton sur la position « LO » (FAIBLE) et retirez le bouton de l'axe de la vanne tant que la flamme est allumée.
- Page 79 notes 130521_(Install)_NX58F5700WS_DG68-00518A_EN+CFR.indb 39 04/06/2013 17:46:07...
- Page 80 (English) CANADA 1-800-SAMSUNG(726-7864) www.samsung.com/ca_fr (French) MEXICO 01-800-SAMSUNG(726-7864) U.S.A 1-800-SAMSUNG(726-7864) www.samsung.com Consumer Electronics U.S.A Mobile Phones 1-800-SAMSUNG(726-7864) Code N° : DG68-00518A 130521_(Install)_NX58F5700WS_DG68-00518A_EN+CFR.indb 40 04/06/2013 17:46:08...