Sony BRAVIA KDL-55HX750 Operating Instructions Manual
Bravia
Hide thumbs
Also See for BRAVIA KDL-55HX750:
- Operating instructions manual (60 pages) ,
- Specifications (4 pages) ,
- I-manual (192 pages)
Table of Contents
Advertisement
Available languages
Available languages
Quick Links
- 1 1: Attaching the Table-Top Stand
- 2 3: Connections
- 3 Connecting Audio/Video Devices
- 4 6: Connecting the Tv to the Internet
- 5 Selecting Various Functions and Settings (Home Menu)
- 6 Troubleshooting
- 7 Specifications
- 8 Installing the Accessories (Wall-Mount Bracket)
- Download this manual
See also:
Manual
Advertisement
Table of Contents

Related Manuals for Sony BRAVIA KDL-55HX750


Summary of Contents for Sony BRAVIA KDL-55HX750
- Page 1 4-416-730-12(1) LCD TV Operating Instructions KDL-55HX750 / 55HX753 / 46HX750 / 46HX753 / 46EX650 / 46EX653 / 40HX750 / 40HX753 KDL-40EX650 / 40EX653 / 32HX750 / 32HX753 / 32EX650 / 32EX653 / 32EX550 / 26EX550...
-
Page 2: Trademark Information
Introduction Trademark information Thank you for choosing this Sony is a registered trademark of the product. Before operating the TV, DVB Project. please read this manual thoroughly and HDMI, the HDMI Logo, and High- retain it for future reference. Definition Multimedia Interface are... -
Page 4: About This Manual
About this manual (Operating Instructions) This manual explains how to set up your TV. For more information on how to use BRAVIA TV, refer to the “Electronic manual”. Operating Instructions Explains how to set up your TV such as connections, initial set-up, and basic operations. -
Page 5: Table Of Contents
Table of Contents Getting Started Checking the accessories................. 6 Inserting batteries into the remote............. 6 1: Attaching the Table-Top Stand ............. 7 2: Adjusting the viewing angle of the TV ........... 8 3: Connections ..................8 4: Preventing the TV from toppling over..........12 5: Bundling the cables ................ -
Page 6: Getting Started
Getting Started Checking the Inserting batteries accessories into the remote Remote (1) Size AAA batteries (R03 type) (2) Table-Top Stand (1)* Fixing screws for Table-Top Stand (M5 × 16) (3) (Except KDL-26EX550) Fixing screws for Table-Top Stand (M5 × 16) (2) (KDL-26EX550 only) Assembling screws for Table-Top Stand (M5 x 16) (4) -
Page 7: 1: Attaching The Table-Top Stand
1: Attaching the Fix the TV to the Table-Top Stand using the supplied screws. The arrow marks Table-Top indicate the location of the screw holes used for securing the Table-Top Stand. Stand KDL-55/46/40/32HX75x, KDL-46/40/32EX65x, KDL-32EX550 Refer to the supplied Table-Top Stand leaflet for proper attachment. -
Page 8: 2: Adjusting The Viewing Angle Of The Tv
2: Adjusting the 3: Connections viewing angle of the TV • Use an antenna cable connector no greater than 14 mm in thickness. • Use an HDMI cable connector within 12 mm (thickness) × 21 mm (width). This TV can be adjusted within the angles as illustrated. - Page 9 KDL-26EX550 To connect a Set Top Box/recorder (e.g. DVD recorder) with HDMI KDL-55/46/40/32HX75x, KDL-46/40/32EX65x, KDL-32EX550 Antenna cable (not supplied) HDMI cable (not supplied) Antenna cable (not supplied) Set Top Box/recorder (e.g. DVD recorder) (Continued)
- Page 10 KDL-26EX550 Connecting an antenna/cable and VCR KDL-55/46/40/32HX75x, KDL-46/40/32EX65x, KDL-32EX550 HDMI cable (not supplied) Antenna cable Antenna cable (not supplied) (not supplied) AV cable (not supplied) Set Top Box/recorder (e.g. DVD recorder) Antenna cable (not supplied)
-
Page 11: Connecting Audio/Video Devices
KDL-26EX550 Connecting audio/video devices KDL-55/46/40/32HX75x, KDL-46/40/32EX65x, KDL-32EX550 AV cable Antenna cable (not supplied) (not supplied) Antenna cable (not supplied) AV cable (not supplied) Antenna cable (not supplied) Antenna cable (not supplied) DVD Player (Continued) -
Page 12: 4: Preventing The Tv From Toppling Over
4: Preventing the KDL-26EX550 TV from toppling over KDL-55/46/40/32HX75x, KDL-46/40/32EX65x, KDL-32EX550 Install a wood screw (4 mm in diameter, not supplied) in the TV stand. Install a machine screw (M4, not supplied) AV cable into the screw hole of the TV. (not supplied) Tie the wood screw and the machine screw with a strong cord (not supplied). -
Page 13: 5: Bundling The Cables
5: Bundling the KDL-26EX550 cables Soft cloth Before bundling the cables, remove the cable holder from the AC cover. Reuse the cable holder to bundle the other cables. • Do not bundle the AC power cord together with other cables. KDL-55/46/40/32HX75x, KDL-46/40/32EX65x, KDL-32EX550 •... -
Page 14: 6: Connecting The Tv To The Internet
6: Connecting the KDL-26EX550 TV to the Internet Internet Modem with router When you connect this TV to the Internet, you functions can enjoy multiple functions: displaying a photograph that shows its location on the map, enjoying Internet video, etc. For details on the functions, refer to the i-Manual. -
Page 15: 7: Performing The Initial Set-Up
7: Performing the KDL-46/40/32EX65x, KDL-32/26EX550 Wireless LAN Ready lets you easily access the initial set-up Internet and your home network with the USB Wireless LAN Adapter UWA-BR100. By inserting the USB Wireless LAN Adapter into your TV’s USB port, you can easily create a cable-free network. - Page 16 Programme Sorting: Changes the order of analogue channels stored in the TV. Press F/f to select the channel you want to move to a new position, then press Press F/f to select the new position for the channel, then press •...
-
Page 18: Using Your Bravia Tv
Using Your BRAVIA TV Watching TV Turn on the TV. Press =/1 on the TV or remote to turn on the TV. Select a mode. Select a TV channel or select an input. To select digital channels Use 0-9. For channel numbers 10 and above, press the next digit quickly. - Page 19 Watching 3D contents (KDL-55/46/40/32HX75x only) This feature lets you experience powerful 3D entertainment, such as stereoscopic 3D games and 3D Blu-ray Disc. Refer to the i-Manual as well as the instruction manual supplied with the 3D Glasses on how to set the 3D settings or watch the 3D contents. Frequently used buttons 1 GUIDE Displays the digital programme guide.
-
Page 20: Selecting Various Functions And Settings (Home Menu)
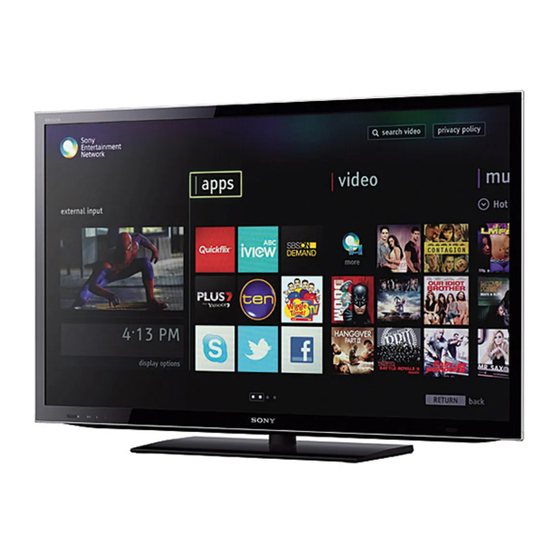
Selecting various functions and settings (Home Menu) You can select the features of your TV from the Home menu. Here is an example on how to select an item and modify the TV settings. Press HOME. Press G/g to select (Settings) category. - Page 21 Widgets Enables access to Widgets. Applications Launches applications that require an Internet connection. Sony Entertainment Enables selection of content from the online service “SEN” (Sony Entertainment Network). Network Internet Content Enables access to Internet services for TV. Allows you to select a list of TV channels, or a programme guide.
-
Page 22: Watching Internet Video
Watching Internet Video This feature serves as a gateway to Internet content, delivering a variety of on-demand entertainment straight to your TV. You can enjoy video content, including movies and cartoons. You will need to make a broadband Internet connection. For details, see page 14 (6: Connecting the TV to the Internet). -
Page 23: Looking For Instructions
Looking for Instructions Looking for instructions in the electronic manual (i-Manual) Operating instructions are built into your BRAVIA TV and can be displayed on the screen. To learn more about your TV features, access your i-Manual with the touch of a button. Press i-MANUAL. -
Page 24: Saving Frequently Viewed Pages (Bookmark)
Saving frequently viewed Displaying the page again pages (Bookmark) while operating the TV You can save frequently viewed pages for easy You can switch between the i-Manual screen access anytime. and the TV screen. This feature allows you to refer to the instructions in the i-Manual while To save a page using your BRAVIA TV. -
Page 25: Additional Information
When the 1 (standby) indicator is flashing, count how many times it flashes (interval time is three seconds). Press "/1 on the TV to turn it off, disconnect the AC power cord, and inform your dealer or Sony service centre of how the indicator flashes (number of flashes). -
Page 26: Specifications
Specifications System Panel system LCD (Liquid Crystal Display) Panel TV system Analogue: B/G, I, D/K, M, L Digital: DVB–T Colour/video system Analogue: PAL, SECAM, NTSC3.58, NTSC4.43 Digital: MPEG-2 MP@HL/H14L/ML, AVC BP@L3/MP@L4/HP@L4 (30Mbps max, limited tool), MPEG-4 Visual SP@L6/ASP@L5/ACEP@L4 Channel coverage Analogue: UHF/VHF/Cable, Depending on your country/area selection Digital: UHF/VHF/Cable, Depending on your country/area selection. - Page 27 Model name KDL- 55HX750 55HX753 46HX750 46HX753 46EX650 46EX653 40HX750 40HX753 Power and others Power requirements 110 V – 240 V AC, 50/60 Hz Screen size Approx. 138.8 cm/ Approx. 116.8 cm/46 inches Approx. 101.6 cm/ (measured diagonally) 55 inches 40 inches Display resolution 1,920 dots (horizontal) ×...
-
Page 28: Installing The Accessories (Wall-Mount Bracket)
Installing the Accessories (Wall-Mount Bracket) To Customers: For product protection and safety reasons, Sony strongly recommends that installing of your TV be performed by Sony dealers or licensed contractors. Do not attempt to install it yourself. To Sony Dealers and Contractors: Provide full attention to safety during the installation, periodic maintenance and examination of this product. - Page 29 SU-WL50B/SU-WL500 When installing the TV on the wall, remove the screws from the rear of the TV. Be sure to store the removed screws in a safe place, keeping them away from children. × Soft cloth • When removing the Table-Top Stand from the TV, lay the display face down on a stable work surface that is larger than the TV.
- Page 30 SU-WL100 (KDL-26EX550 only) Screw (+PSW 4 × 12) Mounting Hook Soft cloth • Attach the Mounting Hook using the four screws supplied with the Wall-Mount Bracket. • When attaching the Table-Top Stand again, be sure to fasten the screws (previously removed) to the original holes on the rear of the TV.
- Page 31 SU-WL50B Screw location Hook location When installing the Mounting Hook on the TV. When installing the TV onto the Base Bracket. Base Bracket Mounting Hook SU-WL500 Screw location Hook location When installing the Mounting Hook on the TV. When installing the TV onto the Base Bracket. (Continued)
-
Page 32: Tv Installation Dimensions Table
SU-WL100 Hook location When installing the TV onto the Base Bracket. TV installation dimensions table SU-WL50B ( Screen centre point... - Page 33 SU-WL500 (2) Screen centre point SU-WL100 ( Screen centre point (Continued)
- Page 34 Unit: mm Screen Length for each mounting angle Display centre Model Name dimensions Angle (0°) Angle (20°) dimension KDL- SU-WL50B (1) 55HX75x 1271 46HX75x 1076 46EX65x 1074 40HX75x 40EX65x 32HX75x 32EX65x 32EX55x SU-WL500 (2) 55HX75x 1271 46HX75x 1076 46EX65x 1074 40HX75x 40EX65x 32HX75x...
-
Page 35: Safety Information
• The TV set should be installed near an easily accessible AC power outlet. – Use only Sony supplied AC power • Place the TV set on a stable, level cords, not those of other brands. • When transporting the TV set, do not... - Page 36 Turn off the TV set and unplug the AC power cord immediately if any of the following problems occur. Ask your dealer or Sony service centre to have it checked by qualified service • Do not install the TV in places subject personnel.
-
Page 37: Precautions
TV set is in use. This is not a • Do not operate this unit near medical malfunction. 3D games. Sony recommends that all equipment (pacemaker, etc.), as viewers take regular breaks while • The LCD screen contains a small... - Page 41 )(احتياط در هنگام كار با كنرتل از ر اه دور و خاک باقی مانده است، آن ر ا با پارچه ای نرم كه با كمی توصيه می كند تمام اف ر اد هنگام تماشای تصاويرSony .ماده شوينده ماليم آغشته می باشد پاک نماييد...
- Page 42 چنانچه هر يک از وقايع زير رخ داد دستگاه تلويزيون ر ا . متناوب ر ا قطع كنيدAC رسيعا خاموش کرده و سيم برق درخواستSony از فروشنده و يا مركز خدمات پس از فروش كنيد تا با ارسال يک تكنيسني متخصص دستگاه شام ر ا...
- Page 43 دستگاه تلويزيون ر ا ب ر ای پرهيز از افتادن آن و سبب ،KDL-46/40/32EX65x استفاده کرده، و ازSony متناوبAC – فقط از سيم برق ج ر احت فردی شدن يا آسيب به تلويزيون بر روی يک سطح KDL-32EX550 .استفاده...
- Page 44 SU-WL100 ) نقطه مركز صفحه واحد: ميلی مرت طول ب ر اى هر ز اويه اى از سوار كردن ابعاد مركز ابعاد صفحه منايش نام مدل صفحه )ز اويه ( 02 درجه )ز اويه ( 0 درجه KDL- SU-WL50B ) 1271 55HX75x 46HX75x...
- Page 45 SU-WL100 محل قالب .هنگام نصب تلويزيون بر روی پايه اصلی جدول ابعاد نصب تلويزيون SU-WL50B ) نقطه مركز صفحه SU-WL500 ) نقطه مركز صفحه...
- Page 46 SU-WL50B محل قالب محل پيچ .هنگام نصب تلويزيون بر روی پايه اصلی .هنگام نصب قالب بر روی تلويزيون يايه اصلی قالب نصب SU-WL500 محل قالب محل پيچ .هنگام نصب تلويزيون بر روی پايه اصلی .هنگام نصب قالب بر روی تلويزيون )(ادامه...
- Page 47 )KDL-26EX550 (فقطSU-WL100 )+ PSW 4 × 12( پيچ قالب نصب پارچه نرم .قالب نصب ر ا با استفاده از چهار پيچ ضميمه شده به پايه نصب ديواری .هنگام وصل كردن دوباره پايه روميزی، حتما پيچ (از قبل خارج شده) ر ا به حفره های اصلی در پشت تلويزيون ببنديد ...
- Page 48 SU-WL50B/SU-WL500 .هنگام نصب تلويزيون بر روی يک ديوار، پيچ ر ا از پشت تلويزيون خارج كنيد. حتام پيچ های خارج شده را در يک مكان امن و دور از دسرتس كودكان نگاه داريد × پارچه نرم .هنگام خارج كردن پايه روميزی از تلويزيون، صفحه نمايش ر ا رو به پايين بر روی يک سطح كاری مقاوم بزرگتر از تلويزيون ق ر ار دهيد ...
- Page 49 :مربوط به مشرتى يا منايندگيهایSony قوی ا ً توصيه می كند كه نصب تلويزيون خود بر روی ديوار ر ا به فروشنده كاالهایSony جهت حفاظت دستگاه و رعايت موارد امينی، رشكت .مجاز واگذار مناييد. لطف ا ً شخص ا ً اقدام به نصب آن ننامييد...
- Page 50 40HX753 40HX750 46EX653 46EX650 46HX753 46HX750 55HX753 55HX750 KDL- نام مدل نريوی برق و ساير موارد ، 06/05 هرتزAC 011 - 042 ولت برق مورد نياز /تقريبا 6.101 سانتی مرت تقريبا 8.611 سانتی مرت/64 اينچ /تقريبا 8.831 سانتی مرت اندازه صفحه (اندازه گريی بصورت 04 اينچ...
- Page 51 مشخصات سيستم ) (منايش كريستال مايعLCD پانل سيستم پانل L ،M ،D/K ،I ،B/G :آنالوگ سيستم تلويزيون DVB–T :ديجيتال NTSC4.43 ،NTSC3.58 ،SECAM ،PAL :آنالوگ سيستم رنگ/ويدئو (حداکرث 03 مگا بایت بر ثانیه، اب ز ارAVC BP@L3/MP@L4/HP@L4 ،MPEG-2 MP@HL/H14L/ML :ديجيتال MPEG-4 ...
- Page 52 .)(آماده به كار)، تعداد دفعات چشمک زدن آن ر ا بشامريد (فاصله زمانی سه ثانيه است در هنگام چشمک زدن نشانگر ) نحوه چشمک زدن نشانگر (تعداد چشمک هاSony ر ا از روی تلويزيون فشار دهيد تا خاموش شود، سيم برق متناوب ر ا بكشيد و فروشنده يا مركز خدمات مطلع سازيد...
- Page 53 منایش مجدد صفحه هنگام بکارگیری تلویزیون )ذخیره صفحات پر بازدید (نشانه و صفحه تلویزیون جابجا شوید. این ویژگیi-Manual می توانید بین صفحه .ب ر ای دسرتسی آسان در هر زمان می توانید صفحات پر بازدید ر ا ذخیره کنید ...
- Page 54 جستجوی دستو ر العمل ها در دفرتچه ر اهنامی الکرتونیکی )i-Manual( . ر ا می توان بر روی صفحه منايش دادBRAVIA دفرتچه ر اهنامی موجود در تلويزيون . خود دسرتسی پيدا كنيدi-Manual ب ر ای آشنايی بيشرت با قابليت های تلويزيون خود، با ملس يک دكمه به ....
- Page 55 متاشای ویدئوی اینرتنتی این ویژگی به عنوان یک دروازه ب ر ای محتوای اینرتنت عمل می کند که رسگرمی های زیادی ر ا به محض درخواست، مستقیام در تلویزیون شام ا ر ائه می کند. می .توانید از محتوای ویدئو شامل فیلم ها و کارتون ها لذت بربید .ب...
- Page 56 برنامه های کاربردی Sony Entertainment .) ر ا ف ر اهم می کندSony " (شبکه رسگرمیSEN" امکان انتخاب محتوا از رسویس آنالین Network .امکان دسرتسی به رسویس های اینرتنت ر ا ب ر ای تلویزیون ف ر اهم می کند...
- Page 57 )انتخاب عملكردها و تنظيامت گوناگون (منوی خانه .شام می توانيد عملكردهای تلویزیون ر ا از منوی خانه انتخاب كنيد .مثالی درباره نحوه انتخاب یک آیتم و تغییر تنظیامت تلویزیون . ر ا فشار دهيدHOME .گروه (تنظیامت)، فشار دهید ر ا ب ر ای انتخاب .محتويات...
- Page 58 )KDL-55/46/40/32HX75x متاشای محتویات سه بعدی (فقط سه بعدی ر ا به شام ا ر ائه می دهد. ب ر ای اطالع از چگونگی انجامBlu-ray و دیسکstereoscopic این ویژگی، رسگرمی سه بعدی از قبیل بازی های سه بعدی . و همچنین دفرتچه ر اهنامی عرضه شده به هم ر اه عینک های سه بعدی م ر اجعه کنیدi-Manual تنظیامت سه بعدی یا متاشای محتویات سه بعدی، به دکمه...
- Page 59 در حال متاشای تلويزيون .تلويزيون ر ا روشن كنيد .ر ا از روی تلویزیون یا کنرتل از ر اه دور فشار دهید تا تلویزیون خاموش شود "/1 .يک حالت ر ا انتخاب كنيد .یک کانال تلویزیونی یا یک ورودی ر ا انتخاب کنید یا...
- Page 61 مرتب کردن برنامه ها: ترتيب كانالهای آنالوگ ذخريه شده در تلويزيون .ر ا تغيري می دهد ر ا ب ر ای انتخاب كانالی كه ق ر ار است به محل جديد منتقلF/f 1 .ر ا فشار دهيد شود، فشار داده و سپس ...
- Page 62 7: انجام تنظیم اولیه KDL-32/26EX550 ،KDL-46/40/32EX65x LAN ىب سيمUSB بی سيم به شام اجازه می دهد تا از طريقLAN به ر احتی به اینرتنت و شبکه خانگی خود دسرتسیUWA-BR 100 آداپتور .داشته باشید ، تلويزيون خودUSB آداپتور درون پورتLAN ىب سيمUSB با وارد كردن .به...
- Page 63 6: اتصال تلویزیون به اینرتنت KDL-26EX550 تلويزيون اگر اين تلويزيون ر ا به اينرتنت متصل كنيد، می توانيد از قابليت های اینرتنت متعددی بهره مند شويد: از منايش تصويری كه محل آن ر ا بر روی نقشه نشان می دهد، از ويدئوی اينرتنتی و غريه لذت بربيد.ب ر ای كسب اطالعات مودم...
- Page 64 5: دسته كردن كابل ها KDL-26EX550 پارچه نرم قبل از دسته کردن کابل ها، نگهدارنده كابل ر ا از پوشش جريان متناوب باز .كنيد. از نگهدارنده كابل، دوباره استفاده كنيد تا ساير كابلها ر ا گره بزنيد .سيم برق متناوب ر ا هم ر اه با ساير كابل ها دسته نكنيد ...
- Page 65 4: جلوگريی از واژگون شدن KDL-26EX550 تلویزیون ،KDL-46/40/32EX65x ،KDL-55/46/40/32HX75x KDL-32EX550 يک پيچ چوبی (با قطر 4 ميلی مرت، ضميمه نيست) ر ا در پايه تلويزيون .نصب كنيد ، ضميمه نيست) ر ا در حفره پيچ تلويزيون نصبM4(يک پيچ خودكار .كنيد كابل...
- Page 66 KDL-26EX550 كابل صوتی/ تصويری ،KDL-46/40/32EX65x ،KDL-55/46/40/32HX75x KDL-32EX550 كابل آننت كابل صوتی/ تصويری )(ضميمه نيست )(ضميمه نيست كابل آننت )(ضميمه نيست كابل صوتی/ تصويری )(ضميمه نيست كابل آننت )(ضميمه نيست كابل آننت )(ضميمه نيست DVD كابل صوتی/ تصويری )(ادامه دارد...
- Page 67 VCR اتصال آننت/كابل و KDL-26EX550 ،KDL-46/40/32EX65x ،KDL-55/46/40/32HX75x KDL-32EX550 HDMI كابل )(ضميمه نيست كابل آننت )(ضميمه نيست كابل آننت )(ضميمه نيست كابل صوتی/ تصويری )(ضميمه نيست / دستگاه ضبطSet Top Box )DVD (مثال، دستگاه ضبط كابل آننت )(ضميمه نيست...
- Page 68 / دستگاه ضبط (مثال، دستگاهSet Top Box ب ر ای نصب يک KDL-26EX550 HDMI ) از طريقDVD ضبط ،KDL-46/40/32EX65x ،KDL-55/46/40/32HX75x KDL-32EX550 كابل آننت )(ضميمه نيست HDMI كابل )(ضميمه نيست كابل آننت )(ضميمه نيست / دستگاه ضبطSet Top Box )DVD (مثال،...
- Page 69 3: اتصاالت 2: تنظيم ز اويه ديد تلويزيون اين تلويزيون ر ا می توانيد در محدوده زوايای نشان داده شده در شكل .تنظيم كرد از یک اتصال دهنده کابل آنتن با ضخامت بیشتر از 41 میلی متر استفاده .کنید )تنظيم...
- Page 70 1: وصل كردن پايه روميزی تلویزیون ر ا با پیچ های ضمیمه شده به پایه رومیزی متصل کنید. عالمت محل حفره های پیچ ب ر ای محکم کردن پایه رومیزی ر ا های پيكان .نشان می دهند .ب ر ای اتصال صحيح به جزوه ر اهنامی ضميمه پايه روميزی رجوع مناييد ،KDL-46/40/32EX65x ،KDL-55/46/40/32HX75x KDL-32EX550 .دستگاه...
- Page 71 وارد كردن باتری ها به كنرتل از بازبينی لوازم جانبی ر اه دور )1( كنرتل از ر اه دور )2( ) نوعR03( AAA باتری های اندازه )1( پايه رو ميزی سفت کردن پیچ ها ب ر ای پایه رومیزی )3( )M5 × 16( )KDL-26EX550 (به...
- Page 72 فهرست مندرجات رشوع كار 6 ..............................بازبينی لوازم جانبی 6 ........................وارد كردن باتری ها به كنرتل از ر اه دور 7 ............................1: وصل كردن پايه روميزی 8 .............................2: تنظيم زاويه ديد تلويزيون 8 ................................3: اتصاالت 12 ........................4: جلوگريی از واژگون شدن تلویزیون 13 ............................
- Page 73 درباره این ر اهنام )(دفرتچه ر اهنام این ر اهنام چگونگی تنظیم تلویزیون ر ا به شام توضیح می دهد. ب ر ای اطالعات بیشرت درباره نحوه .، به "دفرتچه ر اهنامی الکرتونیکی" م ر اجعه کنیدBRAVIA استفاده از تلویزیون دفرتچه...
- Page 75 معرفی . استDVB عالمت تجاری ثبت شده پروژه تشكر میSony از شام به خاطر انتخاب كردن اين محصول كنيم. قبل از به كار بردن تلويزيون، لطف ا ً اين دفرتچه ر ا به High-Definition Multimedia وHDMI ،آرمHDMI .طور...
- Page 76 Instructions about “Installing Wall Mount Bracket” are included within this TV’s instructions manual. Customer Support: © 2012 Sony Corporation...