
Related Manuals for D.E. Systems Border Patrol TC1

Summary of Contents for D.E. Systems Border Patrol TC1
- Page 1 - GPS Containment System - Remote Trainer - Short-Range Tracking Unit Owner’s Manual Please read this manual in its entirety before using this unit.
-
Page 2: Introduction
4 different waypoints. If a Fence is active, the Fence center is also automatically saved as a Waypoint. The D.E. Systems Border Patrol TC1 remote trainer is a safe and effective training tool when used properly. Be sure to read through this instruction manual and the training manuals to get the most out of your unit. -
Page 3: Table Of Contents
TABLE OF CONTENTS Introduction.....................2 1. Before you Begin................7 - Warnings....................8 - Caution.....................10 2. Getting to Know Your System............11 - Package Contents................12 - Features...................13 - Handheld Unit..................14 - Collar Unit..................18 - LCD Screen Icon Definitions............20 - Collar LED Light Status..............22 3. Getting Started.................25 - Charging the System...............26 - Turning the System ON/OFF............28 - Acquiring GPS Signal..............29... - Page 4 TABLE OF CONTENTS 4. Fence....................35 - Fence Overview................36 - Fence Area Terms................38 - Setting Up Fence Boundaries............39 - Activating/Deactivating Fence............42 - Creating Visible Fence..............42 - Fence View Screen................43 - Reading Fence View Screen............44 - Collar Status..................45 - Switching Between Collars..............46 - “Welcome Home”...
- Page 5 TABLE OF CONTENTS 6. Marking Waypoints................55 - Mark Overview.................56 - Mark Current Location..............57 - Find Previously Marked Waypoints..........58 - Edit/Delete Marked Waypoints............59 7. Setup....................61 - Setup Overview................62 - System.....................62 - Adding a Collar Unit.................63 - Edit Name & Color / Delete Collar...........64 - GPS/RF....................65 - Alerts....................68 - Display.....................69...
-
Page 7: Before You Begin
Before You Begin Please read this manual in its entirety before use. -
Page 8: Warnings
WARNINGS The Dog Expedition Systems Border Patrol TC1 GPS Fence and Training system is a safe and effective training tool when used properly. This manual provides essential user information for the proper operation of this unit. Please read the instruction manual and training manuals completely before using this product. - Page 9 Ÿ Do not pierce, drop, or cause high impact to the battery as this may cause the battery to overheat, explode, or cause a fire. Ÿ Use only an authorized D.E. Systems charger and wall adapter. Ÿ Do not leave batteries unattended. In particular, do not leave in an area where an animal or dog may chew on the batteries.
-
Page 10: Caution
CAUTION Ÿ Before training, your dog should be examined by a veterinarian to assure that your dog is in good health. Ÿ Do not use with aggressive-tempered dogs. Ÿ Never leave your dog unattended with the unit on. Since no electronic device is perfect, there is a possibility that your dog may receive an unintentional electric stimulation. -
Page 11: Getting To Know Your System
Getting to Know Your System... -
Page 12: Package Contents
PACKAGE CONTENTS Ÿ Water-resistant Handheld Unit with antenna Ÿ Waterproof Collar Unit with belt assembly Ÿ Charger Ÿ Test light Ÿ Boundary flags Ÿ Screen Cover Ÿ Lanyard Ÿ Carrying Case Ÿ User manual Ÿ Training manuals Ÿ Warranty card... -
Page 13: Features
FEATURES Ÿ GPS Guided e-Fence, e-Collar Training Unit, and Short-Range Tracking Unit operating on 900 MHz radio frequency Ÿ Rechargeable Li-Ion Batteries in both Handheld and Collar Units Ÿ Water-resistant Handheld Unit and waterproof Collar Unit Ÿ High resolution 2.4’’ TFT Color LCD Ÿ... -
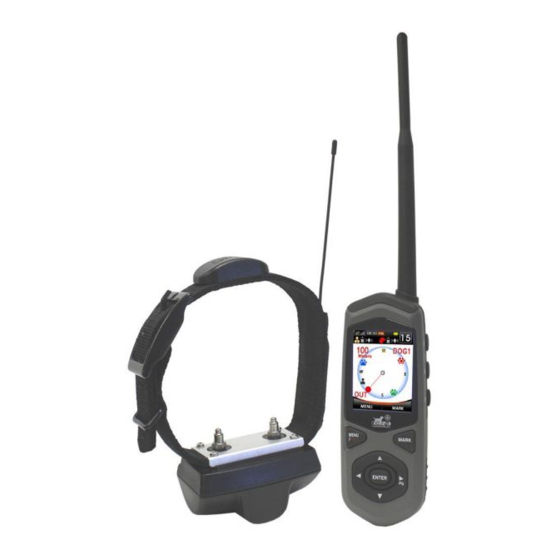
Page 14: Handheld Unit
HANDHELD UNIT Front View Color LCD Screen RF Antenna Nick Button Vibration Button Continuous Button Rise Button Dog Selection Jump Button Button Menu/Power Key Mark Key Up Key Left (Toggle Right (PING) Key Screen) Key Enter Key Down Key... - Page 15 HANDHELD UNIT Color LCD Screen - Displays Training, Fence, and Mark information. RF Antenna - Aids in communication between handheld unit /collar unit. Nick Button - Quick, split-second stimulation. Continuous Button - Continued Stimulation while button is pressed (8 second safety shutoff). Jump Button - User-programmed Jump stimulation level without changing default stimulation level (see pg.
- Page 16 HANDHELD UNIT Back View RF Antenna Lanyard Attachment Slot USB Port Cover USB Connector Port (under cover) Battery Cover Locking Screw Battery Cover...
- Page 17 HANDHELD UNIT RF Antenna - Antenna for communication between handheld unit and collar unit. Lanyard Attachment Slot - Attachment point for optional lanyard. USB Connector Port - Connection point to charge handheld unit. USB Port Cover - Cover protecting USB Port from dirt and debris. Battery Cover - Cover enclosing the handheld unit's rechargeable batteries.
-
Page 18: Collar Unit
COLLAR UNIT Front View GPS Antenna RF Antenna Electrodes Belt LED Light Back View Battery Charging Port Power Button Charging Port Cover... - Page 19 COLLAR UNIT FRONT VIEW GPS Antenna - Antenna used to obtain GPS signal. RF Antenna - Antenna for communication between handheld unit and collar unit. Belt - Flexible nylon collar belt. Electrodes - Makes contact with dog's skin for stimulation. LED Light - Indicates status and errors of collar unit.
-
Page 20: Lcd Screen Icon Definitions
LCD SCREEN ICON DEFINITIONS The System Information Bar is located System Information Bar at the top of the LCD screen and provides information and status of the handheld unit and collar unit. ICON DEFINITION Current time (must establish GPS signal). Indicates that the handheld unit is active. - Page 21 LCD SCREEN ICON DEFINITIONS Training Screen Fence Screen Mark Screen ICON DEFINITION Intensity level of selected collar unit in Training Screen. Indicates True North in Fence Screen. Handheld unit icon used to show location of handheld unit in Fence Screen. Collar unit icon used to show location and status of collar unit in Fence Screen (see pg.
-
Page 22: Collar Led Light Status
COLLAR LED LIGHT STATUS CLASSIFICATION ACTION LED COLOR/ PATTERN Green -Solid LED for Powering ON approximately 2 seconds Turning ON/OFF Powering Green - Solid LED for approximately 3 seconds Green - When holding Power New Collar Button, LED will blink for 8 Programming seconds and then stay on solid. - Page 23 COLLAR LED LIGHT STATUS CLASSIFICATION ACTION LED COLOR/ PATTERN Powered ON Green -Flashes every 2 seconds. CONT, JUMP, - Flashes when emitting RISE selected stimulation. Operation NICK - Flashes once quickly. - Solid LED while vibrating. Orange - Flashes every 2 seconds when battery life is less than 50%.
-
Page 25: Getting Started
Getting Started... -
Page 26: Charging The System
CHARGING THE SYSTEM All D.E. Systems units are equipped with rechargeable Lithium-Ion batteries. Li-Ion batteries are not memory sensitive and do not require depletion before recharging. On average, the handheld unit will last approximately 6-12 hours and the collar unit will last approximately 12-24 hours depending on use, care, and condition of the batteries. - Page 27 CHARGING THE SYSTEM Charging the Handheld unit 1. The handheld unit can be ON or OFF during charging. 2. Pull out the USB Port Cover to expose the USB Connector Port. 3. Plug the AC Adapter into a standard electrical outlet and connect the USB charging cable to the handheld unit.
-
Page 28: Turning The System On/Off
Turning the Handheld unit ON 1. Press and hold the MENU/PWR button on the handheld unit until the D.E. Systems startup logo appears on the LCD screen. 2. Release the button to begin the startup sequence. Turning the Handheld unit OFF 1. -
Page 29: Acquiring Gps Signal
ACQUIRING GPS SIGNAL NOTE - GPS Acquisition Times and Signal Strength may vary according to factors such as trees, buildings, weather, overhead obstructions, and proximity to electromagnetic interferences. For best results, find an open area away from these factors. Wait at least two minutes AFTER GPS signals have been acquired. -
Page 30: Compass Calibration
COMPASS CALIBRATION The D.E. Systems handheld unit utilizes a high performance electronic compass chip in order to get accurate fence and tracking data. This compass must be calibrated by the user. The compass should be the first time it is used, after storage periods, after new batteries are installed, and after long distance changes on the handheld’s last known location. - Page 31 COMPASS CALIBRATION 3. Roll: As shown in fig. 1 below, roll the unit twice at a speed that matches the indicator bar on screen. 4. Rotate: As shown in fig. 2 below, rotate the unit twice at a speed that matches the indicator bar on screen. 5.
-
Page 32: Fitting The Collar
FITTING THE COLLAR CAUTION - Do not fit the collar on your dog with the collar unit ON. Proper collar tightness and position are very important to ensure safe and consistent collar use. All electronic collars need to be very snug around the dog’s neck to work properly. -
Page 33: Finding The Proper Intensity Level
FINDING THE PROPER INTENSITY LEVEL WARNING - Do not set the intensity until you have read this manual and have familiarized yourself with this unit. It is very important to set the correct intensity level on your unit before beginning your training sessions to provide the proper level of stimulation and avoid over-stimulating your dog. -
Page 35: Fence
Fence NOTE: Please read through the Fence Boundary Training Manual BEFORE using the Fence features of the Border Patrol Unit. -
Page 36: Fence Overview
FENCE OVERVIEW The D.E. Systems “Border Patrol” GPS Fence creates a circular fence anywhere a GPS signal is available. 1. The fence radius can be as small as a 15 yard radius to as big as an 800 yard radius from a chosen center point using GPS technology. - Page 37 FENCE OVERVIEW Tips on Using Fence Mode Ÿ Read Fence Training Manual before using Fence mode. Ÿ Always test your Fence settings before use (see pg. 47). Ÿ The handheld unit and collar unit(s) must acquire a GPS Signal before using Fence mode (see pg.
-
Page 38: Fence Area Terms
FENCE AREA TERMS Please refer to fig. 1 for these terms. Fence Center - The center point of the fence. Distances are measured from the Center. Safe Zone - The desired area where the dog can freely roam without correction. Warning Zone - The area outside the Safe Zone where the dog will receive a warning as a reminder that he/she has left the Safe Zone This warning can be a Vibration, Beep, Vibration with delayed Stimulation,... -
Page 39: Setting Up Fence Boundaries
SETTING UP FENCE BOUNDARIES WARNING - Do not put the collar on your dog until Fence boundaries have been physically tested. Boundary distances may vary according to GPS coordinate accuracy, which can be inaccurate +/- 10 yards. Both Fence Center and Zones can have inaccuracies. - Page 40 SETTING UP FENCE BOUNDARIES 4. Choose the distance from the Center Point to the beginning of the Warning Zone. This will be be the Safe Zone. a) Press ENTER in the highlighted box to change the distance (see fig. 1 below). b) Using the navigation keys, enter the desired number and press OK when finished (see fig.
- Page 41 SETTING UP FENCE BOUNDARIES 6. Choose NEXT to move on to Stimulation Zone settings. 7. Choose the distance from the Center Point to the beginning of the Stimulation Zone. This will be the Warning Zone. a) Press ENTER in the highlighted Stim Zone Starts @ box to change the distance.
-
Page 42: Activating/Deactivating Fence
ACTIVATING / DEACTIVATING FENCE To Activate Fence: 1. Press MENU → Fence → ENTER 2. Highlight Activate and press ENTER 3. The Fence is now active and the Fence View Screen will be shown (see fig. in next page). To Deactivate Fence: 1. -
Page 43: Fence View Screen
FENCE VIEW SCREEN Selected Collar Active Fence GPS Status Transmitter GPS Status Selected Collar Intensity Selected Collar Selected Collar Distance from Fence Center Fence Center Active Collars and Status Transmitter Location Actual North Selected Collar Status... -
Page 44: Reading Fence View Screen
READING FENCE VIEW SCREEN CAUTION - This device is not intended to be a tracking unit. Direction of icons may be inaccurate by +/- 20 degrees. Readings can be affected by electromagnetic interferences, obstructions, or loss of line of site. NOTE - Be sure to hold the handheld unit parallel to the ground with the screen facing towards the sky to properly view direction. -
Page 45: Collar Status
COLLAR STATUS Collar information and status is displayed on the Fence screen. The top left corner shows distance from Fence Center. The top right corner shows which collar’s information is being displayed. The bottom left corner shows the collar’s status (an “X” loss of collar unit GPS Signal). Collar is in Safe Zone (see fig. -
Page 46: Switching Between Collars
SWITCHING BETWEEN COLLARS If multiple collars are registered to the handheld unit, pressing the DOG button selects a different collar unit. The information onscreen will change color to match the chosen collar. Each time the DOG button is pressed, the handheld unit will cycle through the active collars (see fig. 1, 2, 3 below). -
Page 47: Welcome Home" Fence Feature
“WELCOME HOME” FENCE FEATURE The D.E. Systems Border Patrol’s “Welcome Home ” feature allows your dog to re-enter the fence area and Safe Zone without correction, preventing confusion to your dog and encouraging a safe return. If your dog crosses the outer fence boundary, he will NOT receive a correction upon re-entry. - Page 48 TESTING FENCE To Test the Warning Zone: 1. Activate Fence and take collar slightly past the Warning Zone. The handheld unit can be used to gauge distance. 2. Check to see if the collar unit emits the desired warning. The handheld unit will also indicate that the collar is in the Warning Zone 3.
-
Page 49: Training
Training... -
Page 50: Training Home Screen
TRAINING HOME SCREEN System Information Bar Registered Collar List Nick Vibration Stimulation Continuous Rise Stimulation Stimulation Jump Stimulation Selection Intensity Level MENU MARK... -
Page 51: Training Functions
TRAINING FUNCTIONS Systems Information Bar: Displays the status of the handheld unit and collar unit(s). Registered Collar List - Displays all collars registered to the handheld unit. Registered collars that are ON show with assigned color. Current active collar will be highlighted with an arrow. Registered collars that are OFF will show gray. -
Page 52: General Training Mode Information
GENERAL TRAINING MODE INFORMATION The D.E. Systems Border Patrol TC1 remote trainer is a safe and effective tool that makes training sessions more efficient and productive when used properly. Training Features Ÿ Up to 2 mile range (line of sight) Ÿ... -
Page 53: Jump And Rise Stimulations
JUMP AND RISE STIMULATIONS Jump stimulation is an ideal feature when regularly using two different stimulation levels in training. It is also a great safety tool for emergency situations when your dog gets excited and cannot feel or ignores the normal intensity level. -
Page 54: Testing Training Functions
TESTING TRAINING FUNCTIONS NOTE - Before testing, make sure that all units are fully charged and the handheld unit and collar unit(s) are ON. If the collar unit being tested is not displayed on the handheld unit, the collar unit must be added to the handheld unit (see pg. -
Page 55: Marking Waypoints
Marking Waypoints... -
Page 56: Mark Overview
MARK OVERVIEW The D.E. Systems “Border Patrol” GPS Mark function allows a user to mark a GPS Waypoint and find that Waypoint at a later time. It can also help a user to find a marked Fence Center of the stored GPS Fence. -
Page 57: Mark Current Location
MARK CURRENT LOCATION To Mark Current Location 1. Press the MARK button. 2. Select General, Car, Home, or Other and press the ENTER button (see fig. 1 below). Only one Waypoint per category can be stored. 3. A text window will pop up indicating the Waypoint has been saved. Press ENTER. -
Page 58: Find Previously Marked Waypoints
FIND PREVIOUSLY MARKED WAYPOINTS To Find Previously Marked Waypoint 1. Press the MARK button. 2. Select Find Mark and press the ENTER button. 3. Highlight the desired Waypoint and press ENTER or OPTION (see fig. 1 below). 4. Highlight Goto and press ENTER (see fig. 2 below). 5. -
Page 59: Edit/Delete Marked Waypoints
EDIT / DELETE MARKED WAYPOINTS To Edit Name of Previous Waypoints 1. Press the MARK button. 2. Select Find Mark and press the ENTER button. 3. Highlight the desired Waypoint to edit and press ENTER or OPTION. 4. Highlight Edit Name and press ENTER. 5. -
Page 61: Setup
Setup... -
Page 62: Setup Overview
SETUP OVERVIEW / SYSTEM To get to Setup: 1. Click on MENU. 2. Highlight Setup and press ENTER. Setup: Customize handheld unit and collar settings (see fig. 1 to right). Collar: Add, edit, and delete collar units. GPS/RF: View and adjust GPS settings and RF channel settings. -
Page 63: Adding A Collar Unit
ADDING A COLLAR UNIT The D.E. Systems Border Patrol TC1 can support up to 5 collar units at a time. All collar units must be added and registered to the handheld unit. 1. Turn on the handheld unit. 2. On the collar unit, press and hold the power button for approximately 8 seconds until the Green LED is solid. -
Page 64: Edit Name & Color / Delete Collar
EDIT NAME & COLOR / DELETE COLLAR To Edit Collar Name: 1. Navigate to MENU → SETUP → COLLAR. 2. Highlight desired collar from list, then select OPTION → Edit Name. 3. Key in desired name and select OK (see fig. 1 below). To Edit Collar Color: 1. -
Page 65: Gps/Rf
GPS / RF Your D.E. Systems Border Patrol TC1 unit requires a GPS signal to determine position and a Radio Frequency (RF) signal to communicate between the handheld unit and collar unit(s). MENU → Setup → GPS/RF → GPS: Activates/deactivates the reception of GPS signals in both the handheld unit and collar unit(s). - Page 66 GPS / RF MENU → Setup → GPS/RF → RF channel: The radio frequency channel used between the handheld unit and the collar unit for GPS communications and sending/receiving Training functions. Highlight the box and press Left or Right key to cycle between channels 1 through 6. NOTE - If there is interference from outside sources or if the signal is not clear, the RF channel may need to be changed.
- Page 67 GPS / RF MENU → Setup → GPS/RF → Geo-Mag. Compensation: Allows the user to adjust the compass readings for magnetism according to location for more accurate tracking. GPS technology utilizes compasses in order to track direction. However, Actual North is a constant, calculated direction while Magnetic north varies according to different variables such as location, magnetism, etc.
-
Page 68: Alerts
ALERTS Your handheld unit can give alerts on the collar unit’s status (see pg. 45 for Fence). These alerts can be turned ON or OFF by highlighting and toggling these options in the box next to the alert (see fig. 1 below). MENU → Setup → Alerts Warning Zone: Alerts when the collar unit enters the Warning Zone of the Fence. -
Page 69: Display
DISPLAY MENU → Setup → Display → Power Save: The amount of idle time (in sec.) before the screen turns off to conserve power. Highlight the Power Save box and press Left or Right keys to cycle between 5, 10, 30, 60, or NEVER (see fig. 1 below). Unit: Choose Yards or Meters as the default unit of measure. -
Page 71: Troubleshooting, Faq, Maintenance, Warranty & Repair
Troubleshooting, FAQ, Maintenance, Warranty & Repair... -
Page 72: Troubleshooting
TROUBLESHOOTING Problem Action 1. Check to make sure the battery is properly seated in handheld unit (pg. 76). Unit is not turning on. 2. Recharge handheld & collar units (pg. 26). 3. Check to see if rechargeable battery needs replacement (pg. 22). Handheld Unit shows 1. - Page 73 TROUBLESHOOTING Problem Action 1. Fence Center and Boundaries should Avoid Obstructions & Magnetic Interference as these cause an increased inaccuracy of GPS points (pg. 29). Fence Boundaries are 2. Acquire a better GPS Signal, making sure not accurate. the H-value is below 2.0 (pg. 66). Test Fence Center and Boundary, making sure to mark off physical boundaries (pg.
-
Page 74: Faq
Question Answer It takes about 7 hours to fully charge your unit. The handheld unit and collar unit will indicate when charging is complete (see pg. How long do I need to 26). Though your unit will go into a trickle charge unit? charge, we recommend you take your unit off the charger as soon as when recharging is... - Page 75 Question Answer The handheld unit will need to be powered ON to create your Fence Boundary, to train, and to mark/find Waypoints. However, the Does the handheld Fence is still active if the handheld unit is unit have to be powered OFF and the Fence was not powered ON? deactivated.
-
Page 76: Maintenance
Periodically clean your Border Patrol TC1 system for maximum performance. Regular cleaning will also lengthen the life of your unit. 1. Clean the Border Patrol TC1 collar box, belt and buckle with lukewarm water and a mild anti-bacterial soap. 2. Thoroughly clean the space between the electrodes and the belt. -
Page 77: Warranty & Repair
WARRANTY & REPAIR All D.E. Systems Border Patrol TC1 systems have a one year parts and labor warranty effective from the original date of purchase. A copy of the original sales receipt is required to validate the date of purchase. The Border Patrol TC1 has been made with State of the Art equipment. -
Page 78: Terms Of Use & Liability Limitations
6. Liability Limitations - D.E. Systems will not be held liable for any damages, injury, death or any other undesired result of using this product, whether used properly or improperly. The user of this product... -
Page 79: Fcc & Ic Compliance
FCC & IC COMPLIANCE Your D.E. Systems Border Patrol TC1 has been manufactured under complete compliance with Part 15 of the Federal Communication Commission (FCC) rules and Industry Canada (IC) Standard RSS-310. The complex internal structure of each product has been designed to operate within specific regulations of FCC specifications. - Page 80 D.E. Systems 2872 Walnut Hill Lane Dallas, Texas 75229 888-588-8364 or 214-350-9446 D.E. Systems Copyright 03/12...