Linksys EFG120 User Manual
Ethernet network attached storage 120 gb hard drive with printserver
Hide thumbs
Also See for EFG120:
- User manual (61 pages) ,
- Quick installation (2 pages) ,
- Specifications (2 pages)
Table of Contents
Advertisement
Quick Links
Download this manual
See also:
User Manual
Advertisement
Table of Contents

Related Manuals for Linksys EFG120


Summary of Contents for Linksys EFG120
- Page 1 Ethernet Network Attached Storage 120 GB Hard Drive with PrintServer Use this guide to install: EFG120 User Guide...
- Page 2 Linksys reserves the right to revise or update its products, software, or documentation without obligation to notify any individ- ual or entity.
-
Page 3: Table Of Contents
Administration Tab - Users Linksys highly recommends that you regularly back up Administration Tab - Status Information the files that are on the EFG120. Linksys is not responsi- Administration Tab - Group ble for any data loss, nor will Linksys perform any recov- Administration Tab - Shares ery on lost data or files. -
Page 4: Chapter 1: Introduction
Additional quick-connect hard drive trays are available, so you can quickly swap the backup drive to create rotating backups. For even more flexibility and utility, the EFG120 can be set up to be accessible directly from the Internet -- up- or downloading files either via a web browser, or by FTP. -
Page 5: Chapter 2: Getting To Know The Efg120
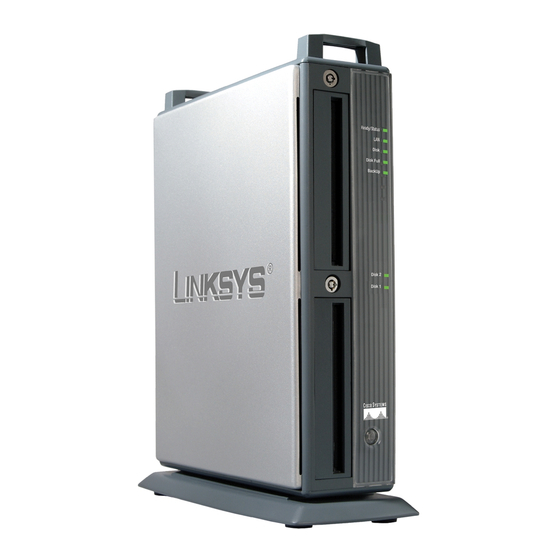
The EFG120’s front panel, shown in Figure 2-2, displays the following power The EFG120’s Rear Panel button and LEDs. All of the EFG120’s connectors and switches are on the rear panel, as shown in Power Button The Power button turns the Figure 2-1. -
Page 6: Beeper Codes
3 Beeps Repeated every 15 seconds for three minutes, this signals 4. Locate the EFG120’s power button on the front panel. Press it once to power that the EFG120’s hard disk usage exceeds 98% capacity. on the EFG120. Then, power on the network printer, if you attached one to the EFG120. -
Page 7: Chapter 4: Using The Efg120'S Setup Wizard
Now that everything is connected and powered on, you are ready to configure the EFG120 so that it is accessible to the users on your network. You will have The remainder of this chapter addresses the setup procedure you would fol- to run the EFG120’s Setup Wizard on your PC to access the EFG120’s Quick... - Page 8 Then, click the Yes button on the right As shown in Figure 4-4, select the radio button beside either Fixed IP to change any of the EFG120’s settings or the No button to accept the set- Address or Dynamic IP Address.
- Page 9 5. If you chose Fixed IP Address in the previous step and clicked the Next but- 6. From the next screen, shown in Figure 4-6, you can set the EFG120 as your ton, you will see the screen shown in Figure 4-5. On this screen, you will network’s DHCP server if no other device is functioning as a DHCP server...
- Page 10 7. From the next screen, Figure 4-7, you can change the time and date on the 8. On the next screen, shown in Figure 4-8, review the EFG120’s settings. If EFG120. they are correct, click the Save button on the right. If you would like to change them, click the Back button to return to a previous screen.
-
Page 11: Chapter 5: Using The Efg120'S Web-Based Utility
10. You have now successfully set up the EFG120 with the Setup Wizard. When Chapter 5: Using the EFG120’s the screen shown in Figure 4-10 appears, click the Exit button to exit the Setup Wizard. Web-Based Utility For your convenience, an administrative utility has been programmed into the EFG120. -
Page 12: Home Tab - User Log In
When you click the Administration tab, a password request window will appear, as shown in Figure 5-6. (Windows XP users will see a Connect to win- dow.) Enter the User Name and Password you use to access the EFG120 and click the OK button. - Page 13 DHCP Server The EFG120 can serve as your network’s DHCP server if no other device is functioning as a DHCP server on your network. If you wish to use the EFG120 as a DHCP server, click the box next to Enable DHCP Server function. Then, enter the range of IP Addresses you wish to assign on your network.
-
Page 14: Administration Tab - System
WINS From the System screen, shown in Figure 5-8, you will be able to change some of the EFG120’s basic settings as well as some of the more advanced settings. Enable WINS When using a Windows NT or 2000 network server, you... -
Page 15: Administration Tab - Users
Figure 5-9 The Users screen, shown in Figure 5-9, allows you to manage the users that are on the EFG120. Users can be members of many user groups. Existing Users The user list shows all existing users. The details of the selected user are displayed in the "Properties"... - Page 16 menu ALWAYS performs these functions. Check the Enable Disk Quota of box if you want to set the disk usage limit for the user. Enter the maximum amount of disk space the user is allowed to use. Click the Clear Form button to clear the form for the entry of a new user.
-
Page 17: Administration Tab - Status Information
• Click the View Log button to view the log file in a separate window. (See Figure 5-12.) The log file is a record of activity on the EFG120, which can help in management and troubleshooting. Click the Refresh button to refresh the screen. -
Page 18: Administration Tab - Group
E-Mail Alerts Check the Send button to enable the sending of E-Mail alerts Administration Tab - Group by the EFG120. Alerts will be sent when there is some problem requiring the Administrator's attention. In the E-Mail Address field, enter the E-Mail Addresses. The messages generated by the EFG120 will be sent to this destination. -
Page 19: Administration Tab - Shares
Figure 5-15 As shown in Figure 5-15, the Backup Settings screen allows you to back up the EFG120’s configuration file to your PC. You can also back up data from one disk to another. This is used to back up data from one disk to another. Select... -
Page 20: Administration Tab - Disk
Format Disk 1 If you have installed a new hard drive in the EFG120’s expan- Administration Tab - Disk sion slot, you will need to format the hard drive with the new format utility. Click the Format Disk 1 button to format that hard drive. -
Page 21: Administration Tab - Upgrade
Check that the EFG120 is properly installed, that the LAN connections are secure, and that the EFG120 is powered ON. • If you are using a router, make sure that your PC and the EFG120 are on the same network segment. •... -
Page 22: Appendix B: Installing A Second Hard Drive
3. When I click the EFG120’s icon in Network Neighborhood, I’m prompted for a Appendix B: Installing a Second password. This can happen in the following situations: Hard Drive • Your Windows Logon name is recognized by the EFG120, but your Logon password is not. - Page 23 9. Slide the drive into the second drive bay. connections are tight before securing the drive to the tray. 10. Lock the tray into the EFG120’s bay. The tray must be locked in for the EFG120 to properly function. Figure B-3 7.
-
Page 24: Appendix C: Setting Up The Built-In Printserver
13. Click the Administration tab and select Disk. Under Format Disk, Disk 2 will show a status of Not Formatted. Click the Format Disk button for Disk 1. Power down the EFG120 by pressing the button on the front. Then, connect 2 to format that hard drive. - Page 25 The next screen will request how the printer will be located by the in Figure C-3. This will open the EFG120. Select Type the Printer name, or click Next to browse for a Add Printer Wizard. printer. Then, in the field below, enter this location in the following for-...
- Page 26 10. From the Add Printer Wizard screen, shown in Figure C-8, select your 12. Clicking the Finish button on the previous screen will return you to the printer’s manufacturer from the list on the left. Then, select your printer’s Printers folder. This folder will show all printers available on the network, model from the list on the right.
-
Page 27: Appendix D: Glossary
Appendix D: Glossary DHCP supports static addresses for computers containing Web servers that need a permanent IP address. DNS - The domain name system (DNS) is the way that Internet domain name 10BaseT - An Ethernet standard that uses twisted wire pairs. are located and translated into Internet Protocol (IP) addresses. - Page 28 can also be initiated from within a Web browser by entering the URL preceded IP Address - In the most widely installed level of the Internet Protocol (IP) with ftp://. today, an IP address is a 32-binary digit number that identifies each sender or receiver of information that is sent in packet across the Internet.
- Page 29 RJ-45 (Registered Jack-45) - A connector similar to a telephone connector that individual units of data (called packets) that a message is divided into for effi- holds up to eight wires, used for connecting Ethernet devices. cient delivery over the network. TCP is known as a "connection oriented" pro- tocol due to requiring the receiver of a packet to return an acknowledgment of Router - Protocol-dependent device that connects subnetworks together.
-
Page 30: Appendix E: Specifications
50-60Hz Power Adapter Provided for credit or refunds. Certifications FCC Class B Linksys will not be held responsible for any data or file loss recovery under any circumstances. Operating Temp. 41°F to 104°F (5°C to 40°C) Linksys offers cross shipments, a faster process for processing and receiving Storage Temp. - Page 31 © Copyright 2003 Cisco Systems Inc. All rights reserved.