Table of Contents
Advertisement
Advertisement
Table of Contents

Related Manuals for AEG L 61271 BI


Summary of Contents for AEG L 61271 BI
- Page 1 EN User manual L 61271 BI L 61470 BI...
-
Page 2: Table Of Contents
14. BUILDING IN ............. . 33 FOR PERFECT RESULTS Thank you for choosing this AEG product. We have created it to give you impeccable performance for many years, with innovative technologies that help make life simpler –... -
Page 3: Safety Information
ENGLISH 1. SAFETY INFORMATION Before the installation and use of the appliance, careful- ly read the supplied instructions. The manufacturer is not responsible if an incorrect installation and use cau- ses injuries and damages. Always keep the instructions with the appliance for future reference. 1.1 Children and vulnerable people safety WARNING! Risk of suffocation, injury or permanent disability. -
Page 4: Safety Instructions
• If the supply cord is damaged, it must be replaced by the manufacturer, its service agent or similarly quali- fied persons in order to avoid a hazard. • The operating water pressure (minimum and maxi- mum) must be between 0,5 bar (0,05 MPa) and 8 bar (0,8 MPa) •... -
Page 5: Technical Information
ENGLISH mains plug, use a 13 amp ASTA (BS • Do not touch the glass of the door 1362) fuse. while a programme operates. The glass can be hot. • • Make sure that you remove all metal objects from the laundry. This appliance complies with the •... -
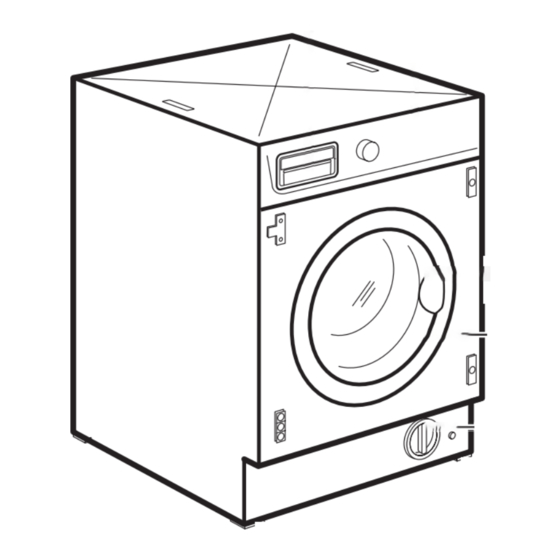
Page 6: Product Description
Maximum load Cotton 7 kg Spin speed Maximum 1200 rpm (L 61271 BI) 1400 rpm (L 61470 BI) 1) Connect the water inlet hose to a water tap with a 3/4'' thread. 4. PRODUCT DESCRIPTION Detergent dispenser Feet for the appliance level... -
Page 7: Control Panel
ENGLISH 4.1 Accessories Spanner To remove the transit bolts. Plastic caps To close the holes on the rear side of the cabinet after the removal of the transit bolts. Anti-flood inlet hose To prevent possible leakage Plastic hose guide To connect the drain hose on the edge of a sink. - Page 8 5.1 Display The display shows the following informa- tion: Duration of the set programme When you set a programme, the display shows the duration in hours and minutes (for example 2.05). The duration is calculated automatically on the maximum load for each type of fabric.
-
Page 9: Washing Programmes
ENGLISH 5.2 Indicator pilot lights After you have pressed the button 8, the WASHING light (A) comes on. The machine is operating. The DOOR light (B) indicates when the door can be opened: • light on: the door cannot be opened •... - Page 10 10 www.aeg.com Programme Maximum and Minimum Temperature Cycle De- Options Type of Laundry scription Maximum Load Prewash SPIN REDUCTION Cottons + Prewash Main wash RINSE HOLD 95° - Cold Rinses Max. load 7 kg - Reduced load 3 kg STAIN...
- Page 11 ENGLISH Programme Maximum and Minimum Temperature Cycle De- Options Type of Laundry scription Maximum Load Spin Drain SPIN REDUCTION Max. load 7 kg Long spin Separate spin for hand washed cotton gar- ments and after programmes with the Rinse hold option set. Turn the programme dial to Off before set- ting this programme.
-
Page 12: Consumption Values
12 www.aeg.com Programme Maximum and Minimum Temperature Cycle De- Options Type of Laundry scription Maximum Load Main wash SPIN REDUCTION Cottons Eco Rinses RINSE HOLD 60° and 40° Long spin STAIN Max. load 7 kg EXTRA RINSE White and fast coloured cotton. -
Page 13: First Use
ENGLISH Programmes Load Energy Water con- Approxi- Remain- (Kg) consump- sumption mate pro- ing mois- tion (kWh) (litre) gramme ture (%) duration (minutes) Delicates 40 0.55 °C Wool/Hand 0.25 wash 30 °C Standard cotton programmes Standard 60 1.01 °C cotton Standard 60 0.78 °C cotton... -
Page 14: Filling The Detergent And Additives
14 www.aeg.com Make sure that no laundry stays between the seal and the door. There is a risk of water leakage or damage to the laundry. 9.2 Filling the detergent and additives The detergent compartment for the prewash phase, the soak programme and for the stain function. -
Page 15: Setting The Spin Speed
ENGLISH If you turn the programme dial to 9.6 Setting the STAIN option another programme when the (button 4) appliance is working, the yellow pilot light of button 8 blinks 3 Set this option to treat heavily soiled or times. The display shows the stained laundry with stain remover message Err to indicate a wrong The appliance extends the main wash... -
Page 16: Starting The Programme
16 www.aeg.com • Press the button 8 again. SUPER The relative pilot light re- Setting the delayed start: QUICK mains lit. • Set the programme and the required The washing duration will options. be reduced to wash lightly • Set the delay start. -
Page 17: Helpful Hints And Tips
ENGLISH If, for any reason, it is necessary to open If you have set a programme or an op- it, firstly press the button 8 to set the tion that ends with water in the tub, the machine to pause light B remains lit. -
Page 18: Care And Cleaning
18 www.aeg.com • A very small load can cause balance • If you use liquid detergents, do not set problems with the spin phase. If this the prewash phase. occurs, adjust manually the items in • If your appliance has not the deter- the tub and start the spin phase again. -
Page 19: External Cleaning
ENGLISH find on the packaging of the manufactur- CAUTION! Do not use alcohol, solvents or Do this separately from the laundry chemical products. wash. 11.2 External cleaning Clean the appliance only with soap and warm water. Fully dry all the surfaces. 11.3 Door seal Regularly examine the seal and remove all objects from the inner part. -
Page 20: Drain Pump
20 www.aeg.com Clean the dispenser recess with a brush. Put back the dispenser in the recess. 11.6 Drain pump WARNING! Before unscrewing the pump The pump should be inspected regularly cover, switch the appliance off and particularly if: and remove the mains plug from the socket. - Page 21 ENGLISH Remove foreign bodies and fluff from the filter seat and from the pump impeller. Check carefully whether the pump impeller rotates (it rotates jerkily). If it doesn’t rotate, please contact your Service Centre. Put the cap back on the emergency emptying hose and place the latter back in its seat.
-
Page 22: Emergency Emptying Out
22 www.aeg.com To clean the water inlet filters: Close the water tap. Remove the water inlet hose from the water tap. Clean the filter in the inlet hose with a stiff brush. Remove the inlet hose behind the appliance. Clean the filter in the valve with a stiff brush or a towel. -
Page 23: Troubleshooting
ENGLISH By doing this, any water remaining in the When you use the machine again, make machine is removed, avoiding ice form- sure that the ambient temperature is ing and consequently damage to the ap- above 0°C. pliance. 12. TROUBLESHOOTING Certain problems are due to lack of sim- •... - Page 24 24 www.aeg.com Problem Possible cause/Solution The water tap is closed. • Open the water tap. The inlet hose is squashed or kinked. • Check the inlet hose connection. The machine does not The filter in the inlet hose or the inlet valve filter are fill: blocked.
- Page 25 ENGLISH Problem Possible cause/Solution Too little detergent or unsuitable detergent has been used. • Increase the detergent quantity or use another one. Stubborn stains have not been treated prior to wash- ing. Unsatisfactory washing • Use commercial products to treat the stubborn results: stains.
-
Page 26: Installation
26 www.aeg.com Problem Possible cause/Solution Machines based on modern technology operate No water is visible in very economically using very little water without af- the drum: fecting performance. Anti-flooding system has activated. The display shows the • Pull out the plug from the power socket, close the alarm code water tap and contact the Service Force Centre. - Page 27 ENGLISH Open the door. Remove the poly- styrene piece from the door seal and all the items from the drum. Put one of the polystyrene packag- ing elements on the floor behind the appliance. Carefully put down the appliance with the rear side on it.
-
Page 28: Positioning And Levelling
28 www.aeg.com Remove the three bolts. Use the key supplied with the appliance. Pull out the plastic spacers. Put the plastic caps in the holes. You can find these caps in the user manual bag. WARNING! We recommend that you keep... -
Page 29: Raising The Appliance
ENGLISH • After having levelled the appliance, tighten the lock nuts. • The appliance must be level and sta- ble. Never place cardboard, wood or Raising the appliance similar materials under the ma- Suspended wooden floors are particular- chine to compensate for any un- ly susceptible to vibration evenness in the floor. -
Page 30: Water Pressure
30 www.aeg.com • Connect the water inlet hose to the cold water tap with 3/4 thread. CAUTION! Make sure that there are no leaks from the couplings. Do not use an extension hose if If you can not connect the water inlet the inlet hose is too short. - Page 31 ENGLISH • On the edge of a sink. • Make sure that the plastic guide can- not move when the appliance drains. Attach the guide to the water tap or the wall. • To a stand pipe with vent-hole. Refer to the illustration. Directly into a drain pipe at a height of not less than 60 cm (23.6”) and not more than 100 cm (39.3”).
-
Page 32: In The Interest Of The Environment
32 www.aeg.com • Directly to a built-in drain pipe in the room wall and tighten it with a clip. You can extend the drain hose to maximum 400 cm. Contact the service centre for the other drain hose and the extension. -
Page 33: Building In
ENGLISH 14. BUILDING IN 14.1 Building in • This appliance has been designed to 600 mm be built into the kitchen furniture. The recess should have the dimensions min. 596 mm 555 mm 560 mm shown in Fig 1. min. 820 mm 818 mm 75 mm... - Page 34 34 www.aeg.com • Hinges To mount the hinges it is necessary to drill two holes (dia. 35 mm, depth 12.5-14 mm depending on the depth of door furniture) on the inner side of the door. The distance between the holes hobs fixing centres must be 416...
-
Page 35: Environment Concerns
ENGLISH If the door has to be opened from left to right, invert the position of the plates E , the magnet D and the plate C. Mount the counter-magnet D and the hinges A as previously described (Fig. 7 ) CAUTION! Do not remove the screw B. - Page 36 www.aeg.com/shop...