Kenwood DNN991HD Quick Start Manual
Connected navigation system
Hide thumbs
Also See for DNN991HD:
- Instruction manual (178 pages) ,
- Quick start manual (261 pages) ,
- Instruction manual (36 pages)
Table of Contents
Advertisement
Available languages
Available languages
Quick Links
You can update the system by connecting a USB device containing an
update file.
For updating the system, visit <http://www2.jvckenwood.com/cs/ce/>.
Puede actualizar el sistema conectando un dispositivo USB que incluya
un archivo de actualización.
Para actualizar el sistema, visite <http://www2.jvckenwood.com/cs/ce/>.
Take the time to read through this instruction manual.
Familiarity with installation and operation procedures will help you obtain the best
performance from your new GPS Navigation System.
For your records
Record the serial number, found on the back of the unit, in the spaces designated on the warranty card,
and in the space provided below. Refer to the model and serial numbers whenever you call upon your
Kenwood dealer for information or service on the product.
Model DNN991HD/ DNN9710BT Serial number
US Residence Only
Register your Kenwood product at www.Kenwoodusa.com
© 2014 JVC KENWOOD Corporation
DNN991HD
DNN9710BT
CONNECTED NAVIGATION SYSTEM
Quick Start Guide
SISTEMA DE NAVEGACIÓN CONECTADO
Guía de inicio rápido
Register Online
LVT2542-001B (KN/RN)
Advertisement
Chapters
Table of Contents

Related Manuals for Kenwood DNN991HD


Summary of Contents for Kenwood DNN991HD
-
Page 1: Quick Start Guide
Record the serial number, found on the back of the unit, in the spaces designated on the warranty card, and in the space provided below. Refer to the model and serial numbers whenever you call upon your Kenwood dealer for information or service on the product. Model DNN991HD/ DNN9710BT Serial number... -
Page 2: Table Of Contents
Precautions ..............3 For functions not described in this Guide, refer to the Instruction Manual on the following website: Safety Precautions and Important http://manual.kenwood.com/edition/im383/ Information .............. 5 Features of Connected systems ......6 First Step ............... 7 Functions of the Buttons on the Front Panel ..........10... -
Page 3: Precautions
Kenwood dealer. Ñ Precautions on using this unit • When you purchase optional accessories, check with your Kenwood dealer to make sure that they work with your model and in your area. • 8-cm (3 inch) discs cannot be used. -
Page 4: Cleaning The Unit
Ñ Acquiring GPS signal Ñ How To Reset Your Unit The first time you turn on this unit, you must wait If the unit or the connected unit fails to operate while the system acquires satellite signals for the properly, reset the unit. first time. -
Page 5: Safety Precautions And Important Information
It does not reflect road follow the instructions in this manual. Neither closures or road conditions, weather conditions, or Kenwood nor Garmin shall be liable for problems other factors that may affect safety or timing while or accidents resulting from failure to observe the driving. -
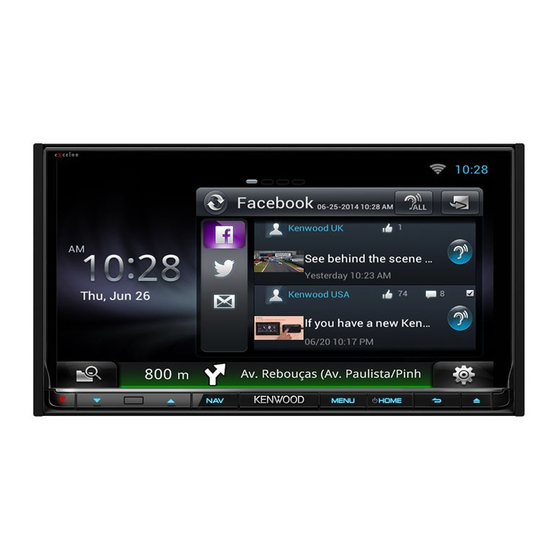
Page 6: Features Of Connected Systems
Facebook and Twitter. • Information (weather*, traffic*, RSS, etc.) service. 4G, 3G, LTE or EDGE Ñ 4G/ 3G Dongle (DNN991HD) • Connect to the Internet directly with 4G/3G Dongle. The Internet device like smartphone is not necessary. Ñ Wi-Fi access point ✎... -
Page 7: First Step
Press the <8HOME> button. the list. 4) Enter the Password. 5) Touch [Connect]. After setting, press the < 6 > button. Mobile Network settings (DNN991HD) Set the direct Internet connection with 4G/3G Dongle. 1) Touch [Mobile Network settings]. 2) Touch [Mobile Network configuration]. -
Page 8: Create User Account
Types of accounts Touch [Next]. Administrator Touch the corresponding key and set the As Administrator, you can create an owner account item. and perform initial setup. You can log in to the system if you have not created an owner account. Guest An account for guests such as your friends. - Page 9 OEM SETUP (North America Sales area only) Insert two “AAA”/“R03”-size batteries with the This function requires a commercial adaptor. poles aligned properly, following the illustration Consult your Kenwood dealer for details. inside the case. DEMO Set the demonstration mode. Default is “ON”.
-
Page 10: Functions Of The Buttons On The Front Panel
• Displays the navigation screen. SD card slot • Pressing for 1 second switches camera view display on/off. • DNN991HD: A slot to insert an SD card. • DNN9710BT: An SD card slot for MENU upgrading the map. For how to upgrade •... -
Page 11: Common Operation
Ñ How to insert an SD card Ñ List screen There are some common function keys in the list 1) Press < > button for 1 second. screens of most sources. The panel fully opens. 2) Hold the SD card as the illustration in the right and insert it into the slot until it clicks. -
Page 12: Login
Login Press the <HOME> button to turn the power on. Select the login user. Enter the password. (Password) Enter the registered password. If you selected Administrator or Guest, this screen is not displayed. [Auto Login?] 1 Service panel Checking this checkbox allows you to log in to the Weather widget: Displays the weather forecast for system automatically from the next time. -
Page 13: How To Use The Navigation System
Adding of a shortcut icon to Source Ñ Source launcher panel launcher panel (Shortcut) 1) Touch [ ] in Source launcher panel. You can register sources you use frequently so that 2) Touching the icon continuously to display you can start them quickly. the Source launcher panel screen. -
Page 14: Taking A Detour
Garmin and 1) While navigating a route, touch [ ] and JVC KENWOOD will not be responsible for any traffic then touch [Where To?]. fines or citations that you may receive for failing to 2) Search for the extra stop. -
Page 15: How To Play Music
Playback starts. update. Updating maps You can purchase updated map data from Garmin or ask your Kenwood dealer or Kenwood service center for details. 1) Go to www.garmin.com/Kenwood. 2) Select [Order Map Updates] for your To disconnect the device: Kenwood unit. - Page 16 • SD card (DNN991HD) E F or move the cursor in the center 1) Press the <G> button for 1 second to open the front panel. Fast forwards or Fast backwards (Disc media, 2) Hold the SD card as the diagram below and CD, USB device, SD card only): insert it into the slot until it clicks.
-
Page 17: How To Play Movie
How to Listen to the Radio/ HD Radio™ tuner/ SiriusXM® You can play DVD video, Video CD (VCD), movie files from disc media, iPod and USB storage device. HD Radio tuner/ SiriusXM only by the DNN991HD. ✎ NOTE Press the <HOME> button twice to the For details on playable file format, device format, etc.,... -
Page 18: How To Make A Phone Call
✎ NOTE Connect your cell-phone to the unit. • For other operations, see Radio, HD Radio™ tuner 1) Touch the device name you want to connect Operation (P.94) and SiriusXM® Satellite in the Bluetooth SETUP screen. Radio Operation (P.102) in the Instruction 2) Touch [ON] of [TEL(HFP)] in the BT Manual. -
Page 19: Installation
Call using the phonebook Installation 1) Touch [ Ñ Before Installation 2) Select the name from the list. 3) Select the number from the list. Before installation of this unit, please note the 4) Touch [ following precautions. Call using the preset number WARNINGS 1) Touch [Preset #] to start calling the •... - Page 20 (3 m) 6 ...6 ~ ...1 M4 x 8mmMAX iDalalink WiFi iPod/ N/OUT Recever AV-IN2 5V=500mA WI-FI receiver POWER HOME (M5x6mm) • Install the WI-FI receiver besides the place enclosed by the metal. 7 ...6 DNN991HD only (M5x7mm) ñ English...
- Page 21 4) Connect the wiring harness wires in the following order; ground, battery, ignition. 5) Connect the wiring harness connector to the General Motors cars (DNN991HD) unit. 6) Install the unit in your car. 1) Cut out accessory 4 to meet the shape of 7) Reconnect the ¤...
- Page 22 Ñ Microphone unit and Push-To-Talk Switch 1) Check the installation position of the microphone (accessory -) and the Push-To-Talk switch (accessory = : DNN991HD only). 2) Clean the installation surface. 3) Install the microphone. 4) Wire the microphone cable up to the unit with it secured at several positions using tape or other desired method.
- Page 23 Ñ Removing the trim plate Ñ Removing the unit 1) Remove the trim plate by referring to step 1 in 1) Engage the catch pins on the extraction key “Removing the trim plate”. (accessory3) and remove the two locks on the lower level.
- Page 24 Ñ Connecting wires to terminals HDMI/MHL M4 x 8mmMAX iDalalink iPod/ AV-IN/OUT AV-IN2 AV-OUT AUDIO POWER Ignition key switch Accessory 1 Red (Ignition wire) Speaker impedance: 4-8 Ω White/Black Yellow (Battery wire) To front left speaker Car fuse box Black (Ground wire) ¤ Car fuse box White (Main fuse)
-
Page 25: System Connection
Ñ System connection Accessory =: Push-To-Talk Switch Accessory 9: Accessory -: (DNN991HD only) GPS Antenna Bluetooth Microphone FM/AM antenna input WI-FI receiver - Reception may drop if there are metal objects near the WiFi Bluetooth antenna and WI-FI Receiver receiver. - Page 26 AV-OUT AUDIO POWER Lightning to USB Cable (Charging) (accessory of the iPod/iPhone) iPod iDatalink connector (sold separately) (DNN991HD only) SiriusXM Connect Vehicle Tuner (sold separately) USB terminal (0.8m) (DNN991HD only) KCA-iP102 (Optional Accessory) D: Music C: Video and Music (analog) AV Output (1.8m)
-
Page 27: Ipod/ Iphone/ Android Setup
Connectable iPod/iPhone The following models can be connected to this USB device 4G/ 3G Dongle unit. (sold separately) (sold separately) (DNN991HD only) Made for Type • iPhone 5 A B E • iPhone 4S C D E • iPhone 4 C D F •... - Page 28 iPod/iPhone connection setup C To listen music and watch video with 30-pin connector device (analog) When you first select iPod as a source, the setting – KCA-iP202 screen of the iPod/iPhone connection will appear. – iPod connection setup: USB + AV-IN (P.28) D To listen music with 30-pin connector device Press the <HOME>...
- Page 29 Select the way to connect the device with this unit. When selecting [iPod/iPhone] If a connectable Bluetooth device is not displayed, touch [Search] and do the pairing of the devices. • “iPod connection setup” also appears when the unit is reset. For the setting items refer to iPod/iPhone •...
-
Page 30: About This Unit
• A Pandora account (if you do not have an account, the Bluetooth SIG, Inc. and any use of such marks by create one for free using the mobile app or on JVC KENWOOD Corporation is under license. Other www.pandora.com). trademarks and trade names are those of their •... - Page 31 • PANDORA, the PANDORA logo, and the Pandora • BlackBerry®, RIM®, Research In Motion® and related trade dress are trademarks or registered trademarks trademarks, names and logos are the property of Pandora Media, Inc., used with permission. of Research In Motion Limited and are registered •...
- Page 32 This KENWOOD Route Network Service “Route issues between Users. Collector” User’s Agreement (“Agreement”) sets forth the terms and conditions for use of the KENWOOD (4) Should any third parties suffer losses or damages Route Network Service “Route Collector” provided by as a result of the User’s use of the Service, we shall...
- Page 33 similar acts by the User are prohibited. Further, should other property rights of the information, text, image, we determine that the User has violated the terms of program, layout, design, architecture, and others this Agreement, we reserve the right to suspend use related to the Service are owned by us, or provided of the Service by the User without prior notice, or take to us under license from the rights holder except for...
-
Page 34: Acerca De La Guía De Inicio Rápido
Precauciones de seguridad e información consulte el Manual de instrucciones en el siguiente importante .............37 sitio web: Características de los sistemas conectados..38 http://manual.kenwood.com/edition/im383/ Primer paso ...............39 Funciones de los botones del panel frontal ..42 Operaciones generales .........43 Inicio de sesión ............44 Funcionamiento de la pantalla de inicio .. -
Page 35: Precauciones
Kenwood. Ñ Precauciones para el uso de esta unidad • Cuando compre accesorios opcionales, pregunte a su distribuidor Kenwood si dichos accesorios son compatibles con su modelo y en su región. • Puede seleccionar el idioma de los menús, las •... - Page 36 Ñ Obtención de la señal GPS Ñ Cómo reiniciar su unidad La primera vez que encienda esta unidad, debe Si la unidad o la unidad conectada no funcionan esperar a que el satélite reciba las señales de correctamente, reiníciela. satélite por primera vez. Este proceso podría durar Pulse el botón <Reset>.
-
Page 37: Precauciones De Seguridad E Información Importante
Kenwood y siga las instrucciones de este manual. Ni Kenwood ni Garmin serán responsables de problemas El sistema de navegación está diseñado para ofrecerle o accidentes producidos por la inobservancia de las sugerencias de ruta. -
Page 38: Características De Los Sistemas Conectados
• Servicio de información (meteorología*, tráfico*, RSS, etc.). 4G, 3G, LTE o EDGE ✎ Notas Ñ Dongle 4G/3G (DNN991HD) Podrá utilizar las siguientes • Conexión a Internet directamente funcionalidades durante 2 años a partir con el dongle 4G/3G. No es necesario de la fecha de registro de la cuenta de un dispositivo con conexión a... -
Page 39: Primer Paso
5) Toque [Connect] (Conectar). Tras el ajuste, pulse el botón < 6 >. Mobile Network settings / Ajustes de redes móviles (DNN991HD) Configure la conexión directa a Internet con el dongle 4G/3G. 1) Pulse [Mobile Network settings] (Ajustes de redes móviles). - Page 40 Tipos de cuentas Configurar cuenta de propietario 1) Toque [Set Owner Account]. Administrator 2) Introduzca la información de la cuenta. Como Administrator, podrá crear una cuenta de Introduzca la información registrada en el sitio propietario y llevar a cabo la configuración inicial. web de Route Collector.
- Page 41 Esta función requiere un adaptador que se encuentre disponible comercialmente. PRECAUCIÓN Consulte a su distribuidor Kenwood para obtener • Coloque el mando a distancia en un lugar en más detalles. el que no se pueda mover en caso de frenado DEMO u otras operaciones.
-
Page 42: Funciones De Los Botones Del Panel Frontal
• Ranura que permite insertar discos. • Al pulsar durante 1 segundo se activa/ Ranura para tarjetas SD desactiva la vista de cámara. • DNN991HD: Ranura que permite insertar MENU tarjetas SD. • Muestra la pantalla de menú opcional. • DNN9710BT: Una ranura para tarjetas SD •... -
Page 43: Operaciones Generales
Ñ Cómo insertar una tarjeta SD (RETURN) 1) Pulse el botón < > durante 1 segundo. Regresa a la pantalla anterior. El panel se abre por completo. 2) Sujete la tarjeta SD como se indica en la Ñ Pantalla de lista ilustración de la derecha e insértela en la Existen teclas de funciones comunes en las unidad hasta que se oiga un clic. -
Page 44: Inicio De Sesión
Inicio de sesión Pulse el botón <HOME> para encender la unidad. Seleccione el usuario para el inicio de sesión. Introduzca la contraseña. (Contraseña) Introduzca la contraseña registrada. Si ha seleccionado Administrator o Guest, no se mostrará esta pantalla. 1 Panel de servicio [Auto Login?] Widget de meteorología: Muestra la previsión Al marcar esta casilla, podrá... -
Page 45: Cómo Usar El Sistema De Navegación
Adición de un icono de acceso directo Ñ Panel de selección de fuentes al panel de selección de fuentes (Acceso directo) 1) Toque [ ] en el panel de selección de Puede registrar las fuentes que utiliza con fuentes. frecuencia para así poder iniciarlas rápidamente. 2) Toque y mantenga pulsado el icono para (Lista de todas las fuentes) visualizar la pantalla del panel de selección... - Page 46 2) Búsqueda de una parada adicional. juicio para mantener una velocidad adecuada en 3) Pulse [Go!]. cada momento. Garmin y JVC KENWOOD no se 4) Pulse [Add to Active Route/ Añadir a ruta responsabilizan de ninguna multa ni denuncia de activa] para añadir esta parada antes de...
-
Page 47: Cómo Reproducir Música
Puede adquirir datos actualizados para los Para desconectar el dispositivo: mapas a través de Garmin o bien pedirlos a su distribuidor Kenwood o consultar al centro de 1) Toque [G] en la pantalla y desconecte el servicio técnico de Kenwood para más detalles. - Page 48 E F o mueva el cursor en la barra central • Tarjeta SD (DNN991HD) Avance o rebobinado rápido (sólo para discos 1) Pulse el botón <G> durante 1 segundo para de datos, CD, dispositivo USB, tarjeta SD): abrir el panel frontal.
-
Page 49: Cómo Reproducir Películas
SiriusXM® dispositivos de almacenamiento USB. ✎ NOTA Sintonizador de HD Radio/SiriusXM únicamente mediante DNN991HD. Para más detalles sobre formatos compatibles, formatos de dispositivos, etc., consulte el manual de Pulse el botón <HOME> dos veces en el instrucciones. panel de selección de fuentes. -
Page 50: Cómo Llamar Por Teléfono
2) Pulse en [AM] o en [FM] para seleccionar la frecuencia. 3) Toque [ 4) Toque [AME]. 5) Pulse [4] o [¢] en el menú de subfunciones. Se inicia la memoria automática. Volver a una emisora prefijada 1) Pulse [P#]. 7) Seleccione su teléfono móvil en la lista También puede ver la lista de emisoras mostrada en la pantalla Searched Device List. -
Page 51: Instalación
Instalación Ñ Antes de la instalación Antes de la instalación de esta unidad, tenga en cuenta las precauciones siguientes. AVISOS • Si conecta el cable de encendido (rojo) y el cable de la batería (amarillo) al chasis del automóvil (tierra), podría producir un cortocircuito y esto, a su vez, un incendio. - Page 52 • Si el panel de mandos tiene una tapa, asegúrese de HDMI/MHL instalar la unidad de tal forma que la placa frontal no M4 x 8mmMAX iDalalink WiFi iPod/ AV-IN/OUT golpee la tapa cuando se abra o se cierre. AV-IN2 Recever 5V=500mA •...
- Page 53 (por ejemplo, el sonido puede 7 ...6 Sólo DNN991HD interrumpirse). Ñ Marco 1) Coloque el accesorio 8 a la unidad. (M5 x 7 mm) Ñ Unidad 1) Para evitar cortocircuitos, retire la llave del encendido y desconecte el terminal ¤ de la batería.
- Page 54 Ñ Unidad de micrófono e interruptor de conversación 1) Compruebe la posición de instalación del micrófono (accesorio -) y del interruptor de conversación (accesorio = : DNN991HD únicamente). 2) Limpie la superficie de instalación. Ñ Antena GPS 3) Instale el micrófono.
- Page 55 Ñ Desmontaje de la unidad ✎ NOTA 1) Retire el marco según las indicaciones del paso • Instale el micrófono lo más lejos posible del teléfono 1 de “Retirar el marco”. móvil. 2) Introduzca las dos llaves de extracción Ñ Retirar el marco (accesorio 3) profundamente en las ranuras de 1) Enganche los pasadores de la llave de cada lado, tal y como se muestra.
- Page 56 Ñ Conectar los cables a los terminales HDMI/MHL M4 x 8mmMAX iDalalink iPod/ AV-IN/OUT AV-IN2 AV-OUT AUDIO POWER Interruptor de la llave de encendido Accesorio 1 Rojo (Cable de encendido) Impedancia del altavoz: 4-8 Ω Blanco/Negro Al altavoz Amarillo (Cable de la batería) delantero Caja de fusibles izquierdo...
- Page 57 Ñ Conexión del sistema Accesorio =: Interruptor de Accesorio 9: Accesorio -: conversación (DNN991HD solo) Antena GPS Micrófono Bluetooth Entrada de antena FM/AM Receptor Wi-Fi - La recepción podría ser baja si existen objetos metálicos WiFi cerca de la antena Bluetooth y Receiver el receptor Wi-Fi.
- Page 58 AV-OUT AUDIO POWER Cable Lightning a USB (carga) (accesorio del iPod/iPhone) iPod Conector iDatalink (se vende por separado) (solo DNN991HD) Sintonizador para vehículos SiriusXM Connect Terminal USB (0,8 m) (se vende por separado) KCA-iP102 (DNN991HD únicamente) (accesorio opcional) D: Música C: Vídeo y música (analógico)
-
Page 59: Configuración De Ipod/Iphone/Android
Dongle 4G/3G Dispositivo USB a causa del calor. (se vede por separado) (se vende por separado) Ñ Conexión y ajuste de iPod/iPhone (DNN991HD únicamente) iPod/iPhone que pueden conectarse Los siguientes modelos pueden conectarse a esta unidad. Fabricados para Tipo • iPhone 5... - Page 60 Configuración de la conexión de iPod/ B Para escuchar música con un dispositivo con conector Lightning iPhone – Cable Lightning a USB (accesorio del iPod/ Al seleccionar iPod como fuente por primera vez, iPhone) se mostrará la pantalla de configuración para la –...
- Page 61 ✎ NOTA Seleccione el dispositivo donde están instaladas las aplicaciones. • Al seleccionar “HDMI + BT” o ”Bluetooth” en el paso 5, se abrirá la pantalla de selección de dispositivos Bluetooth. Seleccione el iPod/iPhone que desee conectar. Seleccione el modo de conexión del dispositivo con esta unidad.
-
Page 62: Acerca De Esta Unidad
Bluetooth SIG, Inc. y cualquier uso de • Una cuenta de Pandora (si no dispone de una, dichas marcas por JVC KENWOOD Corporation está puede crearla gratis utilizando la aplicación para sujeto a los términos de licencia. El resto de marcas móvil o en www.pandora.com). - Page 63 • iPhone, iPod, iPod classic, iPod nano, and iPod touch • BlackBerry®, RIM®, Research In Motion® and related trademarks, names and logos are the property are trademarks of Apple Inc., registered in the U.S. and other countries. of Research In Motion Limited and are registered Lightning is a trademark of Apple Inc.
- Page 64 Usuarios. Network Service “Route Collector” (el “Contrato”) (4) Si un tercero sufre pérdidas o daños como define las condiciones de uso de KENWOOD Route resultado del uso del Servicio por parte del Usuario, Network Service “Route Collector” suministrado no asumimos ningún tipo de responsabilidad por por JVCKENWOOD Corporation (el “Servicio”) a...
- Page 65 o de adoptar cualquier otra medida que pueda el diseño, la arquitectura y los demás derechos ser necesaria. En este caso, no tenemos ninguna relacionados con el Servicio son de nuestra propiedad obligación de revelar nuestros motivos para ello. o se nos han suministrado bajo licencia por el titular de los derechos, con excepción de los derechos (1) Acciones con fines comerciales o ganancias realizados por el Usuario.
- Page 66 • Consult the dealer or an experienced radio/TV are reproductions of labels on, or inside the product technician for help. relating to laser product safety. JVC KENWOOD Corporation • Contains Transmitter Module 2967-3, ISHIKAWA-MACHI, FCC ID : YZP-RBFAC21XX HACHIOJI-SHI, TOKYO, JAPAN •...
-
Page 67: Laser Product
About QAU0568, W02-5613 (USB Wi-Fi® Información acerca de la eliminación de Adapter) (DNN990HD) equipos eléctricos y electrónicos al final de la vida útil (aplicable a los países que hayan About QAU0569 (USB Wi-Fi® Adapter) adoptado sistemas independientes de (DNN9710BT) recogida de residuos) The Wi-Fi Adapter is attached to this unit when shipped from the factory.