Casio QT-6600 User Manual
Touch screen smart terminal
Hide thumbs
Also See for QT-6600:
- Reference manual (240 pages) ,
- Programming manual (216 pages) ,
- Service manual (136 pages)
Table of Contents
Advertisement
Quick Links
Advertisement
Table of Contents

Related Manuals for Casio QT-6600


Summary of Contents for Casio QT-6600
- Page 1 Touch Screen Smart Terminal QT-6600 User’s Manual Introduction Table of Contents Introducing QT-6600 Display/Keyboard Basic Operations & Setups Registrations Programs Advanced Operations Useful Features Reports Troubleshooting Error Code Table Index U.K. Canada...
- Page 2 Use a soft, dry cloth to clean the exterior of the terminal. Never use benzene, thinner, or any other volatile agent. Never try to open the terminal or attempt your own repairs. Take the terminal to your author- ized CASIO dealer for repairs.
- Page 3 Introduction Congratulations on your selection of a CASIO QT-6600 touch screen smart terminal. This terminal is the product of the world's most advanced electronic technology, for outstanding versatility and reliability. Simplified operation is made possible by a specially designed touch screen and a wide selection of automated, programmable functions.
-
Page 4: Safety Precautions
Should you drop the terminal and damage it, immediately shut down the power and unplug the AC plug from the power outlet. Continued use creates the danger of shorting, fire and electric shock. • Attempting to repair the terminal yourself is extremely dangerous. Contact CASIO service representative. - Page 5 Continued use of a damaged power cord can cause deterioration of the insulation, exposure of internal wiring, and shorting, which creates the danger of electric shock and fire. • Contact CASIO service representative whenever the power cord or plug requires repair or maintenance. Caution! Do not place the terminal on an unstable or uneven surface.
-
Page 6: Table Of Contents
Introduction & Contents Introduction & Contents ..................6 Introducing QT-6600 ................... 10 General guide ..........................10 Touch screen panel ......................... 13 Main display part ..........................14 Keyboard part ..........................16 Keyboard part with pop-up window ....................18 List pop-up window ........................18 Check number pop-up window .................... - Page 7 Premium (%+) ..........................55 Coupon transactions ......................56 Coupon registration using <COUPON> (coupon key) ..............56 Coupon registration using <CPN2> (coupon 2 key) ............... 56 Registering the second unit price ..................57 Currency exchange function ....................58 QT-6600 User's Manual...
- Page 8 Introduction & Contents Registering foreign currency ......................58 Full amount tender in a foreign currency ................... 58 Partial tender in a foreign currency .................... 59 Temporarily releasing compulsion ..................60 VAT breakdown printing ......................61 Registering loan amounts ...................... 62 Registering pick up amounts ....................
- Page 9 Troubleshooting ....................82 When an error occurs ......................82 When the terminal does not operate at all ................85 In case of power failure ......................86 Options ..........................86 Specifications ..................... 87 Index ........................88 QT-6600 User's Manual...
-
Page 10: Introducing Qt
This part of the manual introduces you to the terminal and provides a general explanation of its various parts. Touch screen panel Pilot lamp Display on/off key Front view i-Button key receiver (only for QT-6600-DLS) Stand Accessories Dust cover Drawer positioning screws AC adaptor... - Page 11 Tilt the touch screen panel 1. Loosen the panel fixing screws. 2. Tilt the touch screen panel. 3. Tighten the panel fixing screws. (Turn the screw more than one round.) Important! Do not tilt without loosening the screws. QT-6600 User’s Manual...
-
Page 12: Display On/Off Key
Introducing QT-6600 Display on/off key This key is used for turning on/off the terminal display. i-Button key (only for QT-6600-DLS) You can assign the clerk or cashier by attaching an i- Button key to the receiver. Display on/off key Receiver... -
Page 13: Touch Screen Panel
MENU MENU MENU MENU MENU MENU CASH/AMT NEW/OLD • REPORTS /TEND Note: Use only your fingers to perform screen operations. Never use pencil, a mechanical pencil, or any other pointed object. Such objects can damage the screen. QT-6600 User’s Manual... -
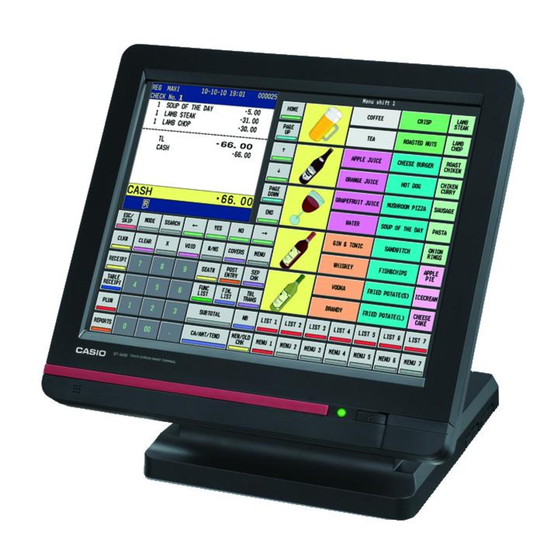
Page 14: Main Display Part
Introducing QT-6600 Main display part Mode Clerk Date Time Consecutive number 31-10-08 12:34 PM 001234 ¨ Spagetti •20.00 T1 Spagetti •20.00 T1 7.5% -1.50 T1 Coffee •8.00 Hamburger •2.00 T1 Scroll area -0.30 T1 Milk •2.00 Apple Juice •5.00 ´... -
Page 15: Table Number
6 Table number 3 Tax status When you enter a table number, it appears here. When you register a taxable item, the corresponding tax status appears here by programming. QT-6600 User’s Manual... -
Page 16: Keyboard Part
Introducing QT-6600 Keyboard part 31-10-08 12:34 PM 001234 HOME PLU010 PLU020 PLU030 PLU040 PLU050 PLU060 PLU070 PAGE PLU009 PLU019 PLU029 PLU039 PLU049 PLU059 PLU069 PLU008 PLU018 PLU028 PLU038 PLU048 PLU058 PLU068 PLU007 PLU017 PLU027 PLU037 PLU047 PLU057 PLU067 PAGE PLU006 PLU016 PLU026 PLU036 PLU046 PLU056 PLU066 DOWN •0.00... -
Page 17: Function List Key
If this key is registered, a pop-up window for separating a check is opened. T Table transfer key Use this key to transfer the contents of a check to another check. QT-6600 User’s Manual... -
Page 18: Keyboard Part With Pop-Up Window
Introducing QT-6600 Keyboard part with pop-up window List pop-up window Keys of the list 31-10-08 12:34 PM 001234 How to Cook 0/1-1 HOME PLU010 PLU020 PLU030 PLU040 PLU050 PLU060 PLU070 PAGE Rare PLU009 PLU019 PLU029 PLU039 PLU049 PLU059 PLU069 PLU008 PLU018 PLU028 PLU038 PLU048 PLU058 PLU068... -
Page 19: Allocatable Functions
Consult your CASIO dealer for detail information. Use this key for conversions of a home currency subtotal or merchandise subtotal to equivalent of another coun- Add check try's currency. -
Page 20: Order Character Change
Introducing QT-6600 Loan Order character change Use this key to input the amount of money provided Use this key to change the order character. The order making change. characters not only of the item but in the order character table can be printed. -
Page 21: Keys In Check No. Pop-Up Window
Use this key to input tare weight. Tax exempt Use this key to change taxable amounts to nontaxable amounts. Tax shift Use this key to activate the tax table which is specified by the same tax status programmed for this key. QT-6600 User’s Manual... -
Page 22: Basic Operations And Setups
Basic Operations and Setups How to use the terminal The following describes the general procedure you should use in order to get the most out of the terminal. BEFORE business hours… • Check to make sure that the terminal is plugged in securely. •... -
Page 23: Clerk Sign On/Off And Mode Change
• The current clerk is also signed off whenever you turn off the terminal or finalize a transaction. Important! • A clerk cannot sign on unless other clerk is signed off. • The signed on clerk is identified on the receipt/journal. QT-6600 User’s Manual... -
Page 24: Mode Change
Basic Operations and Setups Mode change Even the mode switch is not allocated on the terminal, you can change the mode of the terminal by pressing the ° key. Mode pop-up window ° When you press the key, the mode pop-up window is appeared. In the mode pop-up window, only the allowable mode icons of the signed on clerk is appeared. -
Page 25: Displaying The Time And Date
P1C01 000123 Press <MODE> key and press <PGM1> icon. PGM 1 081031| 1.Unit price/Qty Enter the current date in 6 digits (year, month, day order) and press the | key. 31-10-08 10:50 40 Clear the date/time display. QT-6600 User’s Manual... -
Page 26: Preparing And Using Flat-Plu Keys
Basic Operations and Setups Preparing and using flat-PLU keys Registering flat-PLU keys The following examples show how you can use the flat-PLU keys in various types of registrations. Mode Single item sale Example 1 PRINTOUT OPERATION (by optional remote printer) —... -
Page 27: Programming To Flat-Plu
Step 5. Repeat the step 4., if you program the next record. Press and repeat the step 3. and 4., if you program to the other record. Step 6. Press repeatedly to return to the “Step 1. screen”. QT-6600 User’s Manual... -
Page 28: Registering Flat-Plu Keys By Programming Data
Basic Operations and Setups Registering flat-PLU keys by programming data Mode Preset price PRINTOUT OPERATION (by optional remote printer) MC #01 Unit price ($1.00) preset REG C01 31-10-2008 09:30 AM 000007 –––––––––––––––––– Item Quantity 1 PLU002 •1.00 –––––––––––––––––– •1.00 Flat-PLU CASH •1.00 ––––––––––––––––––––––––––... -
Page 29: Preparing And Using Discounts/Reductions
Step 3. Discount rate: Select the %- record, enter discount rate and press the appropriate key. Reduction amount: Select the - record, enter reduction amount and press the appropriate key. Unit Price/Qty 12.34% 12.34% Step 3. screen Step 5. Press repeatedly to return to the “Step 1. screen”. QT-6600 User’s Manual... -
Page 30: Registering Discounts
Basic Operations and Setups Registering discounts The following example shows how you can use the key in various types of registration. Mode Discount for items and subtotals PRINTOUT OPERATION (by optional remote printer) Unit price $5.00 MC #01 REG C01 31-10-2008 10:15 AM 000016 ––––––––––––––––––... -
Page 31: Registering Reductions
CASH •7.00 preset –––––––––––––––––––––––––– •0.43 Subtotal Amount $0.75 –––––––––––––––––– Reduction Taxable (No) preset –––––––––––––––––––––––––– Payment Cash $7.00 NOTE • First of all, it is necessary to allocate key on the keyboard or in the function key list. QT-6600 User’s Manual... -
Page 32: Registering Returned Goods In The Reg Mode
Basic Operations and Setups Registering returned goods in the REG mode The following example shows how to use the R key in the REG mode to register goods returned by customers. Mode PRINTOUT OPERATION (by optional remote printer) 235( Unit price $2.35 MC #01 Item 1 ––––––––––––––––––... -
Page 33: Registering Returned Goods In The Ref Mode
•3.85 IItem 2 Quantity •0.15 –––––––––––––––––––––––––– •1.14 Discount Rate (5%) •0.06 preset –––––––––––––––––––––––––– •5.20 Payment Cash $5.20 CASH •5.20 Important! • To avoid miss registrations in the REF mode, return the mode to the former position immediately. QT-6600 User’s Manual... -
Page 34: Registering Money Received On Account
Basic Operations and Setups Registering money received on account The following example shows how to register money received on account. This registration must be performed out of a sale. Mode PRINTOUT OPERATION (by optional remote printer) ´7--r MC #01 Received amount $700.00 REG C01 31-10-2008 11:15 AM 000028... -
Page 35: Making Corrections In A Registration
— Correction of unit price REG C01 31-10-2008 11:40 AM 000033 — 1 PLU001 •1.00 11 PLU002 •22.00 — •23.00 CASH •15.00 — Correction of quantity CREDIT •8.00 — — — Correction of partial tender amount 15-F — Å QT-6600 User’s Manual... -
Page 36: To Correct An Item You Input And Registered
Basic Operations and Setups To correct an item you input and registered PRINTOUT OPERATION (by optional remote printer) MC #01 REG C01 31-10-2008 11:45 AM 000034 1 PLU001 •1.00 — 1 PLU002 •2.00 — 1 PLU002 •2.00 — — * —... -
Page 37: To Correct The Item You Registered Previously In This Receipt
No sale registration You can use the following procedure to open the drawer without registering a sale. This operation must be performed out of a sale. Mode PRINTOUT OPERATION (by optional remote printer) No receipt is issued. QT-6600 User’s Manual... -
Page 38: Printing The Daily Sales Reset Report
Basic Operations and Setups Printing the daily sales reset report This report shows daily sales totals. Procedure ° Step 1. Press and <X/Z > icon to turn “X/Z Report”. Step 2. Select “4.Daily Z” and press 31-10-08 05:15 PM 000123 31-10-08 05:15 PM 00123 X/Z Report X/Z Report... -
Page 39: Printout (By Optional Remote Printer)
— Cash in drawer CAID •1,057.14 — Credit in drawer CRID •0.19 — Check in drawer CKID •9.02 — Clerk name/ drawer No. ••••••••••••1 Zero totalled departments/functions/clerks are not printed by programming. These items can be skipped by programming. QT-6600 User’s Manual... -
Page 40: Advanced Operations
Advanced Operations This chapter describes more sophisticated operations that you can use to suit the needs of your retail environment. Post-finalization receipt The post-finalization receipt lets you issue a receipt after finalization of the transaction. Note that all of the following conditions must be satisfied. •... -
Page 41: Inputting The Number Of Customers
(by optional remote printer) MC #01 REG C01 31-10-2008 01:20 PM 001055 15-( 1 PLU001 •15.00 1 PLU002 •5.00 •20.00 CASH •20.00 •0.00 20-F NOTE • After initialization, the terminal does not print the number of customer on receipts. QT-6600 User’s Manual... -
Page 42: Clerk Interrupt Function
Advanced Operations Clerk interrupt function There are two types of clerk interrupt function, illustrated by Procedure 1 and Procedure 2 below. • In Procedure 1, each clerk possesses a unique clerk interrupt buffer, and so the clerk interrupt function gives each individual clerk the ability to perform an independent registration operation. -
Page 43: Printing Slip
Finalizing a registration without inserting a slip paper into the slip printer when the terminal is programmed as “Slip Automatic Batch Print Compulsory” produces an error. To perform auto batch printing 1 Finalization Registration Print receipt/journal. Print receipt/journal. Insert a slip paper Print slip. Remove slip paper. into the slip printer. QT-6600 User’s Manual... -
Page 44: To Perform Auto Batch Printing 2
Advanced Operations To perform auto batch printing 2 SLIP Registration/ PRINT finalization Print receipt/journal. Print slip. Insert a slip paper Remove slip paper. into the slip printer. About the maximum number of slip lines You can program the maximum number of lines that can be printed on a slip. Once you do, any attempt to exceed the preset maximum results in an error. -
Page 45: Opening A Check
Table number input after inputting the check number may be performed, however, without generating an error. • Once a check is opened under a number in REG mode, the same mode must be used to make additions to the check. QT-6600 User’s Manual... -
Page 46: Issuing A Guest Receipt
Advanced Operations Issuing a guest receipt The following operation can be used to print out the balance of a temporarily finalized check. Example PRINTOUT OPERATION (by optional remote printer) 1234; MC #01 REG C01 31-10-2008 01:30 PM 001056 Input the number of check you CHECK No1234 #000033 want. -
Page 47: New/Old Check Key Operation
<NEW/OLD> key. In this operation, the <NEW/OLD> key is treated as <NEW> key. PRINTOUT OPERATION (by optional remote printer) 3333Z MC #01 REG C01 31-10-2008 01:56 PM 001061 Input a check number and press CHECK No.3333 <NEW/OLD>. 10-( 1 PLU001 •10.00 1 PLU002 •20.00 •0.50 20-) SRVC TL •30.50 QT-6600 User’s Manual... -
Page 48: Add Check
Advanced Operations Add check This operation lets you combine the amounts of more than one check into a single check. Example Registration for check number 1234 PRINTOUT OPERATION (by optional remote printer) Original check 1234Z MC #01 REG C01 31-10-2008 02:00 PM 001062 Check# 1234 TABLE... -
Page 49: Separate Check
Press <OK>. PLU002 •20.00 40-F PLU003 PLU003 •30.00 •30.00 PLU004 •40.00 •90.00 •40.00 PRINTOUT (by optional remote printer) MC #01 REG C01 31-10-2008 02:15 PM 001065 CHECK No.3456 1 PLU001 •10.00 1 PLU003 •30.00 •40.00 CASH •40.00 •0.00 QT-6600 User’s Manual... -
Page 50: Clerk Transfer
Advanced Operations Clerk transfer This operation lets you change the clerk who is in charge of a specific open check number. Example To change the clerk for check number 1234 from clerk 1 to clerk 4. PRINTOUT OPERATION (by optional remote printer) MC #01 REG C01 31-10-2008 02:20 PM 001067... -
Page 51: Condiment/Preparation Plus
1 PLU001 •46.00 10-) MEDIUM SIZE Flat 2 $10.00 1 PLU002 •10.00 Item 2 –––––––––––––––––– SMALL SIZE TEXT Quantity RECALL •56.00 –––––––––––––––––––––––––– CASH •56.00 Payment Cash $56.00 –––––––––––––––––––––––––– Text 1 MEDIUM SIZE –––––––––––––––––––––––––– Text 2 SMALL SIZE QT-6600 User’s Manual... -
Page 52: Deposit Registrations
Advanced Operations Deposit registrations Use the following procedures to register deposits. Deposit from customer PRINTOUT OPERATION (by optional remote printer) 50-B DEPOSIT Deposit Cash $50.00 MC #01 – REG C01 31-10-2008 03:05 PM 001083 DEPO- •50.00 •50.00 CASH •50.00 Deposit from customer during sales transaction PRINTOUT OPERATION (by optional remote printer) -
Page 53: Set Menu
REG C01 31-10-2008 03:30 PM 001088 Item 1 –––––––––––––––––– Quantity 1 PLU001 •3.00 –––––––––––––––––––––––––– 1 PLU002 •5.00 Flat 2 $5.00 •0.80 Item 2 –––––––––––––––––– •8.80 Quantity CASH •10.00 –––––––––––––––––––––––––– •1.20 10-F Amount $0.80 –––––––––––––––––––––––––– Payment Cash $10.00 QT-6600 User’s Manual... -
Page 54: Single Item Cash Sales
Advanced Operations Single item cash sales A department key, subdepartment or PLU programmed with single item sale status finalizes the transaction as soon as it is registered. The single item sales function cannot work properly if the keyboard does not include <CASH> (the cash key). The single item sales function can only be used for cash sales. -
Page 55: Addition (Plus)
31-10-2008 03:50 PM 001101 Item 1 Quantity –––––––––––––––––– 1 PLU001 •1.00 Premium •0.10 –––––––––––––––––––––––––– 3 PLU001 •6.00 Flat 1 $2.00 •7.10 Item 2 –––––––––––––––––– Quantity •1.07 –––––––––––––––––––––––––– •8.17 Subtotal Premium (15%) CASH •8.17 –––––––––––––––––––––––––– Payment Cash $8.17 QT-6600 User’s Manual... -
Page 56: Coupon Transactions
Advanced Operations Coupon transactions Note that error occurs when the result of the coupon (not coupon 2) registration is negative, if the terminal is programmed to prohibit credit balances. Coupon registration using <COUPON> (coupon key) Example PRINTOUT OPERATION (by optional remote printer) Flat 1 $3.00 MC #01... -
Page 57: Registering The Second Unit Price
PRINTOUT OPERATION (by optional remote printer) Flat 2 ($10.00) MC #01 2nd@ –––––––––––––––––– REG C01 31-10-2008 04:15 PM 001113 Item Quantity 2nd@ 5 PLU002 •50.00 –––––––––––––––––– 50-F •50.00 2nd Q’ty CASH •50.00 –––––––––––––––––––––––––– •0.00 Payment Cash $50.00 QT-6600 User’s Manual... -
Page 58: Currency Exchange Function
Advanced Operations Currency exchange function When <CE> (currency exchange key) and <ST> are pressed, a current subtotal including tax is converted into foreign currency and the result is displayed. Before using the currency exchange function, it is necessary to program the conversion rate and foreign currency amount symbol. -
Page 59: Partial Tender In A Foreign Currency
CASH •19.05 The terminal automatically de- CHECK •10.95 ducts the dollar equivalent of the yen amount tendered from the to- tal amount due and shows the rest amount on the display. 5 Press to finalize the transaction. QT-6600 User’s Manual... -
Page 60: Temporarily Releasing Compulsion
Advanced Operations Temporarily releasing compulsion <OPEN> (open key) can release HDL (High Digit Limitation)/LDL (Low Digit Limitation) and can be programmed to release HAL (High Amount Limit). <OPEN 2> (open 2 key) can be programmed to release specific compulsion. Example 1 PRINTOUT OPERATION (by optional remote printer) -
Page 61: Vat Breakdown Printing
REG C01 31-10-2008 05:20 PM 001161 Item 1 –––––––––––––––––– 200) Taxable 1 PLU001 •1.00 T1 –––––––––––––––––––––––––– 1 PLU002 •2.00 T2 Flat 2 $2.00 •0.90 Item 2 –––––––––––––––––– •0.10 Taxable •1.90 –––––––––––––––––––––––––– •0.10 Payment Cash $3.00 •3.00 CASH •3.00 QT-6600 User’s Manual... -
Page 62: Registering Loan Amounts
Advanced Operations Registering loan amounts Use this procedure to register loan or bank received from the office. PRINTOUT OPERATION (by optional remote printer) Note $1.00 MC #01 –––––––––––––––––– REG C01 31-10-2008 05:30 PM 001180 Quantity LOAN •10.00 Item –––––––––––––––––– LOAN •25.00 Note $5.00... -
Page 63: Stock Check
With this operation, you can recall the actual stock quantity for PLUs, departments, scanning PLUs and show it on the display of the terminal. Example To inquire the actual stock quantity of flat-PLU 001. OPERATION DISPLAY REG C01 31-10-08 03:30 PM 001580 STOCK PLU001 10.05 — Actual stock quantity QT-6600 User’s Manual... -
Page 64: Scanning Plu
Advanced Operations Scanning PLU Product barcodes are read by scanning with hand-held scanner, and are filed in the scanning PLU file. The unit price, item descriptor, programming status, link department, totalizer and counter, the terminal are filed in the scanning PLU file. When a barcode is entered by scanning, or from the keyboard by using <OBR>... -
Page 65: Price Change Registration
31-10-2008 05:48 PM 001184 Not found –––––––––––––––––– (E028 ocuurs) PLU code 49123456 1 DEPT01 •2.50 item –––––––––––––––––– •2.50 Link dept. CASH •10.00 –––––––––––––––––––––––––– •7.050 (Not found PLU key) Payment Cash $10.00 (Item price) (Link department key) 10-F QT-6600 User’s Manual... -
Page 66: Unit Price Inquiry
Advanced Operations Unit price inquiry Use this operation to recall the unit prices of departments, subdepartments, PLUs, second unit price of PLUs, shift PLUs, or scanning PLUs. The unit prices appear on the display of the terminal when recalled. Example To check the unit price of flat-PLU 001. -
Page 67: Programming Descriptors And Messages
Step 5. Repeat the step 4., if you program the next record. Press and repeat the step 3. and 4., if you program to the other record. Step 6. Press repeatedly to return to the “Step 1. screen”. QT-6600 User’s Manual... -
Page 68: Programming Function Key Character Procedure
Advanced Operations Programming function key character procedure ° Step 1. Press and <PGM2> icon to turn “PGM-2”, select “1.Item Descriptor” and press Step 2. Select “7.Char & Press key” and press P2 C01 31-10-08 06:34 PM 000123 Item Descriptor Item Descriptor 1.PLU PGM-2 2.PLU 2nd@... -
Page 69: Programming Receipt/Slip Message Procedure
Guest bottom message 95 ~ 96 E-journal copy receipt message Even records are not used. Step 4. Repeat the step 3., if you have other records to program. Step 5. Press repeatedly to return to the “Step 1. screen”. QT-6600 User’s Manual... -
Page 70: Entering Characters
Advanced Operations Entering characters In this section, the method to enter descriptors or messages (characters) to the terminal during programming is described. Characters are specified by character keyboard. Entering characters Item Descriptor SHIFT1-case HOME PAGE PAGE DOWN π ESC/SKIP Item Descriptor HOME PAGE ENTER... - Page 71 This key is also used for editing the programmed characters. 0 Backspace key Press this key to move the character placed behind. A ESC/SKIP key Press this key to terminate the character programming. QT-6600 User’s Manual...
-
Page 72: Editing Characters
Advanced Operations Editing characters Correcting a character just entered OPERATION DISPLAY 1 Enter LENON, instead of LEMON. “L” “E” “N” “O” “N” LENON 1 Press left arrow key three times. LENON 1 Enter “M”. LEMON “M” Correcting and adding/deleting an item descriptor already set OPERATION DISPLAY Designate the item. -
Page 73: Printing Read/Reset Reports
Batch 1 ~ 10 Cashier/ Clerk Individual All clerk Open Check E-Journal Customer account Customer Customer group Scanning System Others Indificual key -------------------- (Daily X/Z only) Fixed totalizer Periodic 1/2 Z ----------------------------------------------------------------- Same as Periodic 1/2 X Time and Attendance QT-6600 User’s Manual... -
Page 74: To Print The Individual Key (Department, Subdepartment, Plu/Flat-Plu, Function) Read Report
Advanced Operations To print the individual key (department, subdepartment, PLU/flat-PLU, function) read report This report shows sales for specific keys. Procedure ° Step 1. Press and <X/Z> icon to turn “X/Z Report”. Step 2. Select “1.Daily X” and press 31-10-08 05:50 PM 000123 31-10-04 05:50 PM 000123 X/Z Report X/Z Report... -
Page 75: Financial Read Report (By Optional Remote Printer)
•1,845.35 /Reset counter CAID •1,057.14 — Function key count/amount CASH •1,638.04 CRID •0.19 * Mode: CHECK •1,174.85 CKID •9.02 XX1 = Periodic(1) X •810.00 ZZ1 = Periodic(1) Z •520.00 XX2 = Periodic(2) X ZZ2 = Periodic(2) Z QT-6600 User’s Manual... -
Page 76: Plu Read/Reset Report (By Optional Remote Printer)
Advanced Operations PLU read/reset report (by optional remote printer) This report shows sales for PLUs. — Read symbol/Report code/Report title 0000014 PLU — PLU name/No. of items/PLU amount PLU0001 •17.00 — Discount amount DISCOUNT •2.50 — House Bon quantity HOUSE BON QTY —... -
Page 77: Clerk Key
Tax table Void table FTP Login Password FTP Server Name FTP Trans File PC Keyboard Clerk Clerk feature Clerk detail Clerk key ID Clerk window Key feature PLU 2nd @ Subdepartment Department Addifional PLU Character Keyboard Memory allocation QT-6600 User’s Manual... -
Page 78: Procedure
Advanced Operations Procedure ° Step 1. Press and <PGM-6> icon to turn Program 6 mode and press Step 2. Select an appropriate job and press P6 C01 31-10-08 05:55 PM 000123 PGM Read Report PGM Read Report 1.Unit Price/Qty 2.Item Descriptor PGM-6 3.Char &... -
Page 79: Item Descriptor
0001-003 — Subdepartment descriptor/Record No./File No. SUBDEPT02 0002-003 SUBDEPT03 0003-003 Department descriptor DEPT01 0001-005 — Department descriptor/Record No./File No. DEPT02 0002-005 DEPT03 0003-005 Function key descriptor 0001-002 — Function key descriptor/Record No./File No. NEW/OLD 0002-002 0003-002 DISP ON/OFF 0004-002 CLK#1 0005-002 QT-6600 User’s Manual... -
Page 80: Character And Message
Advanced Operations Character and Message Receipt/Slip message 0001-032 — Record No./File No. YOUR RECEIPT — Receipt message 0002-032 0003-032 Clerk Clerk feature 001-007 — Clerk name/Record No./File No. 0001 — Clerk secret code 00 — Drawer No. 000111 — 01-067 0000040000 02-067 00000000000000... - Page 81 @0.00 16-066 — Other program 17-066 20-066 00000000 21-066 000000000000 22-066 00 — DEPT02 0002-005 Function key feature 00000000000000000000 — Record No./Key descriptor/Parameter 0001 CASH 0002 CHARGE 00000000000000000000 0003 CREDIT 00000000000000000000 0004 %+ 00000000000000000000 0005 CLEAR 00000000000000000000 QT-6600 User’s Manual...
-
Page 82: Troubleshooting
Troubleshooting This section describes what to do when you have problems with operation. When an error occurs Errors are indicated by an error codes. When this happens, you can usually find out what the problem is as illustrated below. Press C and check the appropriate section of this manual for the operation you want to perform. Prompt message Meaning Action... - Page 83 Follow the prompt message. During media change Press Cancel Key. Follow the prompt message. E134 Middle of Clerk Transfer During clerk transfer Press ESC Key. Follow the prompt message. E136 Middle of Separate Check During separate check Press ESC key. QT-6600 User's Manual...
- Page 84 Troubleshooting Prompt message Meaning Action E139 Not allowed to be negative Credit balance error Enter proper minus/coupon amount. by Minus/Coupon key. E140 Wrong menu. This sheet holder is prohibited by program. Set correct sheet holder. E141 Press <TRAY TTL> twice before <TRAY TOTAL>...
-
Page 85: When The Terminal Does Not Operate At All
Perform the following check whenever the terminal enter an error condition as soon as you switch it on. The results of this check are required by service personnel, so be sure to perform this check before you contact a CASIO representative for servicing. Start Plug in the power cord. -
Page 86: In Case Of Power Failure
• Have the battery replaced by your dealer within the period noted on this label. Options Remote customer display: QT-6060D Cash drawer: Slip printer: SP-1300 MCR: QT-6046MCR Cable: PRT-CB-8C Interlink cable: PRL-CB-2 Remote printer: UP-400, UP-360 Cable: PRL-CB-2 (UP-400), PRT-CB-8A or PRT-CB-8B(UP-360) Consult with your CASIO dealer for details. -
Page 87: Specifications
✔ ✔ ✔ ✔ ✔ Monthly sales ✔ Transaction Variable with program ✔ (16 digits) Non resettable grand total ✔ (4 digits) Reset counter ✔ Consecutive No. * Specifications and design are subject to change without notice. QT-6600 User's Manual... -
Page 88: Index
Index customer ID number 19 AC adaptor 10 accessories 10 daily sales report 38, 75 add check 19, 48 date/time key 16 add-on new number type 18 declaration 19 adding to check 45 department 19 alphabet key 70 department descriptor 79 arrangement 19 department number 19 arrow key 16... - Page 89 20 scale 20 open 2 20, 60 scanning PLU 64 open check 20, 45 seat number 17 operator number 20, 50 second unit price 20, 57 operator X/Z 20 selective item subtotal key 21 option 86 QT-6600 User's Manual...
- Page 90 Index separate check 20, 49 view 21 separate check key 17 void key 16 set menu 53 shift key 70 shift PLU 21 worktime 21 show table layout type 18 single item 54 single item sale 26 X/Z menu window 74 slip 43 slip back feed/release key 21, 43 slip feed/release 21, 43...
- Page 91 QT-6600 User's Manual...
- Page 92 QT-6600*E CASIO COMPUTER CO., LTD. MA0808-A Printed in Indonesia 6-2, Hon-machi 1-chome Shibuya-ku, Tokyo 151-8543, Japan Printed on recycled paper...