
Related Manuals for Casio V-T500 Series


Summary of Contents for Casio V-T500 Series
- Page 1 Tablet Series User’s Guide Be sure to read “Safety Precautions” inside this guide before trying to use your tablet.
- Page 2 Google, Inc. The Bluetooth wordmark and logo are registered trademarks of Bluetooth SIG, Inc. and are used by permission granted to Casio Computer as a certifi ed logo user. SD, SDHC, microSD and microSDHC are trademarks of SD-3C, LLC.
-
Page 3: Table Of Contents
Contents Chapter 1 Essential Reading ..........E-5 Safety Precautions ..................E-6 Operating Precautions .................E-13 Important ......................E-16 After Service ...................... E-16 Regulatory Information ................E-16 Chapter 2 Basic Operation ........... E-17 Tablet System Confi guration ...............E-18 General Guide ....................E-20 Loading and Removing the Battery Pack ...........E-22 Loading ...................... - Page 4 Handling SD Memory Cards ................E-44 Installing......................E-44 Removing ......................E-44 Handling the NFC Reader/Writer ..............E-45 Contactless IC Cards ..................E-45 RFID Tags ......................E-45 HDMI Connection ..................E-47 Resetting the Tablet ..................E-48 Chapter 3 Built-in Software ..........E-49 Standard Accessories ..................E-50 Software List ......................
- Page 5 Operation Support Tools ................E-80 Software List ...................... E-80 Job Menu ......................E-81 Login Authentication Setting Tool ..............E-83 Account Edit Tool ....................E-84 Security Settings ....................E-85 Theft Protection....................E-86 System Operation Tools ................E-88 Software List ...................... E-88 File Manager ...................... E-89 WLAN Tool .......................
- Page 6 Using the Dual Battery Charger (HA-M32DCHG) ........E-117 General Guide ....................E-117 Charging a Battery Pack................... E-119 Connecting Multiple Dual Battery Chargers............ E-120 Using the AC Adaptor (AD-S36120A-N) ............E-122 Chapter 5 Specifi cations ............ E-123 V-T500 Tablet Specifi cations ..............E-124 Optional (Separately Sold) Accessory Specifi cations ......E-130 Ethernet Cradle (HA-M62IO) ................
-
Page 7: Chapter 1 Essential Reading
Chapter 1 Essential Reading... -
Page 8: Safety Precautions
Safety Precautions Congratulations upon your selection of this CASIO product. Be sure to read the following Safety Precautions before trying to use it for the fi rst time. Your neglect or avoidance of the warning and caution statements in the subsequent pages causes the danger of fi... - Page 9 Warning Dust and Moisture • Though the tablet is dust and water splash resistant, its options including the battery pack are not. Keep loose metal objects and containers fi lled with liquid away from your tablet and the options. Also, never handle the tablet and the options while your hands are wet.
-
Page 10: Lcd Screen
Caution Location • Install the cradle properly on a fl at and stable surface so that it cannot fall down onto fl oor. LCD Screen • Never apply strong pressure to the screen or subject it to strong impact. Doing so can crack the LCD Screen. Warning Avoiding Traffi... - Page 11 Immediately rinse it off with clean tap water and then consult a physician. Caution • Replace only with the same type of battery pack recommended by CASIO. Dispose of used battery packs according to the local regulation. • Keep the battery pack out of the reach of small children.
- Page 12 Caution • Note that CASIO Computer Co., Ltd. shall not be held liable to you or any third party for any damages or loss caused by deletion or corruption of data due to use of the tablet, malfunction or repair of the tablet or its peripherals, or due to the batteries going dead.
- Page 13 Alkaline Battery Handling Precautions (for the Digitizer Pen) Danger • Since there is the risk of blindness and other serious disorders when alkaline battery fl uid enters the eyes, seek medical treatment immediately after adequately fl ushing the eyes with a large amount of tap water or other clean water without rubbing.
- Page 14 Caution • Promptly remove worn out batteries from the device. Allowing worn out batteries to remain installed in the device for a long period of time results in the risk of the generation of gas from the batteries causing the batteries to leak fl...
-
Page 15: Operating Precautions
Operating Precautions Your tablet and its options are precision. Improper operation or rough handling can cause problems with data storage and other problems. Note and observe the following precautions to ensure proper operation. • Do not leave dead battery pack in the tablet for a long period. Dead battery pack can leak, leading to malfunction and damage to the tablet. - Page 16 • Take care not to trap objects such as magnetic cards, magnetic recording media or precision equipment between the V-T500 and the Ethernet Cradle, and do not bring such objects too close to the tablet and cradle. Bringing magnetic cards or other magnetic recording media too close could result in important data being erased due to the effects of magnetism.
- Page 17 Adobe Reader This tablet comes pre-loaded with Adobe Reader from Adobe Systems Incorporated. CASIO has verifi ed the operation of Adobe Reader on this tablet, but does not guarantee all operations of Adobe Reader for the customer. Refer to http://www.adobe.com/support/reader/ for information on using Adobe Reader and problems with that product.
-
Page 18: Important
CASIO COMPUTER CO., LTD. 6-2, Hon-machi 1-chome, Shibuya-ku, Tokyo 151-8543, Japan Representative within the European Union: CASIO EUROPE GmbH Casio-Platz 1, 22848 Norderstedt, Germany The modifi cation of the software for controlling RF radiation of WLAN, Bluetooth and NFC/ RF-ID is prohibited. E-16... -
Page 19: Chapter 2 Basic Operation
Chapter 2 Basic Operation E-17... -
Page 20: Tablet System Confi Guration
Tablet System Confi guration Bundled Items Please check the items in the box before using the tablet for the fi rst time. V-T500 Series V-T500 Series Tablet AC Adaptor Battery Pack AD-S36120A HA-M20BAT Power Cord User's Guide (this manual) AC-CORD-EU... - Page 21 Options Battery Pack Dual Battery Charger HA-M20BAT HA-M32DCHG AC Adaptor for V-T500/ AC Adaptor for Ethernet Cradle/ Dual Battery Charger Cradle-type Battery Charger AD-S90190C-N5 AD-S36120A-N Power Cord for Europe AC-CORD-EU/AC-CORD2-EU Power Cord for North America AC-CORD-US/AC-CORD2-US Power Cord for Taiwan AC-CORD-TW/AC-CORD2-TW Power Cord for Korea AC-CORD-KR/AC-CORD2-KR...
-
Page 22: General Guide
General Guide Left Front Right Bottom Back E-20... - Page 23 Power Button (→ E-27) 18 Communication/Power Supply Terminal Volume Button 19 Mount for Hand Belt (→ E-105) or Strap (→ E-106) mini HDMI Port (→ E-47) 20 Reset Switch (→ E-48) SD Card Slot (→ E-44) 21 Rear Camera Charge LED (→ E-25, 113, 116, 122) 22 Mounting Holes for Screen Cover (→...
-
Page 24: Loading And Removing The Battery Pack
Loading and Removing the Battery Pack Your tablet uses two types of battery: a battery pack and a memory backup battery. The battery pack is used to power normal operations and to store data, while the memory backup battery provides the power required to maintain memory contents when the battery pack power is unable to supply power for some reason. -
Page 25: Loading
Loading 1. Turn the tablet upside down. If the hand belt is fi tted to the tablet, unclip it (see E-105). 2. Slide the left and right lock switches for the battery pack cover to the “FREE” position, and then remove the battery pack cover. 3. -
Page 26: Removing
Removing 1. Make sure that the power on the tablet has been switched off. If the power is still on, hold down the power button to switch off (see E-27). 2. Turn the tablet upside down. If the hand belt is fi tted to the tablet, unclip it (see E-105). 3. -
Page 27: Charging The Battery Pack
LED is still red or off, there is a fault. Immediately stop using the product and contact the dealer or distributor where you purchased the product, or an authorized CASIO service provider. * If the remaining battery change is 5% or less when the AC adaptor is connected correctly, the charge LED turns off for approximately 0.5 seconds and then lights red. -
Page 28: Dual Battery Charger
Dual Battery Charger Push the battery pack in until the mount hooks on the charger engage the mount lugs on the battery. Hook With the engraved side upwards, push the connector fi rmly into the jack until it clicks into place. You can connect up to three Dual Battery Chargers. -
Page 29: Switching On/Off And Sleep
Switching On/Off and Sleep Switching On 1. Hold down the power button until the notifi cation LED lights green (approx. 1 sec.). • The startup screen appears. • The screen shown differs depending on the device settings. • If the tablet is left unused for a set time while switched on, it automatically switches to sleep mode. -
Page 30: Initial Settings
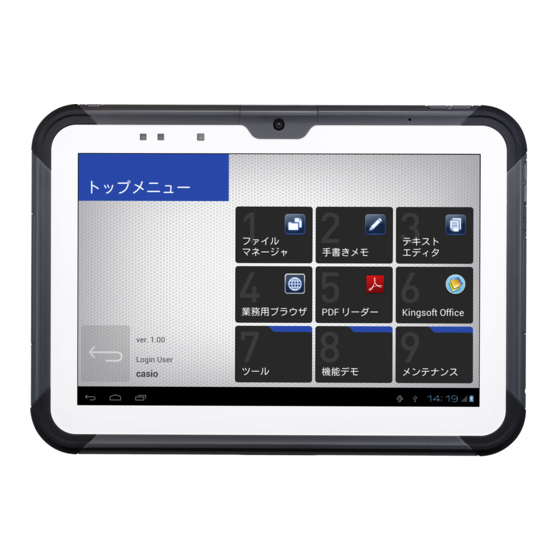
Initial Settings Unlocking the Screen 1. Touch [ ] in the startup screen and drag it to [ ] that appears on the right to unlock the screen. At shipment, the default menu shown below appears. Make a selection based on the operation you actually want to perform. Job Menu Android standard Tick this box to always apply the above setting... -
Page 31: Customization For Job Menu Use
Customization for Job Menu Use To access Job Menu, you must fi rst customize the tablet as follows: 1. Build the menu to suit the operation. See “Job Menu” (E-81) for information on building the menu. 2. Specify “None” as the security level for the Settings screen. E-29... -
Page 32: Syncing The Calendar And Contacts
Syncing the Calendar and Contacts To sync with your Google account, you must confi gure your settings as shown below. You must also set up an account with Google beforehand. (Google is the only host service.) ■ Setting up Syncing 1 Go to “Accounts &... - Page 33 3 Enter your user name and password for the Google account you want to sync. 4 In the next window, touch “Accept”. 5 Click “OK” in the “Initial Sync” window to start initial synchronization. E-31...
- Page 34 ■ Sync Settings 1 In “Accounts & sync” in the Settings screen, select the account you want to confi gure for syncing. 2 Select “Account settings” in “Sync settings”. E-32...
- Page 35 3 In the “Settings” screen, set the sync frequency and the days to sync in the Calendar. 4 You can specify a sync frequency of every 6 hours, every day, or every 7 days. In addition to the frequency specifi ed here, whenever the Calendar and Contacts are modifi...
- Page 36 5 You can specify 7, 30, 60 or 180 days as the extent to which data is synced back into the past and ahead into the future ■ Stopping Syncing 1 To stop syncing, clear the “Sync Calendar” and “Sync Contacts” checkboxes respectively in “Sync settings”.
- Page 37 ■ Removing an account 1 To remove an account, select “Remove account” in “Sync settings”. This erases all the data stored in the tablet for that account. ■ Sync now 1 In “Sync settings”, select “Sync now” to begin synchronization. E-35...
- Page 38 Important! ● Specifi cation differences from Google standard synchronization The operation of synchronization using CalDAV and CardDAV differs from Google standard synchronization in the following respects: • All contact phone number types that are not “Mobile”, “Work”, “Home”, “Work Fax”, “Home Fax”, “Pager” or “Custom” revert to “Other” when synced. •...
- Page 39 ● If you modify a scheduled event or Contact that is on the tablet and on the Google server If you modify a scheduled event or contact that is on both the tablet and the Google server, the data on the server takes precedence. The modifi ed content on the tablet is deleted.
-
Page 40: Using Microsd Cards
Using microSD Cards This tablet supports microSD cards. The card slot is located in the battery pack compartment (see E-20, 21). Remove the battery pack before inserting or removing a card. Refer to pages 22 to 24 for information on “Loading and Removing the Battery Pack”. Install (or remove) a card according to the procedure described below. - Page 41 3. Press on the card slightly ( The card is pushed out ( • If you have diffi culty removing the card, use the microSD card removal tool provided. As shown in the illustration, hook the end of the tool under the projection on the card to pull the card out.
-
Page 42: Using Sam Cards
Using SAM Cards This tablet supports SAM cards. The card slot is located in the battery pack compartment (see E-20, 21). Remove the battery pack before inserting or removing a card. Refer to pages 22 to 24 for information on “Loading and Removing the Battery Pack”. Install (or remove) a card according to the procedure described below. -
Page 43: Removing
Removing 1. Make sure that the power on the tablet has been switched off. If the power is still on, hold down the power button to switch off (see E-27). 2. Remove the battery pack. 3.Gently push the card in above the supporting cover ( The card is pushed out ( 4. -
Page 44: Using Sim Cards
Using SIM Cards This tablet supports SIM cards. SIM cards may not be supported by some models. See E-21 for information on compatible models. The card slot is located in the battery pack compartment (see E-20, 21). Remove the battery pack before inserting or removing a card. Refer to pages 22 to 24 for information on “Loading and Removing the Battery Pack”. -
Page 45: Removing
Removing 1. Make sure that the power on the tablet has been switched off. If the power is still on, hold down the power button to switch off (see E-27). 2. Remove the battery pack. 3.Gently push the card in above the supporting cover ( The card is pushed out ( 4. -
Page 46: Handling Sd Memory Cards
Handling SD Memory Cards SD memory card can be installed in the SD memory card slot on the tablet. Install (or remove) an SD memory card according to the procedure described below. Installing 1. Open the cover of the SD memory card slot on the left side of the tablet ( ) and insert an SD memory card all the way in until the top of the SD memory card aligns with the entrance of the slot of the tablet (... -
Page 47: Handling The Nfc Reader/Writer
Handling the NFC Reader/Writer NFC is a type of RFID (Radio Frequency Identifi cation) technology that allows the data in a device to be read simply by holding the device up to an NFC reader. It can be used to read RFID tags used for controlling goods as well as contactless IC cards used in applications such as employee identifi... -
Page 48: Rfid Tags
Important! Both contactless IC cards and RFID tags • The NFC employs a low power radio wave which does not require regulatory station license. • Frequency band used by the NFC is 13.56 MHz. Secure a suffi cient space between V-T500 and other reader/writer located in the vicinity. Make sure also that a radio station employs the same frequency band does not locate near by prior to using V-T500. -
Page 49: Hdmi Connection
HDMI Connection HDMI-compatible external devices can be connected to the tablet using a third-party HDMI cable. 1. Make sure that the power on the tablet has been switched off. If the power is still on, hold down the power button to switch off (see E-27). 2. -
Page 50: Resetting The Tablet
Resetting the Tablet Resetting the tablet is the same as resetting a PC. Performing a reset causes all unsaved RAM data to be lost that are in mid-course of inputting and editing, but data and settings that are already stored in the FlashROM should be unaffected. Perform a reset to restore normal operation whenever the tablet operates abnormally due to misoperation or some other reason. -
Page 51: Chapter 3 Built-In Software
Chapter 3 Built-in Software E-49... -
Page 52: Standard Accessories
Standard Accessories Software List Icon Software Camera Browser Email Gallery Music Clock Messaging People Calendar Search Calculator E-50... -
Page 53: Camera
Camera Shoots still images and movies. ➀ ➁ ➂ ➃ ➄ ➅ ➆ ➀ Switch between rear camera and front camera ➁ Shutter ➂ Settings ➃ Zoom in/out ➄ Shoot panorama images ➅ Shoot video ➆ Shoot still images ■ Settings You can use Settings to select the following modes for shooting images: Flash mode, white balance, exposure, photography mode, camera settings... -
Page 54: Browser
Browser You can use the Browser to view web pages, just as you do on a computer. There is also the Job Browser app loaded onto the tablet. ➀ ➁ ➂ ➃ ➄ ➅ ➆ ➇ ➈ ➀ Close tab ➁... -
Page 55: Mail
Mail Sends and receives email. ➁ ➂ ➃ ➄ ➀ ➀ Mail sorting folders ➁ Compose new email ➂ Search ➃ Send/Receive ➄ Settings ■ Search Searches through your received email for any that match the specifi ed keyword. ■ Send/Receive Sends and receives email. -
Page 56: Gallery
Gallery Allows you to view and organize your still images and movies. In the initial screen, images are tiled according to the sort categories. ➀ ➁ ➂ Camera Camera Camera ➃ ➀ Sort category ➁ Launch Camera app ➂ Show menu ➃... - Page 57 When you select a still image, the selected image appears in full-screen display. ➀ ➁ ➂ ➃ ➄ ➀ Return to list ➁ Share ➂ Delete ➃ Show menu ➄ Show list of images in group ■ Share You can use the following functions to share images: Bluetooth, Email ■...
-
Page 58: Music
Music Plays audio fi les. ➀ ➁ ➂ ➃ ➄ ➀ Artists ➁ Albums ➂ Songs ➃ Playlists ➄ Now playing ■ Artists Displays a list of the saved tracks for each artist. If no artist information is registered, "Unknown artist" is displayed. ■... -
Page 59: Clock
Clock Allows you to confi gure the date/time display and set the alarm. ➀ ➀ Set alarm E-57... -
Page 60: Message
Message This is the Short Message Service (SMS) app. This service is available on WAN models. ➀ ➁ ➂ ➀ Compose new message ➁ Search ➂ Settings ■ Search Searches through your messages for those that match the specifi ed keyword. ■... -
Page 61: User
User Use this to manage street and email addresses. ➁ ➂ ➃ ➄ ➀ ➀ Select display category ➁ Search ➂ Add new ➃ Edit current info. ➄ Show menu ■ Select display category Use this to select one of the following as the items to be displayed: Groups, All, Favorites ■... -
Page 62: Calendar
Calendar You can use the Calendar to manage your schedule and to store or check events. The layout below shows the screen for the single-day display. ➁ ➂ ➃ ➀ ➀ Select display mode ➁ Show today ➂ Make a plan ➃... - Page 63 The layout below shows the screen for the one-week display. The layout below shows the screen for the one-month display. E-61...
-
Page 64: Search
Search Searches on the web or in the tablet. Items checked in the search settings will be searched. E-62... -
Page 65: Calculator
Calculator Allows you to carry out arithmetic or scientifi c calculations. ➀ ➀ Backspace E-63... -
Page 66: Additional Accessories
Additional Accessories Software List Icon Software Adobe Reader MemoText MemoPaint Job Browser Voice Recorder E-64... -
Page 67: Adobe Reader
Adobe Reader Allows you to view PDF documents. When you select a PDF document in File Manager, this software is used to display the document. ➁ ➂ ➃ ➄ ➀ ➅ ➀ Home screen ➁ Display mode ➂ Edit ➃ Share ➄... - Page 68 ■ Edit In documents that permit editing, you can carry out the following editing tasks: Comments, Highlights, Strikethrough, Underscore, Add text, Freehand drawing, Signature ■ Share You can use the following functions to share documents: Bluetooth, Email, Send for signing ■...
-
Page 69: Memo Text
Memo Text Provides display and editing functions for text memos. When you select a text document in File Manager, this software is used to display the document. You can also launch this app and then use "Open File" to select and display any text fi le. ➀... -
Page 70: Memo Paint
Memo Paint Provides display and editing functions for handwritten (image format) memos. You can also launch this app and then use "Open File" to select and display any image (PNG or JPG). ➀ ➁ ➂ ➃ ➄ ➅ ➆ ➇ ➈... - Page 71 ■ Line thickness Specifi es one of the following as the line thickness: 1, 2, 4, 6, 8, 10, 20 or 30 pixels ■ Line color for fi ngerpainting Specifi es one of the following as the line color for fi ngerpainting: Black, blue, cyan, gray, green, red, magenta, yellow, white ■...
-
Page 72: Job Browser
Apart from the restrictions, the Job Browser is identical to the standard Android browser. Sample setting: Where the browsed site is restricted to “www.casio.com” If a URL other than www.casio.com is entered (“www.google.com” in this screenshot), a pop-up (Toast) warning message appears and access to the site is blocked. -
Page 73: Voice Recorder
Voice Recorder Provides recording and playback functions for voice memos. Screen at startup ➀ ➁ ➀ Show playback list ➁ Record Screen during recording ➂ ➂ Stop E-71... - Page 74 Screen during playback ➃ ➃ Pause Screen when playback ends ➄ ➄ Play E-72...
- Page 75 ■ Show playback list Shows a list of the data recorded so far. Files are saved in the “Recorder_YYMMDD_HHMMSS.amr” format. During recording, the Show Playback List button ➀ changes to the Stop button ➂. ■ Record Recording starts when you press the Record button ➁. To stop recording, press the Stop button ➂.
-
Page 76: Settings
Settings Software List Icon Software Settings If administrator authentication is enabled, the screen below appears requesting the administrator password used at startup. See "Security Settings" (E-85) for information on how to set up administrator authentication. Enter the administrator password and then click "OK". If you are already logged in as a user with system setting privileges, the authentication screen is not displayed even if administrator authentication is enabled. -
Page 77: Wireless And Network Settings
Wireless and Network Settings You can confi gure and manage your connections to devices and networks using Wi-Fi, Bluetooth, mobile networks and USB connections. You can also confi gure the connection between the tablet and a virtual private network (VPN), connect to other devices or the Internet via your tablet's data communications functions, or switch the tablet's Airplane Mode so that all wireless communication is disabled. -
Page 78: Terminal
Terminal You can specify the sound and display settings and check the status of your storage, battery and apps. Item Description Sound Volume Sets the volume for the speakers and for notifi cations and alarms, etc. Default alert tone Sets the default alert tone. Vibration and ring tone Enables/disables vibration and ring tones. -
Page 79: User Settings
User Settings The user settings relate to how the tablet is used and what it is used for, and include various security settings. Item Description Sync to account Confi gures synchronizing accounts between apps. Location Google location Specifi es whether apps are permitted to identify information information service your current location using Wi-Fi or mobile... -
Page 80: System
System This specifi es the date and time and the settings for developers. Item Description Date & time Date and time auto set Specifi es whether the date and time are set automatically. Time zone auto set Specifi es whether the time zone is set automatically. - Page 81 Item Description Developer Use GPU rendering Specifi es whether 2D hardware acceleration is options used. Window animation scale Adjusts the window animation speed. Transition animation scale Adjusts the animation speed when components are switched. Do not save activity Specifi es whether apps are terminated immediately Limit on background Sets an upper limit on the number of...
-
Page 82: Operation Support Tools
Operation Support Tools Software List Icon Software Job Menu Login settings Job User Editor Security Settings AntiBurglar E-80... -
Page 83: Job Menu
Job Menu As well as user identifi cation using NFC or passwords, ActiveMenu also provides a menu system capable of representing a menu tree with up to 5 levels. This menu system runs as the home application, and you can display this menu whenever you press the Home key. - Page 84 At shipment from the factory, the authentication method is set to "none". To use authentication, select the authentication method in the Login Authentication Setting Tool. The user shown below is registered at shipment. User name: CASIO Password: casio Menu screen...
-
Page 85: Login Authentication Setting Tool
Login Authentication Setting Tool Confi gures the operation of the user authentication screen. ➀ ➁ ➂ ➃ Item Description ➀ RFID > PASSWORD: The RFID authentication screen Authentication method appears fi rst. PASSWORD > RFID: The password authentication screen appears fi rst. PASSWORD ONLY: Only the password authentication screen appears. -
Page 86: Account Edit Tool
Account Edit Tool Edits users. This tool allows you to manage up to 10,000 user accounts, and allows only those users who have been granted system setting privileges to add new accounts and to grant, edit and delete system setting privileges. Account information Exit tool Add new account... -
Page 87: Security Settings
Security Settings Set the password for the administrator. The password for the administrator is used for authentication for using a secure function. It is also possible to set whether the user data should be deleted when authentication fails. If administrator authentication is enabled, the screen below appears requesting the administrator password used at startup. -
Page 88: Theft Protection
Theft Protection This allows you to have the tablet emit a loud warning tone when it is removed from the charger (Ethernet Cradle or Cradle-type Battery Charger) and that removal constitutes theft. ■ Enable Theft Protection (Lock) To use the Theft Protection function, enter the PIN code twice. Enter the 4-digit PIN code (fi... - Page 89 ■ Disable Theft Protection (Unlock) To disable the Theft Protection function, launch this app when the Theft Protection function is enabled and enter the 4-digit PIN code. ■ When theft is detected (when the tablet is removed from the charger) The screen shown above automatically appears.
-
Page 90: System Operation Tools
System Operation Tools Software List Icon Software File Manager WLAN Tool Backup/Restore Copy Devices E-88... -
Page 91: File Manager
File Manager Provides fi le management functions. You can select the storage in the pane on the left side of the screen and a list for that directory is then shown on the right of the screen. When you select a folder from the directory list, the content of the selected folder is then listed. When you select a fi... - Page 92 When you press and hold on an item in the directory listing, the menu of editing actions appears. E-90...
-
Page 93: Wlan Tool
WLAN Tool In the user operating environment, this tool allows you to check the wireless LAN signal status. ➀ ➁ ➂ ➃ ➀ Settings menu ➁ Output the signal strength history log fi le ➂ Release/Renew own IP address ➃ Ping specifi... -
Page 94: Backup Tool
Backup Tool Use this to backup and restore tablet data. Backup screen ➀ ➃ ➁ ➂ ➄ ➀ Backup menu ➁ Restore menu ➂ Option settings menu ➃ Checkboxes for selecting items to be backed up ➄ Start backup. ■ Backup menu Transitions to the Backup screen. - Page 95 Restore screen ➀ ➁ ➀ Checkboxes for selecting items to be restored ➁ Start restore ■ Checkboxes for selecting items to be restored Select the items for which data will be restored. ■ Start restore Restores the data saved in the location specifi ed in "Option settings". E-93...
- Page 96 Option settings screen ➀ ➀ Data save location buttons ■ Data save location buttons Use these to select the location where backup/restore data is saved. E-94...
-
Page 97: Copy Devices
Copy Devices You can make a copy of a master terminal effi ciently by transferring the master terminal backup data to a slave terminal and then restoring that data. ➀ ➀ Settings menu ■ Settings menu Use the Settings menu to confi gure the following: Network port number E-95... -
Page 98: Demo Tools
Demo Tools Software List Icon Software NFC Demo Barcode Scanner E-96... -
Page 99: Nfc Demo
NFC Demo Allows you to check the type and ID of a scanned NFC card. ➀ ➁ ➂ ➀ Card type ➁ Enumeration data obtained from Android SDK ➂ Clears the card type and ID display ■ Card type Based on the description in ➁, one of the following is displayed: Displayed information NFC-A (ISO 14443-3A) [MIFARE Classic] NFC-A (ISO 14443-3A) [MIFARE Ultralight]... -
Page 100: Barcode Scanner
Barcode Scanner Scans barcodes. Barcode scanning screen ➀ ➀ Barcode preview area ■ Barcode preview area Position the tablet so that the barcode to be scanned appears in this area. When the tablet scans the barcode, it emits a short beep and transitions to the barcode data display screen on the next page. - Page 101 Barcode data display screen ➀ ➀ Barcode data display ■ Barcode data display Displays an image of the scanned barcode and the information for that barcode. E-99...
- Page 102 E-100...
-
Page 103: Chapter 4 Options (Sold Separately
Chapter 4 Options (Sold Separately) E-101... -
Page 104: Using The Digitizer Pen
Using the Digitizer Pen You can use the optional Digitizer Pen to work on the tablet's touch-panel. General Guide Quick Button 1 Quick Button 2 Pen Tip Strap Hole * The functions of quick buttons 1 and 2 differ depending on the application specifi... -
Page 105: Using The Digitizer Pen
2. Insert the battery with the positive (+) terminal towards the tip of the pen. 3. Turn the cap clockwise to secure. Using the Digitizer Pen Tap: Lightly touch the tip of the pen against the touch-panel. Sketching characters and lines: Sketch characters and lines by holding the tip of the pen against the touch-panel and sliding it lightly over the surface. -
Page 106: Replacing The Pen Tip
Important! • Do not tap the Digitizer Pen too strongly against the touch-panel. • Pens other than the dedicated Digitizer Pen cannot be used. Replacing the Pen Tip The tip of the pen will wear out over time. Replace the tip as follows. 1. -
Page 107: Handling The Hand Belt
Handling the Hand Belt The optional hand belt can be attached to the tablet. If you also plan to attach the neck strap, attach the neck strap fi rst (see E-106). Attaching 1. Feed the ends of the 4 hand belt straps through the mounts on each corner of the back of the tablet. -
Page 108: Attaching The Neck Strap
Attaching the Neck Strap The optional neck strap can be used to prevent the tablet from fall when carrying it around. Four strap mounts are provided. Use whichever 2 mounts provide greatest ease of use. If you also plan to attach the hand belt (see E-105), attach the neck strap fi rst. Attach the neck strap according to the procedure described below. -
Page 109: Using The Screen Cover
Using the Screen Cover An optional screen cover can be fi tted to the tablet to protect the display. The screen cover can also be used as a stand when using the tablet. If the pen holder for the Digitizer Pen is fi tted to the tablet (see E-102), remove it. The Digitizer Pen can be kept in the screen cover's pen holder. -
Page 110: Using The Screen Cover As A Stand
Using the Screen Cover as a Stand 1. Disengage the rubber bands from the tablet, open the cover and place it on a desktop or other fl at surface. 2. Turn the tablet so that it faces forwards and fi t the bottom into the notch in the cover to fi... -
Page 111: Using The Ethernet Cradle (Ha-M62Io
Using the Ethernet Cradle (HA-M62IO) The optionally available Ethernet Cradle (HA-M62IO) makes it possible to transmit system data and fi le data between the tablet and a PC via a USB or LAN connection (download or upload). You can also use the Ethernet Cradle to charge the battery pack installed in the tablet. - Page 112 Communication/ Power is supplied to the V-T500 via these terminals. Also used Power Supply for communication with the V-T500. Terminals Power Indicator Off: Power off. Red: Power on, V-T500 is not installed Green: Power on, V-T500 mounted correctly Power Switch Turns the power on and off.
-
Page 113: Connecting The Ethernet Cradle Power Supply
Connecting the Ethernet Cradle Power Supply Use the optional AC adaptor (AD-S36120A-N) for the power supply of the Ethernet Cradle. Always make sure to connect the AC adaptor to the Ethernet Cradle before performing communication with the tablet. Power to the tablet is supplied from the Ethernet Cradle. - Page 114 4. Before using the cradle ports, remove the caps from the ports. When using a LAN, connect one end of the LAN cable to the LAN port and the other end to the PC or hub. When using a USB connection, connect one end of the USB cable to the USB client port and the other end to the PC.
- Page 115 LED is still red or off, there is a fault. Immediately stop using the product and contact the dealer or distributor where you purchased the product, or an authorized CASIO service provider. * If the remaining battery change is 5% or less when the AC adaptor is connected correctly, the charge LED turns off for approximately 0.5 seconds and then lights red.
-
Page 116: Using The Cradle-Type Battery Charger (Ha-M30Chg
Using the Cradle-type Battery Charger (HA-M30CHG) The optionally available Cradle-type Battery Charger (HA-M30CHG) lets you charge the battery pack installed in the tablet simply by placing the tablet onto the charger. General Guide Front Right Back Power Supply Power is supplied to the V-T500 via these terminals. Terminals Power Indicator Off: Power off... -
Page 117: Connecting The Cradle-Type Battery Charger Power Supply
Connecting the Cradle-type Battery Charger Power Supply Use the optional AC adaptor (AD-S36120A-N) for the power supply of the Cradle-type Battery Charger. 1. Plug the AC adaptor into the AC adaptor jack on the back of the Cradle-type Battery Charger. DC IN 12V 2. - Page 118 LED is still red or off, there is a fault. Immediately stop using the product and contact the dealer or distributor where you purchased the product, or an authorized CASIO service provider. * If the remaining battery change is 5% or less when the AC adaptor is connected correctly, the charge LED turns off for approximately 0.5 seconds and then lights red.
-
Page 119: Using The Dual Battery Charger (Ha-M32Dchg
Using the Dual Battery Charger (HA-M32DCHG) The optionally available dual battery charger (HA-M32DCHG) can be used to simultaneously charge two battery packs. General Guide Left Back Bottom Bundled Items Connecting Bracket 2 Connecting Screws E-117... - Page 120 Dual Battery Use this port to connect multiple Dual Battery Chargers to each Charger Connection other. Port Charge Indicator This lamp indicates the charge status of the battery pack(s). Lamp Off: Not charging Orange: Charging Red: Battery pack problem or standby due to the surrounding temperature being beyond the specifi...
-
Page 121: Charging A Battery Pack
Charging a Battery Pack Use the optionally available AC adaptor (AD-S90190C-N5) for the power supply of the Dual Battery Charger. 1. Plug the cord from the AC adaptor into the AC adaptor jack of the Dual Battery Charger. With the engraved side upwards, push the connector fi rmly into the jack until it clicks into place. -
Page 122: Connecting Multiple Dual Battery Chargers
Connecting Multiple Dual Battery Chargers You can connect up to three Dual Battery Chargers. Doing so makes it possible to supply power to all the Dual Battery Chargers using one dedicated AC adaptor. 1. As shown in the illustrations below, remove the connector covers of the Dual Battery Chargers you want to connect to each other. - Page 123 Important ! • Allowing the power contacts become wet can cause an electric shock or fi re. In addition, if the contacts become soiled, contact may be impaired resulting in poor charging. For reasons of safety and maintaining charging battery pack(s) in optimum condition, clean the power contacts by wiping with a dry cloth or cotton swab after disconnecting the AC adaptor.
-
Page 124: Using The Ac Adaptor (Ad-S36120A-N
LED is still red or off, there is a fault. Immediately stop using the product and contact the dealer or distributor where you purchased the product, or an authorized CASIO service provider. * If the remaining battery change is 5% or less when the AC adaptor is connected correctly, the charge LED turns off for approximately 0.5 seconds and then lights red. -
Page 125: Chapter 5 Specifi Cations
Chapter 5 Specifi cations E-123... -
Page 126: V-T500 Tablet Specifi Cations
V-T500 Tablet Specifi cations Item Classifi cation Details Model V-T500-E, V-T500-GE OMAP 4460 1.5 GHz Dual core Platform Android 4.0 Memory 1 GB FROM 16 GB Display 10.1-inch, WXGA (1280 x 800), LED-backlit TFT color LCD ® ® Bluetooth Protocol Bluetooth Specifi... - Page 127 Item Classifi cation Details WLAN Output IEEE 802.11a: Minimum 12 dBm; Typical 13.5 dBm (for 54 Mbps communication) IEEE 802.11b: Minimum 17 dBm; Typical 18 dBm (for 11 Mbps communication) IEEE 802.11g: Minimum 12 dBm; Typical 14 dBm (for 54 Mbps communication) IEEE 802.11n: Minimum 11 dBm;...
- Page 128 Item Classifi cation Details WCDMA Signal Type Band I: 4M19F9W Band V: 4M19F9W Band VI: 4M19F9W Band VIII: 4M15F9W Supported Bands Band I: Uplink: 1920 - 1980 MHz Downlink: 2110 - 2170 MHz Band V: Uplink: 824 - 849 MHz Downlink: 869 - 894 MHz Band VI: Uplink: 830 - 840 MHz...
- Page 129 Item Classifi cation Details Modulation Scheme GSM/GPRS/EDGE GSM850: 248KGXW (GPRS), 248KG7W (EDGE)EGSM900: 248KGXW (GPRS), 248KG7W (EDGE)DCS1800: 374248KGXW (GPRS), 248KG7W (EDGE)PCS1900: 248KGXW (GPRS), 248KG7W (EDGE) Supported Bands GSM850: Uplink: 824 - 849 MHz Downlink: 869 - 894 MHz EGSM900: Uplink: 880 - 915 MHz Downlink: 925 - 960 MHz DCS1800: Uplink: 1710 - 1785 MHz...
- Page 130 Item Classifi cation Details General Specifi cations 16-channel receiver, L1 1575.42 MHz, C/A code Position Measurement Standalone-GPS (S-GPS) Method Sensitivity Acquisition sensitivity: -146 dBmTracking sensitivity: -162 dBm Standard ISO 7816 IC Card standard General Specifi cations Support for 3 V, 1.8 V and 5 V SAM cards Standard ISO 7816 IC Card standard General Specifi...
- Page 131 Item Classifi cation Details Operating Temperature -20°C to 50°C (-4°F to 122°F) Operating Humidity 10% to 90% RH (non-condensation) Drop Impact Resistance 1.0 m (trial value only, not guaranteed) Dust and Water Splash Proof IP54 level Dimensions Approximately 190 (H) × 269 (W) × 14.4 (D) mm (7 "H ×...
-
Page 132: Optional (Separately Sold) Accessory Specifi Cations
Optional (Separately Sold) Accessory Specifi cations Ethernet Cradle (HA-M62IO) Item Classifi cation Details Communication IEEE 802.3 Specifi cations Protocol Media Type 10base-T/100base-TX auto-switched Protocol USB Ver2.0 Standard Transmission Rate 480 Mbps (max) Charging Charging Method Constant current/voltage Charging Period Approximately 6 hours Power Supply Power Source AD-S36120A-N... -
Page 133: Cradle-Type Battery Charger (Ha-M30Chg
Cradle-type Battery Charger (HA-M30CHG) Item Classifi cation Details Charging Charging Method Constant current/voltage Charging Period Approximately 6 hours Power Supply Power Source AD-S36120A-N Consumption Current 12V DC 3.0A Main Unit (V-T500) Contact: 12 V DC, 2.0 A Output Dimensions and Dimensions Approximately 292 (W) ×... -
Page 134: Car Adaptor (Ha-M37Cac
Car Adaptor (HA-M37CAC) Item Details Input 12 V/24 V DC 3 A/1.5 A Output 7.5 V DC 3.5 A AC Adaptor (AD-S36120A-N) Item Details Input 100 V to 240 V AC 50/60 Hz 1.2 A Output 12 V DC 3.0 A AC Adaptor (AD-S90190C-N5) Item Details... -
Page 135: Chapter 6 Appendix
Chapter 6 Appendix E-133... -
Page 136: Open Source Licenses
Open Source Licenses Apps That Use Licenses License used Barcode Scanner Apache License Version 2.0 E-134... -
Page 137: License Text List
License Text List Apache License Version 2.0 Apache License Version 2.0, January 2004 http://www.apache.org/licenses/ TERMS AND CONDITIONS FOR USE, REPRODUCTION, AND DISTRIBUTION 1. Defi nitions. "License" shall mean the terms and conditions for use, reproduction, and distribution as defi ned by Sections 1 through 9 of this document. "Licensor"... - Page 138 "Derivative Works" shall mean any work, whether in Source or Object form, that is based on (or derived from) the Work and for which the editorial revisions, annotations, elaborations, or other modifi cations represent, as a whole, an original work of authorship. For the purposes of this License, Derivative Works shall not include works that remain separable from, or merely link (or bind by name) to the interfaces of, the Work and Derivative Works thereof.
- Page 139 4. Redistribution. You may reproduce and distribute copies of the Work or Derivative Works thereof in any medium, with or without modifi cations, and in Source or Object form, provided that You meet the following conditions: (a) You must give any other recipients of the Work or Derivative Works a copy of this License;...
- Page 140 6. Trademarks. This License does not grant permission to use the trade names, trademarks, service marks, or product names of the Licensor, except as required for reasonable and customary use in describing the origin of the Work and reproducing the content of the NOTICE fi...
- Page 141 APPENDIX: How to apply the Apache License to your work. To apply the Apache License to your work, attach the following boilerplate notice, with the fields enclosed by brackets "[]" replaced with your own identifying information. (Don't include the brackets!) The text should be enclosed in the appropriate comment syntax for the fi...
- Page 142 CASIO COMPUTER CO., LTD. 6-2, Hon-machi 1-chome Shibuya-ku, Tokyo 151-8543, Japan 2012 CASIO COMPUTER CO., LTD.