Table of Contents
Advertisement
These instructions must be read and understood completely before attempting installation.
Signal Words on Product
Labeling
Safety Labeling and Signal Words
DANGER,
WARNING,
CAUTION,
and NOTE
Signal Words in Manuals
The signal words DANGER, WARNING, CAUTION, and NOTE
The signal word WARNING is used throughout this manual in the
are used to identify levels of hazard seriousness. The signal word
following manner:
DANGER is only used on product labels to signify an immediate
hazard. The signal words WARNING, CAUTION, and NOTE will
be used on product labels and throughout this manual and other
The signal word CAUTION is used throughout this manual in the
manual that may apply to the product,
following manner:
DANGER - Immediate hazards which will result in severe person-
at injury or death.
WARNING - Hazards or unsafe practices which could result in
severe personal injury or death.
Signal words are used in combination with colors and/or pictures
CAUTION
- Hazards or unsafe practices which may result in or product labels.
minor personal injury or product or property damage.
NOTE - Used to highlight suggestions which wilt result in en-
z_
Safety-alert
symbol
hanced installation, reliability, or operation.
When you see this symbol on the unit and in instructions or manu-
als, be alert to the potential for personal injury.
TABLE OF CONTENTS
DIMENSIONS
...............................................
3
SAFETY CONSIDERATIONS
..................................
3
INTRODUCTION
............................................
4
CODES AND STANDARDS
...................................
5
SAFETY ................................................
5
GENERAL
INSTALLATION
................................
5
COMBUSTION
AND VENTILATION
AIR .....................
5
DUCT SYSTEMS
........................................
5
ACOUSTICAL
LINING AND FIBROUS
GLASS DUCT
.........
5
GAS PIPING AND GAS PIPE PRESSURE
TESTING
..........
5
ELECTRICAL
CONNECTIONS
............................
5
VENTING
..............................................
5
ELECTROSTATIC
DISCHARGE
(ESD) PRECAUTIONS
...........
5
LOCATION
.................................................
6
AIR FOR COMBUSTION
AND VENTILATION
....................
7
INSTALLATION
..............................................
10
UPFLOW
INSTALLATION
.................................
10
DOWNFLOW
INSTALLATION
.............................
11
FILTER ARRANGEMENT
.................................
12
AIR DUCTS .............................................
13
AIR DELIVERY
- CFM ....................................
14
ELECTRICAL
CONNECTIONS
............................
20
115-V WIRING
..........................................
20
J-BOX
RELOCATION
....................................
20
ELECTRICAL
CONNECTION
TO J-BOX
....................
20
ELECTRICAL
DATA ......................................
21
24-V WIRING
...........................................
22
ACCESSORIES
.........................................
22
VENTING
..................................................
23
GENERAL
VENTING
REQUIREMENTS
.....................
23
MASONRY
CHIMNEY
REQUIREMENTS
....................
24
APPLIANCE
APPLICATION
REQUIREMENTS
...............
26
ADDITIONAL
VENTING
REQUIREMENTS
..................
26
SIDEWALL VENTING
....................................
27
START-UP,
ADJUSTMENT,
AND SAFETY CHECK
...............
30
GENERAL
..............................................
30
START-UP
PROCEDURES
...............................
30
ADJUSTMENTS
.........................................
31
SPEED SELECTION
.....................................
32
CHECK SAFETY CONTROLS
.............................
33
CHECKLIST
............................................
34
ORIFICE SIZE AND MANIFOLD
PRESSURE
................
35
SERVICE AND MAINTENANCE
PROCEDURES
.................
39
CARE AND MAINTENANCE
...................................
39
SEQUENCE
OF OPERATION
.................................
43
WIRING DIAGRAM
..........................................
44
TROUBLESHOOTING
GUIDE .................................
45
IS09001
Use of the AHRI Certified
TM Mark indicates
a manufacturer's
participation
in the program.
For verification
of certification
for individual
products,
go to www.ahridirectory.org
.
PERSONAL INJURY, AND/OR PROPERTY
DAMAGE HAZARD
Failure to carefully read and follow this warning could
result in equipment
malfunction,
property damage,
3ersonal injury and/or death.
Installation
or repairs made by unqualified
persons
could
result
in equipment
malfunction,
property
damage, personal injury and/or death.
The information contained in this manual is intended for
use by a qualified service technician familiar with safety
3rocedures and equipped with proper tools and test
instruments.
Installation must conform with local building codes and
with the
Natural
Fuel Gas Code
(NFCG)
NFPA
54/ANSI Z223.1, and National standards of Canada
CAN/CSA-B149.1
and .2 Natural Gas and Propane
Installation Codes.
INSTALLER: Affix these instructions on or adjacent to the furnace.
CONSUMER:
Retain these instructions for future reference.
Portions of the text and tables are reprintedfrom NFPA 54/ANSI Z223.t -20096), with permission of National Fire Protection Association, Quincy, MA 02269 and American Gas Association, Washing-
ton, DC 20001. This reprinted material is not the complete and official position of the NFPA or ANSI, on the referenced subiect, which is represented only by the standard in its entirety,
PrintedinU.S.A.
441 01 1402 02 May. 2012
Advertisement
Table of Contents

Related Manuals for Kenmore N8MSL0701412A1

Summary of Contents for Kenmore N8MSL0701412A1
- Page 1 These instructions must be read and understood completely before attempting installation. Safety Labeling and Signal Words DANGER, WARNING, CAUTION, and NOTE Signal Words in Manuals The signal words DANGER, WARNING, CAUTION, and NOTE The signal word WARNING is used throughout this manual in the are used to identify levels of hazard seriousness.
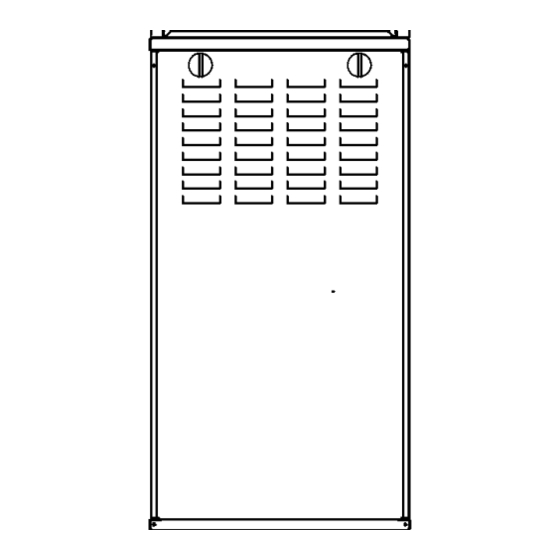
- Page 2 Figure 1 - Dimensional Drawing 1 18/16 I-- 5 16/16 Ll_ll [150.7] / r- s 1/2 _57_ p4t_l i ;,;o.tt ' 1:' "r_ I_ CAImNG s] _22 1/le [51.O] LOCATION ¢ 7/8 "-_ t ¢1/2-_--_ pC.71 27W4 THERMOS'rAT W IRE FO'LT] ___.
-
Page 3: Safety Considerations
Table 1--Dimensions - In. (mm) TOP AND VENT OUTLET BOTTOM BOTTOM CONNECTION SHIP WT FURNACE SIZE CABINET WIDTH WIDTH FLUE COLLAR SIZE* WIDTH N8MSN & N8MSL IN (mm) LB (KG) IN (mm) IN (mm) IN (mm) IN (mm) 0451408 104 (47) 14-3/16 (360) 12-9/16... -
Page 4: Introduction
which hasanexternal static pressure within theallow- (914 mm) h orizontally from thefurnace. See NFPA 90B able range, asspecified inthe"Start-Up, Adjustments, orlocal c ode forfurther requirements. andSafety C heck" section. See furnace r ating p late. 13.These furnaces S HALL NOTbe installed d irectly o n 7.When a furnace i s installed sothatsupply d ucts carry carpeting, tile,oranyother c ombustible material other... -
Page 5: Codes And Standards
Figure 3 - Return Air Temperature Step 6--Gas Piping and Gas Pipe Pressure Testing NFGC; NFPA 54 /ANSI Z223.1-2009 chapters 5, 6, 8OoF/27 o O 7 and 8 and National Plumbing Codes Step 7--Electrical Connections National Electrical Code (NEC) ANSI/NFPA 70-2008 FRONT Step 8--Venting... -
Page 6: Location
LOCATION GENERAL This multipoise furnace is shipped in packaged configuration. Some assembly and modifications are required when used in any of the four applications shown in Figure 4. CARBON MONOXIDE POISONING AND UNIT This furnace must: DAMAGE HAZARD be installed so the electrical components are protec- Failure to follow this warning could result in personal ted from water. - Page 7 Figure 5 - Installation in a Garage FIRE, INJURY OR DEATH HAZARD Failure to follow this warning could result in personal injury, death and/or property damage. When the furnace is installed in a residential garage, the burners and ignition sources must be located at least 18 in.
-
Page 8: Combustion And Ventilation Air
2. Figure 7 illustrates how to provide TWO OUTDOOR OPENINGS, one inlet and one outlet combustion ventilation air opening, to the outdoors. FURNACE CORROSION HAZARD a. One opening MUST commence within 12 in. (300 mm) of the ceiling and the second opening MUST Failure to follow this caution may result in furnace commence within 12 in. - Page 9 Table 3--Minimum Space Volumes for 100% Combustion, Ventilation, and Dilution from Indoors OTHER THAN FAN-ASSISTED TOTAL FAN-ASSISTED TOTAL (1,000'S BTUH GAS INPUT RATE) (1,000'S BTUH GAS INPUT RATE) Space Volume Ft3 (M3) 1,050 1,400 1,750 1,100 1,650 2,200 2,750 3,300 3,850 0.60 (29.7)
-
Page 10: Upflow Installation
c.Minimum s izeofOutdoor openings shall b ethesize required inOutdoor Combustion Air Method Iother = combined i nputof all otherthanfan-assisted above m ultiplied byreduction Factor i nb.above. appliances inBtuh/hr The minimum d imension ofairopenings shall b e Ifan= combined i nputof all fan-assisted a ppliances in notless than3in.(80mm). -
Page 11: Downflow Installation
Figure 10 - Leveling Legs Figure 11 - Floor and Plenum Opening Dimensions (8mm) (44mm) 1 3/4" (44mm) (8mm) 5/16 A96283 (8mm) NOTE: It is recommended that the perforated supply-air duct flanges be completely folded over or removed from furnace (44mm) 1 3/4"... -
Page 12: Filter Arrangement
Figure 13 - Furnace, Plenum, and Coil or Coil Casing each bottom corner. To prevent screws from pulling out, use 2 Installed on a Combustible Floor #8 x 3/4-in. (19 mm) screws into the side and 2 #8 x 3/4-in. (19 mm) screws in the bottom of the furnace casing for each strap. -
Page 13: Air Ducts
Table 4_Opening Dimensions - In. (mm) FURNACE PLENUM OPENING FLOOR OPENING CASING APPLICATION WIDTH Upflow Applications on Combustible or Noncombustible Flooring 12-11/16 21-5/8 13-5/16 22-1/4 (subbase not required) (322) (549) (338) (565) Downflow Applications on Noncombustible Flooring 12-9/16 13-3/16 19-5/8 14-3/16 (subbase not required) (319) - Page 14 Table 5--Air Delivery - CFM (with Filter)* FURNACE RETURN-AIR SPEED EXTERNAL STATIC PRESSURE (in, w,c,) SIZE INLET Bottom High 1035 0451408A Med-Low Side(s) Bottom High 1440 1375 1305 1240 1160 1070 0451412A Med-Low 1360 1300 1240 1175 1115 1040 Side(s) 1250 1210 1160...
- Page 15 Figure 14 - Duct Flanges UPFLOW DOWNFLOW HORIZONTAL I ..120'_ 120°_ 120°_ A02020 Figure 15 - Horizontal Unit Suspension 4 REQ, /4" (6mm) THREADED OUTER DOOR ASSEMBLY SECURE ANGLE IRON TO BOTTOM OF FURNACE WITH 3 #8 x3/4 '' (19mm) SCREWS TYPICAL FOR 2 SUPPORTS 8"...
- Page 16 Figure 16 - Horizontal Suspension with Straps 22 GAUGE GALVANIZED STRAPS TYPICAL FOR 4 STRAPS /OPENING OUTER DOOR METHOD ASSEMBLY USE (4) #8 x 3/4 (19 mm) SHEET METAL SCREWS FOR EACH STRAR THE STRAPS SHOULD BE VERTICAL AGAINST THE FURNACE FROM THE FURNACE SIDES AND NOT PULL AWAY SIDES.
- Page 17 Figure 18 - Upflow Return Air Configurations and Restrictions i ¸_ UPFLOW RETURN CONFiGURATiONS RESTRICTIONS AIR FLOW MODELS RETURN RETURN RETURN RETURN CONNECTION CONNECTION CONNECTION COMBINATIONS ONLY ONLY ONLY OF 1,2, AND 3 5 TONS AND GREATER ALL OTHER MODELS •...
-
Page 18: Fire Or Explosion Hazard
Upflow and Horizontal Furnaces Connect supply-air duct to flanges on furnace supply-air outlet. Bend flange upward to 90 ° with wide duct pliers. (See FIRE OR EXPLOSION HAZARD Figure 14) The supply-air duct must be connected to ONLY the furnace supply-outlet-air duct flanges or air conditioning Failure to follow this warning could result in personal coil casing (when used). - Page 19 Piping should be pressure and leak tested in accordance with NFGC, local, and national plumbing and gas codes before the furnace has been connected. After all connections have been made, purge lines and check for leakage at furnace FURNACE OVERHEAT HAZARD prior to operating furnace.
-
Page 20: Electrical Connections
ELECTRICAL CONNECTIONS NOTE: Proper polarity must be maintained for 115-v wiring. If polarity is incorrect, control LED status indicator light will flash a status code 10 and furnace wilt NOT operate. J-BOX RELOCATION ELECTRICAL SHOCK HAZARD NOTE: If factory location of J-Box is acceptable, go to next section (ELECTRICAL CONNECTION TO J-BOX). -
Page 21: Power Cord Installation In Furnace J-Box
4.Remove a ndsavetwoscrews holding J-Box.(See 7.Pull f ield power wires intoelectrical box. Figure 2 3) 8.Remove cover from furnace J -Box. 5.Pull f urnace p ower wires outof1/2-in. ( 12mm) d iamet- 9.Route fieldground w ire through h oles inelectrical box erhole inJ-Box. -
Page 22: Accessories
Figure 25 - Furnace Control HEAT TWINNING AND/OR OFF-DELAY COMPONENT TEST J2 JUMPER TERMINAL 24-V THERMOSTAT TERMINALS TRANSFORMER 24-MAC CONNECTIONS owvoT 3-AMP FUSE HARNESS CONNECTOR OPERATION & DIAGNOSTIC LIGHT 115-VAC (L2) NEUTRAL CONNECTIONS BLOWER SPEED _ ... 115VA! EAC_ ..,ND_HS, SELECT'ON TER_... -
Page 23: General Venting Requirements
2.Humidifier (HUM 24VAC a ndHUM) HUM 24VAC: Connect anaccessory 24 VAC, 0.5amp maximum h umidifier (ifused) t othe CARBON MONOXIDE POISONING HAZARD 1/4-in male quick-connect HUM 24VAC t erminal Failure to follow the steps outlined below for each appliance and Cscrew terminal onthecontrol board t hermo- connected to the venting system... -
Page 24: Masonry Chimney Requirements
4. Donotventthisappliance withanysolid fuelburning for the local 99% Winter Design Temperature. Chim- appliance. neys having internal areas greater than 38 in2 (24516 5. Category I furnaces must b evented v ertically ornearly mm 2) require furnace input ratings greater than the in- vertically unless e quipped witha listed power venter. - Page 25 Figure 27 - Chimney Inspection Chart CHIMNEY INSPECTION CHART For additional requirements refer to the National Fuel Gas Code NFPA 54/ANSI Z223.1 and ANSI/NFPA 211 Chimneys, Fireplaces, Vents, and Solid Fuel Burning Appliances Crown condition: Rebuild Missing mortar crown. or brick? Is chimney property lined with...
-
Page 26: Additional Venting Requirements
APPLIANCE APPLICATION REQUIREMENTS Table 9--Minimum Allowable Input Rating of Space-Heat- ing Appliance in Thousands of Btuh per Hour Appliance operation significant impact performance of the venting system. If the appliances INTERNAL AREA OF CHIMNEY sized, installed, adjusted, and operated properly, the venting VENT HEIGHT SQ, IN. -
Page 27: Cut Hazard
Theventconnector canexitthe cabinet o f the furnace through o neoffivelocations. 1.Attach thesingle waltventconnector to thefurnace BURN HAZARD ventelbow, andfasten theventconnector tothevent elbow withatleast t wo field-supplied, corrosion-resist- Failure to follow this caution may cause personal ant,sheet metal screws l ocated 1 80 °apart. injury. - Page 28 Figure 28 - Upflow Application-Vent Elbow Up Figure 30 - Downflow Application-Vent Elbow Up then Left SEE NOTES: 1,2,4,7,8,9 on the page following these figures SEE NOTES:1,2,3,4,5,7,8,9 on the page following A03208 these figures Figure 29 -- Upflow Application-Vent Elbow Right A03210 Figure 31 -- Downflow Application-Vent...
- Page 29 Figure 32 - Downflow Application-Vent Elbow Left then Figure 35 - Horizontal Left Application-Vent Elbow SEE NOTES: 1,2,4,5,7,8,9 on the page following these figures A032t 4 Figure 36 -- Horizontal Left Application-Vent Elbow Up SEE NOTES: 1,2,4,5,8,7,8,9,t0 on the page following these figures A03207 Figure 33 -- Downflow...
-
Page 30: Fire And Explosion Hazard
Figure 39 - Horizontal Right Application-Vent Elbow START-UP, ADJUSTMENT, AND SAFETY Left then Up CHECK Step 1 --General FIRE HAZARD Failure to follow this warning could result in personal injury, death and/or property damage. This furnace is equipped with manual reset limit switches in the gas control area. -
Page 31: Adjustments
FIRE HAZARD ELECTRICALSHOCKHAZARD Failure to follow this warning could result in injury, Failure to follow this warning could result in personal death and/or property damage. injury, or death. DO NOT bottom out gas valve regulator adjusting Blower access door switch opens 115-v power to screw. -
Page 32: Speed Selection
NOTE: Blower access door must be installed when taking EXAMPLE 2:(0-2000 ft. (0-610 M) altitude) temperature rise reading. Leaving blower access door off will For 22,000 Btuh per burner application use Table 15. result in incorrect temperature measurements. Heating value = 1000 Btuh/cu ft. a. - Page 33 j. Reinstall blower access d oor i fremoved. Figure 42 - Orifice Hole k. Turn gas valve ON/OFF switch t oON. FURNACE OVERHEATING HAZARD Failure to follow this caution may result in reduced furnace life. Recheck temperature rise. It must be within limits specified on the rating plate.
-
Page 34: Checklist
d. Set thermostat to "call for heat" and wait 1 minute. a. Verify vent pipe is cool to the touch. When pressure switch is functioning properly, hot b. Disconnect power to furnace and remove vent con- surface igniter should NOT glow and control dia- nector from furnace vent elbow. - Page 35 Table 14_Filter Size Information - in.(mm) FILTER SIZE FURNACE CASING WIDTH FILTER TYPE SIDE RETURN BOTTOM RETURN 14-1/2 (368) Washable* 16 x 25 x 3/4 (406 x 635 x 19) 14 x 25 x 3/4 (356 x 635 x 19) 17-1/2 (445) Washable* 16 x 25 x3/4...
- Page 36 Table 15-Orifice Size* and Manifold Pressure in. w.c. for Gas Input Rate (Continued) (Tabulated data based on 22,000 btuh per burner, derated 4 percent for each 1000 ft. (305 M) above sea level) AVG. GAS SPECIFIC GRAVITY OF NATURAL GAS ALTITUDE RANGE HEAT VALUE...
- Page 37 Table 16--Orifice Size* and Manifold Pressure in. w.c. for Gas Input Rate (Tabulated data based on 21,000 btuh per burner, derated 4 percent for each 1000 ft. (305 M) above sea level) SPECIFIC GRAVITY OF NATURAL GAS ALTITUDE AVG, GAS 0,58 0,60 0,62...
- Page 38 Table 16--Orifice Size* and Manifold Pressure in. w.c. for Gas Input Rate (Continued) (Tabulated data based on 21,000 btuh per burner, derated 4 percent for each 1000 ft. (305 M) above sea level) AVG. GAS SPECIFIC GRAVITY OF NATURAL GAS ALTITUDE HEAT VALUE 0.58...
-
Page 39: Service And Maintenance Procedures
SERVICE AND MAINTENANCE ELECTRICAL CONTROLS AND WIRING PROCEDURES ELECTRICAL SHOCK HAZARD Failure to follow this warning could result in personal FIRE, EXPLOSION, ELECTRICAL SHOCK injury or death. HAZARD Before installing, modifying, or servicing system, main Failure to follow this warning could result in personal electrical disconnect switch must be in the OFF position injury, death and/or property damage. - Page 40 maintenance to the accessories as recommended in the accessory instructions. CLEANING AND/OR REPLACING AIR FILTER FIRE OR EXPLOSION HAZARD air filter arrangement will vary depending on the Failure to follow this warning could result in personal application. The filter is exterior to the furnace casing. injury, death and/or property damage.
-
Page 41: Electrical Shock Hazard
8. Vacuum any loose dust from blower housing, wheel 16. If furnace is operating properly, RELEASE BLOWER and motor. ACCESS DOOR SWITCH. Remove any jumpers or re- connect any disconnected thermostat leads. Replace 9. If a greasy residue is present on blower wheel, remove blower access door. - Page 42 spring cable, a variable speed reversible electric drill, (4) Insert brush end of cable in burner inlet opening of cell, and vacuum cleaner, clean cells as follows: and proceed to clean 2 lower passes of cell in same manner as upper pass. a.
-
Page 43: Sequence Of Operation
Simultaneously, the electronic air cleaner terminal Step 3--Sequence of Operation EAC 1 AMP is energized and remains energized as NOTE: Furnace control must be grounded proper long as the blower motor BLWM is energized. operation or control will lock out. Control is grounded through f. - Page 44 CONNECTION DIAGRAM SCHEMATIC DIAGRAM TO 115 VAC FIELD DISCONNECT SWITCH H EAT OFF-DELAY 1"-- JUMPER SELECTOR I NEUTRALI.-2 & PROPANE GASES) E(_PMENT (NATURAL 1"-,3 SP l" ,o 1=-- ,1€ FRS2 _ 12o GRN/YEL/_7 15D_ I I*'" I sP .t START / I INE ' ' * NOTE#5 M 180...
- Page 45 Troubleshooting Guide - Single Stage START Is there 115V at L1 and NEUTRAL? Is door switch closed? Is LED status light ON solid, alternately Close the door switch. flashing bright--dim-bright-dim like a heartbeat, or flashing ON and OFF? Is there 24V at 24VAC and COM? Is there 115V going to switch? Is circuit breaker closed? Is the 24V fuse open?
- Page 46 NOTE: LIMIT CIRCUIT LOCKOUT - Lockout PRESSURE SWITCH DID NOT OPEN - NUMBER IN UPPER LEFT HAND Check for: occurs if the limit, draft safeguard, flame rollout, or blocked vent switch (if used) is - Obstructed pressure tube. CORNER REPRESENTS FLASH CODE - Pressure switch stuck closed.
-
Page 47: Parts Replacement
PARTS REPLACEMENT INFORMATION GUIDE CASING GROUP BLOWER GROUP Gas valve Manual reset limit switches Outer door Blower housing Blower door Blower cutoff HEAT EXCHANGER GROUP Blower motor Top filler plate Heat exchanger cell Blower wheel Bottom filler plate Celt panel Bottom enclosure Capacitor (where used) Lox NOx baffle (California models...