Motorola ES400 User Manual
Enterprise digital assistant
Hide thumbs
Also See for ES400:
- User manual (104 pages) ,
- Application manual (78 pages) ,
- Quick start manual (21 pages)
Table of Contents
Advertisement
Quick Links
Advertisement
Table of Contents
Troubleshooting

Related Manuals for Motorola ES400


Summary of Contents for Motorola ES400
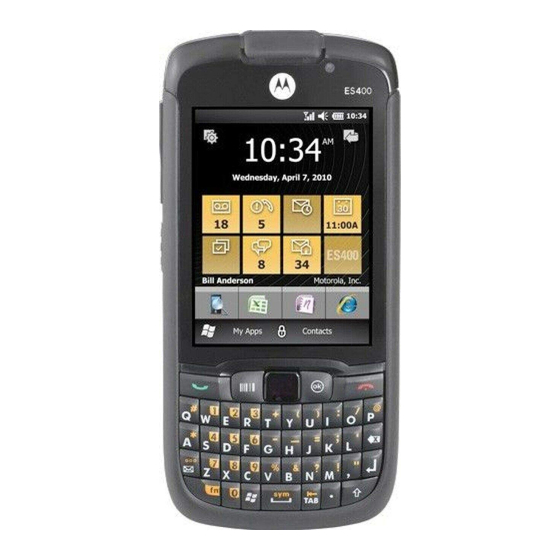
- Page 1 ES400 User Guide...
-
Page 3: User Guide
ES400 User Guide 72E-136310-01 Rev. A September 2010... - Page 4 Motorola. No right to copy a licensed program in whole or in part is granted, except as permitted under copyright law. The user shall not modify, merge, or incorporate any form or portion of a licensed program with other program material, create a derivative work from a licensed program, or use a licensed program in a network without written permission from Motorola.
-
Page 5: Revision History
Revision History Changes to the original manual are listed below: Change Date Description -01 Rev. A 08/2010 Initial release. - Page 6 ES400 User Guide...
-
Page 7: Table Of Contents
Installing a microSD Card ......................1-2 Installing the SIM Card (GSM Only) ....................1-4 Installing the Battery ........................1-5 Powering On the ES400 for the First Time ..................1-6 Network Activation ........................1-7 Power Off the ES400 ....................... 1-8 Suspend ........................... 1-8 Removing the microSD Card ....................... - Page 8 Resetting the ES400 ..........................2-21 Locking the ES400 ..........................2-21 Password Unlocking ........................2-21 Finger Swipe Un-locking ........................ 2-22 Notifications When ES400 is Locked ..................... 2-22 Chapter 3: Making Calls Introduction ............................3-1 Making a Call ............................3-1 Using the Phone Keypad ....................... 3-1 Smart Dialing ..........................
- Page 9 Table of Contents Conference Calling ..........................3-7 Making a 3-Way Call ..........................3-10 Voice Commander ..........................3-10 Call ..............................3-11 Find ..............................3-11 Redial ............................. 3-12 Callback ............................3-12 Start ............................... 3-12 Appointments ..........................3-12 Read .............................. 3-12 What time is it ..........................3-13 Call History .............................
- Page 10 ES400 User Guide Supported Applications ........................5-2 Fusion Setup ............................5-3 Wireless Zero Config Setup ......................... 5-6 More Information on WZC ......................5-7 Chapter 6: Messaging Introduction ............................6-1 Email ..............................6-1 Creating an Email Message ......................6-1 Viewing an Email Message ......................6-1 Replying to or Forwarding a Message ...................
- Page 11 A2DP/AVRCP Services ......................... 9-11 Chapter 10: Using GPS Navigation Introduction ............................10-1 Software Installation ..........................10-1 ES400 GPS Setup ..........................10-1 Operation ............................. 10-2 GPS Maps on microSD Cards ....................... 10-2 Answering a Phone Call While Using GPS ..................10-2 Losing the GPS Signal While in a Vehicle ..................
- Page 12 ES400 User Guide Locking the ES400 ..........................11-3 Switching Between Microsoft Lock and Lock Plus ................. 11-3 Lock Plus Setup ..........................11-3 Password Locking ........................11-4 Finger Swipe Locking ....................... 11-4 Editing Fingerprint Swipes ....................... 11-5 Edit Lock Screen Display ......................11-6 Audio Feedback ........................
- Page 13 Chapter 12: Accessories Introduction ............................12-1 USB Rapid Charge Cable ........................12-2 Single Slot USB Cradle ........................12-3 Charging the ES400 Battery ......................12-3 Communication with Host Computer ..................... 12-3 Vehicle Holder ............................. 12-5 Windshield Installation ........................12-5 Install the ES400 ..........................12-6 Connect Power ..........................
- Page 14 ES400 User Guide Vehicle Holder ..........................13-8 Appendix A: Technical Specifications ES400 Technical Specifications ......................A-1 ES400 ............................A-1 Headset ............................A-5 ES400 Accessory Specifications ......................A-6 Single Slot USB Cradle ........................A-6 Appendix B: Keypads Introduction ............................B-1 Special Character Key ......................... B-4 Appendix C: Windows Mobile Home Screen and Dialer Introduction ............................
- Page 15 Table of Contents xiii Appendix D: Software Installation Installation Using ActiveSync ......................D-1 Installation Using Storage Card ..................... D-1 Installation Using AirBEAM ......................D-2 MSP ............................... D-2 Update Loader Image ........................D-2 Download Update Loader Package ..................D-2 ActiveSync ..........................D-2 microSD Card ..........................
- Page 16 ES400 User Guide...
-
Page 17: About This Guide
About This Guide Introduction This guide provides information about using the ES400 Enterprise Digital Assistant (EDA) and accessories. NOTE Screens and windows pictured in this guide are samples and can differ from actual screens. Documentation Set The documentation set for the ES400 provides information for specific user needs, and includes: •... -
Page 18: Software Versions
Chapter Descriptions Topics covered in this guide are as follows: • Chapter 1, Getting Started provides information on getting the ES400 up and running for the first time. • Chapter 2, Using the ES400 provides information on using the ES400. -
Page 19: Notational Conventions
Chapter 11, Settings provides information for configuring the ES400. • Chapter 12, Accessories describes the available accessories and how to use them with the ES400. • Chapter 13, Maintenance & Troubleshooting includes instructions on cleaning and storing the ES400, and provides troubleshooting solutions for potential problems during ES400 operation. -
Page 20: Service Information
Software type and version number. Manufacturing Label Motorola responds to calls by email, telephone or fax within the time limits set forth in support agreements. If your problem cannot be solved by Motorola Enterprise Mobility Support, you may need to return your equipment for servicing and will be given specific directions. -
Page 21: Chapter 1 Getting Started
Inspect the equipment for damage. If any equipment is missing or damaged, contact the Motorola Enterprise Mobility Support center immediately. See page xviii for contact information. Prior to using the ES400 for the first time, remove the protective shipping film that covers the display and camera window. -
Page 22: Setting Up The Es400
Remove the Battery Cover To remove the battery cover: Hold the ES400 firmly in two hands as shown. With thumbs, push the battery cover toward the bottom of ES400. Lift the battery cover off the ES400. Battery Cover Removal Figure 1-1 Installing a microSD Card The microSD card slot, located under the battery, provides secondary non-volatile storage. - Page 23 Getting Started 1 - 3 To install the microSD card: Slide the SIM card holder up to unlock. Lift the SIM card holder. SIM Card Holder Open SIM Holder Figure 1-2 Slide the microSD card holder to the right to unlock. Lift the microSD card holder.
-
Page 24: Installing The Sim Card (Gsm Only)
Mobile phone service provider account details. • Information regarding service access and preferences. • Contact information, which can be moved to Contacts on the ES400. • Any additional subscribed services. NOTE For more information about SIM cards, refer to the service provider's documentation. -
Page 25: Installing The Battery
Getting Started 1 - 5 Insert SIM Card Figure 1-6 Close the SIM card holder and slide down to lock into place. Ensure that the SIM card is fully inserted and lying flat. Ensure that the end of the card is not laying on top of the SIM Card tab. SIM Card Tab Close and Lock SIM Card Holder Figure 1-7... -
Page 26: Powering On The Es400 For The First Time
Slide the battery cover up to lock into place. Powering On the ES400 for the First Time Press the Power button to turn on the ES400. The splash screen displays as the ES400 boots then the calibration window appears. NOTE The Calibration screen can be accessed by tapping Start > Settings > System > Screen > Align Screen button. -
Page 27: Network Activation
To activate on a CDMA network: Create an account with the CDMA carrier. Provide the MEID number (located on the back of the ES400 or tap Start > Settings > System Display Info) to the customer service representative. If a SIM card was not installed, a No SIM card found dialog box displays. -
Page 28: Power Off The Es400
1 - 8 ES400 User Guide Power Off the ES400 To power off the ES400, press and hold the Power button for at least five seconds. Shutdown Window Figure 1-10 Select Power Off to shutdown the ES400. Suspend ES400 goes into suspend mode when any of the following occur: •... -
Page 29: Removing The Microsd Card
CAUTION Save all data before removing the battery. Failure to do so may cause potential loss of data. Press the Power button to suspend the ES400. Slide the battery cover toward the bottom of the device. Remove the battery cover. -
Page 30: Installing The Tether
Replace the battery cover. Installing the Tether The ES400 comes with an optional tether to secure the stylus to the ES400. Remove the stylus from the back of the device. Feed one loop of the tether through the stylus (1), and pass the other loop through the first (2). -
Page 31: Chapter 2 Using The Es400
Chapter 2 Using the ES400 Introduction This chapter explains the indicators, buttons, status icons, and controls on the ES400, and provides basic instructions for using the device. Features Charging/Communication Battery Contacts Cover Illumination Light Camera Lens Finger Print Reader Ambient Light/Proximity... -
Page 32: Keypads
2 - 2 ES400 User Guide Keypads The ES400 comes in three keypad configurations; QWERTY, QWERTZ and AZERTY. Refer to Appendix B, Keypads for detailed information on the keypad configurations. QWERTY Keypad Figure 2-2 Special Characters To add special characters, press and hold a key until the available special characters appear on the display. Tap the special character. -
Page 33: Screen Navigation
Using the ES400 2 - 3 Single-hand Method Two-hand Method Entering Data on the Keypad Figure 2-4 Screen Navigation NOTE To change the default Optical Nav Pad settings and sensitivity tap Start > Settings > Personal > Nav pad. The optical nav pad on the keypad provides the ability to navigate on the screen using either 4-way navigation or a mouse cursor. -
Page 34: Es400 User Guide
2 - 4 ES400 User Guide Optical Nav Pad Using the Optical Nav Pad Figure 2-5 Finger Scrolling Finger scrolling can be used to scroll up and down web pages, documents, and lists such as the contacts list, file list, message list, calendar appointments list, etc. -
Page 35: Motorola Home Screen
Using the ES400 2 - 5 Motorola Home Screen The customizable Motorola Home screen provides faster and easier access to features and applications, and allows users to tailor the interface to improve their unique workflow and maximize on-the-job efficiency. Status Bar... - Page 36 2 - 6 ES400 User Guide Status Bar Icons Table 2-1 Icon Description Icon Description Notifications Reminder of an upcoming calendar event. One or more instant messages were received. One or more text messages were received. One or more voice messages were received.
-
Page 37: Cards
Cards provide quick access to completing common tasks. The number and type of cards available to an end user are configurable by the system administrator or the end user. By default, the ES400 ships with four cards. Swipe finger left or right on the screen to view adjacent cards. -
Page 38: Full Home Card
2 - 8 ES400 User Guide Full Home Card The Full Home card displays the current date and time and notifications with expanded information. Tap to Open Date and Time Carrier Name Tap to Configure Cards Tap to Configure Active Card Owner’s Name... -
Page 39: Weather Card
Using the ES400 2 - 9 Weather Card The Weather card display the weather for a selected city. Weather Card Figure 2-10 See to Weather Card Setup on page 11-19 for information on configuring the Weather card. Time Tracker Card The Time Tracker card provide a easy way for a worker to log hours spend at a job and output this information in a easy to use format. -
Page 40: My Apps Window
2 - 10 ES400 User Guide My Apps Window The My Apps window provides access to all the applications on the ES400. The window is configurable so that it can display favorite applications. To configure the My Apps window refer to My Apps Window Setup on page 11-17. - Page 41 Remote Desktop Mobile - Log onto Windows Search Phone - Search contacts, data, and NT server type computers and use all of the other information on the ES400. Refer to the programs that are available on that computer Microsoft Applications for Windows Mobile 6 from the ES400.
- Page 42 2 - 12 ES400 User Guide Programs Available on the Start Menu Table 2-3 Icon Description Icon Description Task Manager - Enables viewing of memory Tasks - Keep track of tasks. and CPU allocations and stops running processes. Text - Send an SMS or MMS message.
-
Page 43: Device Management
Tap an icon to open the associated tab. Scroll left or right to view more icons. Programs The Programs tab lists the programs that are currently running on the ES400 and allows for easy program switching, and a quick way to end processes. - Page 44 • RAM - Lists the total available RAM and the amount of RAM that is currently being used. Tap View Large Files to display files on the ES400 that are above a specific byte size. Sound Profiles The Sound Profiles tab provides direct access to sound-related profiles.
-
Page 45: Power & Radio
Using the ES400 2 - 15 Sound Profiles Tab Figure 2-18 To select a profile, tap the profile name. • Vibrate - Ring type, reminder and notifications are set to vibrate. Ring and system volumes are set to 0 (off). - Page 46 Bluetooth - Turns the Bluetooth radio on or off. • Device timeout - Sets the amount of time after inactivity that the ES400 goes into suspend mode. • Backlight - Sets the amount of time after inactivity that the ES400 backlight turns off.
-
Page 47: Alarms
Using the ES400 2 - 17 Alarms The Alarms tab controls the Windows Mobile enabled alarms. Tap Status Bar > Alarms Tab Figure 2-21 To turn an alarm on or off tap the alarm name. To change an alarm setting, tap Edit Alarm. -
Page 48: Status
Tap a notification to read the associated information. Settings The Settings tab lists the settings applications on the ES400. Tap an item in the list to open the associated setting application or folder. Slide the list up to view more settings icons. -
Page 49: Adjusting Volume
Adjusting Volume To adjust the system volume: Press the volume buttons on the right side of the ES400 to increase and decrease the system volume. The Volume dialog box appears. As you increase or decrease the volume, the slider moves accordingly. You can also move the slider to adjust the volume. -
Page 50: Charging Temperature
Charge batteries in temperatures from 0°C to 40°C (32°F to 104°F). Note that charging is intelligently controlled by the ES400. To accomplish this, for small periods of time, the ES400 alternately enables and disables battery charging to keep the battery at acceptable temperatures. The ES400 indicates when charging is disabled due to abnormal temperatures via its LED. -
Page 51: Resetting The Es400
To manually lock the ES400 tap the lock icon in the center of the Home screen Tile bar. Password Unlocking When the ES400 is not used for a period of time and the user tries to access the device, the Lock screen appears. Indicates PIN Password Enabled... -
Page 52: Finger Swipe Un-Locking
Finger Swipe Un-locking When the ES400 is not used for a period of time and the user tries to access the device, the Lock screen appears. Swipe your finger across the fingerprint reader in the direction used during enrollment. If the fingerprint sensor does not read the fingerprint properly, enter a PIN to un-lock the ES400. - Page 53 Using the ES400 2 - 23 Voice messages Missed calls Unread Emails Text messages Lock Screen Notifications Figure 2-30...
- Page 54 2 - 24 ES400 User Guide...
-
Page 55: Chapter 3 Making Calls
High-Speed Packet Access (HSPA) or Evolution Data-Optimized (EvDO) using Cellular Line. Making a Call NOTE The user can make emergency calls even when the ES400 is locked or when it is not activated. See Emergency Calling on page 3-5 for more information. -
Page 56: Smart Dialing
Tap the green Call Line or press Tap Cancel to cancel the call or tap Speaker to place the ES400 in speakerphone mode. When the call connects, the name or number appears in the Call Line. To place the call on hold tap the Call Line. -
Page 57: Using Contacts
Making Calls 3 - 3 Press the keys on the ES400 keypad that correspond to the phone number or contact to call. The contact panel lists contacts that match the sequence entered. Smart Dialing starts looking for numbers or contacts that match the sequence entered. -
Page 58: Using Call Log
Answering a Call When the ES400 receives an incoming call a dialog box appears. If the phone is set to ring, a ring tone sounds. Answer or ignore the incoming call. To answer an incoming call tap Answer or press To ignore the incoming call, tap Ignore. -
Page 59: Emergency Calling
The ES400 offers three audio modes for use during phone calls: • Handset Mode: Switches audio to the receiver at the top front of the ES400, so the user can use the ES400 as a handset. This is the default mode. -
Page 60: Using Call Log
3 - 6 ES400 User Guide Using Call Log Use Call Log to call someone who was recently called, or recently called in. The Call Log provides the time of all incoming, outgoing, and missed calls. Table 4-1 lists the call Log icons that appear in the Call Log window. -
Page 61: Conference Calling
Making Calls 3 - 7 Call Log Options Figure 3-4 Select an applicable option from the list. Depending on the option selected, the appropriate window displays. For example, select SMS to display the Text Messages window. to close the Options window. Conference Calling NOTE For use on GSM/UMTS networks. - Page 62 3 - 8 ES400 User Guide Two Calls Figure 3-5 Tap the Call Line 1 to make that call active. The second call go on hold. to create a conference call (three callers). Two Merged Calls Figure 3-6 To add a third caller tap .
- Page 63 Making Calls 3 - 9 To add the new caller to the conference tap Three Merged Calls Figure 3-8 to view all callers. Un-Merge Calls Figure 3-9 to remove a caller from the conference. To end the conference call, tap next to the Call Line.
-
Page 64: Making A 3-Way Call
Voice Commander is a speech dialog system that provides natural human interface for users to communicate seamlessly with the ES400. Users can make phone calls, look up contact information, launch programs or check calendars. Voice Commander contains the following features: •... -
Page 65: Call
To call a person at a location: Initiate Voice Commander. The ES400 responds with “Say command.” Say “Call Mary Smith at home.” The ES400 responds with “Call Mary Smith home, is it correct?” Say “Yes.” The ES400 responds with “Dialing.”... -
Page 66: Redial
3 - 12 ES400 User Guide Say “Find John Smith at work.” The ES400 responds with “More than one John Smith, please select.” Voice Commander displays a window with the two contacts. (System will show both Halley Johnson and Haley Johnson for user to select.) -
Page 67: What Time Is It
What time is it To find out the time of day: Initiate Voice Commander. The ES400 responds with “Say command.” Say “What time is it?” The ES400 responds with “The time is 3 p.m.” Call History To view the call history window: Initiate Voice Commander. -
Page 68: What Can I Say
Alternately tap Menu > Help to open the help file. Goodbye To exit the Voice Commander application, Say “Goodbye.” The ES400 responds with “Goodbye” and the application terminates. Voice Commander can be also terminated manually by tapping Menu > Exit. Note that goodbye will not be accepted during voice digit dialing operation. -
Page 69: Chapter 4 Phone Network Setup
ES400 upon startup. Manual Network Setup NOTE When an AT&T SIM card is installed in the ES400, the user interface for the CDMA settings is hidden. To restore access to these settings, please contact Motorola Enterprise Mobility Support. -
Page 70: Gsm Network Setup
Tap Start Activation button. On the Phone Network - CDMA Activation dialog box, tap Yes. On an active phone line, call your carrier to active the ES400. Provide the MEID number on the screen to the customer representative. When requested, tap Activate Now to activate the ES400. -
Page 71: Dual Network Usage
Phone Network Setup 4 - 3 Dual Network Usage The ES400 can be set up to be used on both a CDMA and GSM/UMTS networks and the user can switch between them. NOTE Each active network account uses its own phone number. -
Page 72: Configuring A Gsm Data Connection
Tap Start > Settings > Personal > Phone > Sounds. Select a ring type from the Ring type: drop-down list. The ring type changes the way the ES400 rings when it receives an incoming call. Regardless of the ring type selected, a dialog box appears on the ES400’s display... -
Page 73: Security
NOTE To use custom .wav, .mid, or .wma files as ring tones, use ActiveSync on the host computer to copy the file to the /Windows/Rings folder on the ES400. Then select the sound from the ring tone list Select a keypad tone from the Keypad: drop-down list. This selection determines the tone that sounds when entering a phone number on the keypad. -
Page 74: Gsm Services
4 - 6 ES400 User Guide Tap Enter. Tap OK to confirm the change and exit settings. GSM Services Use the GSM Services tab to configure settings for subscribed phone services. For example, block certain types of incoming and/or outgoing calls (page 4-6), disclose the caller’s identity when making outgoing calls... -
Page 75: Voice Mail And Text Messages
Enter PIN2 and tap Done. NOTE PIN2 is buffered in the ES400 indefinitely after entry and will not be requested again until a reboot of the ES400 has been performed. Should PIN2 be required, then the user must perform a reboot of the ES400. -
Page 76: Hac
4 - 8 ES400 User Guide • VCO - Receive TTY characters but transmit by speaking into microphone. • HCO - Transmit TTY characters but receive by listening to earpiece. • Off - Disable TTY functionality. Turn Hearing Aide Compatibility (HAC) on and off. -
Page 77: Chapter 5 Using Wlan
Chapter 5 Using WLAN Introduction WLANs allow the ES400 to communicate wirelessly inside a building. Before using the ES400 on a WLAN, the facility must be set up with the required hardware to run the WLAN (sometimes known as infrastructure). The infrastructure and the ES400 must both be properly configured to enable this communication. -
Page 78: Wireless Zero Config Overview
5 - 2 ES400 User Guide Refer to the Wireless Fusion Enterprise Mobility Suite User Guide for Version 3.20 for detailed information on using and configuring Fusion. To access the on-device Fusion Help tap Status Bar > > Help. Wireless Zero Config Overview WZC is a Microsoft wireless connection management utility that dynamically selects a wireless network to connect to based on a user's preferences and various default settings. -
Page 79: Fusion Setup
Using WLAN 5 - 3 Supported Applications (Continued) Table 5-1 Application Description Fusion Support WZC Support Manage Profiles Invokes the Manage Profiles application (which includes the Profile Editor Wizard) to manage and edit your list of WLAN profiles. Wireless Zero Config Invokes the Wireless Zero Config application to configure the WLAN. - Page 80 5 - 4 ES400 User Guide Profile ID Dialog Box Figure 5-2 Tap Next. The Operating Mode dialog box displays. In the Operating Mode drop-down list, select Infrastructure or Ad-hoc. Operating Mode Dialog Box Figure 5-3 Tap Next. The Security Mode dialog box displays.
- Page 81 Using WLAN 5 - 5 Select the Pass-phrase or Hexadecimal Keys radio button to indicate whether a pass-phrase or hexadecimal keys will be entered on the next page. Select the For added security - Mask characters entered check box to hide characters entered. Deselect this to show characters entered.
-
Page 82: Wireless Zero Config Setup
Tap Status Bar > > Wireless Zero Config. Wireless Zero Config Window Figure 5-9 The ES400 searches for wireless networks in the area and displays them in the window. Tap a network name. Configure Wireless Network Window Figure 5-10 In the Connects to drop-own list, select either The Internet or Work. -
Page 83: More Information On Wzc
Using WLAN 5 - 7 Configure Network Authentication Window Figure 5-11 In the Authentication drop-down list, select the authentication type. In the Data Encryption drop-down list, select the data encryption type. If WEP encryption is selected, enter an encryption key in the Network key text box. Tap Next. - Page 84 5 - 8 ES400 User Guide...
-
Page 85: Chapter 6 Messaging
Chapter 6 Messaging Introduction This chapter describes how to use and setup Email, SMS Messaging and MMS Messaging. Email Use Messaging to send and receive Email. Creating an Email Message To create an email message: Press Select an email account. >... -
Page 86: Replying To Or Forwarding A Message
If the ES400 phone feature is on, the text message is sent. If it’s off, a prompt displays to turn on the phone feature. The message is saved in the Drafts folder and sent when the ES400 phone feature is turned on. -
Page 87: Replying To An Sms Message
Messaging 6 - 3 Text Message Notification Icon New Text Message Notification Figure 6-1 The Caller Identification feature matches incoming text message numbers with those stored in Contacts indicating who is sending the message. Tap to reply to the message. Tap to call the sender, or save, dismiss or delete the message. -
Page 88: Mms Messaging
Tap Done after adding information. to attach a picture or video stored on the ES400 to the message. to attach a sound file stored on the ES400 to the message. -
Page 89: Viewing An Mms Message
Messaging 6 - 5 Viewing an MMS Message To view an MMS message: Press > Text Messages. Tap the MMS message. In the threaded message, tap the MMS icon to view the message. Tap Contents to view a list of files included in the message. On the Message Contents screen: Tap Menu >... - Page 90 6 - 6 ES400 User Guide...
-
Page 91: Chapter 7 Data Capture
To read a bar code, a scan-enabled application is required. The ES400 contains the DataWedge application that allows the user to enable the camera, decode the bar code data and display the bar code content. -
Page 92: Data Wedge
DataWedge allows the user to input captured bar code data into a text field of an application. NOTE When DataWedge is enabled, the Camera button on the right side of the ES400 enables data capture. After using the data capture feature, disable DataWedge to return the Camera button to its default function. -
Page 93: Chapter 8 Using The Camera
Camera View Finder Figure 8-1 To take a picture: Point the ES400 at the subject. Press the Camera button on the side of the ES400 or the Optical Nav Pad. The ES400 takes the picture and stores it in memory. - Page 94 Tap Menu > Panorama and select either Horizontal or Vertical and then tap Close. Point the ES400 at the subject. Press the Camera button on the side of the ES400 or the Optical Nav Pad. The ES400 takes the picture and displays two alignment targets on the screen.
-
Page 95: Camera Settings
Low, Medium and High. Increasing the size and quality of the picture increases the size of the file saved on the ES400. The size of the file displays below the Quality boxes. Also listed is the number of pictures that can be stored on the ES400. -
Page 96: Panorama
• Storage - Allows the user to either save the pictures to the ES400’s built in memory or to a microSD card. Tap the Storage option to select either Device or SD Card. Note that the same feature exists in the Video Capture menu. -
Page 97: About
Point the ES400 at the subject. Press the Camera button on the side of the ES400 or the Optical Nav Pad. The ES400 begins recording. A timer appears at the top of the screen indicating the running time of the video. -
Page 98: Video Menu Options
Storage Allows the user to either have the video saved to the ES400’s built in memory or to a microSD card. Important to note is that the same feature exists in the Photo menu. These are intended to be independent settings. So, it is possible that a user could have images saved to the ES400’s memory and videos stored on the microSD card. -
Page 99: Viewing Pictures And Video
Viewing Pictures and Video Use the Gallery to view pictures and videos stored on the ES400. Press the Camera button on the side of the ES400. Tap the screen to display the Control bar and then tap the Gallery icon. -
Page 100: Select Mode
8 - 8 ES400 User Guide Enter a name for the new album and tap Save. Tap the album name to view the pictures in the album. Select Mode Allows the user to select one or more thumbnails from within the Gallery. Once selected, the menu options change to reflect actions that can be done to pictures or videos. -
Page 101: Annotating Images
Using the Camera 8 - 9 Add Annotation Add Audio Comment View Image Information Close Open Menu Delete Image Go to Camera Mode View Gallery Image Viewer Figure 8-8 Tap the screen to display the Status bar at the top of the screen and the Control bar at the bottom of the screen. Annotating Images The user can place marks permanently on the image. -
Page 102: Audio Commenting
8 - 10 ES400 User Guide Tap Save to save the image with the marks or tap Cancel to discard the marks. Once the image is saved the marks are imbedded into the image and are no longer editable. Audio Commenting The user can add an audio recording to the image. -
Page 103: View Or Edit Video Information
Using the Camera 8 - 11 View Image Information Close Open Menu Delete Image Go to Camera Mode View Gallery Image Viewer Figure 8-10 Tap the screen to display the Status bar at the top of the screen and the Control bar at the bottom of the screen. The bars disappear after six seconds of inactivity. - Page 104 8 - 12 ES400 User Guide...
-
Page 105: Chapter 9 Bluetooth
Motorola Enterprise Smart Phones to operate in any infrastructure. The Bluetooth radio in this ES400 operates as a Class 2 device power class. The maximum output power is 2.5 mW and the expected range is 10 meters (32.8 feet). A definition of ranges based on power class is difficult to obtain due to power and device differences, and whether one measures open space or closed office space. -
Page 106: Security
Recommendations are: • Perform pairing in a secure environment • Keep PIN codes private and don't store the PIN codes in the ES400 • Implement application-level security. The Microsoft stack supports Smart-pairing. For detailed information, refer to the Microsoft MSDN. -
Page 107: Bluetooth Power States
Turn off the Bluetooth radio to save power or if entering an area with radio restrictions (e.g., an airplane). When the radio is off, other Bluetooth devices cannot see or connect to the ES400. Turn on the Bluetooth radio to exchange information with other Bluetooth devices (within range). -
Page 108: Disabling Bluetooth
Un-check the Turn On Bluetooth checkbox. Tap OK. Discovering Bluetooth Device(s) The ES400 can receive information from discovered devices without bonding. However, once bonded, the ES400 and a bonded device exchange information automatically when the Bluetooth radio is on. See Bonding with Discovered Device(s) on page 7-34 for more information. -
Page 109: Available Services
After the passcodes have been accepted on both sides, a trusted (“paired”) connection is established. Available Services NOTE Some devices might not require a PIN. This depends upon the device’s authentication. The ES400 with Microsoft Bluetooth stack offers the following services: • OBEX Object Push Services via Beam •... -
Page 110: Internet Sharing
When completed, Tap to send changes to Done. Internet Sharing Internet Sharing allows the user to connect a computer or laptop to the ES400 and use the ES400 as a modem to connect to an office network or ISP. -
Page 111: Hands-Free Services
Select the headset name and tap Next. The Passcode window appears. Enter the headset’s passcode, if required. Tap Next. The ES400 connects to the headset. Refer to the headset user manual for instructions on communicating with a Bluetooth device. Serial Port Services Use the wireless Bluetooth serial port connection similar to a physical serial cable connection. -
Page 112: Activesync Using Bluetooth
9 - 8 ES400 User Guide Tap Start > Settings > Bluetooth > Devices. Tap Add new device. The ES400 begins searching for discoverable Bluetooth devices in the area. Select a device from the list. Tap Next. The Enter Passcode window appears. - Page 113 Figure 9-5 On the Allow connections to one of the following drop-down list, select the COM port with the number you noted earlier. On the ES400, tap Start > ActiveSync. Tap Menu > Connect via Bluetooth. Synchronization is automatically initiated.
-
Page 114: Phone Book Access Profile Services
If Yes is selected, contacts from the ES400 are transferred to the car kit. Dial-Up Networking Services Dial-up networking allows the user to connect a PC or laptop to the ES400 and use the ES400 as a modem to connect to an office network or ISP. -
Page 115: A2Dp/Avrcp Services
Ensure that the two devices are within 10 meters (32.8 feet) of one another. Tap Start > Settings > Bluetooth > Devices. Tap Add new device. The ES400 begins searching for discoverable Bluetooth devices in the area. Select a HID device from the list. - Page 116 9 - 12 ES400 User Guide...
-
Page 117: Chapter 10 Using Gps Navigation
WARNING When using the ES400 in a vehicle, it is the user’s responsibility to place, secure and use in a manner that will not cause accidents, personal injury or property damage or obstruct their view. It is the responsibility of the driver to operate the vehicle in a safe manner, maintain observation of all driving conditions at all times, and not become distracted by the device to the exclusion of safe driving practices. -
Page 118: Operation
ES400 from receiving a GPS signal from satellites. To improve GPS signal strength, place the ES400 where there is a clear view of the sky. A direct line of sight is required between the ES400 and the GPS satellites to access information from the satellites. - Page 119 Using GPS Navigation 10 - 3 GPS Assistance Window Figure 10-1 To set the source of the data tap Source and select one of the options: WAN (default), WLAN, Active Sync, Any, None. To set the frequency of updating the data tap Update Frequency and select one of the options: On Demand (default), 1 Day, 2 Days, 4 Days, 7 Days.
- Page 120 10 - 4 ES400 User Guide...
-
Page 121: Chapter 11 Settings
Chapter 11 Settings Introduction This chapter provides information for customizing the ES400. Settings Folder Table 11-1 lists applications pre-installed on the ES400. Tap Status Bar > or tap Start > Settings to open the Settings tab. Setting Applications Table 11-1... - Page 122 Phone Network Setup - Configure the of modem connections for your device, ES400 network. such as phone dial-up, cellular, Bluetooth, and more, so that the ES400 can connect to the Internet or a private local network. GPS Assist - Modify the settings associated...
-
Page 123: Locking The Es400
Tap Start > Setting > Lock Switch. Select either Lock Plus for fingerprint and pin security or Microsoft Lock for pin security. Tap Save and then tap OK. Lock Plus Setup Use Lock Plus to set up a password or enroll fingerprints to un-lock the ES400. -
Page 124: Password Locking
Tap Start > Settings > Lock. Lock Plus Settings Window Figure 11-1 Tap Auto lock to select an inactivity timeout period before the ES400 locks, and tap OK. (If Disabled is selected, the ES400 will not auto-lock.) Password Locking If the device is configured to connect to a network, use a strong (difficult to figure out) password to NOTE help protect network security. -
Page 125: Editing Fingerprint Swipes
Settings 11 - 5 Add Fingerprint Window Figure 11-2 Pull the tip of a finger across the fingerprint reader in a downward motion (toward the camera lens) or an upward motion (toward the Power button) starting at the bottom of the fingerprint. Push the tip of a finger across the fingerprint reader in an upward motion (toward the Power button) or a downward motion (toward the camera lens) starting at the top of the fingerprint. -
Page 126: Edit Lock Screen Display
To enable an audio sound upon a successful finger swipe: Tap Audio feedback to toggle audio on and off. Microsoft Locking Locking the ES400 turns off keyboard and touch screen functionality. This is helpful when the ES400 is turned on and you want to prevent accidental key presses. -
Page 127: Password Locking Setup
Messaging window. Password Locking Setup Use the Password window to set a password to disable unauthorized access to the ES400. If the device is configured to connect to a network, use a strong (difficult to figure out) password to NOTE help protect network security. -
Page 128: Switching The Dialer
Ring type - Set the type of ring that occurs when an incoming call is received. • Reminder - Set the type of ring that occurs when a ES400 generates a reminder. • Notification - Set the type of ring that occurs when a notification is received. -
Page 129: Power Profiles
Tap the option to select each feature listed and select an available option. • Device timeout - Sets the amount of time after inactivity that the ES400 goes into suspend mode. • Backlight - Sets the amount of time after inactivity that the ES400 goes into suspend mode. -
Page 130: Alarms
Tap Start > Settings > System > Backlight & Keylight. Use the Battery Power tab to set the backlight and keylight settings when the ES400 is on battery power. Use the External Power tab to set the backlight and keylight settings when the ES400 is on external power. -
Page 131: Accelerometer
Settings 11 - 11 Accelerometer The user has the ability to set behaviors when the ES400 is in motion, has a certain orientation of if the device is face down. Display Tab Use the Display tab to set the ES400 behaviors and to set the ES400 to automatic operations. -
Page 132: Key Remapping
11 - 12 ES400 User Guide Key Remapping The KeyRemap application provides the ability to remap hardware keys to characters and applications. To open the KeyRemap application tap Start > Settings > Personal > KeyRemap. Key Remap Window Figure 11-8... -
Page 133: Remap A Key To A Function
Settings 11 - 13 Tap Remap to. Tap Hard keypad. On the keypad, select a key to remap to. Tap Use key in. Select All Programs or a specific program that the key remap will function in. Tap Save and then tap OK. Remap a Key to a Function To remap a key to a function: Press the key on the keypad to remap. -
Page 134: Remap Simultaneous Keys
11 - 14 ES400 User Guide Close the soft keypad. Tap Use key in. Select All Programs or a specific program that the key remap will function in. Tap Save and then tap OK. Remap Simultaneous Keys To remap simultaneous key presses: Press the first key and then the second key. -
Page 135: Master Reset
Settings 11 - 15 Master Reset Use the Master Reset application to restore the ES400 to the default settings and remove personal information. Data on the SIM card and microSD card is not deleted. To reset the ES400: Tap Start > Settings > System > Master Reset. -
Page 136: Program Shortcuts Setup
11 - 16 ES400 User Guide Program Shortcuts Setup To change program shortcuts: Tap My Apps > Edit > Dock. Add Shortcut Icon Figure 11-13 Tap a shortcut button to remove the assigned shortcut. Tap a new program icon and then tap Save. -
Page 137: My Apps Window Setup
Settings 11 - 17 My Apps Window Setup To create a customized application list: Tap My Apps > Edit > View > Create New. In the text box, enter a name for the list. Scroll through the list and tap an icon to add to the new list. Each icon highlights indicating it is selected. As icons are added to the list, the icon counter increments. -
Page 138: Card Setup
11 - 18 ES400 User Guide Card Setup The cards on the Motorola Home screen can be configured and re-ordered. On any card, tap to flip the card over. Back of Card Figure 11-15 Re-Order Cards Each icon on the card back represents a card. To re-order the cards, press and hold an icon and then drag it to a new location. -
Page 139: Weather Card Setup
Settings 11 - 19 to view a description of the card. Tap OK to return to the Home screen. Weather Card Setup The Weather card displays the current weather for your location plus the next three days provided by Accuweather.com. Tap to manually update the data. -
Page 140: Time Tracker Setup
11 - 20 ES400 User Guide Time Tracker Setup The Time Tracker card is an application that keep track of time spent on projects. Project data is stored in the /Windows directory in file TimeTracker_data_file.csv. Time Tracker Main Screen Figure 11-18 To create a new project, tap the Settings icons. -
Page 141: Email Setup
The ES400’s Messaging application lets users access and manage multiple email accounts simultaneously in one convenient location. To send and receive email messages through an ISP (Internet Service Provider) account, or to use the ES400 to access corporate email through a VPN (Virtual Private Network), first set up an IMAP or POP account. -
Page 142: Manual Email Setup
This name appears within the list of available email accounts on the E-mail page. Tap Next. Tap the Automatic Send/Receive: field and select the time interval you would like for the ES400 to send and check for new email messages. - Page 143 Tap Done once completed making updates to these settings. Tap Next. In the Automatic Send/Receive: drop-down list select the time interval for the ES400 to send and check for new email. Tap the Review all download settings link for additional download settings and options.
-
Page 144: Editing An Email Account
Work (behind a firewall) or a data connection. Tap Done and then tap Next. In the Automatic Send/Receive drop-down list, select the time interval the ES400 sends and checks for new email. In the Download messages drop-down list, select the age range of messages to download from the server to the ES400. -
Page 145: Setting Email Signatures
Using Microsoft ActiveSync With a Corporate Outlook Account Microsoft ActiveSync can be used to sync corporate email with the ES400. If your company uses Microsoft Exchange Server 2003 and 2007 as the corporate email system, you can use Exchange ActiveSync to wirelessly synchronize your email and organizer information directly with your company’s Exchange server. -
Page 146: Mms Messaging
Leave the Save password checkbox selected to avoid having to enter the password whenever logging on to the account, and tap Next. The ES400 begins to try detecting the Exchange Server information automatically. Tap Skip to manually enter the information. -
Page 147: Voice Commander
To configure Voice Commander setting tap Start > Settings > Personal > Voice Commander Settings. Contacts Settings The Contacts tab lists all the names in the ES400 Contacts and SIM card (if installed). When a new contact is created, Voice Commander automatically updates the recognition database. -
Page 148: Application Settings
11 - 28 ES400 User Guide To record a voice tag: Select a contact. After the beep, say the contacts name or nickname. For example: The Boss. After the second beep, repeat it. Voice Commander builds the recorded voice tag. -
Page 149: Music Settings
Settings 11 - 29 Music Settings The Music tab lists all the music files found on the ES400. When a media file is downloaded, Voice Commander automatically updates the recognition database. A check in a box indicates that the music file can be recognized normally. An unchecked box indicates that the music file is not in the recognition range. -
Page 150: Digit Setting Settings
11 - 30 ES400 User Guide Digit Setting Settings Use the Digit Setting tab to set valid phone number lengths to improve digit recognition accuracy. The user can change the default settings based on the local telecom requirement. The user can also select No constraint checkbox to disable this limitation, though with the trade off of increased errors caused by surrounding noises. -
Page 151: Chapter 12 Accessories
CAC400-1000R Charges the ES400 in a vehicle holder. Charge Cable Miscellaneous Power Supply PWRS-124306-01R Provides power to the ES400 or Single Slot USB Cradle using the USB Rapid Charge Cable. 1540 mAh Battery BTRY-ES40EAB00 Replacement battery. 3080 mAh Battery BTRY-ES40EAB02 Replacement battery. -
Page 152: Usb Rapid Charge Cable
Package of three screen protectors. Host Adapter 25-133854-01R Provides host connections. USB Rapid Charge Cable Use the USB Rapid Charge cable to connect the ES400 to the power supply for charging or to a host computer for communication. USB Rapid Charge Cable Figure 12-1... -
Page 153: Single Slot Usb Cradle
Accessories 12 - 3 Single Slot USB Cradle Use the Single Slot USB Cradle to charge the ES400 and to synchronize information between the ES400 and a host computer. NOTE The Host Adapter can only be connected to the ES400 and not the Single Slot USB cradle. - Page 154 12 - 4 ES400 User Guide USB Rapid Charge Cable Communication Setup Figure 12-3 Place the ES400 into the cradle. The USB Connect dialog box appears. Tap ActiveSync RNDIS or ActiveSync Serial. Tap Connect.
-
Page 155: Vehicle Holder
Accessories 12 - 5 Vehicle Holder WARNING Some countries prohibit the mounting of any electronic device in any location on the vehicle dashboard. Be sure to check with local laws acceptable mounting areas before installing the auto mounting kit. Install the vehicle mount on the surface of the vehicle that is reasonably flat and free of dirt and oil. Clean the mounting surface with a glass cleaner and a clean cotton cloth. -
Page 156: Install The Es400
Install the ES400 To install the ES4000 into the Vehicle Holder: Place the ES400 bottom first into the holder. Push the ES400 back until it snaps into place. Insert ES400 into Vehicle Holder Figure 12-6 Position the ES400 for best viewing. -
Page 157: Connect Power
Accessories 12 - 7 Tighten Nut Figure 12-7 Connect Power To connect power to the Vehicle Holder: If required, connect the micro-USB connector of the auto charger to the input power connector in the vehicle holder. Commercial Grade Auto-Charger Figure 12-8 Consumer Grade Auto Charger Figure 12-9... -
Page 158: Remove The Es400
The LED indicator flashes green indicating the ES400 is charging. Remove the ES400 To remove the ES400 from the Vehicle Holder lift the ES400 up and then remove from the bottom of the holder. Remove ES400 from Vehicle Holder Figure 12-11... -
Page 159: Host Adapter
Accessories 12 - 9 Host Adapter Use the host adapter to connect accessory devices, such as printer or USB flash drives) to the ES400. Host Adapter Connection Figure 12-12 NOTE The Host Adapter can only be connected to the ES400 and not the Single Slot USB cradle. -
Page 160: Holster
12 - 10 ES400 User Guide Holster The holster clips onto a belt and stores the ES400 when not in use or when using a Bluetooth headset. Soft Holster Figure 12-13 Place the ES400 with the display toward the body into the holster. The ES400 automatically goes into suspend mode (depending upon the holster application setting). -
Page 161: Activesync
Changes made on the ES400 or host computer appear in both places after synchronization. NOTE When the ES400 is connected to a host computer and an ActiveSync connection is made, the WLAN radio is disabled. This is a Microsoft security feature to prevent connection to two networks at the same time. -
Page 162: Synchronization With The Es400
Select Start > > on the host computer. Programs Microsoft ActiveSync NOTE Assign each ES400 a unique device name. Do not try to synchronize more than one ES400 to the same name. In the window, select > . The window appears. -
Page 163: Chapter 13 Maintenance & Troubleshooting
Do not store the ES400 in any location that is dusty, damp or wet. • Use a soft lens cloth to clean the ES400. If the surface of the ES400 screen becomes soiled, clean it with a soft cloth moistened with a diluted window-cleaning solution. -
Page 164: Cleaning
Always wear eye protection. Read warning label on compressed air and alcohol product before using. If you have to use any other solution for medical reasons please contact Motorola for more information. WARNING Avoid exposing this product to contact with hot oil or other flammable liquids. If such exposure occurs, unplug the device and clean the product immediately in accordance with these guidelines. -
Page 165: Cleaning The Es400
Dip the cotton portion of the cotton tipped applicator in isopropyl alcohol. Rub the cotton portion of the cotton tipped applicator back-and-forth across the interface connector on the back of the ES400. Do not leave any cotton residue on the connector. Repeat at least three times. -
Page 166: Cleaning Cradle Connectors
13 - 4 ES400 User Guide Inspect the area for any grease or dirt, repeat if required. Replace the battery in the ES400. Cleaning Cradle Connectors To clean the connectors on a cradle: Disconnect the USB Rapid Charging cable from the cradle. -
Page 167: Troubleshooting
System crash. Perform a reboot. See Resetting the ES400 on page 2-21. Battery did not Battery failed. Replace battery. If the ES400 still does not operate, perform a charge. reboot. See Resetting the ES400 on page 2-21. No power to cradle Ensure that power is applied to the cradle or cable. - Page 168 Refer to the EMDK. bar code. ES400 is not If the ES400 does not beep on a good decode, set the application programmed to to generate a beep on good decode. generate a beep. Phone service is not SIM card might not Re-install SIM card and ensure that it is seated properly.
-
Page 169: Bluetooth Connection
Verify that other batteries charge properly. If so, replace the faulty battery. No power to cradle. Ensure that power is applied to the cradle. The ES400 LED flashes green to indicate that the ES400 is charging. The ES400 is not Remove and re-seat the ES400 onto the cradle properly. -
Page 170: 13 - 8 Es400 User Guide
ES400 battery is not ES400 was Replace the ES400 in the cradle. The 1540 mAh battery fully recharging. removed from the charges in less than three hours and the 3080 mAh battery cradle too soon. -
Page 171: Appendix A Technical Specifications
Appendix A Technical Specifications ES400 Technical Specifications The following tables summarize the Enterprise Smart Phone’s intended operating environment and technical hardware specifications. ES400 ES400 Technical Specifications Table A-1 Item Description Physical Characteristics Dimensions With 1540 mAh battery: Height: 129 mm (5.08 in.) Width: 60.4 mm (2.38 in.) - Page 172 ® Microsoft Windows Mobile™ 6.5.3 Professional Memory 256 MB RAM/1 GB Flash Interface Motorola Enterprise UI; customizable home screen, enhanced dialer and enterprise camera solution Output Power USB: 5 VDC @ 100 mA max. User Environment Operating Temperature -0°C to 40°C (-32°F to 104°F) Storage Temperature -40°C to 70°C (-40°F to 158°F)
- Page 173 Antenna Internal antenna Voice Communications Voice-over-IP ready (with P2P, PBX, PTT clients), Wi-Fi™-certified, IEEE 802.11 a/b/g direct sequence wireless LAN, Wi-Fi Multimedia (WMM), Motorola Voice Quality manager (VQM) Wireless PAN Data and Voice Communications Bluetooth Class II, v2.0 with Enhanced Data Rate (EDR); integrated antenna...
- Page 174 A - 4 ES400 User Guide ES400 Technical Specifications (Continued) Table A-1 Item Description Wireless Wide Area Network GSM-HSDPA Global: 3GPP TS 51.010, 3GPP TS 34.121, 3GPP TS 34.123, GCF and PTCRB approved module USA: FCC Part 22, Part 24...
-
Page 175: Headset
US Postnet UK 4-state Australian 4-state Japanese 4-state Dutch Postal UK Intellimail Signature Image Headset ES400 accepts 2.5 mm wired headset jacks with the following jack arrangement. GND SPEAKER MIC Mono Headset Stereo Headset LEFT RIGHT SPEAKER SPEAKER Headset Jack... -
Page 176: Es400 Accessory Specifications
A - 6 ES400 User Guide ES400 Accessory Specifications Single Slot USB Cradle Single Slot USB Cradle Technical Specifications Table A-3 Feature Description Dimensions Height: 56 mm (2.2 in.) Width: 81.6 mm (3.21 in.) Depth: 93 mm (3.66 in. Weight 228 g (8.04 oz.) -
Page 177: Appendix B Keypads
Appendix B Keypads Introduction The ES400 offers three types of alphanumberic keypad configurations: • QWERTY • AZERTY • QWERTZ. The keypad produces the 26-character alphabet (A-Z, both lowercase and uppercase), numbers (0-9), and assorted characters. The keypad is color-coded to indicate which modifier key to press to produce a particular character or action. - Page 178 B - 2 ES400 User Guide AZERTY Keypad Figure B-2 QWERTZ Keypad Figure B-3 Keypad Descriptions Table B-1 Action fn Key Accesses the secondary layer of characters and actions (shown on the keypad in orange). Press the Orange key once to activate this mode temporarily, followed by another key.
- Page 179 Keypads B - 3 Keypad Descriptions (Continued) Table B-1 Action End (Red Phone): press when the phone keypad window displays to stop dialing or end a call. Scan Activates the bar code reader in a scan enabled application. Optical Nav Pad Use to navigate across the screen and press to select items.
-
Page 180: Special Character Key
Produces a space character. Move from one field to another. Special Character Key To add special characters using the ES400, press and hold the key until the special characters appear on the screen. Select the desired character. Table B-2 lists the special characters available. -
Page 181: Appendix C Windows Mobile Home Screen And Dialer
Appendix C Windows Mobile Home Screen and Dialer Introduction The appendix describes the functionality of the optional Windows Mobile Home screen and Dialer. Windows Mobile Home Screen The Windows Mobile Home screen is scrollable and contains a list of application plug-ins and an Information Status bar. - Page 182 C - 2 ES400 User Guide Touch and hold the screen with your finger and move the Home screen up and down. As the application names move under the Information Status bar, information relevant to that application appear in the bar.
-
Page 183: Classic Today Screen
Windows Mobile Home Screen and Dialer C - 3 Application Icon Application Information Information Bar Example Figure C-4 To customize the Home screen, tap Start > Settings > Today. On the horizontal scroll, use Appearance to customize the background and the Items to change the display format. Classic Today Screen The user can change the Today screen to the classic layout that is used in Windows Mobile 6.1. -
Page 184: Start Screen
Windows Mobile Dialer Use the ES400 to make phone calls, set up speed dials, keep track of calls, and send text messages. Your wireless service provider may also provide other services such as voice mail, call forwarding, and caller ID. -
Page 185: Making A Call
Tap Microsoft Dialer option. Tap Save. Making a Call NOTE You can make emergency calls even when the ES400 is locked or when a SIM card is not installed. See Emergency Calling on page C-9 for more information. With the ES400, you can make a call from the phone, contacts, speed dial and call history. -
Page 186: Using Contacts
C - 6 ES400 User Guide the Phone keypad, contact names such as the following will be considered matches: “Smith, Bernard”, “Adams, John”, “Carlson, Eileen”, “Dillon, Albert”, “Childs, Larry”, “Cooper, Robert” and “Parks, Celine”. • If the matching list is long narrow down the search further by entering another letter. Using the same example above, tap “3”... -
Page 187: Using Call History
Tap the phone icon next to the number to begin dialing and return to the phone keypad. Press on the ES400 keypad to stop dialing or end the call. Making a Speed Dial Call Use Speed Dial to call someone saved in the speed dial directory. -
Page 188: Answering A Call
To stop dialing or end the call, press Answering a Call A dialog box appears on the ES400 when it receives an incoming call. If the phone is set to ring, a ring tone sounds. Answer or ignore the incoming call. -
Page 189: Incoming Call Features
Windows Mobile Home Screen and Dialer C - 9 Incoming Call Features • You can use other programs on the ES400 during a call. To switch back to the Phone, press or tap Start > Phone. Press to end the call. -
Page 190: Using Speed Dial
C - 10 ES400 User Guide Using Speed Dial Create speed dial numbers to dial frequently called numbers with a single tap. Before creating a speed dial entry, ensure the phone number exists in Contacts. Adding a Speed Dial Entry To add a speed dial entry from the phone keypad: Ensure the contact and phone number are in the Contacts list. -
Page 191: Editing A Speed Dial Entry
Windows Mobile Home Screen and Dialer C - 11 Editing a Speed Dial Entry Press Tap Speed Dial button. Speed Dial Contact List Figure C-13 Tap and hold the contact name and then tap Edit. Change the name, phone number, or location information. Tap OK. -
Page 192: Managing Call History
C - 12 ES400 User Guide Call History Icons Table C-2 Icon Description This icon appears next to the contact information for all outgoing calls. This icon appears next to the contact information for all incoming calls. This icon appears next to the contact information for all missed calls. -
Page 193: Deleting All Call History Items
Windows Mobile Home Screen and Dialer C - 13 Tap Reset. (The All Calls: counter cannot be reset.) Tap OK to exit the Call Timers window. Deleting All Call History Items Press to display the Phone dialer. From the Phone dialer, tap Call History. Select Delete all calls. -
Page 194: Swapping Calls (Gsm
C - 14 ES400 User Guide From the Phone dialer, tap Call History. Tap and hold an item in the list. Call History - Menu Figure C-16 Select an applicable item from the menu, as needed. Depending on the item selected, the appropriate window displays. For example, select Send Text message to display the Text Messages window. -
Page 195: Swapping Calls (Cdma
Windows Mobile Home Screen and Dialer C - 15 Tap Swap to move from one call to the other. Tap End or press to end each call. Swapping Calls (CDMA) To swap between two incoming phone calls: Tap Answer to connect to the first call. Answer a Call Figure C-18 When a second call arrives, tap Answer. -
Page 196: Conference Calling (Gsm
C - 16 ES400 User Guide Conference Calling (GSM) NOTE Conference Calling and the number of conference calls allowed may not be available on all services. Please check with your service provider for Conference Calling availability. To create a conference phone session with multiple people: Press to display the Phone dialer. -
Page 197: Appendix D Software Installation
Appendix D Software Installation The user can install applications and operating system updates on the ES400 using the following: • Microsoft ActiveSync 4.5 or higher • Storage Card • • AirBEAM • Image Loader (for updating the operating system). Refer to the Microsoft Windows Mobile 6 Help file for information on CAB files. -
Page 198: Installation Using Airbeam
Refer to the AirBEAM Smart Windows CE Client Product Reference Guide, p/n 72-63060-xx, for instructions for AirBEAM Smart client. The MSP 3 Client Software is a set of software components that come pre-installed on the ES400. The MSP 3 Client software consists of the following components: The Rapid Deployment Client provides support for MSP 3 Staging functionality, provides support for the MSP 3 Legacy Staging process, and provides support for backward-compatible legacy MSP 2.x Legacy Staging... -
Page 199: Microsd Card
The Update Loader application looks for the update loader file in the root directory of the microSD card. When it finds the file, it loads the update loader package onto the ES400. After completion, the ES400 resets and the calibration screen appears. - Page 200 D - 4 ES400 User Guide...
-
Page 201: Glossary
The pattern of 0 and 1 values within the byte determines its meaning. Bits per Second (bps). Bits transmitted or received. boot or boot-up. The process an ES400 goes through when it starts. During boot-up, the ES400 can run self-diagnostic tests and configure hardware and software. - Page 202 Glossary - 2 ES400 User Guide COM port. Communication port; ports are identified by number, e.g., COM1, COM2. Cradle. A cradle is used for charging the terminal battery and for communicating with a host computer, and provides a storage place for the terminal when not in use.
- Page 203 Glossary - 3 IP Address. (Internet Protocol address) The address of a computer attached to an IP network. Every client and server station must have a unique IP address. A 32-bit address used by a computer on a IP network. Client workstations have either a permanent address or one that is dynamically assigned to them each session.
- Page 204 Glossary - 4 ES400 User Guide RAM. Random Access Memory. Data in RAM can be accessed in random order, and quickly written and read. Resolution. The narrowest element dimension which is distinguished by a particular reading device or printed with a particular device or method.
- Page 205 Index Numerics charging ..... . 1-2, 2-19, 12-3 installing ......1-2, 1-5 3-Way Calling .
- Page 206 Index - 2 ES400 User Guide using single slot USB cradle ....12-3 GPS assist ....... . 11-2 charging error .
- Page 207 MSP Agent ....... 2-11 power off the ES400 ......1-8 muting a call .
- Page 208 GSM starting the ES400 ......1-6 call barring ......4-6 status .
- Page 209 Index - 5 voice mail ........4-7 Weather card .
- Page 210 Index - 6 ES400 User Guide...
- Page 212 1-800-927-9626 http://www.motorola.com/enterprisemobility MOTOROLA and the Stylized M Logo and Symbol and the Symbol logo are registered in the U.S. Patent and Trademark Office. All other product or service names are the property of their registered owners. © Motorola, Inc. 2010...