Table of Contents
Advertisement
Advertisement
Table of Contents

Related Manuals for AEG 6110M


Summary of Contents for AEG 6110M
- Page 1 6110M Ceramic glass hob Installation and Operating Instructions...
-
Page 2: Dear Customer
Dear Customer, Please read these user instructions carefully and keep them to refer to later. Please pass the user instructions on to any future owner of the appli- ance. The following symbols are used in the text: Safety instructions Warning! Information that affects your personal safety. Important! Information that prevents damage to the appliance. -
Page 3: Table Of Contents
Contents Operating Instructions ........Safety instructions. -
Page 4: Operating Instructions
Operating Instructions 1 Safety instructions Please comply with these instructions. If you do not, any damage re- sulting is not covered by the warranty. This appliance conforms with the following EU Directives: – 73/23/EEC dated 19.02.1973 Low Voltage Directive – 89/336/EEC dated 03.05.1989 EMC Directive inclusive of Amending Directive 92/31/EEC –... -
Page 5: Safety During Use
Safety during use • Remove stickers and film from the glass ceramic. • There is the risk of burns from the appliance if used carelessly. • Cables from electrical appliances must not touch the hot surface of the appliance or hot cookware. •... -
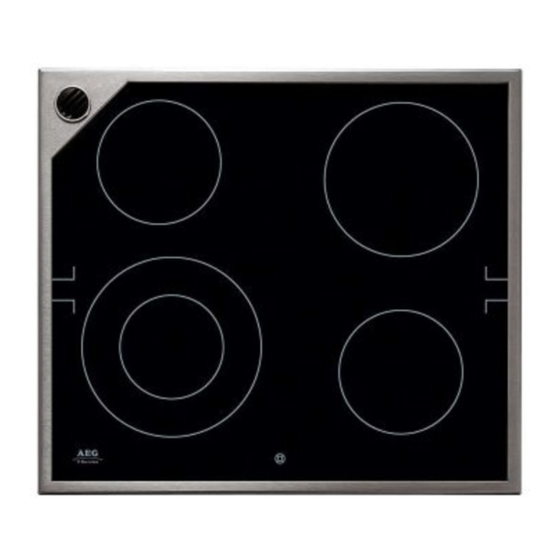
Page 6: Description Of The Appliance
Description of the Appliance Cooking surface layout Singlecooking zone Single ring cooking zone 1200W 1800W Oven steam outlet Residual heat Residual heat indicator indicator Double ring cooking zone Connection Singlecooking zone 750/2200W double ring cooking zone 1200W with power indicator... -
Page 7: Residual Heat Indicator
Touch Control sensor panel The outside ring is switched on and off by touching the Touch Control sensor panel. Sensor panel Function Double ring cooking zone switch To switch the outside ring on and off Residual heat indicator The residual heat indicator lights up, as soon as the corresponding cooking zone is hot. -
Page 8: Tips On Cooking And Frying
Tips on Cooking and Frying Cookware • You can recognise good cookware from the bottoms of the pans. The bottom should be as thick and flat as possible. • Cookware made of enamelled steel or with aluminium or copper bot- toms can leave discolorations on the glass ceramic surface which are difficult or impossible to remove. -
Page 9: Cleaning And Care
Cleaning and Care Take care! Risk of burns from residual heat. Let the appliance cool down. Warning! Sharp objects and abrasive cleaning materials will damage the appliance. Clean with water and washing up liquid. Warning! Residues from cleaning agents will damage the appliance. Remove residues with water and washing up liquid. -
Page 10: What To Do If
What to do if … Problem Possible cause Remedy The cooking zones are not The combination appliance Switch on the appliance. functioning. is not switched on. The desired heat setting is Set the heat setting. not set. The fuse in the house’s Check the fuse. -
Page 11: Disposal
Disposal Packaging material The packaging materials are environmentally friendly and can be recy- cled. The plastic components are identified by markings, e.g. >PE<, >PS<, etc. Please dispose of the packaging materials in the appropriate container at the community waste disposal facilities. Old appliance Please dispose of your old appliance in line with the guidelines for dis- posal in your community. -
Page 12: Installation Instructions
Installation Instructions Safety instructions The laws, ordinances, directives and standards in force in the country of use are to be followed (safety regulations, proper recycling in accord- ance with the regulations, etc.) Installation may only be carried out by a qualified electrician. The minimum distances to other appliances are to be observed. - Page 13 Appliance dimensions Width 576 mm Depth 506mm Height 42mm...
-
Page 14: Assembly
Assembly... - Page 16 Removal...
-
Page 19: Service
Service In the event of technical faults, please first check whether you can remedy the problem yourself with the help of the operating instruc- tions (section “What to do if…”). If you were not able to remedy the problem yourself, please contact the Customer Care Department or one of our service partners. - Page 20 USD 14 billion in more than 150 countries around the world. Hier Typenschild aufkleben (nur für Werk) AEG Hausgeräte GmbH Postfach 1036 D-90327 Nürnberg http://www.aeg.hausgeraete.de © Copyright by AEG 822 924 616-B-050304-02 Subject to change without notice...