Table of Contents
Advertisement
Advertisement
Table of Contents

Related Manuals for AEG COMPETENCE B9831-4


Summary of Contents for AEG COMPETENCE B9831-4
- Page 1 COMPETENCE B9831-4 Built-In Electric Oven Operating Instructions...
-
Page 2: Dear Customer
Dear Customer, Please read these user instructions carefully and keep them to refer to later. Please pass the user instructions on to any future owner of the appli- ance. The following symbols are used in the text: Safety instructions Warning! Information that affects your personal safety. Important! Information that prevents damage to the appliance. -
Page 3: Table Of Contents
Contents Operating Instructions ........Safety instructions. - Page 4 Cleaning and Care ..........45 Outside of the appliance.
-
Page 5: Operating Instructions
Operating Instructions 1 Safety instructions This appliance conforms with the following EU Directives: – 73/23/EEC dated 19.02.1973 Low Voltage Directive – 89/336/EEC dated 03.05.1989 EMC Directive inclusive of Amending Directive 92/31/EEC – 93/68/EEC dated 22.07.1993 CE Marking Directive Electrical safety •... -
Page 6: How To Avoid Damage To The Appliance
Information on acrylamides According to the latest scientific knowledge, intensive browning of food, especially in products containing starch, can constitute a health risk due to acrylamides. Therefore we recommend cooking at the lowest possible temperatures and not browning foods too much. How to avoid damage to the appliance •... -
Page 7: Disposal
Disposal Packaging material The packaging materials are environmentally friendly and can be recy- cled. The plastic components are identified by markings, e.g. >PE<, >PS<, etc. Please dispose of the packaging materials in the appropriate container at the community waste disposal facilities. Old appliance The symbol on the product or on its packaging indicates that this... -
Page 8: Description Of The Appliance
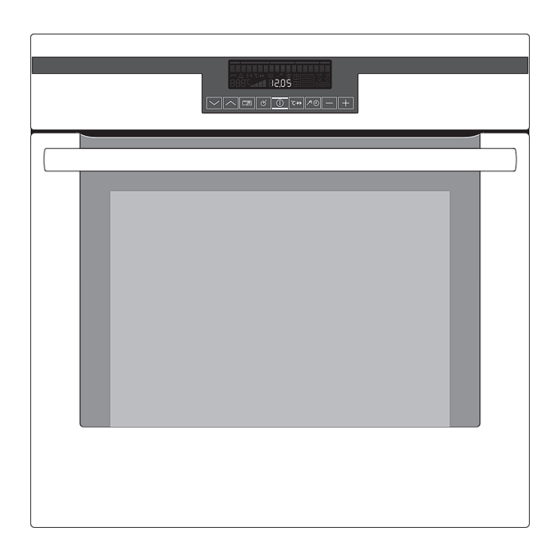
Description of the Appliance General Overview Oven displays and buttons Door handle Full glass door... -
Page 9: The Electronic Oven Controls
The electronic oven controls Indicators Symbol status bar Menu status bar Text line ___________________ PROFI HOT AIR 150û c 12. 0 5 00. 0 6 Heat indicator Shelf positions Temperature Time Clock functions Meat core temperature Period of operation Menu status bar In the menu status bar the current position within a menu is shown by a flashing bar. -
Page 10: Buttons
Buttons wm¸¹º»¼-+ Button Function To select oven functions. To move down and up in the menu. ¸ To open the Options menu. To close the Options menu (press and hold button). ¹ Confirm, change to the sub-menu. º To switch appliance on or off. »... -
Page 11: Oven Features
Oven Features Top heat and heating elements Oven lighting Shelf positions Meat probe socket Fat Filter Oven lighting Fan heating element Bottom Heat Oven shelf runners, removable... -
Page 12: Oven Accessories
Oven accessories Oven shelf For cookware, cake tins, roasts and grilled foods. Oven shelf for non-stick For cookware, cake tins, roasts and grilled foods. Baking tray For cakes and biscuits. Non-stick baking tray For cakes and biscuits. Non-stick roasting tray For baking and roasting or as a tray for collecting fat. -
Page 13: Before Using For The First Time
Before Using for the first time Setting the language 1. When the appliance has LANGUAGE MENU been connected to the elec- ý ý ý ý ý ýþ ýþ ý ý ý ý ý trical supply, SPRACHE EINS- 888û c þ þ... -
Page 14: Setting The Clock
Setting the clock 1. TIME OF DAY lights up. In the clock display you see 12.00. 2. Using the button, TIME OF DAY set the current time. ý ý ý ý ý ýþ ýþ ý ý ý ý ò 888û c þ... -
Page 15: Using The Oven
Using the Oven Menu operation in overview Oven functions Options menu menu PROFI HOT AIR RECIPE MENU AL GUSTO HOT AIR MEMORY MENU ¸ CONVENTIONAL CLEANING MENU ROTITHERM SETTINGS MENU ¹ DUAL GRILL SINGLE GRILL KEEP WARM DEFROST RAPID HEAT UP MENU BOTTOM HEAT RESIDUAL HEAT MENU SLOW COOK ONE... -
Page 16: The Oven Functions Menu
The Oven Functions menu • When you switch the appliance on, you find yourself in the Oven Functions menu. • Select the desired oven function using the arrow buttons In the menu status bar, the currrent position within the menu is shown. -
Page 17: The Options Menu
The Options menu • Using the OPTION button, open the Options menu. • Select the desired option using the arrow buttons . In the menu status bar, the current position within the menu is shown. • Use the OK button to change to the menu of the selected option. The sub-menus •... -
Page 18: Use Of The Oven Functions
Use of the oven functions The oven has the following functions: Heating Oven function Application element/fan PROFI HOT AIR For baking on up to three oven Top heat, bottom levels at the same time. heat, rear wall Set the oven temperatures heating element, 20-40 °C lower than when using Conventional. -
Page 19: Meat Programmes
Meat programmes Meat programmes Application Weight range with weight input POULTRY Chicken, duck, goose 0.9 to 4.7 kg PORK Roast pork, shoulder of pork 1.0 to 3.0 kg BEEF Roast beef, pot roast 1.0 to 3.0 kg VEAL Roast veal 1.0 to 3.0 kg GAME Vension, rabbit... -
Page 20: Switching The Oven On And Off
Switching the Oven On and Off Selecting an oven function 1. Switch appliance on using the ON/OFF button. ____________________ 2. Using the arrow buttons CONVENTIONAL select the desired ý ý ý ý ý ýþ ýþ ý ý ý ý ý oven function. - Page 21 Cooling fan The fan switches on automatically in order to keep the appliance’s sur- faces cool. When the oven is switched off, the fan continues to run to cool the appliance down, then switches itself off automatically. Pre-heating with the RAPID HEAT UP function After an oven function has been selected, with the additional function RAPID HEAT UP the pre-heating time can be shortened.
-
Page 22: Heat Indicator
Heat indicator Heating up indicator When the oven function has CONVENTIONAL been switched on the four ý ý ý ý ý ýþ ýþ ý ý ý ý ý bars that slowly light up one 180û c þþÝÞÜÜþ1ü 2 . 1 2 ý... -
Page 23: Inserting The Oven Shelf, Baking Tray And Roasting Pan
Inserting the Oven Shelf, Baking Tray and Roasting Pan Shelf runner safety and anti-tip device As a shelf runner safety device, all insertable components have a small curved indentation at the bottom on the right and left-hand edge. Always insert insertable components so that this indentation is at the back of the oven interior. -
Page 24: Inserting/Removing The Grease Filter
Inserting/Removing the Grease Filter Only use the grease filter when roasting to protect the rear heating elements from fat splashes. Inserting the grease filter Hold the grease filter by the grip and insert the two mounts downwards into the opening on the rear wall of theoven (fan opening). -
Page 25: Meat Probe
Meat Probe When the meat probe is plugged in, the OVEN FUNCTIONS menu offers a choice of suitable oven functions and additional programmes for the meat probe. Important: Only the meat probe supplied may be used. If replacing, please use only original replacement parts. Inserting the meat probe 1. -
Page 26: Setting Meat Probe Core Temperature
Setting meat probe core temperature To switch the oven off when the temperature at the centre of a roast reaches a core temperature set by you. There are two temperatures to consider: – The oven temperature: See Roasting Table – The core temperature: See MEATPROBE Table 1. -
Page 27: Removing The Meat Probe
Removing the meat probe Warning: The meat probe is very hot. There is a risk of being burned when removing the plug and the tip of the meat probe. 1. Remove the meat probe’s plug from the socket and take the meat out of the oven. -
Page 28: Automatic Programmes
Automatic programmes In addition to the oven functions for individually setting baking and roasting, you have the option of working with various automatic pro- grammes: 1. Meat programmes with weight input (OVEN FUNCTIONS menu) 2. Meat programmes with meat probe (OVEN FUNCTIONS menu) 3. -
Page 29: Meat Programmes With Meat Probe
3. With the POULTRY meat pro- TURN-OVER MEAT gramme, please turn the í ý ý ý ý ýþ ýþ ý ÒÕ ý ý ý food if an acoustic signal 280û c þÝÞßàþ1ü 2 . 5 5 ý 00. 2 ü 5 sounds and the instruction TURN-OVER MEAT is in the wm¸¹º»¼-+... -
Page 30: Options
Options RECIPE MENU in overview ¸ RECIPE MENU ¹ BAKING RECIPES ¹ LEMON SPONGE CAKE SWEDISH CAKE SPONGE CAKE CHEESE CAKE FRUIT CAKE STREUSEL PLAIT YEAST PLAIT ¹ WHITE BREAD BACK ROASTING RECIPES ¹ PIZZA POTATO GRATIN ONION TARTE QUICHE LORRAINE LASAGNE CANNELLONI MEAT CASSEROLE... - Page 31 BAKING RECIPES and ROASTING RECIPES For this function, use the recipes supplied in the booklet “Tables, Tips and Recipes”. This function offers optimum settings for each recipe. Selecting a recipe. _____ 1. Use the OPTION button RECIPE MENU to change to the Options ý...
- Page 32 _______ 6. An acoustic signal will sound ONION TARTE when the cooking time has í ý ý ý ý ýþ ýþ ý ÒÓ ý ý ý finished. 280û c þ þ ü þ 1 ü 3 . 1 ü 5 ý...
-
Page 33: Memory Menu
With the recipes POWDER CAKE and FROZEN PIZZA using the buttons, the suggested temperture can be increased or decreased by 10°C. In the category OTHER RECIPES you will find the following menu options: POWDER CAKE For baking ready-made cakes and cake mixes. FROZEN PIZZA For baking ready-made meals such as pizza, la- sagne, gratins and chips from the deep freeze. - Page 34 5. Using the OK button, se- STORE MEMORY lect the suggested menu op- ý ý ý ý ý ýþ ýþ ý ý ý ý ý tion STORE MEMORY. 280û c þ þ ü þ 1 ü 2 . 2 ü 8 ý...
-
Page 35: Overwriting A Memory Position
Calling up settings for “Personal Recipes” 1. Switch on the appliance with the ON/OFF button. _________________ ___ 2. Using the arrow button DAD’S PIZZA select saved recipe. ý ý ý ý ý ýþ ýþ ý ý ý ý ý 280û c þÝÜÜÜþ1ü 2 . 2 ü 9 ý... -
Page 36: Settings Menu
SETTINGS MENU Independent of the current use of the oven, you can change various base settings. These remain permanently set, until they are changed again. RAPID HEAT UP MENU The function RAPID HEAT UP MENU is automatically switched on with suitable oven functions. –... -
Page 37: Clock Functions
Adjusting SETTINGS MENU 1. Using the OPTION button, open the Options menu. 2. Using the arrow buttons select the menu option SETTINGS MENU. 3. Using the OK button, change to the SETTINGS MENU menu. 4. Using the arrow buttons go to the setting that you want to adjust. -
Page 38: Minute Minder
The clock functions display shows the period of operation for the se- lected oven function, if none of the clock functions MINUTE MINDER , DURATION or END is set. MINUTE MINDER 1. Press the SELECTION but- MINUTE MINDER ton repeatedly, until MINUTE ý... - Page 39 DURATION 1. Select oven function and temperature. 2. Press the SELECTION but- DURATION ton repeatedly until DURA- í ý ý ý ý ýþ ýþ ý ý ý ý ý TION and the symbol 200û c þ þ ü þ 1 ü 4 . 3 ü 5 ý...
- Page 40 1. Select the oven function and temperature. 2. Press the SELECTION but- ton repeatedly until END and ý î ý ý ý ýþ ýþ ý ý ý ý ý the symbol are displayed. 200û c þ þ ü þ 1 ü 4 . 3 ü 5 ý...
- Page 41 DURATION and END combined DURATION and END can be used simultaneously, if the oven is to be switched on and off automatically at a later time. 1. Select the oven function and temperature. 2. Using the DURATION DURATION function, set the time that í...
-
Page 42: Additional Functions
Additional functions CHILD LOCK for the oven As soon as the CHILD LOCK is activated, the appliance cannot be oper- ated. Switching on the CHILD LOCK 1. If necessary, switch on the appliance using the ON/OFF button. No oven function must be selected. 2. -
Page 43: Oven Safety Cut-Out
The BUTTON LOCK does not protect the appliance from being acciden- tally switched off. After the appliance is switched off, the BUTTON LOCK is automatically cancelled. Oven safety cut-out If not switched off after a certain time, or if the temperature is not modified, the oven switches off automatically. -
Page 44: Mechanical Door Lock
Mechanical Door Lock When the appliance is delivered, the door lock is deactivated. Activate the door lock Pull the safety catch forwards until it locks in place. Open the oven door: 1. Shut the door. 2. Press the safety catch and keep it depressed. -
Page 45: Cleaning And Care
Cleaning and Care Warning: For cleaning, the appliance must be switched off and cooled down. Warning: For safety reasons, do not clean the appliance with steam jet or high-pressure cleaning equipment. Attention: Do not use any scouring agents, sharp cleaning tools or scourers. -
Page 46: Accessories
Accessories Wash all slide-in units (shelf unit, baking tray, shelf support rails etc.) after each use and dry well. Soak briefly to make them easier to clean. Fat Filter 1. Clean the fat filter in hot water and washing up liquid or in the dish- washer. -
Page 47: Cleaning Function For Oven Cleaner Spray
Cleaning function for oven cleaner spray With the cleaning function for oven cleaner spray you can pre-heat the oven to the optimum effective temperature for oven cleaner sprays. Important: Only use oven cleaner sprays that require the oven to be heated. -
Page 48: Shelf Support Rails
Shelf Support Rails The shelf support rails on the left and right hand sides of the oven can be removed for cleaning the side walls. Removing the shelf support rails First pull the front of the rail away from the oven wall (1) and then un- hitch at the back (2). -
Page 49: Oven Lighting
Oven Lighting Warning: There is a danger of electric shock! Prior to changing the oven light bulb: – Switch off the oven! – Remove the fuses in the fuse box or switch off the circuit breaker. Place a cloth on the oven floor to protect the oven light and glass cov- Replacing the oven light bulb/ cleaning the glass cover 1. -
Page 50: Oven Ceiling
Oven Ceiling The upper heating element can be folded down to make it easier to clean the oven ceiling. Folding down the heating ele- ment Warning: Only fold down the heat- ing element when the oven is switched off and there is no risk of being burnt! 1. -
Page 51: Oven Door
Oven door For easier cleaning of the oven interior the oven door of your appliance can be taken off its hinges. Removing the oven door from its hinges 1. Open the oven door as far as it will 2. Undo the clamping levers (A) on both door hinges fully. - Page 52 Hanging the oven door back on its hinges 1. From the handle side take hold of the oven door with a hand on each side and hold at an angle of approx. 45°. Position the recesses on the bottom of the oven door on the hinges on the oven.
-
Page 53: Oven Door Glass
Oven door glass The oven door is fitted with four panels of glass mounted one behind the other. The inner panels can be removed for cleaning. Important Rough handling, especially around the edges of the front panel, can cause the glass to break. Removing door glass panels 1. - Page 54 5. Take hold of the door glass panels on their upper edge one after the other and take them out of the guide by pulling them upwards. Cleaning the door glass panels Clean the door glass panels thoroughly with a solution of water and washing up liquid.
- Page 55 On the open side of the door trim (B) there is a guide bar (C). This must be pushed between the outer door panel and the guide corner (D). The clip seal (E) must be snapped in. 3. Open the oven door as far as it will 4.
-
Page 56: What To Do If
What to do if … Problem Possible cause Remedy The oven is not heating The oven has not been Switch oven on switched on The clock has not been set Set the current time on the clock The required settings have Check the settings not been set Oven safety cut-out has... - Page 57 If the appliance has been wrongly operated, the visit from the customer service technician or dealer may not take place free of charge, even during the warranty period. Advice on cookers with metal fronts: Because of the cold surface at the front of the cooker, opening the oven door during (or just after) baking or roasting may cause the glass to steam up.
-
Page 58: Index
Index Meat programmes .....28 Memory menu ......33 Accessories . -
Page 59: Service
Service In the event of technical faults, please first check whether you can remedy the problem yourself with the help of the operating instruc- tions (section “What to do if…”). If you were not able to remedy the problem yourself, please contact the Customer Care Department or one of our service partners. - Page 60 From the Electrolux Group qÜÉ=bäÉÅíêçäìñ=dêçìé=áë=íÜÉ=ïçêäÇ…ë=ä~êÖÉëí=éêçÇìÅÉê=çÑ=éçïÉêÉÇ=~ééäá~åÅÉë=Ñçê=âáíÅÜÉåI=ÅäÉ~åáåÖ=~åÇ=çìíÇççê ìëÉK= jçêÉ= íÜ~å= RR= ãáääáçå= bäÉÅíêçäìñ= dêçìé= éêçÇìÅíë= EëìÅÜ= ~ë= êÉÑêáÖÉê~íçêëI= ÅççâÉêëI= ï~ëÜáåÖ= ã~ÅÜáåÉëI î~Åììã=ÅäÉ~åÉêëI=ÅÜ~áå=ë~ïë=~åÇ=ä~ïå=ãçïÉêëF=~êÉ=ëçäÇ=É~ÅÜ=óÉ~ê=íç=~=î~äìÉ=çÑ=~ééêçñK=rpa=NQ=Äáääáçå=áå=ãçêÉ íÜ~å=NRM=ÅçìåíêáÉë=~êçìåÇ=íÜÉ=ïçêäÇK AEG Hausgeräte GmbH Postfach 1036 D-90327 Nürnberg http://www.aeg-electrolux.de © Copyright by AEG 822 927 647-A-120106-01 Subject to change without notice...