Table of Contents
Advertisement
Advertisement
Table of Contents

Related Manuals for Dell D5000


Summary of Contents for Dell D5000
- Page 1 Dell Wireless Dock D5000 User Manual Ver. 1.0 February 2013...
- Page 2 © 2013 Dell Inc. All rights reserved. Reproduction of these materials in any manner whatsoever without the written permission of Dell Inc. is strictly forbidden. Trademarks used in this text: Dell™ and the DELL logo are trademarks of ® ®...
-
Page 3: Table Of Contents
Connecting to a Dell Wireless Dock D5000 ........13 Managing the Dell wireless dock D5000 ......... 15 Using Devices Connected to the Dell wireless dock D5000 ..18 Exit or Shutdown the Wireless Docking Software ....... 19 5. Appendix A Troubleshooting ........21 6. - Page 4 Removing a Bluetooth Device ............30 9. Bluetooth Settings ........... 32 General Settings ................... 32 Add or Delete a Communications Port ........... 32 Manage My Local Bluetooth Adapters ..........33 Set Rules for Sharing Files and Equipment ........33 Set Rules for Sending and Receiving PIM Items ......35 Display the Device Properties ............
-
Page 5: Introduction
1. Introduction 1.1 Package Contents Your docking station ships with the components shown below. Ensure that you have received all the components and contact Dell (see your invoice for contact information) if something is missing. Wireless Dock DP-VGA Dongle Power Adapter... -
Page 6: Identifying Parts And Controls
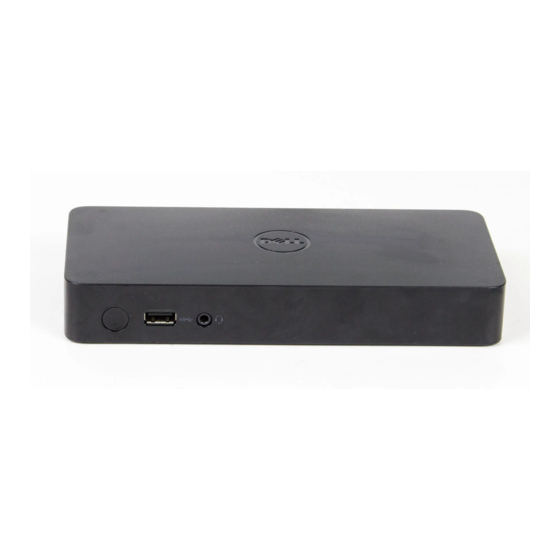
Safety, Environmental, and Regulatory Information 1.2 Identifying Parts and Controls Front View Figure 1. Front View 1. Pairing button 2. USB 3.0 port 3. audio/microphone 4. docking status indicator combo connector 5. reset button... -
Page 7: Product Specifications
Back View Figure 2. Back View 1. power switch 2. power connector 3. network port 4. USB 3.0 port 5. USB 3.0 port 6. HDMI 7. DisplayPort (DP) 8. security-cable slot 1.3 Product Specifications Docking Specifications Standard WiGig 1.1 IEEE 802.11ad ... - Page 8 Environmental Operating: 0 °C to 40 °C Characteristics Non-operating: Storage: -20 °C to 60 °C Temperature (-4 °F to 140 °F) Shipping: -20 °C to 60 °C (-4 °F to 140 °F) Operating: 10% to 80% (non-condensing) Non-operating: Humidity ...
-
Page 9: Quick Setup Of Hardware
2. Quick Setup of Hardware 1. Connect the AC adapter to the AC adapter connector on the Dell Wireless Dock D5000 and to the electrical outlet. Figure 3. AC Adapter 2. Turn on the power switch to the “I” status. -
Page 10: Working On The Dell Wireless Dock D5000
3. Working on the Dell Wireless Dock D5000 3.1 LED Status Indicators The Dell Wireless Dock shall include multiple LED status indicators on the unit. 3.1.1 Docking Status Indicator The Docking Status Indicator is Amber when the device is powered on but not connected to a host. - Page 11 If the wireless link between the computer and the Dell Wireless Dock becomes weak, move the computer closer to the Dell Wireless Dock or rotate the computer to find a position with a stronger wireless link. For example, if you find that the wireless signal strength is reduced when the notebook lid is closed, you can try to rotate the notebook to find the best reception.
- Page 12 You can enjoy HD video on a big-sized screen. The Dell Wireless Dock D5000 also has an audio jack to output audio and MIC input. The Dell Wireless dock can support simultaneous HDMI and DisplayPort output.
-
Page 13: Resetting The Dell Wireless Dock D5000
Figure7. USB 3.0 Port 3.3 Resetting the Dell wireless dock D5000 To delete all associated settings stored on your Dell Wireless Dock, press and hold down the reset button for 10 seconds. All dock settings will be deleted and you will have to re-establish a connection. To re-establish a connection to a wireless dock, you must repeat the connection process. -
Page 14: Connecting To The Dell Wireless Dock D5000
4. Connecting to the Dell Wireless Dock D5000 The Dell Wireless Dock or Wireless Bus Extension (WBE) is an easy-to-use software which allows you to connect to the Dell wireless dock D5000 using 60 GHz frequency band in parallel to other Wi-Fi access. The Wireless Docking software uses WiGig’s WBE PAL leveraging the latest technology in... -
Page 15: Scanning For The Dell Wireless Dock D5000
You can uninstall the Wireless Docking software using the Windows Control Panel and by selecting Uninstall or change a program window option. 4.2 Scanning for the Dell Wireless Dock D5000 The Wireless Docking software runs automatically and scans for available docks when your PC/laptop boots. - Page 16 Note: The symbol in the Wireless Docking software’s taskbar notification icon shows that there are docks available for connection. Figure 1 Connection Manager - Disconnected Figure 2 WiGig Connection Manager - Connected The Wireless Docking software automatically scans for available docks at a pre-set interval of time.
-
Page 17: Connecting To A Dell Wireless Dock D5000
4.3 Connecting to a Dell Wireless Dock D5000 The Wireless Docking software allows you to connect to the Dell wireless dock D5000. While connecting to the Dell wireless dock D5000, you can select the checkbox Connect Automatically. This allows the Wireless Docking software to remember the connection settings and connects to the Dell wireless dock D5000 automatically if the dock is available. - Page 18 Dell wireless dock D5000 automatically from the next time. 4. Select Connect, you will be prompted to enter a password or push the paring button on the Dell wireless dock D5000 and press return key on your PC/laptop.
-
Page 19: Managing The Dell Wireless Dock D5000
Once the dock is connected, the Wireless Docking software allows you to view the status of the connected Dell wireless dock D5000 and also update the firmware of the dock. You can also restore the Dell wireless dock D5000 to factory settings. -
Page 20: Profile Management
4.4.1 Profile Management You can access profile management through the Wireless Hub Connection Manger. The profiles of all the connected Dell wireless dock D5000s are stored on your PC/laptop. You can set the priority of the docks that can be connected, if one or more docks are available. - Page 21 To Edit a profile, follow these steps: 1. Follow the steps 1 to 3 from above. 2. Double click the Profile you want to edit. All the available options for that profile are displayed. 3. Modify the desired options and select Save. The modifications are saved for that profile.
-
Page 22: Using Devices Connected To The Dell Wireless Dock D5000
Once a connection is established between your laptop and the Dell wireless dock D5000 using Wireless Docking software, all the devices attached to the Dell wireless dock D5000 are available to you for use. The typical devices that can be attached to a dock are printers, display devices, external hard driver, and any USB device. -
Page 23: Exit Or Shutdown The Wireless Docking Software
You can also transmit audio and video to the display device attached to the Dell wireless dock D5000 from your PC/laptop. You can play audio and video on your PC/laptop using the DVD tray, from the internal hard disk, from the external memory plugged into an USB port, or from the Internet. - Page 24 Note: Turn ON the hardware switch on your PC/laptop to make Wi-Fi connections. Note: If airplane mode is turned ON, this automatically triggers the software and hardware shutdown.
-
Page 25: Appendix A Troubleshooting
Re-Install the DisplayLink driver from c:/program files/Wilocity/Dockingdrivers/DisplayLink 5. Audio jack is not functioning First, try a re-set on the Dell wireless dock D5000 or is lagging. station to make sure it is not a software issue. If that fails to work, try to re-plug in the audio cable to the docking station from the external speaker. - Page 26 D5000WirelessDock for 64bit windows 10. WiGig connection is not Make sure the SSID of the Dell wireless dock D5000 established. can be detected in the list of items of the Wireless Hub Connection Manager. Make sure the LED color is white when the WiGig...
-
Page 27: Bluetooth Networking Overview
6. Bluetooth Networking Overview This chapter provides an overview of the Bluetooth Windows Suite. This software tool helps you to discover and link with Bluetooth devices using your PC/laptop. The Bluetooth Windows Suite also facilitates the communication between your PC/laptop with other Bluetooth devices. The Bluetooth Windows Suite is a Bluetooth communication application that aids in easy management and interaction with wireless personal area networks (WPAN) and remote Bluetooth devices. -
Page 28: Turn The Bluetooth Adapter On And Off
6.2 Turn the Bluetooth Adapter On and Off There may be times, such as when you are flying on a commercial aircraft, when you want to leave your computer on but are required to turn the Bluetooth adapter off. If your Bluetooth adapter is plugged into a USB port on your computer, you can turn off the adapter just by physically removing it. - Page 29 Devices that have been granted access to the Bluetooth Exchange Folder also have access to all subfolders contained within that folder and all files in those subfolders. Note: The default folder for Bluetooth file exchanges is named Bluetooth Exchange Folder and is located in My Documents. You can choose a different folder for exchanging Bluetooth files;...
- Page 30 Host Controller Interface Human Interface Device (HID) An input device such as a mouse, keyboard, or game controller that sends user input to a computer. Internet Telephony A technology that uses the Internet to place and receive telephone calls. Link key An internally generated unique security key that is exchanged by paired devices as proof of identity before a connection is established.
-
Page 31: Getting Started
7. Getting Started This section describes the information related to both Windows 7 and Windows 8 desktop versions. Reference to the Windows 8 Metro Style is made where ever it is applicable. This chapter describes how to install, uninstall, and launch the Bluetooth Windows Suite. -
Page 32: Launching The Bluetooth Windows Suite
7.2 Launching the Bluetooth Windows Suite From the Start menu , click All Programs > Bluetooth Suite > Bluetooth Devices which will open a window. From this window, you can add a Bluetooth-enabled device or configure a paired device by double-clicking the paired device icon. -
Page 33: Adding Bluetooth Devices
8. Adding Bluetooth Devices This chapter describes how to add commonly used Bluetooth devices to a PC/laptop using the Bluetooth Windows Suite. Before adding any new Bluetooth device, a communication link known as pairing must be first configured. After a successful pairing, the Bluetooth device is added and is ready for exchanging messages or information between your PC/laptop and the connected Bluetooth device. -
Page 34: Adding A Bluetooth Device
8.2 Adding a Bluetooth Device Follow these steps to add a Bluetooth Device. 1. Follow the step 1 and step 2 from above. 2. Select the desired Bluetooth device you want to add for the list. The pairing process is automatically started. A 6 to 8 digit pairing code is generated automatically for the remote device. - Page 35 For Windows 8 Metro style, follow these steps to remove a Bluetooth device: 1. Use the Charm Bar and click Settings > Change PC settings > Devices. 2. Select the desired Bluetooth device from the list and click . The Bluetooth device is removed.
-
Page 36: Bluetooth Settings
9. Bluetooth Settings The Bluetooth Windows Suite allows you to configure the general and Bluetooth options to control the connected Bluetooth device. You can modify the general settings, add or delete communication ports, modify the hardware settings of the Bluetooth adaptor, set permissions for sharing files, and modify the PIM interface. -
Page 37: Manage My Local Bluetooth Adapters
An incoming communications port is used by other Bluetooth-enabled devices to create a communications link to your PC/laptop. An outgoing communications port used your PC/laptop create communications link with another Bluetooth-enabled device. 3. If you select Outgoing, click Browse, select the Bluetooth device you want to create a link to, and click OK. - Page 38 1. Click the Bluetooth icon in the taskbar notification area, and then select Open Settings. The Bluetooth Settings dialog box appears. 2. Select the Share tab in the dialog. 3. Configure any of the following: • Allow other Bluetooth devices to access the files and folders in Bluetooth Exchange Folder and send files to Bluetooth Exchange Folder.
-
Page 39: Set Rules For Sending And Receiving Pim Items
9.5 Set Rules for Sending and Receiving PIM Items You can specify whether you want to allow other Bluetooth-enabled devices to send you PIM items such as business cards, calendar items, messages, and notes. You can also specify where to store received items, whether to include attachments with mail that you send and receive, and which business card to send. -
Page 40: Display The Device Properties
4. Select the application where you want to send and receive items of each PIM type. For example, if you have more than one e-mail application on your PC/laptop, select the one you want to synchronize. If you do not want to receive particular types of PIM items, click Do Not Accept for those types of items. -
Page 41: Managing Bluetooth Devices
Managing Bluetooth Devices This chapter describes how to configure and manage Bluetooth devices using the Bluetooth Windows Suite. The Bluetooth Windows Suite adds and configures Bluetooth devices in order to perform various functions between Bluetooth-enabled devices. These devices can be phones, modems, audio devices, printers, imaging systems, Fax machines, and computers... - Page 42 Add a Bluetooth device: Select this link to add a new Bluetooth device. The Add a device dialog appears and allows you to pair and add a Bluetooth device. Show Bluetooth devices: Select this link to see paired Bluetooth Devices. Open Bluetooth settings: Select this link to configure Bluetooth settings of your PC/laptop.
- Page 43 To use remote device’s speaker to listen to Audio from this PC status: Click the Connect button to transmit audio from your PC/laptop to the Bluetooth device. To use this PC’s speakers to listen to Stereo Audio playing on remote device: Click the Connect button to hear stereo audio on your PC/laptop, originating from the Bluetooth device.
- Page 44 You can also use the remote phone modem and connect to the Internet using DUN services. The Advanced Phone Operations is displayed if the remote phone supports at least one of the four profiles Hands Free (HF), Serial Port Profile (SPP), Phonebook Access Profile (PBAP), and Sim Access Profile (SAP).
- Page 45 number from the book. Click Send, the message is sent to the desired phone number. You can see the date, time, phone number, and the contents of the sent message. Note: To send message to multiple users, enter the phone numbers separated by semicolon “;”.
- Page 46 can be configured in the Bluetooth Settings-Sync folder. Backup PIM from remote device: Click the Backup button to import PIMs from a remote device. Restore PIM to remote device: Click the restore button to export PIMs to a remote device. 10.1.8 Authorization Options This section allows you to modify the authorization settings for the remote device when connecting to your PC/laptop.
- Page 47 10.1.10 Right-Click Options The following options are available when you right click on the Bluetooth Windows Suite taskbar icon Add a device: Select this option to add a Bluetooth device to your PC/laptop. For more information on how to add a Bluetooth device, see Adding Bluetooth Devices.
-
Page 48: Wireless Network Overview
When you set up your wireless adapter, you select the operating mode for the kind of wireless network you want. You can use the Dell Wireless Network Connection adapter to connect to other similar wireless devices that comply with the 802.11 standard for wireless networking. - Page 49 Security: 802.11 wireless networks can use encryption to help protect • your data. To use encryption you will need a key or password. For more information about security and security types, refer to Windows Help and Support. 11.2.2 Identify a Wireless Network Depending on the size and components of a wireless network, there are many ways to identify a wireless network: Network Name or Service Set Identifier (SSID): Identifies a wireless...
-
Page 50: To Turn Radio On And Off
11.3 To Turn Radio ON and OFF You may want to turn your wireless adapter's radio on and off to: • Conserve your computer’s battery when not connected. • Meet the requirement to turn off radios on airplanes to prevent interference. -
Page 51: Operational Information
Operational Information NOTE: EIRP = Effective Isotropic Radiated Power (including antenna gain) NOTE: Your Dell Wireless 1601 WLAN and Bluetooth device transmits less than 100 mW of power, but more than 10 mW. 12.1 Wireless Interoperability Dell Wireless 1601 WLAN and Bluetooth products are designed to be...