Sony DVW-A500/1 Service Manual
Digital videocassette recorder
Hide thumbs
Also See for DVW-A500/1:
- Installation and maintenance manual (36 pages) ,
- Operation manual (164 pages)
Table of Contents
Advertisement
DIGITAL VIDEOCASSETTE RECORDER
DVW-A500/1
DVW-A500P/1
DVW-500/1
DVW-500P/1
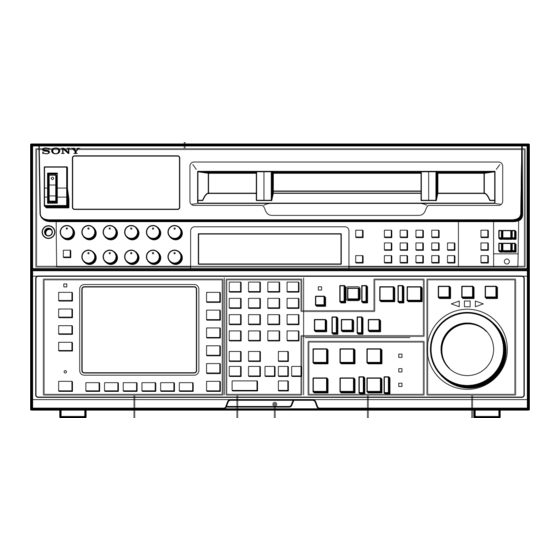
CONTROL PANEL
BKDW-515
ANALOG COMPOSITE DECODER BOARD
BKDW-505/506
AUDIO PROGRAM PLAY BOARD
BKDW-507
PARALLEL (50P) INTERFACE KIT
BKDW-509
CONTROL PANEL
BKDW-514
OPERATION MANUAL
1st Edition (Revised 3)
Serial No. 50001 and Higher (DVW-A500/1)
Serial No. 50001 and Higher (DVW-A500P/1)
Serial No. 50001 and Higher (DVW-500/1)
Serial No. 50001 and Higher (DVW-500P/1)
Serial No. 10001 and Higher (BKDW-515)
[ English ]
Advertisement
Table of Contents

Related Manuals for Sony DVW-A500/1


Summary of Contents for Sony DVW-A500/1
- Page 1 CONTROL PANEL BKDW-514 OPERATION MANUAL [ English ] 1st Edition (Revised 3) Serial No. 50001 and Higher (DVW-A500/1) Serial No. 50001 and Higher (DVW-A500P/1) Serial No. 50001 and Higher (DVW-500/1) Serial No. 50001 and Higher (DVW-500P/1) Serial No. 10001 and Higher (BKDW-515)
- Page 2 For the customers in the United Kingdom WARNING WARNING To prevent fire or shock hazard, do not THIS APPARATUS MUST BE EARTHED expose the unit to rain or moisture. IMPORTANT The wires in this mains lead are coloured in accordance To avoid electrical shock, do not open the with the following code: Green-and-yellow: Earth...
-
Page 3: Table Of Contents
Table of Contents Chapter 1 1-1 Features ................... 1-1 Overview 1-1-1 Features of the DVW-A500/1, A500P/1, 500/1 and 500P/1.. 1-1 1-1-2 Features of the BKDW-515 ........... 1-3 1-2 Optional Accessories ..............1-5 Chapter 2 2-1 Control Panel .................. 2-1 Locations and Functions 2-1-1 Upper Control Panel............... - Page 4 4-3-3 Setting the Time Code Generator (TCG SOURCE/MODE) ............. 4-21 4-3-4 Selecting the Time Code Running Mode (RUN MODE) ..4-22 4-3-5 Selecting the Drop Frame Mode (DF/NDF) (DVW-A500/1 and 500/1 only) ................4-22 4-3-6 Recording VITC (VITC) ............4-23 4-3-7 Selecting CTL Display Mode (TAPE TIMER) ....
- Page 5 Chapter 5 5-1 Preparing for Recording ..............5-1 Recording/Playback 5-1-1 Setting Switches and Menus ..........5-1 5-1-2 Selecting Audio Signals ............5-2 5-1-3 Adjusting the Audio Recording Level ........5-3 5-1-4 Monitoring Simultaneous Playback of Video and Audio Signals Being Recorded ..............5-4 5-1-5 Recording Analog Audio ............
- Page 6 Table of Contents Appendix Specifications ..................A-1 Glossary ....................A-5 Menu List ....................A-7 Items Related to the Hours Meter (Hs) ........... A-7 Items Related to VTR Operations (000s) ........A-8 Items Related to Operation Panels (100s) ........A-10 Items Related to Remote Interface (200s) ........A-14 Items Related to Editing (300s) .............
-
Page 7: Features
(Discrete Cosine Transform), quantizing, and variable Betacam SP formats. length coding. The DVW-A500/1 and 500/1 can be used in the NTSC color system while the DVW-A500P/1 and 500P/1 can ECC encoder be used in the PAL color system, though they both The outer ECC (Error Correction Code) is added to the adopt a component format. - Page 8 High-quality digital recording The DVW-A500/1 series and DVW-500/1 series adopt component digital video and a four-channel, 20-bit Features for Ease of Operation digital audio recording system using an AES/EBU format with a wide dynamic range.
-
Page 9: Features Of The Bkdw-515
[F4] (PF1&2 ASSIGN) button in the A full range of editing functions SET UP menu. You can connect two DVW-A500/1 or DVW-500/1 SET UP menu series units to enable automatic or manual editing in • Use the VTR BANK menu to memorize menu either assemble or insert mode. - Page 10 1-1 Features DMC (Dynamic Motion Control) editing ® Using the DT (Dynamic Tracking ) heads, you can play back a section of an edit at speeds between –1 and +3 times normal speed, and store the speed variation in memory for later use in automatic editing. Split editing In insert mode, you can set audio and video edit points separately.
-
Page 11: Optional Accessories
506 (for PAL video format) Analog Composite Decoder Board • Installation and Maintenance Manual (supplied with Converts in-coming analog composite video signals to the DVW-A500/1 series, DVW-500/1 series or the digital signals. Allows bridge connection with other BKDW-515) components. Provides information necessary for users to maintain the control panel. - Page 12 1-1 Features Chapter 1 Overview...
-
Page 13: Control Panel
2-1 Control Panel The control panel consists of the following sections: memory card insertion slot, editing operations • Upper control panel section, tape transport section and search operations section • Lower control panel: menu operations section, IC Upper control panel Lower control panel IC memory card Search operations section... -
Page 14: Upper Control Panel
2-1 Control Panel 2-1-1 Upper Control Panel 1DISPLAY FULL/FINE button 2PHONES jack 3POWER switch 4PHONES level control 5 PB level 7Audio level meters 6REC level controls controls 8Indicator window 9MONITOR SELECT button !ºINPUT SELECT button !¡AUDIO INPUT/MONITOR SELECT buttons !™VIDEO INPUT SELECT buttons !£REMOTE buttons and RS-232C indicator Upper control panel 1 DISPLAY FULL/FINE button... - Page 15 Indicator Status DOLBY NR Lights up when the Dolby NR circuit is For details, refer to “5-1-2 Selecting Audio Signals” on (DVW-A500/1 activated. series only) page 5-2. KEY INHIBIT Lights up when the [F1] (KEYINH) button 5 PB (playback) level controls in the PANEL SETUP menu is set to on.
-
Page 16: Bkdw
2-1 Control Panel !º INPUT SELECT button !£ REMOTE buttons and RS-232C indicator Selects the audio input signal. Press to light the button Press these buttons to select external equipment to be up, then press one of the AUDIO INPUT/MONITOR used to remotely control the VTR. -
Page 17: Lower Control Panel (Menu Operations Section)
2-1-2 Lower Control Panel (Menu Operations Section) 1Menu display 3MEMORY CARD indicator 2Menu buttons 4ACCESS button 5IC memory card insertion slot 6Function buttons 7ALT button 8MAINTENANCE switch 9ALARM indicator Lower control panel (menu operations section) Chapter 2 Locations and Functions of Parts and Controls... -
Page 18: Alarm Indicator
TC menu, you can switch between LTC and Press to change the functions of the current menu. VITC and between DF and NDF (DVW-A500/1 Press again to return to the original functions. and DVW-500/1 only), and make settings for time 8 MAINTENANCE switch code displays on an external monitor. -
Page 19: Lower Control Panel (Editing Operations Section)
2-1-3 Lower Control Panel (Editing Operations Section) !ºNumeric buttons and +/– buttons !¡SFT button !™RCL button !£CLR button !¢SET button @£PREREAD indicator @™PLAYER/RECORDER buttons !∞AUDIO IN/OUT buttons @¡REVIEW button !§IN/OUT buttons !¶ENTRY button @ºAUTO EDIT button !•Cursor control buttons !ªPREVIEW button Lower control panel (editing operations section) Chapter 2 Locations and Functions of Parts and Controls... - Page 20 2-1 Control Panel !º Numeric buttons and +/– buttons !ª PREVIEW button Press to input time data or edit points data at the cursor Press to view the results of an edit on a monitor position in menu display. Press buttons 0 to 5 while connected to the recorder VTR without actually holding down the SFT button to input A to F recording the edit.
-
Page 21: Lower Control Panel (Tape Transport Section)
2-1-4 Lower Control Panel (Tape Transport Section) @¢PREROLL button @∞EJECT button @§STANDBY button @¶EDIT button @•SERVO indicator @ªSTOP button #ºPLAY button #¡REC button #™REC INHIBIT indicator Lower control panel (tape transport section) @¢ PREROLL button @∞ EJECT button Press to position the tape to the preroll point (a Press to eject the cassette. - Page 22 2-1 Control Panel @§ STANDBY button #º PLAY button Press this button in other than standby mode to make it Starts playback. light up and place the VTR in standby mode. The Press this button while holding down the REC button head drum rotates in standby mode, thereby shortening to start recording, or while holding down the EDIT the time required for the tape to start.
-
Page 23: Lower Control Panel (Search Operations Section)
Digital playback exceeding this speed range is not possible. In Betacam tape, or at –35 to +35 (DVW-A500/1 only) or this mode, the VAR button lights up, and the search –42 to +42 (DVW-A500P/1 only) times normal dial clicks at the positions for still-picture and normal playback speed when using analog Betacam tape. - Page 24 (–50 to +50 times normal speed when playing back a Digital Betacam tape, and –35 to +35 (DVW-A500/1 only) or –42 to +42 (DVW-A500P/1 only) times normal speed when playing back an analog Betacam tape).
-
Page 25: System Set-Up Panel
2-2 System Set-Up Panel Lift the lower control panel up to its horizontal position to access the system set-up panel. Lower control panel Accessing the system set-up panel CONTROL PANEL switch System set-up panel CONTROL PANEL switch Selects which control panel controls this VTR. INT: Control is by the control panel attached to this VTR. -
Page 26: Connector Panel
2-3 Connector Panel 2-3 Connector Panel 1 COMPOSITE VIDEO OUTPUT connectors 2 COMPONENT VIDEO INPUT 7 COMPONENT VIDEO OUTPUT connectors connectors 8 SERIAL V/A OUTPUT connectors 3 COMPOSITE VIDEO INPUT connectors and 75 termination switch 9 SERIAL V/A INPUT connectors 4 REF.VIDEO INPUT connectors and termination switch 5BREAKER button... - Page 27 3 COMPOSITE VIDEO INPUT connectors !¡ AUDIO INPUT LEVEL/600 termination (BNC) and 75 termination switch (with optional BKDW-505 for DVW-A500/1 and 500/ switches 1, or BKDW-506 for DVW-A500P/1 and 500P/1) Set according to the audio input level of each channel Accepts analog composite video signal.
- Page 28 2-3 Connector Panel !∞ REMOTE1-IN/OUT (9P) connectors @¡ TIME CODE OUT connector (XLR-3-31) (D-sub 9-pin) Outputs one of the following time codes according to Connect to another DVW-500/1 or 500P/1 VTR or D- the VTR operation mode. 1, D-2, or Betacam VTR through a 9-pin remote In playback mode: Playback time code control cable.
-
Page 29: Connecting External Equipment
The diagram below shows how to connect this VTR to Digital VTR used as a recorder. another DVW-A500/1 series or 500/1 series VTR used as a player and to a DVR-2100/2100P D-1 Component DVW-A500/1 or DVW-500/1 series, or BVW-D75 series (player) -
Page 30: Making Analog Connections
3-1 Connecting External Equipment 3-1-2 Making Analog Connections The diagram below shows how to make connections for analog video and audio signals from a Betacam/ Betacam SP VTR, 1-inch VTR, or D-2 VTR. DVR-28/20 D-2 VTR or BVW-75/70/65/60 series REMOTE (9P) REMOTE (9P) BVH-3000 1-inch VTR etc. -
Page 31: Reference Signals For Video Output And Servo System
3-2 Reference Signals for Video Output and Servo System This section describes how reference signals for the generator is supplied as a reference signal for the video video output and servo system are selected. output signals and servo circuits. The output from the internal reference video signal 3-2-1 External Sync Signal for the Internal Reference Video Signal Generator signal input conditions and the setting of the [F2] The internal reference video signal generator... -
Page 32: Reference Signal For The Servo System
3-2 Reference Signals for Video Output and Servo System 3-2-2 Reference Signal for the Servo System The VTR automatically selects either the video input system. Which of the two signals is selected depends signal or the output from the internal reference video on the operational status of the VTR, as shown in the signal generator as the reference signal for the servo following flow chart. -
Page 33: Reference Signals Connections
For recording signals from a switcher or signal generator For recording signals from a VTR Reference signal SERIAL V/A REF.VIDEO INPUT SERIAL V/A INPUT OUTPUT DVW-A500/1 series or DVW-500/1 series DVW-A510/510 series (recorder) (player) 75 termination switch: OFF 75 termination switch: ON For recording signals from a VTR... - Page 34 3-2 Reference Signals for Video Output and Servo System For playback Reference signal REF.VIDEO INPUT SERIAL V/A Serial monitor OUTPUT 1/2/3/ 4(SUPER) 75 termination switch: ON For playback Chapter 3 Setting Up the VTR...
-
Page 35: Handling Cassettes
STANDBY and STOP buttons light up. When a Betacam/Betacam SP video cassette is loaded into a DVW-A500/1 series VTR, the DIGITAL indicator goes off. When a Betacam/Betacam SP video cassette is loaded into a DVW-500/1 series VTR, the cassette is automatically ejected. -
Page 36: Preventing Accidental Erasure
3-3 Handling Cassettes Removing slack in the tape 3-3-3 Preventing Accidental Press one of the reels in slightly, then carefully rotate it Erasure in the direction of the arrow until it stops. To prevent accidental erasure of material recorded on a tape, push in the record-protect plug. -
Page 37: Registering And Storing Menu Settings
4-1 Registering and Storing Menu Settings The operating conditions of the VTR are set by the 4-1-1 Menu Configuration menu operation section on the lower control panel. Menu items are divided among six different menus In addition to the six main menus, the VTR has two (HOME, TC, CUE, PF1, PF2, SET UP). -
Page 38: Changing Menu Settings
4-1 Registering and Storing Menu Settings Press the ALT button. 4-1-2 Changing Menu Settings The second page of the HOME menu appears in the display. To activate the HOME, TC, CUE, PF1, PF2, or SET UP menu, press the respective menu button. Menu items are assigned to function buttons ([F1] to D O L B Y N R CH.COND... -
Page 39: Registering Items To The Pf1/2 Menus
4-1-3 Registering Items to the PF1/2 Menus P F 1 Å L T + P F 1 S E T U P M E N U Å L T + F 6 K E Y S E T U P I T E M - 6 1 0 P F 1 You can register up to 40 items to the PF (Personal 1 : 7 1 0... -
Page 40: Vtr Memory Bank Function
4-1 Registering and Storing Menu Settings Storing the current VTR menu settings to 4-1-4 VTR Memory Bank a VTR memory bank Function Eight VTR memory banks are provided for storing up to eight sets of menu settings including items CLR button registered to the PF1/2 menus with titles. - Page 41 Press the [F9] (COPY) button. Press the SET UP button. A message asking you to confirm the operation The SET UP menu appears in the display. appears in the display. Press the [F1] (VTR BANK) button. To cancel the storage operation The VTR BANK menu appears in the display.
-
Page 42: Ic Memory Card Function
4-1 Registering and Storing Menu Settings Press the [F10] (EXIT) button. 3,4,5 The SET UP menu appears again. 4-1-5 IC Memory Card Function You can store menu settings in the VTR memory banks and cue point data to an IC memory card for later recalling. - Page 43 Press the F button to move the cursor (z) to the Storing the contents of the VTR memory VTR side, then press the G or g button to move banks to an IC memory card the cursor to the number of the VTR memory bank to be stored.
- Page 44 4-1 Registering and Storing Menu Settings Press the [F10] (EXIT) button. Press the [F4] (SHOW CUESET) button. The SET UP menu or the menu displayed before The display for storing cue point lists appears. you pressed the ACCESS button appears again. M E M O R Y C Å...
- Page 45 Press the [F6] (EDIT TITLE) button to add a title Press the G or g button to move the cursor (z) to to the cue point list. the number of the memory bank in the IC memory card whose contents are to be recalled. For details, refer to “4-1-6 Adding Titles to the Data”on page 4-11.
- Page 46 4-1 Registering and Storing Menu Settings Press the [F9] (COPY) button while holding down Press the [F4] (SHOW CUESET) button. the SFT button. The menu for storing cue point lists appears. The VTR recalls the contents of the memory card. After the recalling process is complete, the title of M E M O R Y C Å...
-
Page 47: Adding Titles To The Data
Press the [F10] (EXIT) button. Press the f or F button to select a letter. The SET UP menu or the menu displayed before you pressed the ACCESS button appears again. E D I T T I T L E 4-1-6 Adding Titles to the Data 6 7 8 9 : ;... -
Page 48: Functions
Compatibility Among the DVW- A500/1 and DVW-500/1 Series VTRs IC memory card data recorded on one DVW-A500/1 series or 500/1 series VTR (VTR A) can be read into the VTR memory banks of another DVW-A500/1 series or DVW-500/1 series VTR (VTR B) and equipped with the BKDW-515. -
Page 49: Home Menu
4-2 HOME Menu To activate the HOME menu The HOME menu sets the basic VTR operation Press the HOME button. conditions for recording, playback, and editing. The HOME, TC, PF1 and PF2 menus show To change the HOME menu page information that includes the VTR operation mode, Press the ALT button. -
Page 50: Setting The Preread Function (Pre Read)
4-2 HOME Menu 4-2-1 Setting the Preread 4-2-3 Selecting the Edit Mode Function (PRE READ) and Edit Channel (ASSEMBLE to INS CUE) To perform prereading during insert edit mode, press the [F1] (PRE READ) button while holding down the Selects assemble or insert edit mode. SFT button. -
Page 51: Setting Record Inhibit Mode (Rec Inh)
4-2-4 Setting Record Inhibit Either setting can be specified during analog Betacam Mode (REC INH) playback on the DVW-A500/1 series; in actual operation, however, only PB (playback) signals are Press the ALT button, then the [F1] (REC INH) button output. -
Page 52: Setting The Preroll Time (P-Roll Time)
AB (i.e., a tape with composite input data recorded on a rolling. Digital Betacam VTR or Betacam/Betacam SP VTR). DVW-A500/1 and 500/1 only 4-2-8 Setting the Preroll Time 2FD: The capstan servo is locked every 2 fields. (P-ROLL TIME) -
Page 53: Selecting Dmc Playback (Dmc)
I N S I N S I N S I N S During tape editing using two DVW-A500/1 series or V I D E O Å - C H 1 Å - C H 2 Å - C H 3 Å... -
Page 54: Tc Menu
O U T 0 0 : 0 0 : 0 0 : 0 0 S E T DF: This appears when drop frame mode data is being recorded or played (DVW-A500/1 and T I M E R H O L D 500/1 only). -
Page 55: Setting The Time Data (Timer Sel/Reset/Set/Hold)
Selecting the time data display 4-3-1 Setting the Time Data (TIMER SEL/RESET/SET/HOLD) Press the [F1] (TIMER SEL) button repeatedly to select the desired time data display. The display shows the following types of time data: CTL: Counts the CTL signals on the playback tape Indication Time data type or the CTL signals being recorded on the tape, and... - Page 56 4-3 TC Menu To cancel entered value Setting time code Press the CLR button. Before starting the procedure below for setting time Press the SET button to set the entered data, set the [F6] (TCG SOURCE) button to int, the value.
-
Page 57: Setting The Time Code Reader (Tc Sel)
Press the [F6] (TCG SOURCE) button repeatedly to Select df by pressing the [F9] (DF/NDF) button select the time code generator. (DVW-A500/1 and 500/1 only). int: Selects the time code generated by the internal time code generator. Select free by pressing the [F8] (RUN MODE) ext: Selects an external time code input to the TIME button. -
Page 58: Selecting The Time Code Running Mode (Run Mode)
VITC. When the settings have been completed, the 4-3-5 Selecting the Drop Frame internal time code generator starts operating in Mode (DF/NDF) (DVW-A500/1 and synchronization with the external time code 500/1 only) generator. Press the [F9] (DF/NDF) button to select the running The following table shows the conditions specified by mode for the CTL counter and the time code generator. -
Page 59: Recording Vitc (Vitc)
Time data button to select a 12-hour or 24-hour clock for the 2 Drop frame mark of the time CTL display. code reader (DVW-A500/1 and 500/1 only) +/–12H: 12-hour clock 3 Drop frame mark of the time 24H: 24-hour clock... - Page 60 For example, “T*R”, “U*R”, “T*R.”, or “U*R.”. 2 Drop frame mark of the time code reader (DVW-A500/1 and 500/1 only) “•”: Drop frame mode (factory-setting) “:”: Non-drop frame mode 3 Drop frame mark of the time code generator (DVW-A500/1 and 500/1 only) “•”: Drop frame mode (factory-setting)
- Page 61 Operation mode display configuration Indication Operation mode Block A Block B TAPE UNTHREAD No cassette is loaded. STANDBY OFF Standby off mode T.RELEASE Tension release mode STOP Stop mode F.FWD Fast-forward mode Rewind mode PAUSE Pause mode PREROLL Preroll mode PLAY Playback mode (servo unlock) PLAY...
-
Page 62: Setting The Vitc Insertion Line (Vitc Pos-1/Pos-2)
VITC signals can be inserted at two positions between increments (hexadecimal 00 to 24) in the horizontal the 12th line and 20th line (DVW-A500/1 and 500/1) direction and up to 106 increments (hexadecimal 00 to or between the 9th line and 22nd line (DVW-A500P/1 6A) in the vertical direction. -
Page 63: Cue Menu
4-4 CUE Menu For details on storing cue point data, refer to “4-1-5 IC The BKDW-515 allows you to register up to 100 cue Memory Card Function” on page 4-6. points (0 to 99), and to manage cue points in groups of 10 (per page). -
Page 64: Selecting A Multi-Cue Mode
4-4 CUE Menu 4-4-1 Selecting a Multi-Cue Mode 4-4-2 Registering Cue Points The BKDW-515 has the following two multi-cue There are two ways to register cue points: (1) by direct modes. registration of the tape address where the ENTRY button is pressed, and (2) by the entry of cue point data with the numeric buttons. - Page 65 To select the cue number directly by Registering cue points by the numeric numeric buttons buttons Enter the cue number in the data entry window with the numeric buttons, then press the [F9] (CUENUM SET) button. Press the JOG or VAR button, then rotate the search dial to find the position where you want to register the cue point.
-
Page 66: Erasing Cue Point Data
4-4 CUE Menu Enter the cue point data in the data entry window 4-4-3 Erasing Cue Point Data with the numeric buttons, then press the SET button. To erase any cue point data, blank out the data entry For example, to enter 01:30:00:00, press 1, 3, 0, 0, window, then do the cue point registration procedure. -
Page 67: Prerolling To A Cue Point
Press the CLR button then the SET button. 4-4-4 Prerolling to a Cue Point “SET” appears in a blank data entry window. Set the [F5] (CUE P-ROLL) button to specify the C U E P R E V preroll time to a cue point. Data entry P Å... -
Page 68: Changing A Cue Point Into An Edit Point
4-4 CUE Menu 4-4-5 Changing a Cue Point Into 4-4-6 Backspace Editing an Edit Point You can perform backspace editing with the CUE menu. In backspace editing, assemble editing is Follow the procedure below to change any cue point performed from the recording end point. Since the into an edit point. -
Page 69: Pf1 Menu (Factory Settings)
A500/1 and 500/1 only) prst, 0 to 220H BLACK LEVEL (DVW- Adjusts the black level. A500P/1 and 500P/1 only) [F7] Y/C DELAY(DVW-A500/1 Adjusts the Y/C delay during analog Betacam playback. prst, 0 to FFFH series only) [F8] CHROMA PHASE Adjusts the chroma phase. -
Page 70: Selecting The Input Video Signal
4-5 PF1 Menu (Factory Settings) Note 4-5-1 Selecting the Input Video Changing the PROC CONTRL setting during playback Signal (VIDEO IN) may cause a momentary interruption in the sound output. Press the [F1] (VIDEO IN) button repeatedly to select the video signal to input. sif: Serial digital video signal input to the SERIAL V/ 4-5-4 Adjusting the Output Video A INPUT connector... - Page 71 Adjusting the output level Adjusting the Y/C delay during analog Betacam playback (DVW-A500/1 series Make this adjustment with the [F4] (VIDEO GAIN) only) button. prst: Selects the standard setting. Make this adjustment with the [F7] (Y/C DELAY) Numerical value: 0 to B50H button.
-
Page 72: Pf2 Menu (Factory Settings)
4-6 PF2 Menu (Factory Settings) 4-6 PF2 Menu (Factory Settings) For details on registration methods, refer to “4-1-3 The PF2 menu is used to register frequently used menu Registering Items to the PF1/2 Menus” on page 4-3, and on items. restoring factory-set menu items, refer to “4-1-4 VTR When shipped from the factory, the PF2 menu contains Memory Bank Function”... -
Page 73: Selecting The Audio Input Signal
4-6-1 Selecting the Audio Input 4-6-4 Selecting the Monitor Signal (A-IN ALL to A-IN CH4) Output Signal (MON-L SEL/MON- R SEL) Function buttons [F1] (A-IN CH1) to [F4] (A-IN CH4) select the audio input signal for the various channels. The [F9] (MON-L SEL) and [F10] (MON-R SEL) sif: Selects the audio signal input through the buttons allow you to specify the audio channel to be SERIAL V/A INPUT connector. -
Page 74: Set Up Menu
4-7 SET UP Menu 4-7 SET UP Menu In the SET UP menu, you can store and recall menu To activate the SET UP menu settings to and from the VTR memory banks and IC Press the SET UP button. memory card, register items to the PF menu, and set items in the VTR SETUP menu and PANEL SETUP To change the SET UP menu page... - Page 75 Selecting remote operation mode When operating the VTR with an external device, set the [F8] (REMOTE 9-PIN) button or [F9] (REMOTE 50-PIN) button to on. When the [F8] (REMOTE 9-PIN) button is set to You can operate the VTR with a device connected to the REMOTE1-IN(9P)/OUT(9P) connectors.
-
Page 76: Vtr Setup Menu
4-7 SET UP Menu 4-7-1 VTR SETUP Menu All menu items required for setting up the VTR To activate the VTR SETUP menu operating conditions are displayed in the scrollable Press the SET UP button, then press the [F6] (VTR VTR SETUP menu. - Page 77 Scrolling items in the VTR SETUP menu Press the [F7] (CHANGE DATA) button. The window for changing settings appears. Press the G and g to scroll the items in the VTR SETUP menu. To search the menu by category C U R R E N T S E T U P I T E M - 6 1 0 Items in the VTR SETUP menu are divided into R E G E N Å...
-
Page 78: Panel Setup Menu
4-7 SET UP Menu 4-7-2 PANEL SETUP Menu The PANEL SETUP menu is used to set the operation To activate the PANEL SETUP menu conditions of the upper and lower control panels. Press the SET UP button, then press the [F5] (PANEL SETUP) button. - Page 79 Disabling the upper and lower control panel buttons Set the [F1] (KEYINH) button to on. You can select buttons to be disabled through 118. KEY INHIBIT SWITCH EFFECTIVE AREA in the VTR SETUP menu. Setting the keyboard sound Press the [F6] (KEY BEEP) button repeatedly. high: The keyboard sound is loud.
- Page 80 4-7 SET UP Menu 4-44 Chapter 4 Menu Settings...
-
Page 81: Preparing For Recording
5-1 Preparing for Recording 5-1-1 Setting Switches and Menus Before recording, set the switches and menus as shown For details, refer to the pages indicated in the parentheses. in the diagram below. AUDIO INPUT/MONITOR SELECT buttons: Audio channels to be recorded (page 5-2) VIDEO INPUT SELECT buttons: Input REC level controls: Reference level or signals to be recorded... -
Page 82: Selecting Audio Signals
5-1 Preparing for Recording For details, refer to “4-6 PF2 Menu (Factory Settings)” on 5-1-2 Selecting Audio Signals page 4-36. This section describes how to select the audio signals Selecting audio signals to be monitored for input and monitoring. For details on switch and menu settings, refer to “5-1-1 Press the AUDIO INPUT/MONITOR SELECT Setting Switches and Menus”... -
Page 83: Adjusting The Audio Recording Level
To adjust the audio output level of the Selecting the display range of the audio MONITOR OUTPUT connectors level meters You can make an initial settings to allow the audio output level of the MONITOR OUTPUT connector to You can switch the range of audio level meters display be adjusted with the PHONES level control on the by pressing the DISPLAY FULL/FINE button on the upper control panel. -
Page 84: Monitoring Simultaneous Playback Of Video And Audio Signals Being Recorded
5-1 Preparing for Recording 5-1-4 Monitoring Simultaneous 5-1-5 Recording Analog Audio Playback of Video and Audio Signals Being Recorded Recording with emphasis You can emphasize analog audio signals that are Monitoring signals being recorded recorded from the ANALOG AUDIO INPUT connectors. -
Page 85: Recording
5-2 Recording To record, follow the procedure below. Recording Check that the REC INHIBIT indicator is off, then insert a cassette. For details on inserting a cassette, refer to “3-3-2 Inserting and Ejecting Cassettes” on page 3-7. Press the PLAY button while holding down the REC button. -
Page 86: Preparing For Playback
5-3 Preparing for Playback 5-1 Preparing for Recording 5-3-1 Setting Switches and Menus Before starting playback, set the switches and menus as shown in the diagram below. For details, refer to the pages indicated in the parentheses. POWER switch: ON AUDIO INPUT/MONITOR SELECT buttons: Audio channels to be monitored (page 5-2) PB level controls:... -
Page 87: Playback
5-4 Playback Using Dolby noise reduction (DVW-A500/1 There are five types of playback: series only) • Normal-speed playback The VTR is equipped with the Dolby C noise • Jog/Shuttle/Variable mode playback reduction system for analog Betacam and Betacam SP • Capstan override playback playback. -
Page 88: Variable Speed Playback In Jog/Shuttle/Variable Modes
Digital Betacam tape, and –35 to switches the VTR between jog and shuttle modes, +35 (DVW-A500/1 and 500/1 only) or –42 to +42 however, you can set the VTR so that this function is (DVW-A500P/1 and 500P/1 only) times normal disabled. - Page 89 Follow the procedure below to play back in variable mode. Shuttle mode +50 (+35 for DVW-A500/1 –50 (–35 for DVW-A500/1 –50 and –42 for DVW-A500P/1 and +42 for DVW-A500P/1...
-
Page 90: Capstan Override Playback
5-4 Playback Set the search dial to center position for still- Use either method (A) or (B). picture, or press the STOP button to stop variable (A)Rotate the search dial while holding down the mode playback. PLAY button to adjust the playback speed. The adjustment range is ±15% (in steps of 1%) To return to normal-speed playback of the normal playback speed. - Page 91 Press the PREVIEW button. Storing playback speeds in memory The tape is prerolled and played back at normal speed from the preroll point to the speed variation Follow the procedure below to store playback speeds start point. The moment the tape passes the speed in memory.
- Page 92 5-4 Playback To start playback immediately after prerolling Performing DMC playback Press the PREVIEW button. The PREVIEW button lights up. When the tape passes There are two methods of starting DMC playback. the speed variation start point, DMC playback starts •...
-
Page 93: Program Playback
5-4-5 Program Playback In program playback mode, you can play back a tape at a previously determined speed. This speed may be set within a range of normal playback speed ±15% (in 0.1% steps). Installation of the optional BKDW-507 Audio Program Play Board allows you to obtain higher quality audio output during program playback. - Page 94 5-4 Playback 5-14 Chapter 5 Recording/Playback...
-
Page 95: Basic Automatic Editing
V-sync phase of the video output is delayed 6H (on editing even if there are breaks in the continuity in the the DVW-A500/1 and 500/1) or 4H (on the DVW- time codes. A500P/1 and 500P/1) with respect to the external reference signal. -
Page 96: Setting Switches And Menus
6-1 Basic Automatic Editing 6-1-2 Setting Switches and Menus Before editing, set the following switches as shown below. AUDIO INPUT/MONITOR SELECT buttons or the [F1] (A-IN CH1) to [F4] (A-IN CH4) buttons in the PF2 menu: input signal VIDEO INPUT SELECT button or the [F1] (VIDEO IN) button in the PF1 menu: input signal Recorder VTR POWER switch: ON... -
Page 97: Selecting The Edit Mode
6-1-3 Selecting the Edit Mode 6-1-4 Setting Edit Points Select assemble or insert mode. This section describes how to set edit points (IN and OUT points). In insert mode, a technque called split editing allows you to set edit points separately for [F3] (ASSEMBLE) button in the HOME menu video and audio. - Page 98 6-1 Basic Automatic Editing Setting edit points with the numeric buttons Press the SET button to set the input data. SET is displayed. CLR button D O L B Y N R C H . C O N D DIGITÅL H O M E P R E R E Å...
- Page 99 Setting edit points with the numeric buttons Split editing Positioning and setting edit points CLR button Split editing allows you to set edit points separatelty for video and audio. Set audio edit points with the AUDIO IN/OUT buttons and video edit points with the IN/OUT buttons.
- Page 100 6-1 Basic Automatic Editing Press the SET button to set the input data. AUDIO AUDIO IN point OUT point IN point OUT point SET is displayed. Recorder VTR P R E D O L B Y N R C H . C O N D DIGITÅL H O M E R E Å...
-
Page 101: Confirming Edit Points
6-1-5 Confirming Edit Points 6-1-6 Cuing Up and Prerolling You can confirm the duration between two edit points You can preroll the tape to a point prior to the edit start in the display. point (preroll point), or cue up the tape to any edit point. -
Page 102: Previewing
6-1 Basic Automatic Editing Changing the preroll time 6-1-7 Previewing The preroll time is factory set to 5 seconds, but can be set to any time between 0 and 30 seconds, in 1-second When all necessary edit points have been set, the steps. -
Page 103: Modifying Edit Points
Monitoring signals during previewing 6-1-8 Modifying Edit Points During previewing, you can monitor the following video and audio signals on a monitor connected to the If an edit point is incorrectly set, for example, if an recorder VTR: OUT point is located before an IN point, or the length •... - Page 104 6-1 Basic Automatic Editing Press the + or – button, then use the numeric Moving an edit point position one frame at buttons to enter the value to be added or a time subtracted. To cancel the entered value Press the CLR button. D O L B Y N R C H .
-
Page 105: Performing Automatic Editing
6-1-9 Performing Automatic Editing Overview Once you have set the necessary edit points, the During automatic editing, the tape in the recorder VTR AUTO EDIT button flashes to show that the VTR is and the player VTR move as shown in the diagram ready for automatic editing. - Page 106 6-1 Basic Automatic Editing Monitoring signals during editing Monitoring video and audio signals of the During editing, you can monitor the following video recorder and player VTRs on a single and audio signals on a monitor connected to the monitor recorder VTR.
- Page 107 Performing automatic editing Modifying edit points for automatic editing later Press the AUTO EDIT button to perform automatic editing. After you perform automatic editing, the time data of The AUTO EDIT button lights up during automatic IN, OUT, AUDIO IN or AUDIO OUT points remain editing, then turns off when it ends.
-
Page 108: Advanced Automatic Editing
6-2 Advanced Automatic Editing 6-2 Advanced Automatic Editing This section describes the following advanced editing Setting edit points and playback speed methods: • DMC editing Use the procedure below to set edit points and • Quick editing playback speeds for DMC editing. •... - Page 109 Set the initial playback speed by rotating the search Performing DMC editing dial while holding down the [F7] (DMC) button in the HOME menu. After storing the playback speed(s) in memory in The display shows the set speed. preview mode, press the AUTO EDIT button to If you wish to set the initial speed to normal speed, perform DMC editing.
-
Page 110: Performing Quick Editing
6-2 Advanced Automatic Editing For even quicker editing 6-2-2 Performing Quick Editing Press the PLAYER or RECORDER button to After selecting the edit mode, quick editing can save select the VTR to be operated, locate the position you time by allowing you to set edit points and for the IN point on the tape in the respective player preview the results at the same time. -
Page 111: Performing Consecutive Editing
To stop consecutive editing 6-2-3 Performing Consecutive Press the OUT button while holding down the ENTRY Editing button. After performing automatic editing, the tape in the recorder VTR is automatically rewound to the OUT point. From then, you can set IN and OUT points only for the player VTR to do consecutive edit operations. -
Page 112: Performing Preread Editing
6-2 Advanced Automatic Editing Notes 6-2-4 Performing Preread Editing • In preread editing, if an input video signal is used as the reference signal for the output video signal, Video and digital audio signals already recorded on the oscillation may occur because of loop-closing. To tape can be used as an edit source for insert editing. -
Page 113: Manual Editing
6-3 Manual Editing Follow the procedure below to perform manual editing. 6 3,5 Manual editing After pressing the RECORDER button, enter jog or shuttle mode to position the tape at a place a few seconds before the position at which you want to set an edit point. - Page 114 6-2 Advanced Automatic Editing 6-20 Chapter 6 Editing...
-
Page 115: Head Cleaning
Notes • When not using the automatic eject method above with the DVW-A500/1 series, be sure to eject the cleaning cassette after cleaning not to damage the heads. • When cleaning the heads of the DVW-500/1 series, perform Step 2 immediately after inserting the cleaning cassette. -
Page 116: Moisture Condensation
7-2 Moisture Condensation 3-1 Connecting External Equipment If “ERROR-10” appears immediately after If you suddenly move the VTR from a cold location to turning the VTR on a warm one, or use the VTR in a very humid place, Leave the VTR turned on and wait until the error moisture in the air can form on the head-drum or tape message goes off. - Page 117 Storage temperature –20°C to +60°C (–4°F to + 140°F) Humidity 25% to 80% (relative humidity) Digital video Mass DVW-A500/1 and A500P/1: 35 kg (77 lb) Sampling frequency DVW-500/1 and 500P/1: 33 kg Y: 13.5 MHz (73 lb) R-Y/B-Y: 6.75 MHz...
-
Page 118: Specifications
Output SCH phase DVW-A500P/1 and 500P/1: Less Based upon RS-170A/CCIR than 0.2% (DIN 45507 weighted) R.624-3 Digital audio (CH-1 to CH-4) Betacam SP playback (for DVW-A500/1 and A500P/1 only) Sampling frequency 48 kHz (synchronized with video) Video Quantization 20 bits/sample... - Page 119 ±3.0 dB +1.0 dB/–2.0 dB Setup/Black level ±30 IRE/±210 mV below refernce Y/C delay ±100 ns (in Betacam playback on level DVW-A500/1 and A500P/1) S/N Ratio (at 3% More than 72 dB More than 50 dB Chroma phase ±30° distortional level)
- Page 120 Analog Composite Decoder Board A500P/1 and 500P/1 and with (NTSC/PAL) 100% or 75% color bar BKDW-507 Audio Program Play Board selectable for DVW-A500/1 and BKDW-509 Parallel (50P) Interface Kit 500/1 BKDW-514 Control Panel COMPOSITE: BNC (3 including 1 for character...
-
Page 121: Glossary
Glossary AES/EBU format Component video signal Emphasis A standard format for the transfer of A video signal that consists of a luminance Emphasizing the high frequencies of a digital audio signals. In this format, two signal (Y) and two chrominance (color- signal before processing (pre-emphasis) audio signals can be input/output through difference) signals (R-Y, B-Y). - Page 122 Glossary Reference video signal User bits A video signal containing a sync signal or A recordable 32-bit section in each time sync and burst signal, used as a reference code on a video tape for recording such for synchronizing video equipment. information as the recording year, month, and day, and the tape or program ID Servolocking...
-
Page 123: Menu List
Menu List Items in the VTR SETUP menu are divided into • Items related to the time code generator (600s) categories according to type of setting they perform. • Items related to the video control (700s) Descriptions on each item are given below: •... -
Page 124: Items Related To Vtr Operations (000S
5 seconds or longer would be recommended for phase synchronization by an edit 30 sec controller. CHARACTER Sets the horizontal screen position of the superimposed (DVW-A500/1 H-POSITION characters output from the SERIAL V/A OUTPUT 4(SUPER) [14] [14] and 500/1) or COMPOSITE VIDEO OUTPUT 3(SUPER) connector. - Page 125 Item number Item Settable range Function LOCAL FUNCTION Selects which buttons on the control panel are enabled, all disable ENABLE when this unit is in the remote control mode. [stop eject] & 0: All switches and buttons are disabled. all enable 1: Only the STOP and EJECT buttons are enabled.
-
Page 126: Items Related To Operation Panels (100S
SHUTTLE, JOG or VAR button. Selects the maximum analog Betacam tape speed in MAXIMUM TAPE [ 35] search mode. (DVW-A500/1) SPEED 35 (shuttle 24) Note The maximum digital Betacam tape speed in search mode is 50 times normal tape speed no matter what this setting is. - Page 127 0: No warning is displayed. 1: Warning is displayed by a flashing STOP button. CAPSTAN LOCK [switch select] Selects the capstan servo lock mode. (DVW-A500/1 2FLD 0: The capstan servo lock mode is determined by the ALT/ and 500/1) 4FLD [F5] (CAP LOCK) button menu on the lower control panel while in the HOME menu.
- Page 128 1: Program play mode is enabled. [off] PHASE LOCK IN Specifies whether the capstan phase servo is locked during (DVW-A500/1 VARIABLE the variable-speed mode of 3 times normal speed. and A500P/1) 0: Capstan phase servo is not locked during the variable- speed mode of 3 times normal speed.
- Page 129 0 to +2 times normal speed. [disable] AUTO EE WITH As in the case of digital tape insertion (Item 108), the VTR (DVW-A500/1 ANALOG TAPE enable automatically changes to E-E mode from a VTR mode and A500P/1) (F.FWD, REW, STOP, etc) when an analog tape is inserted.
-
Page 130: Items Related To Remote Interface (200S
REMOTE1 (9P) connector on the connector panel. ESBUS 0: SONY 9 pin protocol AUTO selection 1: EBU-SMPTE bus protocol 2: EBU-SMPTE bus and SONY 9 pin protocols are automatically selected. ES BUS ADDRESS [8280] [8280] Allocates the bus for the ES BUS protocol when it is used... -
Page 131: Items Related To Editing (300S
ALT/[F5] (DVW-A500/1 and DIRECTION (CAP LOCK) button in the HOME menu is set to 4FD 500/1) (DVW-A500/1 and 500/1) or 4FD or 8FD (DVW-A500P/1 deceleration and 500P/1) . [acceleration] 0 : Capstan servo re-locks in deceleration mode. - Page 132 Menu List Item number Item Settable range Function Specifies the action taken when an edit point is incorrectly [manual] AUTO-DELETION set. neg & excess 0 : a warning message is output on the display on the lower INCONSISTENT control panel. Delete manually the unnecessary edit DATA points or correct the erroneous edit point manually.
- Page 133 Item number Item Settable range Function REC INHIBIT Specifies the extent of the record inhibit function. [all] 0 : Recording is disabled. crash 1 : Normal recording is disabled, but recording in assemble video or insert edit mode is possible. audio 2 : Recording of video and CTL signal is disabled.
- Page 134 Menu List Item number Item Settable range Function SYS 1,SYS 2 ROM CONFIDENCE Specifies the confidence playback mode when the [F2] version 1.30 and higher PB MODE (CONFI) button in the HOME menu is set to ON. 0: VTR changes to CONFI playback mode during recording MODE 1 : Rec/Edit and editing mode.
-
Page 135: Items Related To Prerolling (400S
Items Related to Prerolling (400s) The values enclosed in a box are factory settings. Item number Item Settable range Function FUNCTION MODE Selects the operation mode that the VTR changes to after [stop] AFTER CUE-UP completing a cue up operation. still 0 : Enters stop mode. -
Page 136: Items Related To Recording Protection (500S
Menu List Items Related to Recording Protection (500s) The values enclosed in a box are factory settings. Item number Item Settable range Function STILL TIMER Select the amount of time elapse after which the VTR to 0.5 sec automatically enters tape-protect mode, for the purpose of 5 sec protecting the video head and tape. -
Page 137: Items Related To The Time Code Generator (600S
Settable range Function VITC POSITION Specifies the line the VITC signal is inserted into. 12 line SEL-1 The VITC signal can be inserted in any line from line 12 (DVW-A500/1 through line 20. [16 line] and 500/1) [16] Note 20 line VITC can be inserted into two positions through item 601 and item 602. - Page 138 Menu List Item number Item Settable range Function [off tape] Specifies the signal output to the TIME CODE OUT TC OUTPUT regen connector when the internal time code generator is in a SIGNAL IN REGEN mode for regenerating the playback time code (i.e., when MODE the [F6] (TCG SOURCE) button in the TC menu is set to int and the [F7] (TCG MODE) button is set to regen, or when...
- Page 139 Item number Item Settable range Function Specifies whether the time code signal is automatically REGEN CONTROL auto (assem & insert) edit auto assemble edit regenerated or not, during editing using the control panel of MODE manual the VTR. assemble & insert 0: When the VTR is used as a recorder for editing, the time code generator automatically regenerates the time code signal using the time code on the tape during assemble...
-
Page 140: Items Related To The Video Control (700S
0: Sync signal is delayed. 1: Sync signal is not delayed. BLANK LINE Specifies whether blanking is on or off during the vertical (DVW-A500/1 SELECT blanking of the video signal. and 500/1) The lines that are blanked can be individually specified. - Page 141 Item number Item Settable range Function DECODE Y/C (DVW-A500/1 SEP MODE and 500/1 with optional accessory BKDW-505) Sub item Specifies the Y/C separation mode during vertical blanking. Line 12 Can be specified independently for each line from line 12 to [B W]...
- Page 142 0: When monitoring the composite output level of the VTR with a composite vector monitor (Sony Tektronix 1750 for DVW-A500/1 and 500/1, and 1751 for DVW-A500P/1 and 500P/1), rotating the CHROMA PHASE (hue) control changes only the chroma phase (hue), but not the chroma level.
- Page 143 Note When recording composite signals, the composite input signal is first converted to a component digital signal by decoder (optional BKDW-505 for DVW-A500/1 and 500/1, or BKDW-506 for DVW-A500P/1 and 500P/1) before it is recorded. To eliminate the adverse effect of the residual chroma...
- Page 144 0 (HEX) PHASE CONTROL [80] [80 HEX ] preset: 80 H FF (HEX) 0000 0 (HEX) SETUP LEVEL Sets the setup level. (DVW-A500/1 preset: 110 H and 500/1) [0110] [110 HEX ] 0220 220 (HEX) 0000 0 (HEX) BLACK LEVEL Sets the black level.
- Page 145 Item Settable range Function Item number REMOTE VIDEO [composite] Specifies the type of video process control via the Sony 9- CONTROL MODE component (Y-R, B) pin remote interface. 0: composite (Video, Chroma, Hue) 1: component (Y, P Note Hue cannot be controlled in component mode via 9-pin remote interface.
- Page 146 Menu List Item number Item Settable range Function [internal] VIDEO INPUT Sets the output phase for the video playback signal in edit AGC/MANUAL external switcher preset mode. 0: Video playback signal phase is identical to that in E-E mode. Choose this setting during single VTR editing or previewing the VTR output signal with the monitor function.
-
Page 147: Items Related To The Audio Control (800S
Items Related to the Audio Control (800s) The values enclosed in a box are the factory settings. Item number Item Settable range Function Turns the digital jog sound on or off. DIGITAL JOG [on] 0: Digital jog sound is turned off. SOUND Audio signals of digital channels for which speed compensation has not been conducted are output even... - Page 148 Menu List Item number Item Settable range Function Specifies the type of audio mixing to be conducted on the AUDIO MONITOR [rms] digital audio signal or Betacam playback analog audio OUTPUT MIXING signal output to the MONITOR OUTPUT connector. average 0: Simple addition 1: Multiplied average 2: Simple average...
- Page 149 Item number Item Settable range Function Specifies the brightness of the audio level meter. AUDIO LEVEL 0 is the brightest level. METER DIMMER 7 is the darkest level. CONTROL [internal] AUDIO EDIT Sets the output phase for the audio playback signal in external switcher PREVIEW edit preset mode.
-
Page 150: Items Related To Digital Process (900S
(bit reduction processing). DATA 0: When an 8-bit system is connected to the unit. 1: When an DVW-A500/1 series unit or a 10-bit system is connected to the unit. Note Select the same bit length as that of the equipment connected. - Page 151 Item number Item Settable range Function [momentary] Determines the freeze operation control by button FREEZE operations. CONTROL latch 0: The picture is freezed only while the button is held down FROM KEY 1: The picture is freezed when the button is pressed, and PANEL remains freezed when the button is released.
- Page 152 Menu List Item number Item Settable range Function [on] Specifies whether the pitch correction is conducted in PITCH digital audio signal processing during playback in program (with optional CORRECTION play mode. BKDW-507) IN P.PLAY 0 : Pitch correction is conducted. 1 : Pitch correction is not conducted.
-
Page 153: Items Set By Switches On Models Dvw-A500, A500P, 500, And 500P (Ks
Selects the video/audio signals to be output in fast-forward, SELECT (PB/EE) [PB/EE] rewind, stop, or standby mode. 0: Playback signals 1: Input signals Either setting can be specified during analog Betacam playback on the DVW-A500/1 series; in actual operation, however, only playback signals are output. A-37 Appendix... - Page 154 Function CAPSTAN LOCK [2F] Switches the capstan servo lock mode for editing or playing (DVW-A500/1 a tape with decoded component signals (i.e., a tape with and 500/1) composite input data recorded on a Digital Betacam VTR or Betacam/Betacam SP VTR).
- Page 155 [F7] (TCG MODE) button to prst. [drop frame] DF/NDF Selects the running mode for the CTL counter and the time non-drop frame code generator. (DVW-A500/1 0: Drop frame mode (DF is displayed.) and 500/1 only) 1: Non-drop frame mode (NDF is displayed.) VITC [on] Specifies the recording of VITC.
- Page 156 [sif] CH-4 AES/EBU DOLBY NR Turns on and off the Dolby NR (noise reduction) C system (DVW-A500/1 and [on] which is used for cue audio tracks only when using an A500P/1) oxide tape. The system automatically turns on when using a metal tape.
- Page 157 Item number Item Settable range Function [ch1 – – – – ] AUDIO MONITOR- Selects the audio signal to be output at the MONITOR – ch2 – – – L SELECT OUTPUT L/R connector(s). If you specify more than one ch1ch2 – – – channel to the same MONITOR OUTPUT connector, a –...
- Page 158 Menu List Item number Item Settable range Function CUE MENU [page mode] Selects the default mode to be activated when you activate DEFAULT MODE extend mode the CUE menu. 0: PAGE mode 1: EXTEND mode Specifies the preroll time to a cue point. CUE MENU PRE- [0 sec] You can set a preroll time of 0 to 30 seconds in 1-second...
-
Page 159: Index
Index Cassettes Drop frame mode 4-22 handling cassettes 3-7 AC IN connector 2-15 inserting and ejecting cassettes 3-7 ACCESS button 2-6 preventing accidental erasure 3-8 ECC encoder 1-1 Adding titles 4-11 recommended cassettes 3-7 EDIT button 2-10 Adjusting Changing Edit point audio playback level 5-6 menu settings 4-2 automatic setting 6-6... - Page 160 Index PB audio output level controls 2-3 Personal function menu 4-3 MAINTENANCE menu 1-3 Search dial 2-12 PF1 menu 4-33 MAINTENANCE switch 2-6 Selecting PF2 menu 4-36 Making analog connections 3-2 audio input signals 5-2 PHONES jack 2-2 Manual editing 6-19 audio signals 5-2 PHONES level control 2-3 Memory card...
- Page 161 Time code reader (TCR) 4-21 drop frame mark 4-24 setting 4-21 Time data selecting the time data display 4-19 setting 4-19 types of time data 4-19 Upper control panel 2-2 User bits setting 4-21 V, W, X, Y, Z VAR button 2-11 Variable mode 5-8 Variable mode playback 5-9 Variable speed playback in jog/shuttle/...
- Page 163 The material contained in this manual consists of information that is the property of Sony Corporation and is intended solely for use by the purchasers of the equipment described in this manual. Sony Corporation expressly prohibits the duplication of any...
- Page 164 DVW-A500/1 Sony Corporation DVW-A500P/1 Communication System Solutions Network Company DVW-500/1 DVW-500P/1 (UC/EK, Printed in Japan BKDW-515 (WW, 2000.09.13 3-800-541-04(1) 1995...