Table of Contents
Advertisement
Advertisement
Chapters
Table of Contents

Related Manuals for Panasonic Arbitrator-CP


Summary of Contents for Panasonic Arbitrator-CP
- Page 1 Arbitrator-CP ver.1.9 Basic Operation [For Officers]...
-
Page 2: Table Of Contents
Arbitrator-CP Basic Operation for Officers -Contents- (1) Control Reference Guide Front Camera (AG-CK10P) P2 Recorder-VPU (AG-CPD15P) Control Panel (AG-RCP30P) Control Panel - User Friendly Design Digital Wireless Microphone (TDSS-900-PNA) (2-a) Control Panel Menu for Officer (for non LPR users) (2-b) Camera Menu for LPR (License Plate Recognition) -
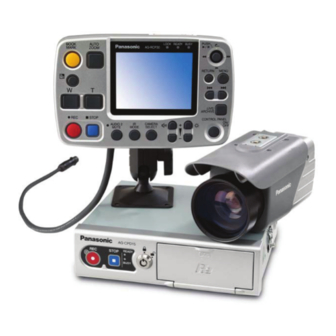
Page 3: Front Camera (Ag-Ck10P)
(1) Control Reference Guide Front Camera (AG-CK10P) Rear panel LED Control Connector for VPU Backlight compensation to make it brighter T(TELE) for Zoom In W(WIDE) for Zoom Out Auto Zoom REC Start and STOP Camera Control *Keep pressing this button for more than 2 seconds will stop recording. -
Page 4: P2 Recorder-Vpu (Ag-Cpd15P)
(1) Control Reference Guide P2 Recorder - VPU (AG-CPD15P) Key Lock P2 card Locks and unlocks slot cover the P2 Card slot cover READY lamp STOP P2 card Lights up when button button slot 1, 2 recording is ready BUSY lamp Lights up or flashes while a P2 card is accessed. -
Page 5: Control Panel (Ag-Rcp30P)
(1) Control Reference Guide Control Panel (AG-RCP30P) 1) Lock Lamp Book Auto Lock except “REC”, “Menu”, Mark Zoom Screen “Control Panel ON/OFF”, “Return” Button while lights on 2) Ready Lamp Backlight 3) Busy Lamp Compensation Cursor Button T: Zoom In Return W: Zoom Out To go back to previous... -
Page 6: Control Panel - User Friendly Design
(1) Control Reference Guide Control Panel (AG-RCP30P) - User Friendly Design Admin/Archive Control Mode Buttons Live Control Mode Buttons High Priority Buttons for Live Control Mode on the left side for easy access High Priority Buttons REC, STOP, Zoom in/out, Bookmark Auto Zoom, Backlight compensation The Same REC/STOP Button Size as that of VPU (P2 Recorder) for easy recognition... -
Page 7: Digital Wireless Microphone (Tdss-900-Pna)
(1) Control Reference Guide Digital Wireless Microphone TX and RX (TDSS-900-PNA) Transmitter (TX) With Receiver (RX) Transmitter (TX) Beep Tone Lavalier Mic Input Talk Button: Built-in Mic Press for REC Mute Button Mode Selection Button Talk ON : Green BATT : Red-In charging, Green-Fully charged Regarding Mode and Indication of LED Buttons, there are 3 different versions of TX as below serial numbers. - Page 8 (1) Control Reference Guide Version 1.0: Digital Wireless Microphone TX Indication of LED BUTTON: TDSS-900 TX Version 1.0 Serial No: 070601609 to 071103658 Mode Talk Out of Mute Push Battery Range Push Mode button Talk button Mute button BEEP Blue Blue blink blink fast...
- Page 9 (1) Control Reference Guide Version 1.5.2: Digital Wireless Microphone TX Indication of LED BUTTON: TDSS-900 TX Version 1.5.2 Serial No: 071103659 to 071104658 Mode Talk Out of range Mute Button Push Battery Push Mode button Talk button Mode 1 Blue Blue Blue Blue LED OFF...
- Page 10 (1) Control Reference Guide Version 1.5.3: Digital Wireless Microphone TX Indication of LED BUTTON: TDSS-900 TX Version 1.5.3 Serial No: 071104659 and above Mode Talk Out of Mute Battery range Push Push Mode Mode button Talk button Talk button Mute button button Vibration Blue...
-
Page 11: Top Menu
(2-a) Control Panel Menu for Officer [Camera] For users who do not use LPR (License Plate Recognition mode) [Top Menu] (“Init LPR Mode” in Admin set up is “Disable” as a factory default.) *For LPR users, please go to ”Camera Menu for LPR” for details Re-Auto Focusing Adjust manual focus Adjust image brightness... -
Page 12: (2-B) Camera Menu For Lpr (License Plate Recognition)
(2-b) Camera Menu for LPR (License Plate Recognition) In order to use LPR (License Plate Recognition) mode, the Administrator needs to set up “Init LPR Mode” as “Enable” in Admin/Camera menu. *If setting up “Init LPR Mode” as “Disable”, there will be “LPR Mode”, “LPR/Patrol Shutter Speed”, “LPR/Patrol Zoom”... - Page 13 (3) Record the video (Live Mode) Press REC button for (1) Control Panel, (2) Camera (Rear Panel), or (3) VPU (P2 Recorder) *If the trigger is set, VPU will start recording automatically when the trigger is on. <Camera> <Control Panel> <VPU-P2 Recorder>...
- Page 14 (4) Playback the recorded video (Archive Mode) (a) Press “Live/Archive” button of Control Panel to playback the video. (Playback starts from the location where playback was last made. Or if the recording was started or stopped prior to pressing “Live/Archive” button, playback starts from the beginning of the file.) (b) Press “Menu”...
- Page 15 (5) Camera Control (a) Zoom “W”: Zoom Out “T”: Zoom In (b) Auto Zoom Press “Auto Zoom” button of Control Panel or Camera. (c) IR Mode Press “IR Mode” button switching to IR “Auto”, “On”, “Off” Auto Zoom W: Zoom Out T: Zoom In IR Mode...
- Page 16 (6) Officer Information Register at the beginning of shift & delete at the end of shift (A) Register the Officers information (At the beginning of shift) (1) “Auto”: Plug USB memory (saved the officer information) to VPU. (2) “Manual”: Plug USB memory to VPU and press “Load”...
- Page 17 Arbitrator-CP ver.1.9 Basic Set up & Operation [For Administrators]...
- Page 18 Arbitrator-CP Basic Set up & Operation for Administrator -Contents- (1) -Before Use, Format 16GB P2 Card -16GB P2 Card Format by Products / Combination with Windows version (2) Control Panel Menu for Administrator (3) REC/Play Set up by Administrator (4) Camera Control - Auto Zoom / IR Set up by Administrator...
-
Page 19: Before Use, Format 16Gb P2 Card
(1) Before use, Format 16G P2 card Formatting 16G P2 card is mandatory at the first time usage. When modified (copy, delete, move etc) folders in P2 Card, please format the card. (If you copy the folders/files from 5 slot P2 drive or PC PCMCIA to PC HDD, please format the card.) The format of 16G P2 card is available by Control Panel, 5 slot P2 drive and PC PCMCIA slot. -
Page 20: 16Gb P2 Card Format By Products / Combination With Windows Version
(1) 16GB P2 Card Format by Products / Combination with Windows version Format by How to format? By SI Menu, go to “Config”-”Operations”-”Format”. (FE Application) Control Panel By Control Panel Menu, go to “Setup Info”-”Admin”-”File Management”- ”Format” Before format, install the P2 driver (from “P2 ICV Filter w/ P2 Drivers” CD included in PC PCMCIA slot Arbitrator kit) to PC. - Page 21 (2) Control Panel Menu for Administrator [Setup/Info] [Top Menu] [Admin] Page 1/2 [Admin] Page 2/2 Record/Play mode settings Date and Time settings Export or Delete files Officer Registration Format files Trigger (8GPIO) settings On Screen Display settings to appear on screen and include in recording files Camera settings Management mode...
- Page 22 (3) REC/Play Set up by Administrator Power off time setting after shutting down the ignition Initial camera setting, camera 1 or 2 Initial Audio 2 setting, INCAR or 2 WMIC or LINK CAM Start recording when VPU is turned on [Admin] Page 1/2 Setting: Off Fixed From Control Panel Top Menu...
- Page 23 (4) Camera Control-Auto Zoom / IR Set up by Administrator [Admin] Page 1/2 From Control Panel Top Menu --”Setup info”—”Admin” Adjust “Zoom Limit”, “x22” for optical or “x220” for digital 1. Adjust “Auto Zoom Magnification” selecting from “1,2,3,4,5,7,10,15, or 22” 2.
- Page 24 (5) Control Panel Key Lock All buttons except buttons in circle “REC” “Cursor Button” “Menu” “Return” “Control Panel On/Off”, “REC” on both VPU and Camera will be locked. Control Panel Key Lock Set up by Administrator and Officer [Key Lock by Admin] From Control Panel Top Menu --”Setup info”—”Admin”...
- Page 25 (6) On Screen Type set up by Officer / OSD set up by Administrator [Top Menu] [Setup/Info] On Screen Type set up by Officer, “AUTO”, “SIMPLE”, “DETAILS” or “OFF” *1. See more details on “Live mode on screen type” and “Archive mode on screen type”.
-
Page 26: (6-A) Live Mode On Screen Type
(6-a) Live Mode On Screen Type [SIMPLE] Remaining P2 card recording time Mode indication ( Pause, Record) Status Display PON: Power On Recording “ON” CARD FULL: No space on P2 card CARD PROTECT: The write-protect switch of P2 card is set to protect VUP CARD: Recording is not possible due to P2 card intended for version upgrade UNFORMATTED: P2 card is not formatted... -
Page 27: (6-B) Archive Mode On Screen Type
(6-b) Archive Mode On Screen Type [SIMPLE] Playback filename (Local time at start of recording) Mode indication ( Playback, Pause, Slow) Playback Speed and Status Display <Playback Speed> x1/10, x1/2, x4, x20, x200 <Status Display> READ ERROR: An error occurred while reading META ERROR: No associated meta information file exists. -
Page 28: (A) Set Up By Administrator
(7) Trigger (a) Set up by Administrator (1) Go to “Trigger” in “Admin” menu by Control Panel. (2) Select “Action” which you need when detecting the trigger signal (Trigger 1 to 8). Select the Detection from the followings and choice of detection depends on “Action”: Trigger On or Off setting 1. -
Page 29: (B) Stop Recording By Trigger Off
(7) Trigger (b) Stop recording by Trigger OFF [Admin] From Control Panel Top Menu --”Setup info”—”Admin” REC Continue Timer Setting Select either of “Continue” or “1-90” Trigger Select either of “Level H”, “Level L” Setting to stop recording by Trigger OFF Stop Recording Detection REC Continue Time... - Page 30 (8) Menu (VPU settings) Copy [Step 1] Get a setting configuration file from the VPU which settings need to be copied to other VPUs. (1) Plug an USB memory* to the VPU which settings need to be copied to other VPUs. (2) Go to “Operations”...
-
Page 31: (A) Create An Event Type Text And Register It To Vpu
(9) Event Type for Bookmark (a) Create an Event Type text and register it to VPU [STEP 1: Create the Event Type text file (“evtype.txt”) and save it to the USB memory.] Create the event Create “WIDKEY” Plug an USB type text file under root directory memory to PC... -
Page 32: (B) How To Add / Delete The Bookmark
(9) Event Type for Bookmark (b) How to Add / Delete the Bookmark? LIVE mode ARCHIVE mode (during recording) (during playback) Event Type Loaded to VPU Add the Press “Bookmark” button. Press “Bookmark” button. Press “Bookmark” button. bookmark will appear on screen. will appear and select the event type. - Page 33 (10) Officer/Admin Information Set up -Contents- 1. Admin Set up (1) Creating Text Files and Saving in USB memory 2. Admin Set up (2) Text Files for Officer/Admin 3. Admin Set up (3) How to register Officer/Admin information? 4. Admin Set up (4) How to log in “Admin” menu? 5.
-
Page 34: Admin Set Up (1) Creating Text Files And Saving In Usb Memory
-Officer/Admin Information Set up by Control Panel- Admin Set up (1) Creating Text Files and Saving in USB memory Create the following text files under Plug USB “WIDKEY” directory: Memory memory (1) Officer Data File to PC (2) Officer Registration File (3) Administrator Registration File (4) Event Type File (see “Event Type for Bookmark”) -
Page 35: Admin Set Up (2) Text Files For Officer/Admin
-Officer/Admin Information Set up by Control Panel- Admin Set up (2) Text Files for Officer/Admin (1) Officer Data File: “wid*****.txt “ (2) Officer Registration File: (3) Administrator Registration *Within 8 characters for file name, “wofficer.txt” File: “wadmin.txt” 1 text file per officer, Max 2 text files *Max 500 officers in 1 text file *Max 10 Administrator in 1 text file *Necessary only when using “Officer List”... -
Page 36: Admin Set Up (3) How To Register Officer/Admin Information
-Officer/Admin Information Set up by Control Panel- Admin Set up (3) How to register Officer/Admin information (A) Before registering the Officers, Administrator needs to set “Management Mode” in “Admin ” menu such as “Auto”, “Manual” or “List” for Officer registration mode. (See “Officer Set up (1)”) [Admin] [Setup/Info] [Top Menu]... -
Page 37: Admin Set Up (4) How To Log In "Admin" Menu
-Officer/Admin Information Set up by Control Panel- Admin Set up (4) How to Log in “Admin” menu? How to Log in “Setup/Admin” menu by administrator? (1) Create Officer Data File (wid*****.txt) that is the same Admin information registered in VPU (2) Save the Officer Data File to USB memory and plug it to VPU to log in “Setup/Admin”... -
Page 38: Admin Set Up (5) How To Delete Admin/Officer Information
-Officer/Admin Information Set up by Control Panel- Admin Set up (5) How to delete Admin/Officer information? How to delete Admin information when Admin information had registered in VPU? (1) Log in “Admin” menu followed by Admin Set up (4) (2) Create a blank Admin Registration File (wadmin.txt) and save it to USB memory. Then, plug USB memory to VPU and select “Load Admin”... -
Page 39: Officer Set Up (1) How To Register Officers Info At The Beginning Of Shift
-Officer/Admin Information Set up by Control Panel- Officer Set up (1) How to register Officers info at the beginning of shift? How to register the Officers information at the beginning of the shift? (1) Plug USB memory saved the Officer information as the file “wid*****.txt”... -
Page 40: Officer Set Up (2) How To Delete Officers Info At The End Of Shift
-Officer/Admin Information Set up by Control Panel- Officer Set up (2) How to delete Officers info at the end of shift? How to delete Officers information at the end of the shift? (1) Go to “Officer” by Control Panel menu. If either “Manual”... - Page 41 APPENDIX: Officer/Admin Information Text File Comparison -Data of text files for Officer/Admin- Officer Data File Officer Registration File Administrator Registration File: “wadmin.txt” “wid*****.txt” “wofficer.txt” Remark/Limitation 1) Up to 8 characters 1) Max 500 officers in 1 text file 1) Max 10 Administrator for file name 2) Necessary only when using in 1 text file...