Table of Contents
Advertisement
Quick Links
English
Contents
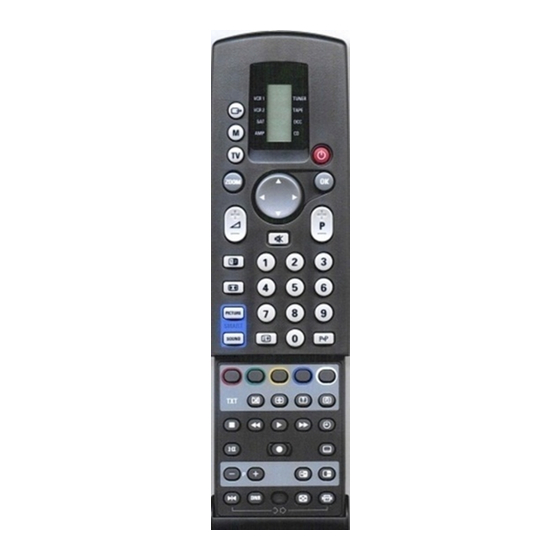
Your remote control ________________________________________2
Preparation ________________________________________________3
Installation_________________________________________________4
Select the menu language and country ______________________4
Automatic installation ___________________________________5
Manual installation ______________________________________5
Give name ________________________________________________6
Reshuffle the programme list _________________________________6
Select favourite TV channels __________________________________6
Install TV setup ____________________________________________7
Operation
Use of the remote control __________________________________8-9
Picture menu __________________________________________10
Sound menu___________________________________________11
Features menu ______________________________________13-14
Dual Screen ______________________________________________15
Teletext _______________________________________________16-17
Connect peripheral equipment _________________________18-23
Tips ____________________________________________________24
Index ___________________________________________________24
Lexicon _________________________________________________25
EasyLink features are based on the "one touch operation" approach. This means that
a sequence of actions are executed at the same time in both the television and the
video cassette recorder, provided both are fitted with the EasyLink function and
connected with the eurocable supplied.
1
Advertisement
Table of Contents

Related Manuals for Philips 28PW9763/58


Summary of Contents for Philips 28PW9763/58
-
Page 1: Table Of Contents
English Contents Installation Your remote control ________________________________________2 Preparation ________________________________________________3 Installation_________________________________________________4 Store TV channels Select the menu language and country ______________________4 Automatic installation ___________________________________5 Manual installation ______________________________________5 Give name ________________________________________________6 Reshuffle the programme list _________________________________6 Select favourite TV channels __________________________________6 Install TV setup ____________________________________________7 Operation Use of the remote control __________________________________8-9 Use of the menus... -
Page 2: Installation
Your remote control VCR 1 TUNER p. 21 u selection of EXT1, EXT2, VCR 2 TAPE EXT3 FRONT peripheral selection switch to standby p. 8 TV selection p. 8 zoom on/off select your choice p. 10 ZOOM ZOOM OK activate your choice p. -
Page 3: Preparation
Preparation & Place the TV on a solid surface. For ventilation, leave at least 5 cm free all around the TV. To prevent any unsafe situations, do not place any objects on top of the TV. é Insert the aerial plug tightly into the aerial socket x at the back of the TV. You can improve the picture quality by using the suppressor aerial cable supplied. -
Page 4: Installation
SOUND Installation ‡ Ò † π Select the INSTALLATION MENU & Open the door of the remote control. fi y Ú é Press S and s at the same time. To use the menus & Use the A keys to select a menu item. é... -
Page 5: Automatic Installation
Automatic installation In the Automatic Installation menu select Start and press the OK key to activate the searching. All TV channels are searched for and stored automatically. Automatic Installation If a cable system which broadcasts ACI (Automatic Channel Installation) or a TV channel transmitting a teletext page with the frequencies and programme Start names of all the TV channels which can be received, is detected, the search is... -
Page 6: Give Name
Give name INSTALLATION It is possible to change the name stored in the memory or to assign a name Menu Language to a TV channel which has not yet been entered. A name with up to 5 letters Country or numbers can be given to the programme numbers 0 to 99. For example Automatic Installation SUPER, BBC1,... -
Page 7: Install Tv Setup
INSTALLATION Connection diagrams Menu Language Country See Connect Peripheral Equipment, p. 18. Automatic Installation Manual Installation Give Name Reshuffle Install TV Setup Favourite Programmes Connection diagrams & Use the A keys to select the menu item. SETUP SETUP é Use the OK key to activate. SETUP “... -
Page 8: Use Of The Remote Control
Use of the remote control Select your computer or other peripherals Press this key repeatedly to select EXT1, , according to EXT2, EXT3, FRONT where you connected your peripherals (see p. 21). Standby The TV set is switched off and the red Mode selection indicator lights up. - Page 9 menu PICTURE, SOUND FEATURES Programmes Select the desired TV channel and press the Teletext on/off see p. 16 OK key. æ æ Programme guide see p. 15 Surround-mode selection Press this key repeatedly to select another surround mode: Pro Logic, Dolby 3 Stereo, Hall or Off.
-
Page 10: Use Of The Menus
VCR 1 TUNER Use of the menus VCR 2 TAPE & Press the red, green or yellow colour key to display/cancel the PICTURE menu. SOUND FEATURES ZOOM π π é Use the A keys to select the menu item. activate “... -
Page 11: Sound Menu
Sound menu • Store the modified adjustments for Volume, Treble and Bass from the Graphic Equalizer menu and Loudness for all TV channels with Store PP in the SOUND menu. FEATURES Dolby Pro Logic Volume Volume Graphic Equalizer Graphic Equalizer Loudness Here you can select the preferred sound style which does not correspond with Headphone... - Page 12 Dolby* Pro Logic SOUND Adjust the volume balance level of the loudspeakers Dolby Pro Logic Dolby Pro Logic Most programmes will sound good with the volume balance between the Volume centre left and right and rear loudspeakers in an equally loud position. Graphic Equalizer However, some programmes may benefit from an adjustment of the level of Loudness...
-
Page 13: Features Menu
VCR 1 TUNER VCR 2 TAPE Features menu ZOOM π π & Press the yellow colour key to display/cancel the menu. FEATURES activate é Use the A keys to select the menu item. ¬ “ Use the OK key to activate. select adjustments PICTURE... - Page 14 FEATURES Message Store PP With this function you can enter a personal message on 2 lines which will be Sleeptimer displayed automatically when the set is switched on from standby. Message Message For example: I'll be late this evening. Don't wait for dinner. Child Lock Animation demo Change...
-
Page 15: Dual Screen
Dual Screen (not available in VGA mode) VCR 1 TUNER If Dual Screen is off, the picture or teletext are displayed full screen. VCR 2 TAPE • Press the key: the TV screen is divided into two parts. - the left side for the normal main picture. - the right side for teletext broadcast by the selected TV channel. -
Page 16: Teletext
Teletext Most TV channels broadcast information via teletext. Each channel which broadcasts teletext transmits a page with information on how to use its teletext system. Look for the teletext page with the main index (usually p. 100). Depending on the TV channel, teletext is transmitted in different systems. VCR 1 TUNER VCR 2... - Page 17 Select the index teletext page • Press the white colour key to display the main index (usually p.100). Only for T.O.P teletext broadcasts : T.O.P orders the pages in categories and adds other possibilities of enhancing ease of use. • Press i.
-
Page 18: Connect Peripheral Equipment
Connect Peripheral Equipment Connection diagrams There is a wide range of audio and video equipment that can be connected Amplifier to your TV. The following connection diagrams show you how to connect it. Front speakers See also Connection diagrams in the menu where the INSTALLATION Rear speakers... - Page 19 Video recorder and other peripherals (except CD-i/Photo CD) • CABLE Connect the aerial cables 1, 2 and 3 as shown opposite. Better picture quality can be obtained if you also connect eurocable 5 to and a EXTERNAL 2 eurocable 4 to EXTERNAL 1 •...
- Page 20 Headphone • Insert the plug into the headphone socket L at the front side of the TV. • Press ¬ on the remote control to switch off the internal loudspeakers of the The headphone impedance must be between 8 and 4000 Ohm. The headphone socket has a 3.5 mm jack.
-
Page 21: To Select Connected Equipment
To select connected equipment If the TV is connected to a video recorder with the EasyLink function, in some cases the TV will be switched on, even when the TV was in standby. (E.g. playback tape,...) This is not possible when Child Lock On is selected. Equipment connected with an aerial cable only : •... -
Page 22: Record With Your Video Recorder Without Easylink
Record with your video recorder without EasyLink To record S-VHS quality, connect a S-VHS peripheral directly to the video recorder. 1. Record a TV programme using only an aerial cable • Select the programme number on your video recorder. • Set your video recorder to record. -
Page 23: Record With A Video Recorder With Easylink
Record with a video recorder with EasyLink If you have connected a S-VHS video recorder provided with the EasyLink function, you can record S-VHS-quality from a S-VHS peripheral connected to the front side of the TV. (E.g. from a S-VHS camcorder.) In TV mode, it is possible to start a direct recording of the programme which is being displayed on the TV screen. -
Page 24: Tips
Tips Care of the screen No picture No solution Clean the TV with a slightly damp soft Is the aerial connected properly ? Are the Switch your TV off and then on again. cloth. Do not use abrasive solvent as it can plugs tightly connected in the aerial socket? Never attempt to repair a defective damage the TV screen. -
Page 25: Lexicon
Lexicon 100 Hz Dolby Surround Pro Logic Sleeptimer 100 Hertz provides a superior solution to Literally wraps you in 4-channel sound. It Function with which you can set a time the problem of picture flicker which is brings your favourite movies to life with all period after which the TV should switch particularly noticeable with larger screen the realism and impact of cinema sound as...