Table of Contents
Advertisement
Advertisement
Table of Contents

Related Manuals for AEG ARCTIS U 86050 i


Summary of Contents for AEG ARCTIS U 86050 i
- Page 1 ARCTIS U 86050 i Built-in freezer Operating and Installation Instructions...
- Page 2 Dear customer, Before placing your new refrigerator/freezer into operation please read these operating instructions carefully. They contain important informa- tion for safe use, for installation and for care of the appliance. Please keep these operating instructions for future reference. Pass them on to possible new owners of the appliance.
-
Page 3: Table Of Contents
Contents Important Safety Instructions ........4 Disposal ...........6 Appliance Packaging Information . -
Page 4: Important Safety Instructions
Important Safety Instructions These warnings are provided in the interests of your safety. Ensure you fully understand them before installing or using the appliance. Your safety is of paramount importance. If you are unsure about the meaning of these warnings contact the Customer Care Department for assistance. - Page 5 • This product should be serviced by an authorised engineer and only genuine spare parts should be used. • Under no circumstances should you attempt to repair the appliance yourself. Repairs carried out by inexperienced persons may cause injury or serious malfunctioning. Contact your local AEG Service Force Centre.
-
Page 6: Disposal
Disposal Appliance Packaging Information All materials are environmentally sound! They can be disposed of or burned at an incinerating plant without danger. About the materials: The plastics can be recycled and are identified as follows: >PE< for polyethylene, e.g. the outer covering and the bags in the interior. -
Page 7: Installation
Installation Installation Location The appliance should be set up in a well ventilated, dry room. Energy use is affected by the ambient temperature. The appliance should therefore – not be exposed to direct sunlight; – not be installed next to radiators, cookers or other sources of heat; –... -
Page 8: Grid Preparation
Installation Grid preparation The side at which the door opens can be changed from the right side (as supplied) to the left side, if the installation site requires. Warning! When changing the side at which the door opens, remove plug from the mains. Left door opening: 1. -
Page 9: Reversing The Door
Installation After completion Warning! of the door reversing opera- tion, check that the door gasket adheres to the cabi- net. If the ambient temper- ature is cold (i.e. in Winter), the gasket may not fit per- fectly to the cabinet. In that case, wait for the natural fitting of the gasket or accelerate this process by... -
Page 10: Building The Appliance In Under A Worktop
Installation Building the appliance in under a worktop The dimensions of the recessed installation area must correspond with those indicated in the figure. Installation kit 1. Two cabinet securing brackets are supplied with the installa- tion pack. They need to be assembled onto the cabinet prior to cabinet being pushed into the Kitchen aperture. - Page 11 Installation 4. Push the appliance into place. The plug socket nec- essary for connection of the appliance to the elec- tricity supply should be positioned, so that the plug is not placed in the recess. To adjust the height pro- ceed as follows: 5.
- Page 12 Installation 8. Push the appliance into place and retain the cab- inet with screws through the securing brackets into the worktop or adjacent woodwork as necessary. 9. To mount the furniture door proceed as shown in the fig- ures:...
- Page 13 Installation clic clic...
- Page 14 Installation Upper part of kitchen furniture panel Lower part of kitchen furniture panel...
- Page 15 Installation 10. Refit the covering strip.
-
Page 16: Fitting The Plinth
Installation Fitting the plinth Important! For the efficient operation of the appliance, it is important that the original ventilation grid is used. • For an opening height dimension A=820 mm and a plinth height dimension a=100 mm, the plinth may be fitted without adjustments. -
Page 17: Electrical Connection
The mains cable may only be changed by a qualified electrician or competent person. If your appliance needs repairing, please contact your local AEG Service Force Centre. Electrical Connection Any electrical work required to install this appliance should be carried out by a qualified electrician or competent person. -
Page 18: Description Of The Appliance
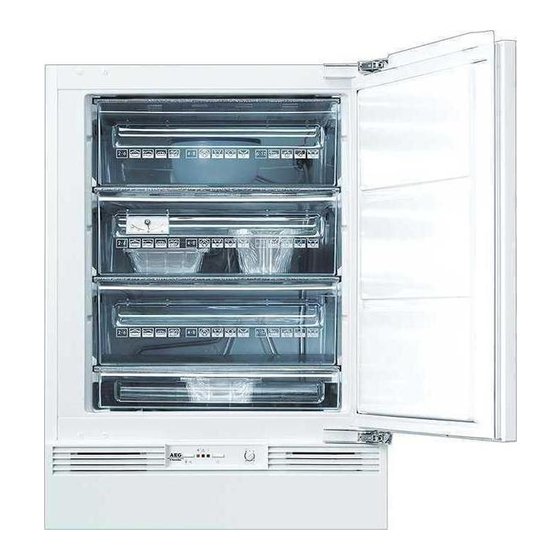
Description of the appliance View of the appliance Freezer calendar Control panel Drawer (only for storage) Drawer (for storing frozen food and freezing fresh produce) Temperature display Magnet holder for door alarm Prior to Initial Start–Up 1. Please clean the appliance interior and all accessories prior to initial start-up (see section: “Cleaning and Care”). -
Page 19: Operating And Indicator Panel
Operating and indicator panel Important! Only use the appliance when built-in! 1 Thermostat control knob 2 ON/OFF switch 3 Pilot light (green) 4 Warning light (red) 5 Fast freeze light (yellow) 6 Fast freeze button and used to switch off the warning tone The appliance can be switched ON or OFF by pressing the ON/OFF... -
Page 20: Warning System
Operating and indicator panel – the minimum storage temperature is no longer being maintained (fault); – excessive amounts of fresh food are placed inside; or – if the appliance door is open for too long. 1. Turn the thermostat control knob to the desired setting with the aid of a coin. -
Page 21: Starting Up And Temperature Regulation
Starting up and temperature regulation 1. Turn the thermostat control knob (1) in the direction of “1”. The green light (3) and the red light (4) come on, the audible warning sounds (if fitted), and the refrigeration motor starts up. 2. - Page 22 Freezing and storing frozen food You can use your freezer for freezing fresh food yourself. Important! • The temperature in the freezer compartment must be –18°C or cold- er before freezing food. • Please observe the freezing capacity given on the rating plate. The freezing capacity is the maximum quantity of fresh food that can be frozen within a period of 24 hours.
-
Page 23: Storage Goods Symbol/Freezing Calendar
Place frozen foods in the drawers sorted by type, as far as possible. 4. Once the required storage temperate has been reached, press the fast freeze button again. The yellow light goes out. Tips: • The following are suited for the packaging of frozen goods: –... -
Page 24: Defrosting
Defrosting During use and when the door is opened, moisture is deposited as frost inside the appliance, particularly on the evaporator melts. This frost must be removed from time to time using the soft plastic scraper sup- plied. Under no circumstances use hard or pointed objects for this pur- pose. -
Page 25: Switching Off The Appliance
Switching off the appliance To switch off the appliance, turn the thermostat control knob to posi- tion "0". If the appliance is not going to be used for an extended period: 1. Remove all deep-frozen packages as well as ice-trays. 2. -
Page 26: Magnetic Door Seal
Magnetic door seal 3. Switch off the appliance and unplug it. 4. Clean the appliance and the interior accessories with a cloth and luke- warm water. 5. After cleaning wipe with fresh water and rub dry. 6. After everything is dry, switch to fast freeze. After running the appli- ance for two or three hours, it is ready again for storing frozen food. -
Page 27: Energy Saving Tips
Energy Saving Tips • Do not install the appliance near boilers, radiators or other sources of heat. High ambient temperatures cause longer, more frequent operation of the compressor. • Ensure sufficient air circulation and exhaust at the appliance base and at the back wall of the appliance. Never cover air vent openings. •... - Page 28 What to do if ... Symptoms Possible Cause Remedy Appliance is not switched Switch on the appliance. Mains plug is not plugged Insert mains plug. Appliance does not work, in or is loose. no pilot light is Fuse has blown or is Check fuse, replace if illuminated.
- Page 29 What to do if ... Symptoms Possible Cause Remedy Temperature is not Please look in the “Initial properly adjusted. Start Up” section. Do not leave the door Door was open for an open any longer than nec- extended period. essary. Press the fast freeze The freezer temperature is switch.
-
Page 30: Noises During Operation
Noises during Operation The following noises are characteristic of refrigeration appliances: • Clicks Whenever the compressor switches on or off, a click can be heard. • Humming As soon as the compressor is in operation, you can hear it humming. •... -
Page 31: Technical Terminology
Technical terminology • Refrigerant Liquids that can be used to a generate a cooling effect are known as refrigerants. They have a relatively low boiling-point, indeed so low, that the warmth from the food stored in the fridge or freezer can cause the refrigerant to boil and vaporise. - Page 32 AEG Hausgeräte GmbH Postfach 1036 D-90327 Nürnberg http://www.aeg.hausgeraete.de © Electrolux plc 2003 2222 740-26 -02- 0103 Subject to change without notice...