Table of Contents
Advertisement
Advertisement
Table of Contents

Related Manuals for AEG SANTO U86000-4I


Summary of Contents for AEG SANTO U86000-4I
- Page 1 SANTO Built-In Refrigerator Operating and Installation Instructions U 8 60 00-4 I...
- Page 2 Dear customer, Before switching on your new appliance please read these operating instructions carefully. They contain important information for safe use, for installation and for care of the appliance. Please keep these operating instructions for future reference. Pass them on to possible new owners of the appliance. These operating instructions are for use with several technically com- parable models with varying accessories.
-
Page 3: Table Of Contents
Contents Important Safety Instructions ....... . . 4 Disposal ..........6 Appliance Packaging Information. -
Page 4: Important Safety Instructions
Important Safety Instructions These warnings are provided in the interests of your safety. Ensure you fully understand them before installing or using the appliance. Your safety is of paramount importance. If you are unsure about the meaning of these warnings contact the Customer Care Department for assistance. - Page 5 Important Safety Instructions Safety of children • Packaging (e.g. wraps, polystyrene) can be dangerous for children. There is a risk of suffocation! Keep packaging material away from children! • Please make old appliances unusable prior to disposal. Pull out the mains plug, cut off the mains cable, break or remove spring or bolt catches, if fitted.
-
Page 6: Disposal
Disposal Appliance Packaging Information All materials are environmentally sound! They can be disposed of or burned at an incinerating plant without danger. About the materials: The plastics can be recycled and are identified as follows: >PE< for polyethylene, e.g. the outer covering and the bags in the interior. -
Page 7: Remove Transport Packaging
Remove transport packaging The appliance and the interior fittings are protected for transport. 1. Pull off the adhesive tape on the left and right side of the door. 2. Remove all adhesive tape and packing pieces from the interior of the appliance. -
Page 8: Grid Preparation
Installation Grid preparation The side at which the door opens can be changed from the right side (as supplied) to the left side, if the installation site requires. Warning! When changing the side at which the door opens, remove plug from the mains. Left door opening: 1. -
Page 9: Reversing The Door
Installation Reversing the door The side at which the door opens can be changed from the right side (as supplied) to the left side, if the installation site requires. To reverse the opening direction of the door, pro- ceed as shown in the fig- ures: After completion of Warning! -
Page 10: Building The Appliance In Under A Worktop
Installation Building the appliance in under a worktop The dimensions of the recessed installation area must correspond with those indicated in the figure. Installation kit 18xI Two cabinet securing brackets are sup- plied with the installation pack. They need to be assembled onto the cabinet prior to cabinet being pushed into the Kitchen aperture. - Page 11 Installation Push the appliance into place. The plug socket necessary for connection of the appliance to the elec- tricity supply should be positioned, so that the plug is not placed in the recess. 3. To adjust the height proceed as follows: Loosen or tighten the two front feet.
- Page 12 Installation 5. Push the appliance into place and retain the cabinet with screws (I) through the securing brackets into the worktop or adja- cent woodwork as necessary. 6. To mount the furniture door proceed as shown in the fig- ures: click click...
- Page 13 Installation Upper part of kitchen furniture panel Möbeltür Innenseite...
- Page 14 Installation 7. Refit the covering strip.
-
Page 15: Fitting The Plinth
Installation Fitting the plinth Important! For the efficient operation of the appliance, it is important that the original ventilation grid is used. • For an opening height dimension A=820 mm and a plinth height dimension a=100 mm, the plinth may be fitted without adjustments. -
Page 16: Electrical Connection
Installation The mains cable may only be changed by a qualified electrician or competent person. If your appliance needs repairing, please contact your local Service Force Centre. Electrical Connection Any electrical work required to install this appliance should be carried out by a qualified electrician or competent person. -
Page 17: Description Of The Appliance
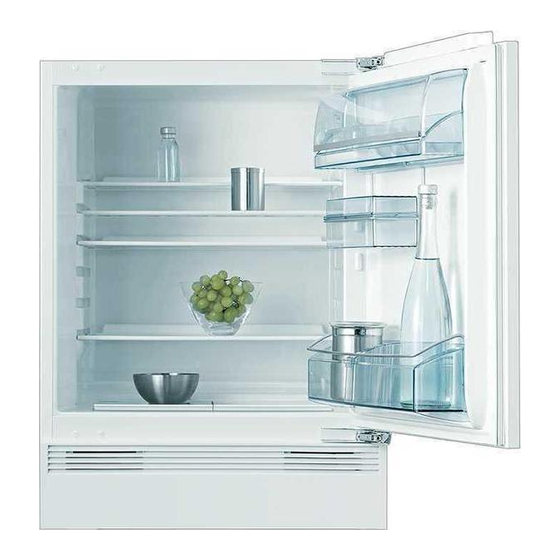
Description of the appliance View of the appliance 1 Butter/cheese compartment 2 Sliding shelf 3 Bottle shelf 4 Vegetable drawers 5 Storage shelves 6 Thermostat Prior to Initial Start–Up Please clean the appliance interior and all accessories prior to initial start-up (see section: “Cleaning and Care”). -
Page 18: Starting Up And Temperature Regulation
Starting up and temperature regulation Important! Only use the appliance when built–in! 1. Connect the appliance to the mains electricity supply. When the refrigerator compartment door is opened, the internal light- ing is switched on. The temperature control knob is located on the right hand side of the refrigerator compartment. -
Page 19: Switching Off The Appliance
Switching off the appliance To switch off the appliance, turn the temperature regulator to position "0". If the appliance is not going to be used for an extended period: 1. Remove all refrigerated packages. 2. Switch off the appliance by turning the thermostat knob to position "0". -
Page 20: Variable Storage Box
Interior Accessories Variable Storage Box Some models are equipped with a variable stor- age box which is fitted under a door shelf com- partment and can be slid sideways. The variable box can be hung from a storage shelf in the refrigerator com- partment: 1. -
Page 21: Correct Storage
Correct storage For physical reasons, there are different temperature regions in the fridge. The coldest region is on the lowest storage shelf. Warmer regions are the top storage shelf, the vegetable drawer and the storage compartments on the door. The arrangement example shows at which places in the refrigerator suitable temperatures for various... -
Page 22: Cleaning And Care
Cleaning and Care For hygienic reasons the appliance interior, including interior acces- sories, should be cleaned regularly. Warning! • The appliance must not be connected to the mains during cleaning. Danger of electrical shock. Before cleaning switch the appliance off and remove the plug from the mains, or disconnect from the elec- tricity supply. -
Page 23: Energy Saving Tips
An accumulation of dust will affect the performance of the appliance and cause excessive electricity consump- tion. The structure of the appliance permits you to clean the rear zone close to the wall, using a vacuum cleaner. 1. Remove the plinth (1), then the venti- lation grid (2);... - Page 24 What to do if ... Symptom Possible Cause Remedy Appliance is not switched Switch on the appliance. Mains plug is not plugged Insert mains plug. in or is loose. Fuse has blown or is defec- Check fuse, replace if nec- Appliance does not work.
-
Page 25: Changing The Light Bulb
Changing the light bulb Warning! There is a risk of electric shocks! Before changing the light bulb, switch off the appliance and unplug it, or disconnect from the power supply. Light bulb data: 220-240 V, max. 15 W 1. To switch off the appliance, turn the thermostat knob to position "0". 2. -
Page 26: Technical Terminology
were observed in the manufacture of this appliance. The refrigerant circuit has been checked for leaks. This appliance is in accordance with the following EU guidelines: – 73/23/EWG dated 19 February 1973 - low voltage guidelines. – 89/336/EWG dated 3 May 1989 (including guideline change notice 92/31/EWG) - EMV guideline Technical terminology •... - Page 28 AEG Hausgeräte GmbH Postfach 1036 D-90327 Nürnberg http://www.aeg.hausgeraete.de © Electrolux plc 2005 2222 682-17 -00- 0405 Subject to change without notice...