Table of Contents
Advertisement
Quick Links
Download this manual
See also:
Service Manual
Advertisement
Table of Contents

Related Manuals for Sharp VL-C8000X


Summary of Contents for Sharp VL-C8000X
- Page 1 SHARR...
- Page 2 Please refer servicing to a qualified dealer or a Camcorder service centre approved by Sharp as shown in the enclosed Directory of Service Centres. CAUTION: To prevent shock, do not open the cabinet. No user serviceable parts inside.
-
Page 3: Table Of Contents
With so many brands available, the choice was difficult. But after enjoying the top quality and high performance of this Sharp Camcorder, you’ll know you were right. This Camcorder has outstanding features which allow to relax and enjoy the home entertainment programmes of your choice. -
Page 4: Precautions
Under such circumstances, contact the nearest service centre approved by SHARP or your dealer for further advice. @ Make sure there is enough air in the plastic bag con- taining the Camcorder. - Page 5 Handling the Camcorder For safety, strictly observe the following .Do not open the case. Protect the microphone from damage. @Take care to avoid flammables or other liquids and Keep the Camcorder horizontal during use, other- metal objects from entering the unit. Should this wise the tape may become slack and be damaged.
-
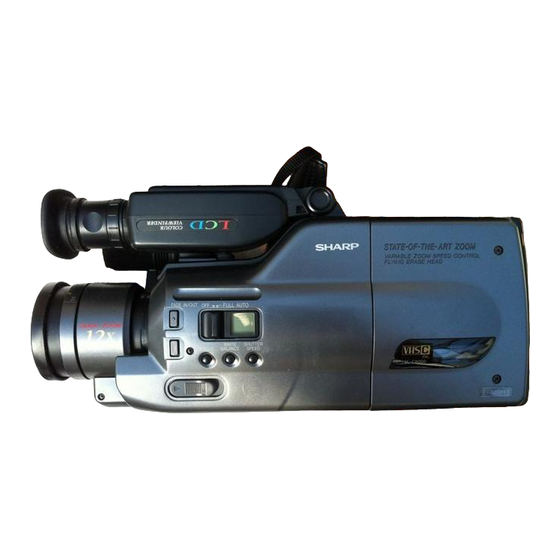
Page 6: Major Operating Components And Their Functions
For details on the use of each control, refer to the page indicated in the brackets. Microphone BLC (Back Light Compensation)/GAIN-UP button If the subject is darker than the background, the recorded subject may appear too dark and unde- fined. If this is the case, push this button for “BLC”. When “LIGHT”... - Page 7 Sub REC START/STOP button Press to start recording. Recording will be paused if pressed during the recording mode. Use when recording from a low angle. 0 14 TRACKING 4 control button [23] DATE/TIME SET button m c l 15 TRACKING b control button [23] DATE/TIME SELECT button m DATE/TIME INITIAL button m Power Zoom Wide/Telephoto control button...
- Page 8 EJECT button Used to insert or remove the@@@ cassette. CAMERA RECNCR PLAY switch To record with the Camcorder, set this switch to the CAMERA REC position. (The Camcorder will then automatically go into REC PAUSE mode.) When using the Camcorder as a VCR, set this switch to VCR PLAY.
-
Page 9: Preparations
100°C or incinerate. Replace battery with type The battery life is approximately one year but it differs de- CR2025 of SHARP CORPORATION, SONY ENERGYTEC, pending on the ambient temperature and the condition of the FUJI ELECTROCHEMICAL or MATSUSHITA ELECTRIC lithium battery. -
Page 10: Attaching And Detaching The Battery Pack
ATTACHING AND DETACHING THE BATTERY PACK Attaching the Battery Pack 1. Lower the battery release lever 2. Align the “A” mark on the up- 3. Raise the battery release lever by pulling it forward. per portion of the battery pack until it locks into place. -
Page 11: Inserting And Removing A Cassette
INSERTING AND REMOVING A CASSETTE Inserting a cassette Removing a cassette Press the EJECT button to open the cassette Press the EJECT button. The cassette com- compartment. insert a ‘m cassette with the partment will open. Remove the cassette. 0. I Z.” transparent window facing you and the arrow Close the compartment door. -
Page 12: Using The Colour Viewfinder
This does not indicate a defect in your Camcorder. Please wait a moment for the liquid crystal display to normalize. 2. Please do not subject the viewfinder to sharp impact. 3. When recording the same subject for a long period of time, the image may remain on the LCD viewfinderr. This... -
Page 13: Power Supply System
OPERATE (red) The optional Car Battery Adaptor/Charger tights to indicate the power is on. SHARP VRP75CH is like the AA-75X, but operates from a car battery. Battery Pack holder Precautions: @The AC Adaptor/Battery Charger, if used near a radio, may cause interference. -
Page 14: Charging The Battery Pack
USING THE CAR BATTERY ADAPTOR/CHARGER (OPTIONAL ACCESSORY) To charge the battery pack or power the Camcorder in a car, use the optional SHARP VR-P75CH Car Battery Charger. Start the car engine and leave it idling while using the Car Battery Charger. -
Page 15: Using The Battery Pack
The recording time of a fully charged battery pack is influenced by the amount of recording and standby time, use of the zoom lens and other factors. Spare battery packs are available from your SHARP dealer. Have spare battery packs on hand, otherwise ycu may miss important video opportunities. -
Page 16: Camera Recording
CAMERA RECORDING Power up the Camcorder indoors using either the supplied AC Adaptor and 2 metre DC OUT cable when mains supply is available or the battery pack for ease of movement. For outdoor recording, use the optional car battery adaptor/ charger connected to a car cigarette lighter or the battery pack. - Page 17 Slide the REC Speed LP/SP select switch to select the tape speed and set the recording time. This causes the selected recording mode to appear in the viewfinder. Recording time on the m4 tape EG30 is as follows. SP mode: 30 minutes LP mode: 60 minutes Set the CAMERA RECNCR PLAY switch to “CAMERA REC”...
-
Page 18: Full Auto System
FULL AUTO SYSTEM Setting the FULL AUTO switch to “FULL AUTO” position sets the Focus and White Balance to the AUTO modes and speed to the shutter STANDARD mode. This makes it possible for anyone to make accurate Camcorder recordings. When the FULL AUTO switch is set to the “FULL AUTO”... -
Page 19: Rec Review
REC REVIEW Press the REC START/STOP button while recording to REC PAUSE (‘ ‘ ----- ” will light in the viewfinder), and very briefly press the REC REVIEW button. About the last 2 seconds of the recording are rewound and played back. The Camcorder is then ready to continue recording. -
Page 20: Using The Zoom Select Bul-I-On
USING THE ZOOM SELECT BUTTON This Camcorder is equipped with a 1.5 times extender function. Enlarge or reduce the image in the viewfinder instantly, for an entirely new kind of zoom effect. For example, slide the when an interesting scene appears in the viewfinder, ZOOM SELECT button, and the image will be instantly enlarged 1.5 times. -
Page 21: Lap Time Function
LAP TIME FUNCTION This Camcorder has a LAP TIME function which counts the approximate recording time. Slide the OPERATE switch to on. Slide the CAMERA REC/VCR PLAY switch to “CAMERA REC”. The Cam- corder will automatically switch to the REC PAUSE mode. Press the COUNTER/COUNTER MEMORY/ LAP TIME button and select LAP TIME. -
Page 22: Lcd Display And Viewfinder Information
LCD DISPLAY AND VIEWFINDER INFORMATION The Camcorder provides information needed for camera recording on the LCD display and in the viewfinder. 1) DEW Condensation on head drum. Recording cannot be carried out be- Wait power will cut off in a few seconds. cause the video cassette has its tab re- several hours before resuming use. -
Page 23: Auto Date/Time Function
mode is engaged. ppears when the BLC/ pressed while ck mode is en- ade stand-by mode is engaged. appears when the en the REC START/STOP button is CE button is pressed. pressed, Fade in or Fade out is ob m If you use a TV as a monitor, only the date or date/time appear in the viewfinder. AUTO DATE/TIME FUNCTION The auto date/time function features a date and time which can be recorded as a handy reference. -
Page 24: Assemble Recording
(PICTURE INSERT) ASSEMBLE RECORDING To record on a partially recorded tape or produce an assembly recording: Slide the EJECT button and insert a cassette with its tab in place. Slide the CAMERA RECNCR PLAY switch to “VCR PLAY”. Press the PLAY button and use the FF or REW button to quickly locate the exact point, then press the PAUSE/STILL button. -
Page 25: Play Back
The VL-C8OOOX can playback VHS-C cassettes you have recorded. They can be played back on the viewfinder or a TV. PLAYBACK IN THE VIEWFINDER Attach a Battery Pack or use the AC Adaptor/ Battery Charger. Slide the OPERATE switch on -the OPERATE indicator will light up. -
Page 26: Forward/Reverse Search And Still
FORWARD/REVERSE SEARCH AND STILL To quickly locate a point on a recorded tape, use the Forward and Reverse Search buttons. Forward Search Press the FF( @I) button during playback. This speeds playback up to 3 times faster than normal for an SP recorded tape and 7 times faster for an LP recorded tape. -
Page 27: Counter Memory Feature
COUNTER MEMORY FEATURE The 4-digit display acts as a handy reference to help you locate specific scenes. Use the tape counter memory to quickly return to a favourite scene. When the memory is on, the tape stops when the counter reads “MOOOO” during FF and REW. COUNTER MEMORY LAP TIME RESET... -
Page 28: Connection To Tv
CONNECTION TO TV To playback tapes recorded with your Camcorder on your TV, connect the supplied RF Converter between your TV and the Camcorder. Connection to normal TV. The supplied RF converter permits playback of video/audio signals through a normal TV. The convener is factory set to CHO. -
Page 29: Connection To Tv With A/V Terminals
CONNECTION TO TV WITH A/V TERMINALS Plug the supplied A/V OUTPUT cable into the AV out terminal on the Camcorder. Plug the VIDEO OUT and AUDIO OUT connec- tors on the cable into the VIDEO IN and AUDIO IN terminals on the TV. Set the television TV/VIDEO switch to the VIDEO position. -
Page 30: Recording To Another Vcr
RECORDING TO ANOTHER VCR Your SHARP Camcorder can be connected as the playback source deck for dubbing and editing a tape with another VCR. Unnecessary scenes can be removed, the overall length shortened, scenes moved and rearranged, and other effects added to make your tapes more effective and enjoyable. -
Page 31: Using The Cassette Adaptor
USING THE CASSETTE ADAPTOR Inserting the Battery into the Cassette Adaptor The VHS compact video cassettes recorded with the The VR-72CA Cassette Adaptor is battery operated VLC8000Xcan be played back with a standard VHS ry one “Type R6 (AA)” battery. by using the provided VR72CA Cassette Adaptor. -
Page 32: Video Cassettes
Removing the Compact Video Caution: Check the tape condition after inserting the cassette and Cassette tape loading is completed: Slide the latch to open the door, then push up on the 1. Check to see if there is any tape slack. (Do not open the tape cover.) cassette to remove it, pushing on the cassette with remove it by turning... -
Page 33: Advanced Operation
MANUAL FOCUS In the following cases, it may be difficult to use the Autofocus, so you might want to focus the lens yourself. 1. When the object is not in the middle of the scene. 2. When you want the background or the front of the scene blurred. 3. -
Page 34: Backlight Compensation
BACKLIGHT COMPENSATION The Auto Iris in this Camcorder uses a new light meas- uring system to automatically control bleaching and ad- just to backlit subjects. However, if the background is too bright and the subject appears dark, press the BLCIGAIN-UP button to prevent the subject from ap- pearing dark on the recording. -
Page 35: High Speed Shutter
HIGH SPEED SHUTTER Use the HIGH SPEED SHUTTER (l/10,000, l/4000, 111000, 11250, 11100 sec.) mode when recording fast moving objects like sports (tennis, golf, etc.). When you playback the scene on a 4-head VCR, the playback picture will be clear even in the STILL and SLOW modes. -
Page 36: Macro Shots
MACRO SHOTS Small plants, insects, even photos in the family By setting the lens to Macro, you can manually focus on album can be recorded using Macro and enlarged to any subject within the macro range, lOmm-llOcm, right fill the screen. You can also use Macro to record up to the front of the lens. -
Page 37: Lighting
LIGHTING For clear good-quality pictures you will need between 500 and 100,000 lux - you can record in less light, however the picture quality may suffer. Adequate lighting is also essential for correct white balance. Colour White Balance Brightness Situation Situation Colour Temperature... -
Page 38: Before Requesting Service
Before calling for servicing, please check the following troubleshooting table. SYMPTOM POSSIBLE CAUSE SUGGESTED SOLUTION Power .No power Safety devices are functioning. Disconnect the AC adaptor cord, and into then plug it the power point again. *The battery pack is not charged. *Charge the battery pack sufficiently. -
Page 39: Specifications
Format VHS standard Power source DC 9.6V : 9.2w Power consumption Signal system PAL-type colour signal Recording system Luminance: FM recording Colour: Converted subcarrier direct recording Conforms to VHS standard Cassette VHS-C cassette Tape speed 23.39 mm&x (SP) 11.69 mm/set (LP) Recording time Max. - Page 40 SHARP CORPORATION Osaka, Japan Printed in Japan TINSE0092TAZi T7852-A...