Epson MovieMate 30s User Manual
Epson portable, lightweight home cinema system user's guide moviemate 30s
Hide thumbs
Also See for MovieMate 30s:
- Quick manual (32 pages) ,
- Setting up (9 pages) ,
- Quick setup manual (6 pages)
Table of Contents
Advertisement
Advertisement
Table of Contents

Related Manuals for Epson MovieMate 30s


Summary of Contents for Epson MovieMate 30s
- Page 1 ™ Epson MovieMate 30s Series User’s Guide...
-
Page 2: Copyright Notice
Epson product. Epson is not responsible for any use of this information as applied to other products. Neither Seiko Epson Corporation nor its affiliates shall be liable to the purchaser of this product or third parties for damages, losses, costs, or expenses incurred by purchaser or third parties as a result of: accident, misuse, or abuse of this product or unauthorized modifications, repairs, or alterations to this product, or (excluding the U.S.) failure to... -
Page 3: Table Of Contents
Contents Welcome! Registration and Warranty Optional Accessories About This Manual MovieMate 30s Parts and Controls Playing Movies Choosing a Location Setting Up MovieMate Starting a DVD Movie Adjusting the Picture Adjusting the Sound Turning Off MovieMate Controlling Playback Pausing Searching (Fast Forward or Reverse) - Page 4 Using MovieMate With Other Equipment Viewing Video from External Devices Using the Optional Subwoofer Playing Audio From a Digital Audio Device Playing MovieMate Audio Through an External Audio System Connecting a Computer or Laptop Wall and Projection Screen Recommendations Viewing on a Wall Viewing on a Projection Screen Doing More with MovieMate Playing Music and Displaying Photos...
- Page 5 Adjusting Detailed Audio Settings Adjusting Picture Settings Adjusting Picture Quality Viewing and Adjusting Video Information Disabling Progressive Mode Changing the Display Window Brightness Caring for MovieMate Protecting MovieMate Cleaning the Lens Cleaning MovieMate’s Case Cleaning and Replacing the Air Filter Replacing the Lamp Resetting the Lamp Timer Storing MovieMate...
- Page 6 Specifications and Notices MovieMate Specifications Important Safety Information FCC Compliance Statement Declaration of Conformity Epson America, Inc. Limited Warranty Index Contents...
-
Page 7: Welcome
We encourage you to register your projector. To register, simply fill out the registration card that came with your projector and mail it to Epson. Or you can register online at http://www.epson.com/webreg. Registering also lets you receive special updates on new accessories, products, and service. -
Page 8: Optional Accessories
Wireless 5.1 Surround Sound System adapter You may be able to purchase these accessories from an Epson authorized reseller. To contact the nearest reseller, call 800-GO-EPSON (800-463-7766). Or you can purchase online at www.epsonstore.com (U.S. sales) or www.epson.ca (Canadian sales). -
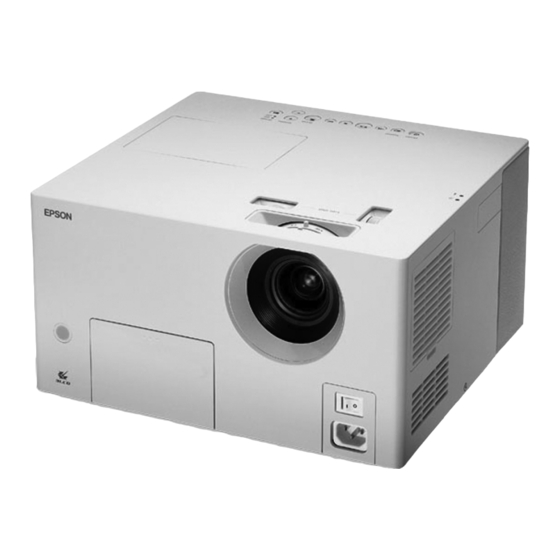
Page 9: Moviemate 30S Parts And Controls
MovieMate 30s Parts and Controls Front View S-Video port Remote control receiver Push to open Audio Video inputs port Back View Speaker Display Headphone jack window Lens Lens cover Optional Optical audio-out subwoofer port with output port protective plug Lamp cover latch... - Page 10 Top View Focus ring Zoom ring Horizontal image adjustment dial Vertical image adjustment dial Status lights Remote Control Power Function/numerics button toggle switch Welcome! Power Source button button Play/Pause button DVD Tray Open/Close button Note: The remote control buttons can glow in the dark.
-
Page 11: Playing Movies
Playing Movies Follow the instructions in this section to choose a location, play a DVD movie, and control playback. Choosing a Location You can use your MovieMate just about anywhere—in the living room, bedroom, or even outside. You can use it with the optional subwoofer and an optional floor-, wall-, or ceiling-mounted screen, or simply project on a flat white wall and use the built-in audio system. - Page 12 MovieMate doesn’t have to be directly in front of the screen or wall, but it has to face straight ahead (at a 90-degree angle to the surface). If the image is too low, too high, or off to the side, you can use the quick image adjustment dials to adjust the position (see page 15).
-
Page 13: Setting Up Moviemate
When setting up MovieMate, keep these considerations in mind: ■ Make sure you don’t block the air vents on the sides. ■ Make sure you place MovieMate within 10 feet of an electrical outlet, power strip, or extension cord. ■ Do not tilt MovieMate more than 5 degrees up or down. -
Page 14: Starting A Dvd Movie
Starting a DVD Movie 1. Press the button to open the DVD tray. 2. Insert your DVD and close the tray. If the movie doesn’t start automatically, you may have to press the button or the button. Power Image On/Off 3. -
Page 15: Adjusting The Picture
Adjusting the Picture Once you see your picture, you may need to make certain adjustments. 1. If the image is too low, too high, or off to the side, use the quick image adjustment dials to adjust its position. Note: The image adjustment feature cannot move the image both horizontally and vertically by the full amount. -
Page 16: Adjusting The Sound
Adjusting the Sound To adjust the volume, use the buttons on MovieMate’s control panel or on – Volume the remote control. Turning Off MovieMate 1. To stop playing a DVD or CD, press on the remote control or on MovieMate’s control panel. - Page 17 5. Turn off the main power switch. Note: Turn off this product when not in use to prolong the life of the projector. 6. Unplug MovieMate. 7. Before you put MovieMate away, attach the lens cover to protect the lens from dirt or damage.
-
Page 18: Controlling Playback
Controlling Playback You can use the buttons on the remote control or the MovieMate control panel to pause, fast-forward, or replay sections of your video or audio. You can also select items on a DVD menu by using the remote control. Note: DVD movies are divided into units called titles. -
Page 19: Searching (Fast Forward Or Reverse)
Searching (Fast Forward or Reverse) ■ To move forward or backward through a video or music CD, press on the remote control. You can also press and hold Each time you press the button, the search (or “shuttle”) speed increases. ■... -
Page 20: Using Dvd Menus
Using DVD Menus Many DVDs display a top menu at startup and include submenus that let you select chapters. ■ To display a menu, press ■ To select items in a menu, press if necessary. You can also select a title or chapter by number. ■... -
Page 21: Listening With Headphones
■ Living Room: Use in rooms with the blinds or drapes closed. ■ Theatre: Use in rooms with the blinds or drapes closed and the lights off; the Epson cinema filter automatically provides more natural skin tones. ■ Theatre Black: Use in completely darkened rooms;... - Page 22 Playing Movies...
-
Page 23: Using Moviemate With Other Equipment
Using MovieMate With Other Equipment You can connect a variety of video, audio, and computer equipment to MovieMate to further enhance your viewing and listening experience. ■ Video equipment such as a VCR, DVR, cable or satellite TV receiver, game console, video camera, digital camera, video or photo iPod, or other device that has a video output port ■... - Page 24 1. Connect the external equipment as shown, using either the yellow composite video port, the S-Video port, or a component video cable and the adapter cable that came with MovieMate. Composite Video Connection Video or Cable or satellite TV Photo iPod receiver or DVR Camcorder Digital...
- Page 25 Component Video Connection Cable or satellite TV receiver or DVR White Output Audio RCA stereo audio cable Component video cable Game console 2. Connect the power cords and plug in all the equipment. 3. Turn on MovieMate’s main power switch. 4.
-
Page 26: Using The Optional Subwoofer
Using the Optional Subwoofer You can connect the optional 40 W subwoofer to provide rich, deep bass sound for your movies, games, and other presentations with audio. 1. Connect the RCA audio cable that came with the optional subwoofer as shown below. See the instructions included with the subwoofer for more information. -
Page 27: Playing Audio From A Digital Audio Device
Playing Audio From a Digital Audio Device You can use MovieMate to provide speakers for a digital audio device, such as an iPod, MP3 player, portable CD player, or other device. 1. Make sure your audio equipment is turned off. 2. -
Page 28: Playing Moviemate Audio Through An External Audio System
Note: For additional convenience, Epson has developed an optional Wireless 5.1 Surround Sound System adapter for the MovieMate 30s Series. To find out more about this accessory, go to www.epson.com/homeentertainment. You will also need an optical digital cable, which may be provided with your external equipment, or may be purchased from an electronics store. -
Page 29: Connecting A Computer Or Laptop
Connecting a Computer or Laptop You can connect MovieMate to a computer or laptop to play videos or games, display presentations or photos, or project anything you can see and hear on your computer. Caution: Before connecting, make sure all equipment is turned off. 1. -
Page 30: Wall And Projection Screen Recommendations
8. If the image flickers, you may need to synchronize the signal, especially if you have connected different computers to MovieMate in the past. Press the remote control to correct this problem. 9. To enlarge or reduce the aspect ratio of the picture, press the button on the remote control to select (if available for the video source you’re using). - Page 31 Considering Screen Shape and Size In a home theater setting—for watching DVD movies, HDTV broadcasts, or other widescreen content—the best screen shape ratio is 16:9, where the width is almost twice the height. Most DVD movies and HDTV broadcasts will fill the screen vertically and horizontally for maximum impact.
- Page 32 Considering Color and Surface Quality For home theater settings, screens come in white or a shade of gray. Gray screens (sometimes called high contrast screens) increase the natural contrast of images projected in rooms with ambient light by absorbing the room light and preserving the darker blacks. If you have a dedicated home theater room with dark walls, ceiling, floor, and furniture, a gray screen may not provide better contrast than a white screen.
-
Page 33: Doing More With Moviemate
Doing More with MovieMate Follow the instructions in this section to play music and photos on MovieMate, use advanced playback controls, and adjust various MovieMate features. Playing Music and Displaying Photos You can play music CDs and CDs with MP3 or WMA files. You can also view JPEG photos on CDs. -
Page 34: Playing Mp3/Wma Music And Jpeg Photo Files On Disc
Playing MP3/WMA Music and JPEG Photo Files on Disc You can play MP3 or WMA music files and JPEG photo files on CDs or DVDs. See page 63 for information on the types of discs that are supported. When you insert a disc that contains MP3, WMA, and/or JPEG files, an on-screen menu like this is displayed: 1. -
Page 35: Using Advanced Playback Controls
Using Advanced Playback Controls MovieMate 30s provides advanced features for looping videos or music tracks and selecting titles, chapters, or tracks. On DVDs that include subtitles, multiple languages, or multiple camera angles, you can use remote control for easy access to these features. -
Page 36: Changing The Play Sequence (Program Play)
Changing the Play Sequence (Program Play) You can create your own program for playing tracks on a music CD or chapters and titles on a DVD. 1. When the CD or DVD is stopped, press in the display window. 2. Set the toggle switch on the remote control to the 3. -
Page 37: Selecting Language, Subtitles, And Camera Angles
Selecting Language, Subtitles, and Camera Angles Some DVDs allow you to display subtitles or select from several languages or camera angles. If these features are available, you can use the buttons on the remote control to select them. 1. Press the appropriate button on the remote control: ■... -
Page 38: Playing Video Cds With Playback Control (Pbc)
6. Set the toggle switch on the remote control back to the To cancel the on-screen menu, press you specified. Playing Video CDs with Playback Control (PBC) When you insert a video CD with playback control (PBC), you see a menu like the following: ■... -
Page 39: Customizing Moviemate
Customizing MovieMate You can limit children’s access, improve the sound, adjust the picture, and customize other features of MovieMate. Many of these settings are available through the Setup menus, which you can access by pressing the button on the remote control (when a DVD is not playing). Setup Setting Parental Controls You can set parental controls to prevent children from viewing... -
Page 40: Locking The Power Button On The Control Panel
Locking the Power Button on the Control Panel You can lock the accidentally turning on MovieMate and looking into the lens. (You can still turn on MovieMate using the remote control, so you may want to place it out of children’s reach.) Warning: Do not allow young children to look into the projector lens when MovieMate is turned on. -
Page 41: Changing Language Settings
Changing Language Settings You can use the Setup menu to change the default language for DVDs that allow Language you to make this selection. 1. When a DVD is not playing, press the Setup menu: LANGUAGE 2. Press to highlight the setting you want, then press 3. -
Page 42: Adjusting General Audio Settings
Adjusting General Audio Settings MovieMate provides several settings for adjusting the audio quality and volume. ■ To adjust the treble, use the ■ To adjust the sound mode, press to select the JVC original sound system setting that you prefer: Produces a broader, more natural sound. -
Page 43: Adjusting Picture Settings
4. Press to select the option you want, then press the following: ■ DIGITAL AUDIO OUTPUT: audio equipment connected to the Optical Audio-Out port. For a DTS/Dolby Digital Decoder or surround sound system STREAM/PCM: (default setting). For equipment that is only compliant with Linear PCM (Pulse Coded PCM ONLY: Modulation). -
Page 44: Adjusting Picture Quality
4. Press to select the option you want, then press the following: ■ PICTURE SOURCE The image source (video/film) is determined automatically (default setting, AUTO: recommended for most purposes). For film or video recorded with progressive scan. FILM: For video images without progressive scan, for example, camcorder input. VIDEO: ■... -
Page 45: Viewing And Adjusting Video Information
3. Press to increase or decrease the setting. The settings are saved, even after you turn MovieMate off. Viewing and Adjusting Video Information You can use the . button on the remote control to view the number of hours the Visual Info lamp has been used, and to reset the timer after you install a new lamp. -
Page 46: Changing The Display Window Brightness
Changing the Display Window Brightness The status display window above the tray is normally dimmer when a DVD is playing and brighter when it is paused or stopped. To change the display window setting, press . Continue pressing the button to select from the following settings: ■... -
Page 47: Caring For Moviemate
Caring for MovieMate MovieMate 30s needs little maintenance. All you need to do on a regular basis is keep the lens clean. You also need to clean the air filter periodically to prevent overheating. Warning: Before you clean any part of MovieMate, turn it off and unplug the power cord. Never open any part of MovieMate, except as described in this User’s Guide. -
Page 48: Cleaning Moviemate's Case
If you cannot clean the removable filter or it is broken, you need to replace it. You can purchase a new filter (part # V13H134A09) from an Epson authorized reseller. To find the nearest reseller, call 800-GO-EPSON (800-463-7766). Or you can purchase online at www.epsonstore.com (U.S. -
Page 49: Replacing The Lamp
3. If you need to replace the filter, press up on the tab and lift off the cover. 4. Remove the old filter and install the new filter. 5. Replace the cover. Replacing the Lamp The life span of the lamp is about 3000 hours if the color mode is consistently set to Theatre , and 2000 hours if any other color mode is used. - Page 50 Caution: If you continue to use the lamp after you see the replacement indicators, the lamp is more likely to break. You can purchase a new lamp (part # V13H010L33) from an Epson authorized reseller. To find the nearest reseller, call 800-GO-EPSON (800-463-7766). Or you can purchase online at www.epsonstore.com (U.S.
- Page 51 5. Grasp the lamp as shown and pull it straight out. Note: The lamp in this product contains mercury. Please consult your state and local regulations regarding disposal or recycling. Do not put in the trash. 6. Gently insert the new lamp and tighten its screws. Caution: Don’t touch the glass portion of the lamp with your bare hands;...
-
Page 52: Resetting The Lamp Timer
Resetting the Lamp Timer 1. Press the button on the remote control. You see the following on the screen: 2. To reset the lamp timer, continue pressing the 3. Press 4. Press the button to reset the timer. The lamp usage timer displays 0H (zero hours) until you’ve used the lamp for at least 10 hours. -
Page 53: Transporting Moviemate
Transporting MovieMate Note: Epson shall not be liable for any damages incurred during transportation. MovieMate contains many glass and precision parts. If you need to transport it, follow these guidelines to prevent damage: ■ When shipping MovieMate for repairs, use the original packaging material if possible. If you do not have the original packaging, use equivalent materials, placing plenty of cushioning around MovieMate. - Page 54 Caring for MovieMate...
-
Page 55: Problem Solving
Problem Solving This section explains how to interpret MovieMate’s status lights, solve problems, and contact technical support. What To Do When the Lights Flash The lights on top of MovieMate indicate its status and let you know when a problem occurs. If all lights are off, make sure the power cable is connected correctly and the main power switch is turned on. - Page 56 Power are flashing red. MovieMate may have an internal error. Turn off the power, then turn it back on. If the lights continue to flash, unplug MovieMate and contact Epson. See page 62. Problem Solving warning light is warning light is...
-
Page 57: Solving Moviemate Operation Problems
Try using a different power outlet. If the power cord has been damaged, turn off MovieMate, disconnect the power cord, and contact Epson. See page 62. MovieMate turns itself off after a period of time. The Sleep or Auto Standby functions may be turned on to save power when MovieMate is not in use. -
Page 58: Solving Picture And Sound Problems
■ Some discs don’t support all of the remote control’s functions. ■ If you’re using a “universal” remote control, it might not work with MovieMate. Epson does not support any third-party remote controls. Solving Picture and Sound Problems The picture is blurry or out of focus. - Page 59 ■ If you’re using the Keystone wish to decrease the projection angle to reduce the amount of keystone correction needed, or use the quick image adjustment dials to position the image. See page 15. ■ If you’re using external video equipment, check the solutions on page 61. The picture looks too light or too dark.
- Page 60 There is no sound, or the sound is not loud enough. ■ Try pressing the volume knob on the optional subwoofer. ■ Press the button on the remote control to make sure the sound hasn’t been turned off temporarily. ■ Press and make sure ■...
-
Page 61: Problems With External Video Equipment
Problems with External Video Equipment No picture appears on the screen. ■ Make sure the equipment is turned on. ■ Press the button on MovieMate or on the remote control. Power ■ Press the button on the external equipment. Play ■... -
Page 62: Where To Get Help
Speak to a Support Representative To use the Epson PrivateLine Support service, call (800) 637-7661 and enter the PIN on the included Epson PrivateLine Support card. This is the fastest way of speaking to a live representative, and it’s free. This service is available 6 through Friday, for the duration of your warranty period. -
Page 63: Specifications And Notices
Specifications and Notices This section includes specifications, safety instructions, and other important information about your MovieMate 30s. MovieMate Specifications General Type of display Poly-silicon TFT active matrix Size of LCD panels 0.55 inch (14 mm) wide Lens F=1.7 to 2.1, f=13.7 to 20.5 mm... -
Page 64: Remote Control
Remote Control Range Battery Operating angle Projection Lamp Type Part number Lamp life Note: Lamp life results will vary depending upon mode selected, environmental conditions and usage. Turn off this product when not in use to prolong the life of the projector. Dimensions Height Width... -
Page 65: Compatible Video Formats
Safety and Approvals United States FCC Part 15B Class B (DoC) UL60950-1 Canada ICES-003 Class B CSA C22.2 No.60950-1 Compatible Video Formats Composite video/S-Video Signal Resolution TV (NTSC) 720 x 480 720 x 360* TV (PAL, SECAM) 720 x 576 720 x 432* * Letterbox signal Component video... - Page 66 Computer image Signal VGA 60/72/75/85, iMac* SVGA56/60/72/75/85/, iMac* XGA60/70/75/85, iMac* SXGA60/75/85 MAC13” MAC16” MAC19” * Only supported by models that include a VGA output port. File Specifications MovieMate supports MP3, WMA, and JPG files that conform to the following specifications: File system Filename Group (folder) count...
-
Page 67: Language Codes
Language Codes Code Language Code Afar Abkhazian Afrikaans Ameharic Arabic Assamese Aymara Azerbaijani Bashkir Byelorussian Bulgarian Bihari Bislama Bengali Bangla Tibetan Breton Catalan Corsican Czech Welsh Danish Bhutani Greek Esperanto Estonian Basque Persian Finnish Fijian Faroese Frisian Irish Language Code Language Scots Gaelic Macedonian Galician... -
Page 68: Important Safety Information
■ The lamp is fragile and can easily break. If the lamp breaks, handle the projector with extreme care to avoid injury from broken glass, and contact Epson to replace the lamp. ■ Do not use the lamp after the lamp replacement period has elapsed, because the possibility of lamp breakage increases. - Page 69 ■ If you use the projector in a country other than where you purchased it, use the correct power cord for that country. ■ Place the projector near a wall outlet where the plug can be easily unplugged. ■ Don’t place the projector where the cord can be walked on. This may result in fraying or damage to the plug.
-
Page 70: Fcc Compliance Statement
■ Make sure there is at least 4 inches of space between the intake ventilation slots and the wall or other object. ■ Do not use the projector with the lens cover on; otherwise, the cover could melt and cause injury. ■... -
Page 71: Declaration Of Conformity
For warranty service, you must provide proof of the date of original purchase. What Epson Will Do To Correct Problems: If your product requires service, Epson will ask you to bring the product securely packaged in its original container or equivalent, along with proof of the date of original purchase, to your Epson Dealer or Epson Customer Care Center as instructed by Epson. - Page 72 (e.g., filters), other than lamps as provided herein. This warranty is not transferable. Epson is not responsible for warranty service should the Epson label or logo or the rating label or serial number be removed. Epson is not responsible for warranty service should the product fail to be...
-
Page 73: Index
14 menus, 20 playing, 11 to 21 DVR, connecting, 23 to 25 Dynamic range compression, 43 Electrical specifications, 64 Environmental specifications, 64 Epson accessories, 8, 62 Home Service, 7 PrivateLine Support, 62 technical support, 8, 62 Exhaust vent, 9 Index... - Page 74 External equipment connecting, 23 to 30 problems, 61 Fast forward, 19 FCC Compliance Statement, 70 File specifications, 66 File type setting, 44 Filters, see Air filters Focus ring, 15 Formats, video, 65 to 66 Game console, connecting, 23 to 25 General specifications, 63 Headphones, 21 Help, 8, 62...
- Page 75 MovieMate choosing location, 11 to 13 cleaning, 48 control panel, 10 dimensions, 64 distance from screen, 12, 63 lights, 55 to 56 maintenance, 47 to 52 operation problems, 57 to 58 parts, 9 positioning, 11 to 13 speakers, 63 specifications, see Specifications storing, 52 transporting, 53 turning off, 16 to 17...
- Page 76 Safety approvals, 65 instructions, 68 to 70 Satellite receiver, connecting, 23 to 25 Scenes, replaying, 19 Screen distance, 12, 63 Screen projection, 30 to 32 Screen saver setting, 44 Searching, 19, 37 Sharpness setting, 44 Shuttle control, 19 Signal not supported message, 61 Size, image, 12, 63 Skipping chapters or tracks, 19 Sleep mode, 40, 55, 57...
- Page 80 Epson MovieMate 30s Series CPD-22197 Printed in xxx...