Table of Contents
Advertisement
Advertisement
Table of Contents

Related Manuals for Philips LFH9750 - Desktop 9750 Digital Transcriber


Summary of Contents for Philips LFH9750 - Desktop 9750 Digital Transcriber
- Page 1 Philips 9750 User Manual...
- Page 2 Philips 9750 - 05/2005 (English) COPYRIGHT © 2003 - 2005 Philips Austria GmbH, PSP - Dictation Systems. All rights reserved. Reproduction in whole or in part is prohibited without the written consent of the copyright owner. Information in this manual is subject to change without notice.
-
Page 3: Table Of Contents
Working with the Foot Control LFH 0210/90B....................25 Recording with the Foot Control LFH 210/90B ....................25 Foot Control and the Philips microphones LFH 276/10 and LFH 278/10 ........... 25 Foot Control and Philips conference microphone LFH 172 ................ 26... - Page 4 Philips 9750 - User Manual Appendix .............................. 27 Troubleshooting the Philips 9750........................27 Attaching the microphone bracket........................28 Index ..............................29...
-
Page 5: Chapter 1: Introduction
Ergonomic design. • High-resolution LCD display with backlight. • Support of Philips microphones LFH 276/10 and LFH 278/10 for use as a digital dictation system. • Support of Philips conference microphone LFH 172. • Support of Philips Foot Control LFH 0210. -
Page 6: Chapter 2: Introducing The Philips 9750
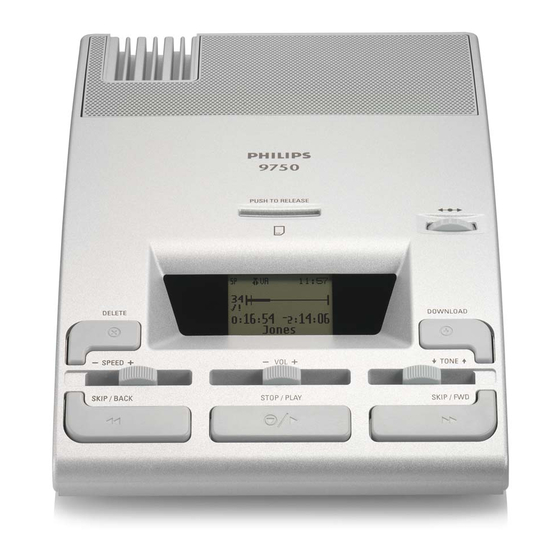
Philips 9750 - User Manual Chapter 2: Introducing the Philips 9750 This chapter introduces the Philips 9750 through a series of graphics and explains the symbols on the LCD display. Graphic The following graphics show the device and the names of the various parts. -
Page 7: Lcd Display
19: Foot Control socket. 20: Headphones socket. 21: Power supply socket. LCD display The Philips 9750 has a high-quality graphical LCD display. You will see the following symbols: Standard Play Long Play mobile AM symbol (hours before noon) PM symbol (hours after noon) -
Page 8: Chapter 3: First Steps
Memory card (optional) The Philips 9750 operates with a memory card of the type MMC or SD. It supports MMC and SD cards with storage capacities of up to 1 GB. For example, a 32 MB memory card of the type MMC supports about 312 minutes of recording time in SP format or 468 minutes of recording time in LPm format. -
Page 9: Start Screen
When the memory card is full, a warning is displayed and the device beeps; recording stops. Start screen After the memory card has been inserted or the Philips 9750 is turned on, a start screen is displayed. This screen is identical to the screen which is displayed when the device is in Stop mode. -
Page 10: Display Appearance
Power Save mode If the Philips 9750 is left inactive for more than 15 minutes, it goes automatically into Power Save mode and the display is turned off. You can reactivate the device by pressing any button. -
Page 11: Accessing The Menu
Select the menu entry for exiting the menu and confirm the selection by pressing the Jog Dial: • Press the DELETE button. General menu entries The following menu entries are for making general settings on the Philips 9750 which will be used for transcription and dictation. • Setting the date and time •... -
Page 12: Device Beep
Jog Dial. Device beep You can define whether you want the Philips 9750 to beep when specific operations take place. Otherwise the device is muted except for warnings, for example, when the memory card is almost full. -
Page 13: Reformatting The Memory Card
This menu entry is only available if the corresponding option has been enabled in SpeechExec Dictate and the setting was transferred to the Philips 9750. If enabled, it is displayed as the first entry when you access the menu. The Philips 9750 stores the last user-defined label(s) you entered. These will be displayed when you access the menu entry. -
Page 14: Assigning Keywords
Philips 9750. Setting the recording format When used as a digital dictation system, the Philips 9750 enables to record dictations either in the Standard Play or the Long Play mobile recording format. The default setting is Standard Play (SP). -
Page 15: Setting The Microphone Sensitivity
Confirm the setting by pressing the Jog Dial and to return to the main menu. Voice-activated recording When using the Philips 9750 for digital dictation, the device supports the voice-activated recording mode. This is the menu entry for voice-activated recording; a check mark next to the symbol indicates that voice- activated recording is enabled. -
Page 16: Chapter 4: Operating The Philips 9750
Philips 9750 - User Manual Chapter 4: Operating the Philips 9750 The Philips 9750 provides enhanced functions for both transcription and dictation and can be operated in the following ways: • The Philips 9750 is a fully operational, conventional digital transcription device for the playback and transcription of sound files recorded with the any devices of the DPM product range (version 2). -
Page 17: Skip Forward And Skip Back
20 times and after thirty seconds to 100 times the playback speed. Skip Forward and Skip Back The Philips 9750 also provides a skip function for moving between files. For skipping between files, you can either use the Jog Dial or the skip buttons (SKIP/BACK, SKIP/FWD). -
Page 18: Dictation
Philips microphones LFH 276/10 or LFH 278/10. To record a dictation, do the following: 1. On the Philips microphone LFH 276/10 press the REC button; the device goes into Record Standby mode (blinking LED). To start recording, move the slider to the Play position ( ) and start dictating. -
Page 19: Finishing A Dictation (Eol And Priority)
During recording, the Record LED is on. 3. On the Philips microphone LFH 276/10 move the slider to the Stop position ( ) to return to Record Standby mode. To stop recording, press the REC (Record) button again. To continue recording, move the slider back to the Play position ( ). -
Page 20: Insert Mode And Overwrite Mode
Voice-activated recording mode is a convenient feature for hands-free dictation. When voice-activated recording is enabled, the Philips 9750 is in Record Standby mode; recording will start automatically when the input level exceeds a certain threshold (i.e. usually when you start dictating). This means that recording stops a few seconds after you stop speaking and restarts automatically when you start speaking again. -
Page 21: Conference Recording
To transfer data from the Philips 9750 to the PC with the automatic download functionality enabled in the DPM Downlod/Configuration program, do the following: 1. Make sure the Philips 9750 is connected to the mains power supply and to the PC via the USB cable; and that the device is in Stop mode. - Page 22 To leave the USB mode, press the STOP/PLAY button. Additional information • During transfer and as long as the Philips 9750 is connected to the PC, all buttons and switches on the device are inactive. • For more information on the different download configuration options, including the automatic download...
-
Page 23: Chapter 5: Advanced Operations
Working with the Foot Control LFH 0210 Inserting index marks When using the Philips 9750 as a digital dictation device in combination with the Philips microphones LFH 276/10 or LFH 278/10, the Philips 9750 supports inserting of index marks into your dictations. -
Page 24: Entering User-Defined Labels
A user-defined label is an alphanumeric string which can have up to 13 characters. Such a label is entered directly on the Philips 9750. If and how many user-defined labels can be entered depends on the corresponding setting in SpeechExec Dictate. For more information, refer to the Online Help delivered with the program. -
Page 25: Assigning Keywords
Keywords are a combination of their usage definition and the content definitions for that usage. All this information is stored in the configuration file which is transferred to the Philips 9750. On the device, the authors can select from the predefined entries and assign them to their dictations. These entries are saved together with the dictation and can finally be used by the transcriptionist for filtering the dictations. -
Page 26: Linked Keywords
When the Linked Keywords setting is enabled in SpeechExec Dictate and the Philips 9750 has been configured with this setting, you can transfer sets of Keyword strings to the Philips 9750. These sets can then be selected on the device and assigned to a dictation file. -
Page 27: Recording Spoken Instructions
Keyword set 2 = Steve, first aid, 456, yes, m Keyword set 3 = Patricia, surgery, 789, private, f After this configuration has been transferred to the Philips 9750, the Keyword sets can be selected on the device as follows: 1. -
Page 28: Recording Spoken Instructions In Overwrite Mode
Recording mode. To insert an instruction, do the following: 1. Make sure that the Philips 9750 is in Recording mode. For more detailed information, refer to the Dictation section in this manual. 2. Press the S button ( ) on the microphone for at least 1 second to insert your spoken instruction. -
Page 29: Deleting Spoken Instructions
3. Confirm the delete operation by pressing the DELETE button for at least two seconds. Working with the Foot Control LFH 0210/90B The Philips 9750 has been designed to work with a footpedal device for the control of playback functions. Foot Control switches The Foot Control has three switches: middle, left and right switch. -
Page 30: Foot Control And Philips Conference Microphone Lfh 172
4. Keep the REC button on the Philips microphone LFH 276/10 pressed and press the middle pedal on the Foot Control at the same time. 5. HF will appear on the display of the Philips 9750. This means that the device is now in Recording mode. To start and stop recording: To start recording, press the right pedal. -
Page 31: Appendix
No sound during playback • The volume is turned down (0): Turn the volume up. • Earphones are plugged into the Philips 9750: Unplug the earphones to listen to playback via the built-in loudspeaker. Deleting files is not possible •... -
Page 32: Attaching The Microphone Bracket
Attaching the microphone bracket You can attach a microphone bracket for the Philips microphones LFH 276/10 or LFH 278/10 on the left or right side of the Philips 9750. Proceed as follows: 1. Align the microphone bracket with the mounting plate and attach it to the Philips 9750 with the long screw provided: 2. -
Page 33: Index
Philips 9750 - User Manual Index Delete, 14 Skip Back, 13 Activate, 4 Skip Forward, 13 Advanced display, 6 First steps, 4, 12 Advanced operations, 19 Foot Control, 25 Appearance, 6 Format Assign Memory card, 4 Keywords, 10 Format for recording... - Page 34 Philips 9750 - User Manual Recording time, 8 Section (sound file) Reformatting the memory card, 9 Delete, 13 SP/LPm, 10 Settings User-defined label, 9 Volume, 12 Voice-activated recording, 11 Skip Back, 13 Menu entry Skip Forward, 13 Dictation-specific, 9 SKIP/BACK, 12, 13...