Panasonic AG-HMR10 Operating Instructions Manual
Memory card portable recorder
Hide thumbs
Also See for AG-HMR10:
- Brochure & specs (6 pages) ,
- User manual (4 pages) ,
- Manual (19 pages)
Table of Contents
Advertisement
This product is eligible for the AVCCAM
3 Year Warranty Repair Program. For
details, see page 7.
Before operating this product, please read the instructions carefully and save this manual
for future use.
S0809S0 -M
Operating Instructions
Memory Card Portable Recorder
Model No.
Model No.
ENGLISH
VQT2H54(E)
Advertisement
Table of Contents

Related Manuals for Panasonic AG-HMR10


Summary of Contents for Panasonic AG-HMR10
-
Page 1: Operating Instructions
This product is eligible for the AVCCAM 3 Year Warranty Repair Program. For Operating Instructions details, see page 7. Memory Card Portable Recorder Model No. Model No. Before operating this product, please read the instructions carefully and save this manual for future use. -
Page 2: Read This First
Please contact either a local or foreign The exclamation point within an equilateral Panasonic authorized service center for triangle is intended to alert the user to the presence of important operating and assistance in selecting an alternate AC plug. -
Page 3: Important Safety Instructions
Please be advised that we are not liable for any accident or failure occurring as a result of use of a counterfeit battery pack. To ensure that safe products are used we would recommend that a genuine Panasonic battery pack is used. -
Page 4: Caution For Ac Mains Lead
If you lose the fuse cover the plug must not be Fuse used until a replacement cover is obtained. A replacement fuse cover can be purchased from your local Panasonic Dealer. -
Page 5: Declaration Of Conformity
Responsible Party: Panasonic Corporation of North America One Panasonic Way, Secaucus, NJ07094 Support contact: Panasonic Broadcast & Television Systems Company 1-800-524-1448 This device complies with Part 15 of the FCC Rules. Operation is subject to the following two conditions: (1)This device may not cause harmful interference, and (2) this device must accept any interference received, including interference that may cause undesired operation. - Page 6 EMC NOTICE FOR THE PURCHASER/USER OF THE APPARATUS 1. Applicable standards and operating environment (AG-HMR10E) The apparatus is compliant with: • standards EN55103-1 and EN55103-2 1996.11, and • electromagnetic environments E1, E2, E3 and E4 2. Pre-requisite conditions to achieving compliance with the above standards <1>...
- Page 7 Details about user registration and the extended warranty: Please note, this is a site that is not maintained by Panasonic Canada Inc. The Panasonic Canada Inc. privacy policy does not apply and is not applicable in relation to any information submitted. This link is provided to you for convenience.
- Page 8 The SDHC logo is a trademark. The miniSD logo is a trademark. “AVCHD” and the “AVCHD” logo are trademarks of Panasonic Corporation and Sony Corporation. This product has been manufactured under license from Dolby Laboratories. Dolby and the double-D symbol are trademarks of Dolby Laboratories.
-
Page 9: Using The Portable Recorder
In addition, operations for starting or stopping recording on the portable recorder can be performed from some types of camera-recorder. (When SDI input is selected.) (For details on the compatible devices, see page 85.) AG-HMR10 (portable recorder) Camera recorder SD Memory Card... - Page 10 Playback on the portable recorder’s LCD monitor (Page 58) Content (video/audio) that is shot with an AVCCAM camera-recorder and recorded onto an SD Memory Card can be played back on-the-spot. AG-HMR10 (portable recorder) AVCCAM camera-recorder SD Memory Card Outputting to an external monitor for playback (Page 70) Content (video/audio) on an SD Memory Card can be output to an external monitor for playback.
- Page 11 When outputting data in the portable recorder’s recording format Select [SDI EE SEL] → [NORMAL] in the [AV OUT SETUP] setup menu. • Using the setup menus (Page 29) AG-HMR10 (portable recorder) Camera-recorder External monitor HD-SDI input signal HD-SDI output signal •...
- Page 12 Using the portable recorder (continued) Example of system configuration for CAM mode AG-HMR10 (portable recorder) AG-HCK10G camera head External monitor (optional) Camera cable HD-SDI output signal (optional) • Frame sequence information is not output. • S-VITC/UMID information is not output.
-
Page 13: Table Of Contents
Read this first! ..........2 Recording IMPORTANT SAFETY INSTRUCTIONS ..3 Recommendation for Use of Genuine Recording onto an SD Memory Card Panasonic Battery (REC mode) ........... 36 (Rechargeable Battery) ......3 Performing HD-SDI input recording Using the portable recorder ......9 (SDI mode) .......... - Page 14 Contents (continued) Playback Menu Clip playback (PB mode) ......58 Setup menu structure ........80 Thumbnail screen ......... 59 Recording (REC) mode menu ......80 Playback settings (PLAY SETUP)....61 Playback (PB) mode menu ......81 Setup menu list ..........82 Setting the playback format (PB FORMAT) ..
-
Page 15: Precaution For Use
Panasonic makes no compensation for your recordings. • Please understand that Panasonic makes no compensation for your recordings in cases where images and/or sound were not recorded as you intended due to problems with the camera-recorder or SD/SDHC Memory Cards. - Page 16 It is recommended that you use SD Memory Cards or SDHC Memory Cards above, or the following Panasonic SD Memory Cards (correct as of October 2009). ∗ Speed class 4 or above is required for recording in PH mode or HA mode.
- Page 17 SDHC-compatible device • This product (SDHC-compatible device) is compatible both with SD Memory Cards and with SDHC Memory Cards. SDHC Memory Cards may be used with SDHC Memory Card-compatible devices, but cannot be used with devices that are only compatible with SD Memory Cards. (Always check the relevant product’s operating instructions when using SDHC Memory Cards with other devices.) When cards of SD speed class 4 or above are recommended for the SD-compatible devices, use of such cards will ensure stable recording operations.
-
Page 18: Operating Precautions
Operating precautions The portable recorder and SD card become When carrying the portable recorder, take care warm during usage. This is not a defect. not to drop it or let it hit other objects. • Strong impact can cause the outer case to break Do not allow any water to get into the unit when or damage the portable recorder. - Page 19 Protect the battery terminals. Liquid crystal displays • Images or letters can get burned onto the screen Keep the battery terminals free from dust and foreign matter. of the LCD if they are displayed for a long time, If the battery has been inadvertently dropped, but you can fix this by leaving the unit off for check whether its body and terminal area have several hours.
-
Page 20: Accessories
VW-VBG260 (7.2 V, 2640/2500 (typ./min.) mAh: equivalent to accessory battery) • Compact camera head for AG-HMR10 AG-HCK10G (The camera head option cable is required for connecting to the AG-HMR10.) Image sensor 1/4.1-inch, MOS type solid state image sensor × 3 Lens Optical image stabilizer lens, motorized 12 ×... -
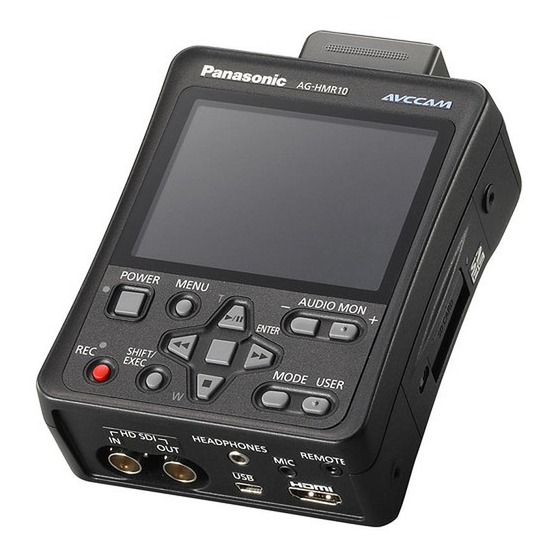
Page 21: Description Of Parts
Description of parts Operation panel, LCD and system parts ■ Front PLAY/STILL button LCD monitor (Pages 29, 44, 58) (Page 32) Indicated by in the operation descriptions. MENU button (Page 29) ENTER button (Pages 29, 41, 44, 58) POWER button (Page 26) AUDIO MON/ADV button (Pages 44, 47, 68) -
Page 22: Terminals And System Parts
Description of parts (continued) Terminals and system parts Battery release button (Page 25) CAMERA terminal (Page 37) Battery compartment (Page 25) CAMERA terminal cover SD Memory Card access lamp (Page 27) SD Memory Card slot (Page 33) Card slot cover (Page 33) Card slot cover open button... -
Page 23: Power Sources
Power sources Charging The battery does not come ready charged when the portable recorder is purchased. Charge the battery before use. It is recommended that you keep one extra battery as a spare. ■ Charging lamp Connect the power cable to the AC adapter. On: Charging in progress Disconnect the DC cable. - Page 24 AC adapter. ■ Remaining battery capacity displays When using Panasonic-manufactured batteries compatible with this product, the remaining battery capacity is displayed in minutes. 90 min Time remaining will be displayed after a brief pause.
-
Page 25: Using The Battery
• Support the battery with your hand to ensure that it will not fall. Battery release button Panasonic VW-VBG260 battery may be used with this product. POWER lamp Using the AC adapter Installation Removal Connect the DC cable to the AC adapter. -
Page 26: Turning The Power On/Off
Turning the power on/off Press the [POWER] button for 2 seconds or longer. • The POWER lamp (green) illuminates and the power turns on. • If you press the [POWER] button for 2 seconds or longer when the power is on, the POWER lamp flashes, the power turns off, and then the lamp goes off. -
Page 27: Tally Lamp
Tally lamp The tally lamp turns on during recording (red). Also, the tally lamp flashes in the following circumstances. (flashes 4 times per second) Tally lamp • Recording error has occurred • Battery has run out • SD Memory Card is full REC/ PAUSE AUDIO MON/ADV... -
Page 28: Operation Modes
Operation modes The portable recorder has 3 operation modes: REC mode, PB mode and PC mode. Press the [MODE] button to change the mode. While the power is off, connect the Press the AG-HCK10G camera head (optional) to the [POWER] button portable recorder with the camera cable for 2 seconds or (optional), and then press the [POWER] button... -
Page 29: Using The Setup Menus
Using the setup menus ■ Button operations in the setup menus Moves to the menu item above. For some items, changes the Displays the menu. value. When the menu is displayed, closes the menu. Moves to the menu item on the Moves to the menu item to the left. -
Page 30: Initializing The Setup Menus
Using the setup menus (continued) Initializing the setup menus Press the [ENTER] button or to set the item. Perform the following operation during REC mode Press to change the values. to return the setup menus to their factory default Example: settings. -
Page 31: Setting The Date And Time/Recharging The Built-In Battery/Adjusting The Lcd Monitor
Setting the date and time/Recharging the built-in battery/Adjusting the LCD monitor Before recording with this portable recorder, first set the date and time and adjust the LCD monitor in the setup menus. Setting the date and time The [CLOCK SET] value in the setup menu is Press to select [OCT]. -
Page 32: Recharging The Built-In Battery
Setting the date and time/Recharging the built-in battery/Adjusting the LCD monitor (continued) • Slight time errors may occur, so check that the time is correct before recording. • When using the recorder overseas, do not set the [CLOCK SET] time to the local time, but instead enter the time difference from Greenwich Mean Time in [TIME ZONE]. -
Page 33: Sd Memory Cards
SD Memory Cards Inserting and removing SD Memory • Always format SD Memory Cards that have Cards been used in other devices when first using them with this portable recorder. (Page 34) Open the SD card cover. • If the system frequency of the portable recorder is changed, it will not be possible to Slide the card slot cover open button to use an SD Memory Card. -
Page 34: Repairing Sd Memory Cards
AVCCAM Restorer can also be downloaded from recording or the recording finalization process, a the following website. repair verification screen is displayed the next time https://eww.pavc.panasonic.co.jp/pro-av/ the power is switched on, allowing errors to be repaired. Formatting SD Memory Cards Press the portable recorder’s [POWER] button for 2... -
Page 35: Sd Memory Card Recording Times
SD Memory Card recording times • Total available recording times (approx.) when using SD/SDHC Memory Cards manufactured by Panasonic Recording mode PH ∗ HA ∗ HG ∗ HE ∗ SD Memory Card (Highest quality mode ∗ capacity (High quality mode/... -
Page 36: Recording
Recording onto an SD Memory Card (REC mode) The following 2 modes can be used to record onto an SD Memory Card. SDI mode: When connected to an HD-SDI output device to perform input recording CAM mode: When connected to the AG-HCK10G camera head (optional) to perform shooting and input recording Performing HD-SDI input recording (SDI mode) An external device that has an HD-SDI output terminal can be connected to record data such as video... -
Page 37: Shooting And Recording With A Camera (Cam Mode)
Shooting and recording with a camera (CAM mode) When connected to the AG-HCK10G camera head (optional), you can shoot while operating the camera function with the portable recorder. Portable recorder CAMERA terminal AG-HCK10G camera head (optional) Camera cable (optional) Connect the portable recorder to the camera Press [MENU]. - Page 38 Recording onto an SD memory card (REC mode) (continued) ■ About recording onto SD Memory Cards • The images shot from when recording starts until it is stopped are recorded as one clip. • The upper limit for the number of clips that can be recorded on a single SD Memory Card is 900. (However, note that this clip limit of 900 may be exceeded if recording is started immediately after turning on the power.) •...
-
Page 39: Setting The Time Code
Setting the time code Setting the time code When the screen below appears, set the time code value. In the [TC/UB SETUP] setup menu, set the Press to select the time code value. following time code related items. (Page 86) •... -
Page 40: Setting User Information
Setting the time code (continued) Setting user information Set the user information. Press to select the user information The user information setting allows you to record characters. a memo, using up to 8 characters from a choice of • You can use numbers from 0 to 9 and letters 16 different character types. -
Page 41: Using The [User] Button
Using the [USER] button ■ You can assign one of eleven functions to the INH (Disable operation) [USER] button. Using the [USER] button allows When INH is assigned, there is no operation you to easily switch the portable recorder function. when the [USER] button is pressed. - Page 42 Using the [USER] button (continued) ■ ■ LCD DTL (Emphasizing outlines) SHOT MARK (Shot mark function) Emphasizing the outlines of the images you The marks added to clip thumbnails are called see on the LCD makes it easier to focus. shot marks.
- Page 43 ■ COUNTER (Counter function) You can display a counter that indicates how much time has elapsed during recording or shooting. Each time you press the [USER] button, the display changes as follows. 0 : 00 . 00 Counter value display ·...
-
Page 44: Useful Recording And Shooting Functions
Useful recording and shooting functions If you press designated buttons while pressing down the [SHIFT/EXEC] button, you can use useful recording and shooting functions. • Operation is not possible when a menu screen is displayed. First close the menu screen, and then perform the operation. -
Page 45: White Balance And Black Balance Adjustment
White balance and black balance Mode Operation Adjustment adjustment White balance Recording adjustment is performed. White balance W.SET Black balance adjustment Other than In order to reproduce the white accurately, adjust is performed after white recording the ratio between the three RGB primary colors. balance adjustment. -
Page 46: Using Focus Assist (Fa)
Useful recording and shooting functions (continued) Using focus assist (FA) Temporarily switching to auto focus mode (ONE PUSH AF) The center of the screen can be enlarged to make it easier to focus. Even during manual focus (Page 50), you can temporarily switch to auto focus mode to focus While pressing the [SHIFT/EXEC] button, automatically. -
Page 47: Turning Off The Lcd Monitor Screen (Lcd Off)
The recording level is set approximately 8 dB • The recorded date and time display will follow the higher than Panasonic broadcasting camera- [DATE/TIME] setting in [DISPLAY SETUP]. recorders (AJ series products). When [DATE/TIME] is set to [OFF], the date and •... -
Page 48: Operating The Camera Head
Operating the camera head The operation buttons on this portable recorder can be used to operate the camera function of the AG- HCK10G camera head (optional). • Operation is not possible when a menu screen is displayed. First close the menu screen, and then perform the operation. -
Page 49: Pre Rec
PRE REC Optical Image Stabilizer Record video and audio from three seconds before Use the Optical Image Stabilizer (OIS) to reduce the time of the operation to start recording. the effects of camera head shake when shooting by hand. Operation to start Operation to stop Select [O.I.S.] →... -
Page 50: Performing Manual Adjustments (Camera Functions)
Operating the camera head (continued) Performing manual adjustments (CAMERA FUNCTIONS) The focus, iris, shutter speed and white balance can be manually adjusted. Enable manual adjustment by setting the items in the [CAMERA SETUP] setup menu. (See table below) Press the [ENTER] button to select the function. Each time you press the [ENTER] button, the functions that can be manually adjusted are displayed in order on the LCD monitor. -
Page 51: Adjusting The Shutter Speed
When [SYSTEM FREQ] is set to [59.9Hz] Shutter speed Adjusting the shutter speed Frame rate 50 Hz 60 Hz Select [IRIS] → [AUTO2] or [MANUAL] in the 1/100 1/60 [CAMERA SETUP] setup menu. Using the setup menus (Page 29) 1/50 1/60 Press the [ENTER] button to display 1/50... - Page 52 Operating the camera head (continued) ■ Range of shutter speed variations When [SYSTEM FREQ] is set to [59.9Hz] With the 1080/60i or 720/60P formats (Standard) SYNCRO SCAN 1/15 1/30 1/60 1/2000 1/1000 1/500 1/250 1/120 1/100 With the 1080/30P or 720/30P formats SYNCRO SCAN 1/15 1/30...
-
Page 53: Setting The White Balance
• Depending on the environment, there may be Setting the white balance some error in the adjustment. • Adjust the white balance yourself if you need Press the [ENTER] button to display a more precise white balance. (For adjusting on the LCD monitor. the white balance and black balance, see page 45.) Press... -
Page 54: Shooting In Progressive Mode
Shooting in progressive mode Select [REC FORMAT] → [PH1080/30P] Note the following when shooting in or [PH1080/24P] (or [PH1080/25P]) in the progressive mode. [RECORDING SETUP] setup menu to enable • Set the shutter speed to 1/50 for best results. shooting in progressive mode. (Page 84) •... -
Page 55: Clip Metadata
DEVICE: This indicates the MANUFACTURER (manufacturer of the equipment), SERIAL NO. (serial number of the equipment) and MODEL NAME (equipment model name: AG-HMR10). SHOOT: This indicates the SHOOTER (name of the videographer) and the PLACE NAME (name of location). -
Page 56: Uploading The Metadata (Meta Data)
Clip metadata (continued) CARD READ: Uploading the metadata The metadata that is set on the SD Memory (META DATA) Card is loaded onto the portable recorder. Press the [ENTER] button to select the You can perform any of the following operations. metadata to be loaded, select whether or not If necessary, perform preparations prior to the the metadata is to be loaded (YES/NO), and... -
Page 57: Selecting The User Clip Name Recording Method
Selecting the USER CLIP NAME recording method Press the [MENU] button and select [META DATA] → [USER CLIP NAME] to select the recording method. 2 options are available: [TYPE1] and [TYPE2] USER CLIP NAME to be recorded TYPE1 TYPE2 Uploaded If clip metadata has Uploaded data data +... -
Page 58: Clip Playback (Pb Mode)
Clip playback (PB mode) Press the [POWER] button to turn on the power. When the [POWER] button is pressed for 2 seconds or longer, the POWER lamp (green) illuminates and the power turns on. Press the [MODE] button to display the thumbnail screen. -
Page 59: Thumbnail Screen
Thumbnail screen Video data created in one shooting session is called a “clip”. In PB mode, the clips are displayed on the LCD screen as thumbnails. (When there is a large number of clips, it will take some time for them to be displayed.) You can perform the following operations using the thumbnail screen. - Page 60 Thumbnail screen (continued) 1 Thumbnail display status (Page 63) The types of clips displayed as thumbnails appear in this area. 2 Repeat playback indicator (Page 61) Displayed during repeat playback. 3 Card status display Displays the SD Memory Card status. 4 Battery remaining display (Page 24) Displays the remaining battery capacity.
-
Page 61: Playback Settings (Play Setup)
Playback settings (PLAY SETUP) The playback format and method can be set. Repeat playback (REPEAT PLAY) Setting the playback format Use this setting to repeatedly play back all available clips. (PB FORMAT) Press the [MENU] button. Set the format for playback. Using the setup menus (Page 29) Press the [MENU] button. -
Page 62: Resume Playback (Resume Play)
Playback settings (PLAY SETUP) (continued) Resume playback (RESUME PLAY) Setting the skip method (SKIP MODE) Use this setting to play back from where the clip was previously paused. Use this setting to set the operation performed when pressing while playback is paused. Press the [MENU] button. -
Page 63: Thumbnail Operations
Thumbnail operations Selecting the thumbnail display method (THUMBNAIL SETUP) You can display as thumbnails the type of clips that INDICATOR: you want to see. Set whether or not to display the indicators You can also set in detail how you want the (ON/OFF). -
Page 64: Deleting And Protecting Clips (Operation)
Thumbnail operations (continued) Deleting and protecting clips (OPERATION) Clips can be deleted or protected. • Protected clips cannot be deleted. • If you select [ALL CLIPS] to delete all clips Press the [MENU] button. from the memory, the operation may take Using the setup menus (Page 29) some time to complete, depending on the size of the clips to be deleted. -
Page 65: Formatting Cards/Checking Clip And Card Information (Card Functions)
CLIP PROTECT: Press the [MENU] button to return to the YES: thumbnail screen. Protects the selected clips. Press to select a clip, and then press the [ENTER] button. mark is displayed.) • Select a protected clip to cancel the protection. ( mark disappears.) Formatting a memory card will delete all clips even if they are protected. - Page 66 Thumbnail operations (continued) SD Memory Card information screen Clip information screen REMAIN: Clip number Displays the remaining SD Memory Card Thumbnail (Thumbnail screen: Page 59) capacity. Clip information SD STANDARD: Displays the indicators that are added to the Displays whether or not the SD Memory clip, and various other information.
-
Page 67: Useful Playback Functions
Useful playback functions Fast forward/rewind Next/previous clip Press during playback. Press during playback to pause the clip. The clip plays forwards or backwards at approximately 5 times ∗ normal speed. Press • Press during fast forward or rewind to change the fast forwarding or rewinding speed. -
Page 68: Frame-By-Frame Playback
Useful playback functions (continued) Frame-by-frame playback Viewing images on a television or monitor Press during playback to pause the clip. You can view the playback images on a television Press the [AUDIO MON/ADV] button. or monitor that is connected to the HD-SDI OUT •... -
Page 69: Connecting External Devices
Connecting external devices Using headphones Stereo mini plug (3.5 mm) • Sound is not output from the built-in speaker when the headphones (optional) are connected. Using the external microphone External microphone Stereo mini plug (3.5 mm) MIC IN When the external microphone (optional) is connected to the microphone terminal, the recorded sound is switched as follows. -
Page 70: Viewing Images On A Television Or Monitor
■ When outputting video and audio signals from the portable recorder to an external device, connect to the input terminals of the external device. • We recommend Panasonic’s HDMI cable. • This product is not compatible with VIERA Link. •... -
Page 71: Nonlinear Editing (Pc Mode)
Nonlinear editing (PC mode) Nonlinear editing of video data on SD Memory (Example) Windows Cards can be performed by connecting the portable recorder to an editing computer with a USB cable. (Connection: Page 70) Removable disk (E:) Use a sufficiently charged battery or the AC adapter. (Example) Macintosh •... -
Page 72: Screen Displays
Screen displays Regular displays For details on the safety zone, see 33. (Page 75) 29 28 TC 12 : 34 : 56 . 00 120 min – 112 min D10X PH 1080 P3.2 K 18dB EXPANDED MARK OFF OCT 10 2009 17 : 20 : 00 MF 69 1 / 60 SPOT... - Page 73 5 Recording format display (Page 84) 12 Frame rate display Displays the format that was set when the clip Displays the recording frame rate. was recorded. Not displayed when set to 1080/60i (or 1080/50i). • You can switch between displaying and •...
- Page 74 Depending on the zoom position, the macro 27 Remaining battery capacity display range may not be enabled. Also, depending When using Panasonic-manufactured batteries on the zoom position, the lower limit value of that are compatible with the portable recorder, the macro range may be different.
- Page 75 • The remaining battery capacity display is ( ): Paused in final scene (paused in a guideline and may change according to initial scene) usage conditions. 30 Input signal display • The remaining battery capacity display will SDI: Displayed when in SDI mode. momentarily disappear when switching •...
-
Page 76: Main Warning Displays
Screen displays (continued) Main warning displays The main warning displays that appear on the LCD monitor screen are listed below. If a warning display is not listed here, check it carefully when it is displayed. ■ CANNOT SET PRE-REC, CANNOT BE USED DUE TO CARD CAPACITY TOO LOW. -
Page 77: Error Displays
■ ■ REC STOPPED. WRITE PROTECT NOW WRITING. The card is write-protected. Video recording has been stopped. Data is now being written onto the card. Error displays REPAIR CLIP? The following messages are displayed when an Do you want to repair clips now? error occurs in the portable recorder or the SD REC WARNING Memory Card. -
Page 78: Selecting The Display Items
Screen displays (continued) Selecting the display items The following items can be displayed on the LCD monitor screen by setting them in [OTHER DISPLAY] in the [DISPLAY SETUP] setup menu (Page 88). Operation modes Display can be switched on/ Display item off in [OTHER DISPLAY] Time code display Media information display... -
Page 79: Recording And Output Format Compatibility List
Recording and output format compatibility list The recording and output formats are selected as shown below in accordance with the settings in the setup menu. ■ SDI input signal and SDI output/HDMI output list SDI input signal and [SDI OUT] HD-SDI OUT terminal recording format HDMI terminal output... -
Page 80: Setup Menu Structure
Setup menu structure Recording (REC) mode menu <SDI mode> (during SDI input) REC MENU RECORDING SETUP REC FORMAT (Page 84) AUTO REC TIME STAMP TC/UB SETUP TC MODE MIC ALC (Page 86) INT SG SDI REGEN TC PRESET UB PRESET AV OUT SETUP SDI OUT REC COUNTER... -
Page 81: Playback (Pb) Mode Menu
Recording (REC) mode menu (continued) AV OUT SETUP SDI OUT (Page 87) HDMI OUT SEL SDI EDH DOWNCON MODE HP MODE DISPLAY SETUP (Page 88) ZEBRA SAFETY ZONE CARD FUNCTIONS CARD FORMAT FOCUS BAR (Page 89) CARD STATUS REC COUNTER OUTPUT OSD DATE/TIME LEVEL METER... -
Page 82: Setup Menu List
Setup menu list When the [SYSTEM FREQ] (Page 92) setting in [OTHER FUNCTIONS] is changed, the [SYNCRO SCAN] (Page 82), [REC FORMAT] (Page 84) and [HDMI OUT SEL] (Page 87) settings are changed to the factory default. CAMERA SETUP Display Item Description of settings mode... - Page 83 CAMERA SETUP (continued) Display Item Description of settings mode GAMMA Selects the gamma curve. HD NORM: This gamma setting is suitable for HD shooting. LOW: Makes a mellow image using a gamma curve that has a gentle incline in the low-brightness area. The contrast sharpens. SD NORM: This is the normal video setting, continued from the DVX100 series.
-
Page 84: Recording Setup
Sets when using a camera-recorder that is not manufactured by Panasonic. • For details on whether to select TYPE1 or TYPE2, see “Recording formats and recording marks of Panasonic camera-recorders”. (Page 85) • See the following web site for devices that have confirmed compatibility with TYPE3. http://panasonic.biz/sav/autorec_e •... - Page 85 ∗ In the initial setting, the recording mark is not superimposed onto the HD-SDI signal. If the UB (LTC) or VITC (S-VITC) of the connected camera recorder is set to the frame rate, it will be superimposed on the HD-SDI signal. For details, see the Panasonic camera recorder user’s manual. •...
-
Page 86: Tc/Ub Setup
Setup menu list (continued) TC/UB SETUP The content selected under [TC/UB SETUP] is set for each mode individually. Display Item Description of settings mode TC MODE SDI/CAM Selects the time code correction mode when the time code of the internal time (Not displayed code generator is recorded. -
Page 87: Av Out Setup
AV OUT SETUP Display Item Description of settings mode SDI OUT SDI/CAM Selects the output video format of the SDI OUT terminal. Outputs in the recording format. DOWNCON: Outputs in the down-converted format. OFF: Does not output video from the SDI OUT terminal. (HDMI output mode) HDMI OUT SEL SDI/CAM Sets the output video format of the HDMI OUT terminal. -
Page 88: Display Setup
Setup menu list (continued) DISPLAY SETUP Display Item Description of settings mode ZEBRA Sets the level of the zebra pattern that is displayed on the LCD monitor screen. OFF, 105%, 100%, 95%, 90%, 85%, 80%, 75%, 70%, 65%, 60%, 55%, 50% SAFETY ZONE Sets the display method for the safety zone. -
Page 89: Card Functions
CARD FUNCTIONS Display Item Description of settings mode CARD SDI/CAM Formats the SD Memory Card. FORMAT YES NO CARD STATUS SDI/CAM Displays the SD Memory Card status. YES NO CLIP Displays information about the selected clip. PROPERTY YES NO META DATA Display Item Description of settings... -
Page 90: Play Setup
Setup menu list (continued) PLAY SETUP Display Item Description of settings mode PB FORMAT Sets the format for playback. When [SYSTEM FREQ] is set to [59.9Hz] 1080/60i (30P), 1080/24P, 720/60P (30P), 720/24P When [SYSTEM FREQ] is set to [50Hz] 1080/50i (25P), 720/50P (25P) •... -
Page 91: Operation
OPERATION Display Item Description of settings mode DELETE Deletes clips. ALL CLIPS: Deletes all clips. SELECT: Deletes only the selected clips. Press the [SHIFT/EXEC] button and then select [YES] to execute the deletion. Returns to the previous screen. • Clips for which protection is set in [CLIP PROTECT] cannot be deleted. INDEX Adds or deletes a clip index. - Page 92 Setup menu list (continued) OTHER FUNCTIONS (continued) Display Item Description of settings mode TIME ZONE SDI/CAM Sets the time in 30-minute increments from GMT, from -12:00 to +13:00. (See the table below.) +00:00 Time Time Location Location difference difference + 00:00 Greenwich –...
- Page 93 OTHER FUNCTIONS (continued) Display Item Description of settings mode SYSTEM INFO SDI/CAM Displays the version of the portable recorder system. MENU INIT SDI/CAM Returns the menu settings to the factory default settings. • Even when the setup menus have been initialized, [TIME ZONE] will not revert to its factory default setting.
-
Page 94: Troubleshooting
Troubleshooting Power supply • There’s no power. Make sure the battery and AC adapter are connected properly. Check the connections again. • Power goes off for no To prevent the battery from running down needlessly, the portable apparent reason. recorder automatically turns off when it has been left in the shooting pause mode for more than 5 minutes. - Page 95 Recording • Cannot record even Is the write-protect switch on the SD Memory Card in the “LOCK” through the SD Memory position? The card cannot be recorded to if the switch is in the Card is inserted correctly. “LOCK” position. •...
- Page 96 Troubleshooting (continued) PC connection • Computer does not Check the operating environment. • recognize the recorder Is the recorder’s operating mode setting correct? The recorder will when USB connection cable not be recognized when in REC mode or PB mode. Please set the is connected.
- Page 97 The changeover between clips may not always be smooth when playing back multiple clips in succession. Video may momentarily pause when playing back multiple clips in succession in circumstances such as those detailed below. ■ Mixture of different recording formats Recording mode = PH mode Playback format = 1080/60i(30P) or 1080/50i(25P) Recording format...
-
Page 98: Updating The Portable Recorder
Updating the portable recorder For details on updating the portable recorder, see the support page of the following website. https://eww.pavc.panasonic.co.jp/pro-av/ Cleaning When cleaning, do not use benzene or thinner. • Using benzine or paint thinners may deform the recorder and/or cause the surface finish to peel off. -
Page 99: Recording Format List
Recording format list ■ When [SYSTEM FREQ] is set to [59.9Hz] Frame rate Recording mode (CAM mode only) (CAM mode only) 1080/30P 1080/24P 1080/60i 1080/60i (over 60i) (Native recording) 720/30P 720/24P 720/60P 720/60P (over 60P) (Native recording) 1080/60i 1080/60i 1080/60i 1080/60i 1080/60i 1080/60i... -
Page 100: How To Handle Data Recorded On Sd Memory Card
SD Memory Card, be sure to use the dedicated AVCCAM Viewer. The AVCCAM Viewer can be downloaded from the following website. (Compatible OS: Windows XP/Windows Vista/Mac OS X 10.5/Mac OS X 10.4) https://eww.pavc.panasonic.co.jp/pro-av/ ■ Concerning the handling of the recorder’s metadata A special manufacturer area in the control file area under the AVCHD format is employed for the metadata which is supported by this recorder. -
Page 101: Specifications
Specifications [General] When [SYSTEM FREQ] is set to [50Hz] Preset Supply voltage DC 7.2 V (when the battery is used)/ 50i/50P mode: 7.3 V (when the AC adapter is used) 1/50 (Standard), 1/60, 1/120, 1/250, 1/500, Power consumption 1/1000, 1/2000 seconds SDI recording: 6.5 W 25P mode: Recording with AG-HCK10G connected: 11.7 W... - Page 102 Specifications (continued) [Audio input and output] When [SYSTEM FREQ] is set to [50Hz] PH mode: Microphone input 1080/50i AG-HCK10G built-in microphone 1080/25P (over 50i) ∗ Stereo microphone 720/50P HDMI 720/25P (over 50P) ∗ 2 ch (Linear PCM), 5.1 ch (Dolby Digital) Headphones HA mode: 1080/50i...
-
Page 103: Index
Index ABB (Auto Black Balance) ……………………… 45 Nonlinear editing …………………………… 70, 71 AC adapter ……………………………… 20, 23, 25 AG-HCK10G camera head …………… 9, 12, 28, 37 Aperture …………………………………………… 50 Operation modes Auto focus ………………………………………… 46 REC mode ……………………………… 28, 36 AVCHD ……………………………………………... - Page 104 Index (continued) Tally lamp ………………………………………… 27 Thumbnails ……………………………………… 59 Time code ………………………………………… 39 Time stamp ……………………………………… 47 USER button ……………………………………… 41 INH …………………………………………… 41 REC CHECK ………………………………… 41 SPOTLIGHT ………………………………… 41 BACKLIGHT ………………………………… 41 ATW LOCK ………………………………… 41 LCD DTL …………………………………… 42 LCD REVERSE ………………………………...
- Page 105 For Europe Information for Users on Collection and Disposal of Old Equipment and used Batteries These symbols on the products, packaging, and/or accompanying documents mean that used electrical and electronic products and batteries should not be mixed with general household waste. For proper treatment, recovery and recycling of old products and used batteries, please take them to applicable collection points, in accordance with your national legislation and the Directives 2002/96/EC and 2006/66/EC.