Table of Contents
Advertisement
Quick Links
Advertisement
Table of Contents

Related Manuals for Lenovo 250610U - Thinkpad X4 Ultrabase


Summary of Contents for Lenovo 250610U - Thinkpad X4 Ultrabase
- Page 1 ® ThinkPad X4 Dock User’s Guide...
- Page 2 Attention Refer to the documentation that comes with your computer before installing the product. Note Be sure to keep your proof of purchase, because it might be required for warranty services. (See Appendix A, “Service and Support,” on page A-1, Appendix B, “IBM Statement of Limited Warranty Z125-4753-08 04/2004,”...
-
Page 3: Table Of Contents
Contents General safety guidelines Service . Power cords and power adapters . Extension cords and related devices . . vi Plugs and outlets . vi Batteries . . vii Heat and product ventilation . . vii CD and DVD drive safety . . - Page 4 ® ThinkPad X4 Dock User’s Guide...
-
Page 5: General Safety Guidelines
General safety guidelines Always observe the following precautions to reduce the risk of injury and property damage. Service Do not attempt to service a product yourself unless instructed to do so by the ® Support Center. Use only an IBM authorized service provider who is approved to repair your particular product. -
Page 6: Extension Cords And Related Devices
Do not use any power adapter that shows corrosion at the ac input pins and/or shows signs of overheating (such as deformed plastic) at the ac input or anywhere on the power adapter. Do not use any power cords where the electrical contacts on either end show signs of corrosion or overheating or where the power cord appears to have been damaged in any way. -
Page 7: Batteries
Batteries All IBM personal computers contain a non-rechargeable coin cell battery to provide power to the system clock. In addition many mobile products such as Thinkpad notebook PCs utilize a rechargeable battery pack to provide system power when in portable mode. Batteries supplied by IBM for use with your product have been tested for compatibility and should only be replaced with IBM approved parts. -
Page 8: Cd And Dvd Drive Safety
CD and DVD drive safety CD and DVD drives spin discs at a high speed. If a CD or DVD is cracked or otherwise physically damaged, it is possible for the disc to break apart or even shatter when the CD drive is in use. To protect against possible injury due to this situation, and to reduce the risk of damage to your machine, do the following: v Always store CD/DVD discs in their original packaging... -
Page 9: Laser Compliance Statement
Laser compliance statement An optical storage drive (device), such as a CD-ROM, CD-RW, DVD-ROM drive and SuperDisk, which can be installed in the IBM ThinkPad computer is a laser product. The drive’s classification label (shown below) is on the surface of the drive. - Page 10 DANGER Do not open the optical storage drive unit; no user adjustments or serviceable parts are inside. Use of controls, adjustments, or the performance of procedures other than those specified might result in hazardous radiation exposure. Class 1 laser products are not considered hazardous. The design of the laser system and the optical storage drive ensures that there is no exposure to laser radiation above a Class 1 level during normal operation, user maintenance, or servicing.
-
Page 11: About The Thinkpad X4 Dock
About the ThinkPad X4 Dock This section provides information on registering, installing, and using the ThinkPad X4 Dock. Product registration Thank you for purchasing this IBM product. Please take a few moments to register your product and provide us with information that will help IBM to better serve you in the future. -
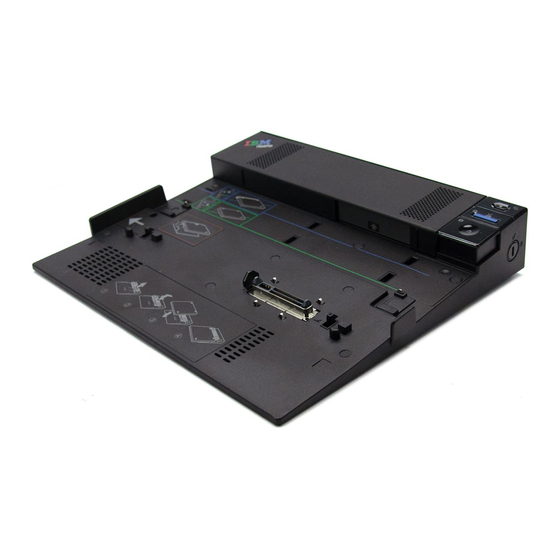
Page 12: Front View
Front view 1 The power switch turns the computer on and off. 2 By pressing the eject request button, you can request the operating system to undock the computer from the X4 Dock. The Docked indicator is green when the computer is attached to the X4 Dock. This indicator turns off when the eject request is issued and the computer can be detached safely from the X4 Dock. -
Page 13: Rear View
Rear view 1 The security lock key is for locking the eject button. 2 The power jack is for connecting the ac adapter. 3 The security keyhole enables you to attach a mechanical lock to secure the X4 Dock to a heavy object, such as a desk. 4 The keyboard/mouse connector is for connecting an external keyboard, keypad, or mouse. - Page 14 7 The Ethernet connector is for connecting the X4 Dock to a 10BASE-T/100BASE-TX/1000BASE-T Ethernet LAN. The indicator on the connector is the same as that on the ThinkPad computer. Notes: 1. If your ThinkPad computer does not have the Ethernet connector, you cannot use the Ethernet connector on the X4 Dock.
-
Page 15: Using The Thinkpad X4 Dock
Using the ThinkPad X4 Dock Note Before you attach or detach your computer when it is operating, always make sure that it has finished operations involving devices that are connected to the USB connector, the serial connector, or the parallel connector. - Page 16 3. Secure the adjuster in the proper position. The position of the adjuster depends on the computer model and the type of battery installed. Refer to the label attached to your ThinkPad X4 Dock. 4. If you are using the ThinkPad X41 Tablet Series computer, align the left side of the computer with the guide on the left side of the X4 Dock;...
-
Page 17: Detaching The Thinkpad X4 Dock
If you are using the ThinkPad X40 Series computer, attach the computer, aligning the rear side of the computer with the adjuster. 5. Press firmly on both sides of your computer until you hear a click. The computer is now attached to the X4 Dock. Note: Turn the security lock key clockwise to lock it. - Page 18 2. Make sure the security lock key of the X4 Dock is in place and in the unlocked (vertical) position. 3. Close the computer display. 4. Press the eject request button. The Docked indicator starts blinking, then turns off. ® ThinkPad X4 Dock User’s Guide...
-
Page 19: Security Feature
5. The Eject Ready indicator turns on; press the eject button until the computer moves up. 6. Grasping both sides of the computer, remove the computer from the X4 Dock. For details about setting up and using the X4 Dock, refer to Access IBM or the Setup Poster that came with this option. - Page 20 Attach a mechanical lock as follows: 1-10 ® ThinkPad X4 Dock User’s Guide...
- Page 21 Présentation de la station d’accueil X4 ThinkPad La présente section contient des informations sur l’enregistrement, l’installation et l’utilisation de la station d’accueil X4 ThinkPad. Enregistrement du produit Nous vous remercions d’avoir acheté ce produit IBM. Veuillez prendre quelques instants afin d’enregistrer votre produit et de fournir les informations nécessaires pour qu’IBM vous garantisse des services de qualité.
-
Page 22: Vue Avant
Vue avant 1 L’interrupteur d’alimentation permet de mettre l’ordinateur sous tension/hors tension. 2 En appuyant sur le bouton de requête d’éjection, vous pouvez demander au système d’exploitation de déconnecter l’ordinateur de la station d’accueil X4. L’indicateur d’accueil est vert lorsque l’ordinateur est connecté à la station d’accueil X4. - Page 23 X4. Cette position dépend du modèle de l’ordinateur et du type de batterie installé. Pour en savoir plus, reportez-vous à l’étiquette apposée sur la station d’accueil X4. 8 Les hauts-parleurs intégrés permettent d’avoir un son stéréo. Vue arrière 1 La clé de verrouillage permet de verrouiller le bouton d’éjection. 2 La prise d’alimentation permet de connecter le boîtier d’alimentation.
- Page 24 6 Le connecteur de modem permet de brancher la station d’accueil X4 à une ligne téléphonique. Remarques : 1. Si votre ThinkPad ne prend pas en charge un connecteur de modem, vous ne pouvez pas utiliser ce connecteur. 2. Si vous connectez votre ordinateur à la station d’accueil X4, utilisez le connecteur de modem de la station d’accueil X4 et non celui de l’ordinateur.
- Page 25 Utilisation de la station d’accueil X4 ThinkPad Remarque Avant de connecter ou déconnecter votre ordinateur alors qu’il est actif, vérifiez toujours que les opérations impliquant des périphériques connectés au connecteur USB, au connecteur série ou au connecteur parallèle sont terminées. En outre, assurez-vous qu’aucune connexion modem ou Ethernet n’est active.
- Page 26 3. Fixez le dispositif de réglage dans une position appropriée. Cette position dépend du modèle de l’ordinateur et du type de batterie installé. Reportez-vous à l’étiquette qui figure sur votre station d’accueil X4 ThinkPad. 4. Si vous utilisez le ThinkPad X41 Tablet Series, alignez le côté gauche de celui-ci sur le rail de guidage situé...
- Page 27 Si vous utilisez le ThinkPad X40 Series, connectez-le en alignant l’arrière de celui-ci au dispositif de réglage. 5. Appuyez fermement sur les deux côtés de l’ordinateur jusqu’à ce que vous entendiez un bruit de verrouillage. L’ordinateur est à présent installé dans la station d’accueil X4.
- Page 28 2. Assurez-vous que la clé de verrouillage de la station d’accueil X4 est en place et en position déverrouillée (verticale). 3. Rabattez l’écran de l’ordinateur. 4. Appuyez sur le bouton de requête d’éjection. L’indicateur d’accueil clignote, puis s’éteint. 1-18 ® ThinkPad X4 Dock User’s Guide...
- Page 29 5. Le voyant Prêt pour l’éjection s’allume ; appuyez sur le bouton d’éjection jusqu’à ce que l’ordinateur se déplace vers le haut. 6. Retirez l’ordinateur de la station d’accueil X4 en l’attrapant par les deux côtés. Pour en savoir plus sur la configuration et l’utilisation de la station d’accueil X4, reportez-vous à...
- Page 30 jugement, commentaire ou garantie d’aucune sorte concernant le fonctionnement, la qualité ou les performances des dispositifs de verrouillage et de sécurité. Pour attacher un antivol, procédez comme suit : 1-20 ® ThinkPad X4 Dock User’s Guide...
- Page 31 Sobre o ThinkPad X4 Dock Esta seção fornece informações sobre registro, instalação e utilização do ThinkPad X4 Dock. Registro do Produto Obrigado por adquirir este produto IBM. Reserve alguns minutos para registrar o produto e nos fornecer informações que nos ajudarão a melhor servi-lo no futuro.
-
Page 32: Vista Frontal
Vista Frontal 1 O botão liga/desliga liga e desliga o computador. 2 Pressionando o botão de pedido de ejeção, você pode pedir ao sistema operacional para desacoplar o computador do X4 Dock. O indicador Acoplado é verde quando o computador está conectado ao X4 Dock. Esse indicador apaga quando o pedido de ejeção é... - Page 33 8 Os alto-falantes estéreo internos geram som estéreo. Vista Posterior 1 A chave da trava de segurança é para travar o botão de ejeção. 2 A tomada de energia é para conectar o adaptador de corrente alternada. 3 O orifício de segurança permite conectar uma trava mecânica para prender o X4 Dock a um objeto pesado, como uma mesa.
- Page 34 2. Se você conectar seu computador ao X4 Dock, utilize o conector de modem no X4 Dock, não o do computador. 7 O conector Ethernet é para conectar o X4 Dock a uma rede local Ethernet 10BASE-T/100BASE-TX/1000BASE-T. O indicador no conector é o mesmo que o do computador ThinkPad.
- Page 35 Utilizando o ThinkPad X4 Dock Nota Antes de conectar ou desconectar o computador quando ele estiver operando, sempre certifique-se de que ele concluiu as operações que envolvam dispositivos que estão conectados ao conector USB, ao conector serial ou ao conector paralelo. Certifique-se também de que qualquer conexão a um modem ou a uma Ethernet esteja parada.
- Page 36 3. Prenda o ajustador na posição apropriada. A posição do ajustador depende do modelo do computador e do tipo de bateria instalada. Consulte a etiqueta afixada no ThinkPad X4 Dock. 4. Se estiver utilizando o computador ThinkPad X41 Tablet Series, alinhe a lateral esquerda do computador com a guia na lateral esquerda do X4 Dock;...
- Page 37 Se estiver utilizando o computador ThinkPad X40 Series, conecte o computador, alinhando a parte traseira do computador com o ajustador. 5. Pressione firmemente em ambas as laterais do computador até ouvir um clique. O computador está agora conectado ao X4 Dock. Nota: Gire a chave da trava de segurança no sentido horário para travá-la.
- Page 38 2. Certifique-se de que a chave da trava de segurança do X4 Dock esteja no lugar e na posição destravada (vertical). 3. Feche a tela do computador. 4. Pressione o botão de pedido de ejeção. O indicador Acoplado começará a piscar e, em seguida, apagará.
- Page 39 5. O indicador Pronto para Ejeção acenderá; pressione o botão de ejeção até que o computador se mova para cima. 6. Segurando ambas as laterais do computador, remova-o do X4 Dock. Para obter detalhes sobre a instalação e utilização do X4 Dock, consulte o Access IBM ou o Poster de Instalação fornecido com esse opcional.
- Page 40 Conecte uma trava mecânica da seguinte maneira: 1-30 ® ThinkPad X4 Dock Guia do Usuário...
- Page 41 Informationen zu ThinkPad X4 Dock Dieser Abschnitt enthält Informationen zur Registrierung, Installation und Ver- wendung von ThinkPad X4 Dock. Produktregistrierung Vielen Dank, dass Sie sich für dieses IBM Produkt entschieden haben. Bitte nehmen Sie sich etwas Zeit, um das von Ihnen verwendete Produkt zu regist- rieren und uns Informationen zu geben, damit wir Ihnen in Zukunft einen noch besseren Service bieten können.
- Page 42 Vorderansicht 1 Mit Hilfe des Netzschalters wird der Computer ein- bzw. ausgeschaltet. 2 Durch Drücken der Entnahmetaste können Sie das Betriebssystem anwei- sen, Ihren Computer von der X4 Dock abzudocken. Die Andockanzeige leuch- tet grün, wenn der Computer an der X4 Dock angeschlossen ist. Die Anzeige erlischt, wenn die Entnahmeanforderung gestellt wurde und der Computer sicher aus der X4 Dock entfernt werden kann.
- Page 43 8 Die integrierten Stereolautsprecher ermöglichen die Stereowiedergabe. Rückansicht 1 Mit Hilfe des Sicherheitsschlosses können Sie die Entnahmetaste verrie- geln. 2 Der Netzteilanschluss dient zum Anschließen des Netzteils. 3 An der Öffnung des Sicherheitsschlosses können Sie ein mechanisches Schloss anbringen, um die X4-Andockstation an einem schweren Gegenstand, z.
- Page 44 Anmerkungen: 1. Wenn Ihr ThinkPad den Modemanschluss nicht unterstützt, können Sie den Anschluss nicht verwenden. 2. Wenn Ihr Computer an die X4 Dock angeschlossen ist, verwenden Sie den Modemanschluss an der X4 Dock und nicht den Modemanschluss am Com- puter. 7 Der Ethernet-Anschluss dient zur Verbindung der X4 Dock mit einem 10BASE-T/100BASE-TX/1000BASE-T-Ethernet-LAN.
- Page 45 ThinkPad X4 Dock verwenden Anmerkung Wenn Sie Ihren Computer anschließen bzw. entfernen möchten, während er in Betrieb ist, sollten Sie zuvor sicherstellen, dass die Einheiten, die mit dem USB-Anschluss, dem seriellen Anschluss oder dem Parallelan- schluss verbunden sind, ihre jeweiligen Operationen beendet haben. Stel- len Sie ebenfalls sicher, dass eventuelle Verbindungen über einen Modem oder einen Ethernet-Anschluss beendet wurden.
- Page 46 3. Bringen Sie die Schiebeleiste in die richtige Position. Die Position der Schiebeleiste hängt vom Computermodell und vom Typ des installierten Akkus ab. Nähere Informationen dazu finden Sie auf dem Etikett an der ThinkPad X4 Dock. 4. Wenn Sie einen ThinkPad-Tablett-PC der Serie X41 verwenden, richten Sie die linke Seite des Computers am Führungselement an der linken Seite der X4 Dock aus, und stellen Sie sicher, dass der Andockanschluss an der Unterseite Ihres Computers und der Andockanschluss der X4 Dock einan-...
- Page 47 Wenn Sie den ThinkPad X40 Series verwenden, schließen Sie den Computer an, indem Sie Rückseite des Computers an der Schiebeleiste ausrichten. 5. Drücken Sie an beiden Seiten des Computers, bis er hörbar einrastet. Der Computer ist nun an die X4 Dock angeschlossen. Anmerkung: Drehen Sie das Sicherheitsschloss im Uhrzeigersinn, um es zu verriegeln.
- Page 48 ThinkPad X4 Dock entfernen Gehen Sie wie folgt vor, um Ihren Computer von der ThinkPad X4 Dock zu entfernen: 1. Stellen Sie sicher, dass der Akku über genügend Akkustrom für normalen Betrieb verfügt. 2. Stellen Sie sicher, dass sich das Sicherheitsschloss der X4 Dock in der Posi- tion ″Entriegelt″...
- Page 49 5. Die Entnahmeanzeige leuchtet. Drücken Sie anschließend erneut die Entnahmetaste, bis sich der Computer nach oben bewegt. 6. Halten Sie den Computer seitlich mit beiden Händen fest, und entfernen Sie ihn von der X4 Dock. Weitere Informationen zur Einrichtung und Verwendung der X4 Dock finden Sie im Hilfeprogramm ″Access IBM″...
- Page 50 Sicherheitseinrichtung An der ThinkPad X4 Dock befindet sich eine Öffnung für ein mechanisches Sicherheitsschloss. Sie können die X4 Dock an einem schweren Gegenstand, z. B. an einem Tisch, befestigen, indem Sie ein mechanisches Schloss mit einem Kabel an der Öffnung des Sicherheitsschlosses anbringen. Bei IBM erhalten Sie kein mechanisches Schloss.
- Page 51 Acerca de ThinkPad X4 Dock Esta sección facilita información acerca del registro, la instalación y el uso de ThinkPad X4 Dock. Registro del producto Gracias por adquirir este producto de IBM. Tómese unos instantes para registrar el producto y proporcionarnos información que servirá de ayuda a IBM para prestarle un mejor servicio en el futuro.
-
Page 52: Vista Anterior
Vista anterior 1 El interruptor de alimentación enciende y apaga el equipo. 2 Si pulsa el botón Petición de expulsión, puede solicitar que el sistema operativo expulse el equipo de X4 Dock. El indicador de acoplamiento se enciende de color verde cuando el equipo se conecta a X4 Dock. Este indicador se apaga cuando se emite la petición de expulsión y el equipo se puede extraer de forma segura de X4 Dock. - Page 53 8 Los altavoces estéreo integrados emiten el sonido estéreo. Vista posterior 1 La llave de bloqueo de seguridad bloquea el botón de expulsión. 2 La toma de alimentación conecta el adaptador CA. 3 La cerradura de seguridad permite conectar un seguro mecánico para asegurar el X4 Dock a un objeto pesado, como por ejemplo un escritorio.
- Page 54 7 El conector Ethernet sirve para conectar el X4 Dock a una LAN Ethernet 10BASE-T/100BASE-TX/1000BASE-T. El indicador del conector es el mismo que el del equipo ThinkPad. Notas: 1. Si el equipo ThinkPad no dispone del conector Ethernet, no podrá utilizar el conector Ethernet en el X4 Dock.
- Page 55 Utilización de ThinkPad X4 Dock Nota Antes de conectar o desconectar el equipo cuando esté en funcionamiento, asegúrese siempre de haber finalizado las operaciones que implican los dispositivos que están conectados al conector USB, al conector de serie o al conector paralelo. Asegúrese también de que todas las conexiones al módem o a un Ethernet se hayan detenido.
- Page 56 4. Si utiliza el equipo ThinkPad X41 Tablet Series, alinee el lateral izquierdo del equipo con la guía del lateral izquierdo de X4 Dock; asegúrese de que el conector de acoplamiento de la parte inferior del equipo y el de X4 Dock se alinean.
- Page 57 5. Pulse firmemente a ambos lados del equipo hasta que oiga un clic. El equipo está ahora conectado a X4 Dock. Nota: gire la llave de bloqueo de seguridad en el sentido de las agujas del reloj para bloquearlo. Guarde siempre la llave de bloqueo de seguridad en un lugar seguro.
- Page 58 3. Cierre la pantalla del equipo. 4. Pulse el botón de petición de expulsión. El indicador de acoplamiento empieza a parpadear y, a continuación, se apaga. 5. El indicador de expulsión preparada se enciende; pulse el botón de expulsión hasta que el equipo se mueva hacia arriba. 1-48 ®...
- Page 59 6. Sujete ambos lados del equipo, extraiga el equipo de X4 Dock. Para obtener más detalles acerca de la configuración y el uso de X4 Dock, consulte Access IBM o el Setup Poster que acompañaba esta opción. Funciones de seguridad ThinkPad X4 Dock dispone de una cerradura de seguridad para un seguro mecánico.
- Page 60 1-50 ® ThinkPad X4 Dock Guía del usuario...
- Page 61 Informazioni su ThinkPad X4 Dock Questa sezione contiene le informazioni sulla registrazione, sull’installazione e sull’utilizzo di ThinkPad X4 Dock. Registrazione del prodotto Grazie per aver acquistato questo prodotto IBM. Effettuare la registrazione del prodotto e fornire le informazioni per rendere migliore l’assistenza in futuro. La collaborazione è...
- Page 62 Vista anteriore 1 L’interruttore di alimentazione accende e spegne il computer. 2 Premendo il pulsante di espulsione, è possibile richiedere al sistema operativo di sbloccare il computer da X4 Dock. L’indicatore collegato è verde quando il computer è collegato a X4 Dock. Questo indicatore si spegne quando la richiesta di espulsione viene emessa ed il computer può...
- Page 63 Vista posteriore 1 La chiave del blocco di sicurezza consente di bloccare il pulsante di espulsione. 2 Il connettore di alimentazione consente di collegare l’adattatore CA. 3 Il foro di sicurezza consente di collegare un blocco meccanico per fissare X4 Dock ad un oggetto pesante, quale un tavolo. 4 Il connettore per tastiera/mouse consente di collegare una tastiera esterna, una tastierina o un mouse.
- Page 64 2. Se si collega il computer a X4 Dock, utilizzare il connettore modem di X4 Dock, piuttosto che quello sul computer. 7 Il connettore Ethernet consente di collegare X4 Dock ad una rete LAN Ethernet 10BASE-T/100BASE-TX/1000BASE-T. L’indicatore del connettore coincide con quello del computer ThinkPad. Note: 1.
- Page 65 Utilizzo del ThinkPad X4 Dock Nota Prima di collegare o scollegare il computer quando è in funzione, verificare sempre che siano terminate le operazioni che richiamano le periferiche collegate al connettore USB, connettore seriale o al connettore parallelo. Inoltre, verificare che sia stata interrotta qualsiasi connessione ad un modem o a Ethernet.
- Page 66 3. Fissare il regolatore in posizione corretta. La posizione del regolatore dipende dal modello del computer e dal tipo di batteria installata. Consultare l’etichetta allegata al ThinkPad X4 Dock. 4. Se si utilizza il computer ThinkPad X41 Tablet Series, allineare la parte laterale sinistra del computer alla guida della parte laterale sinistra di X4 Dock;...
- Page 67 Se si utilizza il computer ThinkPad X40 Series, collegare il computer, allineando la parte posteriore del computer al regolatore. 5. Premere su entrambi i lati del computer fino a inserirlo con uno scatto. Il computer è collegato a X4 Dock. Nota: Girare la chiave del blocco di sicurezza in senso orario per bloccarla.
- Page 68 2. Verificare che la chiave del blocco di sicurezza di X4 Dock sia in posizione di sblocco (verticale). 3. Chiudere il video del computer. 4. Premere il pulsante di espulsione. L’indicatore di collegamento inizia a lampeggiare, quindi si spegne. 1-58 ®...
- Page 69 5. L’indicatore di espulsione si accende; premere il pulsante di espulsione fino a quando il computer si solleva. 6. Afferrando entrambi i lati del computer, rimuovere il computer da X4 Dock. Per i dettagli sull’impostazione e sull’utilizzo di X4 Dock, consultare Access IBM o Setup Poster, fornito con questa opzione.
- Page 70 Collegare un blocco meccanico come segue: 1-60 ® ThinkPad X4 Dock Guida per l’utente...
- Page 71 Dok ThinkPad X4 Tato část obsahuje informace o registraci, instalaci a používání doku ThinkPad X4. Registrace produktu Děkujeme vám za zakoupení produktu IBM. Prosím, věnujte několik minut registraci produktu a poskytnutí informací, které společnosti pomohou lépe vás obsloužit v budoucnu. Váš komentář je pro nás velmi cenný z hlediska vývoje produktů a služeb, které...
- Page 72 Pohled zepředu 1 Vypínač zapíná a vypíná počítač. 2 Stisknutím tlačítka požadavku na odpojení předáte operačnímu systému požadavek na odpojení počítače od doku X4. Kontrolka připojení svítí zeleně, pokud je počítač připojený k doku X4. Po předání požadavku na odpojení tato kontrolka zhasne a počítač je možné...
- Page 73 Pohled zezadu 1 Klíč bezpečnostního zámku slouží pro uzamknutí tlačítka vyjmutí. 2 Konektor napájení slouží pro připojení adaptéru napájení. 3 Zabezpečovací otvor umožňuje připevnit dok X4 pomocí mechanického zámku k těžkému předmětu, například ke stolu. 4 Konektor klávesnice/myši slouží pro připojení externí klávesnice, numerické klávesnice nebo myši.
- Page 74 7 Konektor Ethernet slouží pro připojení doku X4 k síti Ethernet 10BASE-T/100BASE-TX/1000BASE-T. Kontrolka na konektoru je stejná jako na počítači ThinkPad. Poznámky: 1. Nemá-li váš počítač ThinkPad konektor Ethernet, nelze použít konektor Ethernet na doku X4. Tento konektor nelze použít pro kabel Token Ring. Tento konektor lze použít pro síť...
- Page 75 Používání doku ThinkPad X4 Poznámka Chcete-li připojit nebo odpojit počítač za běhu, vždy se ujistěte, že dokončil operace se zařízeními, která jsou připojená ke konektoru USB, sériovému konektoru nebo paralelnímu konektoru. Také se ujistěte, že spojení přes modem nebo síť Ethernet jsou ukončena. Poznámka: Používáte-li počítač...
- Page 76 3. Nastavte regulátor do odpovídající polohy. Poloha regulátoru závisí na modelu počítače a typu instalované baterie. Návod naleznete na štítku na doku ThinkPad X4. 4. Používáte-li počítač ThinkPad X41 Tablet Series, srovnejte levou stranu počítače s vodítkem na levé straně doku X4, ujistěte se, že konektor pro připojení k doku na spodní...
- Page 77 Používáte-li počítač ThinkPad X40 Series, srovnejte zadní stranu počítače s regulátorem. 5. Rovnoměrně zatlačte na obě strany počítače, dokud neuslyšíte cvaknutí. Počítač je nyní připojen k doku X4. Poznámka: Otočením klíče ve směru hodinových ručiček uzamknete bezpečnostní zámek. Klíč bezpečnostního zámku uschovejte na bezpečném místě. Neztraťte ho, bez klíče nebudete moci odpojit počítač...
- Page 78 2. Ověřte, že klíč bezpečnostního zámku doku X4 je v umístěn zámku v odemknuté (svislé) poloze. 3. Uzavřete displej počítače. 4. Stiskněte tlačítko požadavku na odpojení. Kontrolka připojení začne blikat, potom zhasne. 1-68 ® Dok ThinkPad Uživatelská příručka...
- Page 79 5. Kontrolka připravenosti na vyjmutí se rozsvítí, stisknutím tlačítka vyjmutí posuňte počítač nahoru. 6. Uchopte počítač na obou stranách a vyjměte ho z doku X4. Podrobnosti o nastavení a používání doku X4 naleznete v systému Access IBM nebo v dokumentaci dodané s tímto produktem. Zabezpečení...
- Page 80 Mechanický zámek připojíte takto: 1-70 ® Dok ThinkPad Uživatelská příručka...
- Page 81 Informácie o základni ThinkPad X4 Dock Táto časť poskytuje informácie o registrácii, inštalácii a používaní základne ThinkPad X4 Dock. Registrácia produktu Ďakujeme, že ste si zakúpili tento produkt spoločnosti IBM. Venujte pár minút registrácii tohto produktu a uvedeniu informácií, ktoré spoločnosti IBM umožnia poskytovať v budúcnosti lepšie služby.
- Page 82 Pohľad spredu 1 Vypínač slúži na zapnutie a vypnutie počítača. 2 Stlačením tlačidla požiadavky o odpojenie môžete požiadať operačný systém o odpojenie počítača zo základne X4 Dock. Indikátor základne je zelený, keď je počítač pripojený k základni X4 Dock. Tento indikátor zhasne, keď zadáte požiadavku na vysunutie a počítač...
- Page 83 Pohľad zozadu 1 Kľúč bezpečnostného zámku slúži na uzamknutie tlačidla vysunutia. 2 Jack napájania slúži na pripojenie napájacieho adaptéra. 3 Bezpečnostný uzamykací otvor vám umožňuje pripojiť mechanický zámok slúžiaci na pripevnenie základne X4 Dock k pevným objektom, ako je napríklad stôl, za účelom bezpečnosti.
- Page 84 7 Ethernetový konektor slúži na pripojenie základne X4 Dock k sieti 10BASE-T/100BASE-TX/1000BASE-T Ethernet LAN. Indikátor konektora je rovnaký, ako indikátor na počítači ThinkPad. Poznámky: 1. Ak váš počítač ThinkPad nemá ethernetový konektor, nemôžete ethernetový konektor používať ani na základni X4 Dock. Pre tento konektor nemôžete použiť kábel typu Token Ring.
- Page 85 Používanie základne ThinkPad X4 Dock Poznámka Predtým ako zasuniete alebo vysuniete svoj zapnutý počítač sa presvedčte, či ukončil operácie týkajúce sa zariadení, ktoré sú pripojené k USB konektoru, sériovému konektoru alebo paralelnému konektoru. Taktiež sa uistite, či sú zastavené všetky pripojenia k modemu alebo ethernetu. Poznámka: Ak používate počítač...
- Page 86 3. Zaistite nastavovací ovládač v správnej pozícii. Táto poloha nastavovacieho ovládača závisí od modelu počítača a typu nainštalovanej batérie. Pozrite si štítok na základni ThinkPad X4 Dock. 4. Ak používate počítač ThinkPad X41 Tablet Series, zarovnajte ľavú stranu počítača s vodidlom na ľavej strane základne X4 Dock;...
- Page 87 Ak používate počítač ThinkPad X40 Series, pripojte ho tak, že zarovnáte jeho zadnú časť s nastavovacím ovládačom. 5. Pevne zatlačte na obidve strany vášho počítača, kým nezačujete kliknutie. Počítač je teraz pripojený k základni X4 Dock. Poznámka: Otočte kľúč bezpečnostného zámku proti smeru hodinových ručičiek, aby ste ho zamkli.
- Page 88 2. Uistite sa, že kľúč bezpečnostného zámku základne X4 Dock je na svojom mieste a v odomknutej (vertikálnej) pozícii. 3. Zatvorte displej počítača. 4. Stlačte tlačidlo požiadavky na vysunutie. Indikátor základne začne blikať, a potom zhasne. 1-78 ® ThinkPad X4 Dock Užívateľská...
- Page 89 5. Indikátor pripravenosti vysunutia sa zapol; zatlačte na tlačidlo vysunutia, čím sa počítač posunie smerom nahor. 6. Potiahnutím za obidve strany počítača ho vysuňte zo základne X4 Dock. Podrobnosti o nastavení a používaní základne X4 Dock nájdete v systéme pomoci Access IBM alebo Setup Poster, ktorý...
- Page 90 Pri pripájaní mechanického zámku postupujte takto: 1-80 ® ThinkPad X4 Dock Užívateľská príručka...
- Page 91 ThinkPad X4 Dock Hakkında Bu bölümde, ThinkPad X4 Dock ürününün kaydedilmesine, kurulmasına ve kullanılmasına ilişkin bilgiler yer alır. Ürünün kaydedilmesi Bu IBM ürününü satın aldığınız için teşekkür ederiz. Ürününüzü kaydetmek ve IBM’den gelecekte daha sağlıklı hizmet alabilmek için gerekli bilgileri vermek üzere lütfen birkaç dakikanızı...
- Page 92 Önden görünüm 1 Güç anahtarı, bilgisayarı açıp kapatmak için kullanılır. 2 Çıkartma isteği düğmesine basarak işletim sisteminden, bilgisayarı X4 Dock ürününden ayırmasını isteyebilirsiniz. Bilgisayar X4 Dock ürününe takılı olduğunda, Takılı göstergesi yeşil renklidir. Çıkartma isteği düğmesine basıldığında, bu göstergenin ışığı söner ve bilgisayar X4 Dock ürününden güvenli bir şekilde çıkartılabilir. 3 Çıkartma düğmesi bilgisayarı...
- Page 93 Arkadan görünüm 1 Güvenlik kilidi anahtarı çıkartma düğmesini kilitlemek için kullanılır. 2 Güç yuvası, AC bağdaştırıcısının takılması için kullanılır. 3 Güvenlik anahtarı deliği, X4 Dock ürününü masa benzeri ağır bir nesneye sabitlemek için mekanik bir kilit takmanızı sağlar. 4 Klavye/fare bağlacı harici bir klavyeyin, tuş takımının ya da farenin bağlanması için kullanılır.
- Page 94 7 Ethernet bağlacı X4 Dock ürününün bir 10BASE-T/100BASE-TX/1000BASE-T Ethernet LAN sistemine bağlanmasını sağlar. Bağlaç üzerindeki gösterge, ThinkPad bilgisayarı üzerindekinin aynısıdır. Notlar: 1. ThinkPad bilgisayarınızda Ethernet bağlacı yoksa, X4 Dock ürünü üzerindeki Ethernet bağlacını kullanamazsınız. Bu bağlaç için Simgeli Halka kablosunu da kullanamazsınız.
- Page 95 ThinkPad X4 Dock ürününün kullanımı Çalıştığı sırada bilgisayarınızı takmak ya da çıkartmak istediğinizde, öncelikle bilgisayrınızın USB bağlacına, dizisel bağlaca ya da koşut bağlaca bağlı aygıtlarla ilişkili işlemleri bitirmiş olduğundan emin olun. Ayrıca, her tür modem ya da Ethernet bağantısının kesilmiş olduğundan da emin olun. Not: ThinkPad X40 Series bilgisayarı...
- Page 96 3. Ayarlayıcının doğru konumda olduğundan emin olun. Ayarlayıcının konumu bilgisayarınızın modeline ve aygıtınızda takılı olan pilin tipine bağlıdır. Buna ilişkin olarak ThinkPad X4 Dock ürünü üzerine yapıştırılmış olan etikete bakın. 4. ThinkPad X41 Tablet Series bilgisayarı kullanıyorsanız, bilgisayarın sol tarafını, X4 Dock ürününün sol tarafında bulunan kılavuzla hizalayın ve bilgisayarınızın alt tarafındaki takma bağlacıyla X4 Dock üzerindeki takma bağlacının birbirleriyle aynı...
- Page 97 ThinkPad X40 Series bilgisayarı kullanıyorsanız, bilgisayarınızı, arka tarafını ayarlayıcıyla hizalayarak takın. 5. Tık sesi duyuncaya kadar, bilgisayarınızın her iki yanına da iyice bastırın. Artık bilgisayarınız X4 Dock ürününe takılmıştır. Not: Güvenlik kilidini kilitlemek için anahtarı saat yönüne doğru çevirin. Güvenlik kilidi anahtarını...
- Page 98 2. X4 Dock ürününün güvenlik kilidi amahtarının yerine takılı, ancak anahtarın çevrilmemiş (dikey) konumda olduğundan emin olun. 3. Bilgisayarınızın görüntü birimini kapatın. 4. Çıkartma isteği düğmesine basın. Takılı göstergesi önce yanıp sönmeye başlar, daha sonra ise tümüyle söner. 1-88 ® ThinkPad X4 Dock Kullanıcı...
- Page 99 5. Çıkartılmaya Hazır göstergesi yanar; bilgisayarınız yukarı doğru hareket edinceye kadar çıkartma düğmesine basın. 6. Bilgisayarın iki yanından tutarak aygıtı X4 Dock üzerinden çıkarın. X4 Dock ürününün kurulmasına ve kullanılmasına ilişkin ayrıntılı bilgi almak için, Access IBM olanağına ya da bu seçenekle birlikte gönderilen Setup Poster (Kuruluş Şeması) belgesine başvurun.
- Page 100 Mekanik kilidi aşağıda belirtilen şekilde takın: 1-90 ® ThinkPad X4 Dock Kullanıcı Kılavuzu...
- Page 101 XZ ThinkPad X4 )9k >Za)KPX"a"20M9C ThinkPad X4 )9kDE"# z7"a P;z:r> IBM z7#k(;c1d"azDz7"rRGa)PzZ IBM + 4|CX*z~qDE"#zD4!TZRGZ*"Tz`1X*Dz7M~q, T00R|CD==Tckz5(=f_PX*[5#kZTB IBM Web >c" azD!~: www.ibm.com/pc/register IBM +rz"MPXzy"aDz7DE"M|BDO,}GzZ Web >cDw imPmwz;#{SUx;=DE"# z7hv ThinkPad X4 )9kvk ThinkPad X40 5P(|, Tablet PC ME)DFcz; ™ p$w#(}tC|49C Ultrabay Slim MwVI!h8IT)9FczD\ &# +Fcz,S= ThinkPad X4 )9k.s,zIT9C|DSZ4zfFczDS 1Fcz,S= ThinkPad X4 )9ks,PpCpiO~1vU!Fcz#k<U...
- Page 102 0S< 1 g4*X*trXUFcz# 2 4/vks4|ITksYw53+FczS X4 )9kP6B#1Fcz, S= X4 )9k1,Sk8>F*L+#1"v/vkss,C8>F(p,MI TS X4 )9k2+pkFczK# 3 /v4|IS X4 )9kMEFcz#1FczQMwS X4 )9k2+pk 1,/vMw8>F*L+#1FczS X4 )9kpks,C8>F(p# ":*x( X4 )9kD/v4|,k9C2+x(?W# 4 )9kSkSZG,S ThinkPad FczD;C# 5 P\,xMEVz,byzMIT|; Ultrabay Slim h8K# Ultrabay Slim h8CZ20wVh8,}g DVD }/w"CD-RW/DVD Combo }/wrZ~v2L}/w# 7 + ThinkPad Fcz,S= X4 )9k1,k7#w{wL(Z}7;C#w {wD;C!vZFczMEMy20gXD`M#PXj8E",kN<...
- Page 103 sS< 1 2+x(?WCZx(/v4|# 2 g4eWCZ,S;wg4Jdw# 3 2+xW9z\;,Sz5x+ X4 )9kL(ZXoO,}g@S# 4 |L/sjSZCZ,SbSD|L"!|Lrsj# 5 (C.P\_(USB)SZCZ,S USB 1.1 M USB 2.0 h8# ":1z+ USB gB,S=SZ1,k7#<PT>DjG/O#qr,SZI \ap5# 6 wFbwwSZCZ+ X4 )9k,S=g0_# ": 1. g{zD ThinkPad Fcz;'VwFbwwSZ,r^(9CCSZ# 2. g{z+Fcz,S= X4 )9k,k9C X4 )9kODwFbwwSZ, kp9CFczODSZ# 7 T+xSZCZ+ X4 )9k,S= 10BASE-T/100BASE-TX/1000BASE-T T +x LAN#SZOD8>Fk ThinkPad FczOD`,# 1-93 XZ ThinkPad X4 )9k...
- Page 104 ": 1. g{zD ThinkPad Fcz;PT+xSZ,r^(9C X4 )9kODT+x S Z # z ; \ * C S Z 9 C n F 7 g B # C S Z I T C Z 10BASE-T/100BASE-TX/1000BASE-T T+x,S#+G,g{zD ThinkPad F c ; \ ; 9 C 1 0 B A S E - T / 1 0 0 B A S E - T X T + x , r C S Z ; \ C Z 10BASE-T/100BASE-TX T+x,Sx;\CZ 1000BASE-T T+x,S# 2.
- Page 105 9C ThinkPad X4 )9k " ZFczKP1xP,Srpk.0,k<U7#|QjIf0,S= USB SZ".Zr"ZDh8DYw#9*7#kwFbwwrT+xDNN, S<Q#9# ":g{zZ9C ThinkPad X40 5PFcz,rZ+|,S= ThinkPad X4 ) 9k.0,zh*|B BIOS M Easy Eject Utility#*BXnBf>D BIOS zkM5CLr,k*Ar,xOD www.pc.ibm.com/support# ,S ThinkPad X4 )9k *+Fcz,S= ThinkPad X4 )9k,k4PTBYw: 1. SFczO*;wg4Jdw,qrI\p5;wg4Jdw#+;wg4J dw,S= ThinkPad X4 )9k, k9C X4 )9kf=D|0P|,D;w g4Jdw# 2.
- Page 106 3. +w{wL(ZJ1;C#w{wD;C!vZFczMEMy20gXD` M#kN< ThinkPad X4 )9kO3yDj)# 4. g{zZ9C ThinkPad X41 Tablet 5PFcz,k+FczDs`k X4 ) 9ks`D<lTk;7#FczW?M X4 )9kODSkSZ`%Tk# 1-96 Untitled...
- Page 107 g{zZ9C ThinkPad X40 5PFcz,kZ,SFcz1+FczDs?k w{wTk# 5. 4NFczD=`1=z}=GU;y#FczVZQ,S= X4 )9kK# ":31k=r}*2+x(?W+|x(#k<U+2+x(?W#fZ2+; C#kpE';qrz+^(+FczS X4 )9kpk# pk ThinkPad X4 )9k *+FczS ThinkPad X4 )9kpk,k4PTBYw: 1. 7#gXQdzT)}#KP# 1-97 XZ ThinkPad X4 )9k...
- Page 108 2. 7# X4 )9kD2+x(?WQM;"&Zbx(91);C# 3. OOFczT>w# 4. 4/vks4|#0Sk18>F*<A8,;s(p# 1-98 Untitled...
- Page 109 5. 0/vMw18>FAp;4!/v4|1=FczOF# 6. U!FczD=`,S X4 )9k!vFcz# PX20M9C X4 )9kDj8E",kND Access IBM rC!~f=D20 2+&\?~ ThinkPad X4 )9k_PCZz5xD2+xW#*+ X4 )9kL(=Xo(} g@S)O,k+xP_BDz5x,S=2+xW# IBM ;a)z5x#z+h*ZpDX=:r#zPpN@@"!qM5VNNx (h8M2+&\?~#IBM ;TNNx(h8r2+&\?~D&\"J?rT \wNN@["POr### 1-99 XZ ThinkPad X4 )9k...
- Page 110 k4gBy>,Sz5x: 1-100...
- Page 111 ÷≤ ThinkPad X4 Dock ÷ ThinkPad X4 Dock UBw H ú ÑΩTC ú P z R IBM ú C ß@ í ú U ú ÷ΩTAHK IBM X ¼ QAi≤U }o½n ú ú ≤n A Cz A A ∩ q DC IBM ⌠...
- Page 112 1 q }÷i} ÷¼qúC 2 ÷UhXnDsANinD@ t ≈qúP X4 DockC Jⁿ OY ± ΓAϕ qúw X4 Dock WCϕoXhXnD A ⁿ O ϕ qúiHP X4 Dock w ≈C 3 hXsiNqúP X4 Dock P}ChX ⁿ OY ±ΓAϕ qúw nP X4 Dock w ≈C@ qúP X4 Dock ≈A ⁿ...
- Page 113 1 w Ω ΩwhXsC 2 q í AC πy C i²zs ≈±ΩAHKN X4 Dock w Ωb½½WAp αC 4 ΣL/ ½ Y íΣLB÷Σ O ½C USB 1.1 M USB 2.0 (USB) : N USB lus Y A T{ x WC hAiα la ñ...
- Page 114 1. pGz ThinkPad qúúπ A ⌠⌠ YAzNLk X4 Dock W A ⌠⌠ YC Y úA O ⌠luCªi ≤ 10BASE-T/100BASE-TX/1000BASE-T A ⌠⌠suCM ApGz ThinkPad q ú u i 1 0 B A S E - T / 1 0 0 B A S E - T X A ⌠...
- Page 115 ThinkPad X4 Dock bqú⌡µ AYn J ≈qúA YB C ÷ mAw ¿Σ@ C A] T{ ≈ A ⌠ ⌠ suwg εC : pGz ThinkPad X40 tCqúAbs ThinkPad X4 Dock ºeAz ≤s BIOS Easy Eject UtilityCYnUⁿ s BIOS {íX {íA yX yΩT⌠W www.pc.ibm.com/supportC W ThinkPad X4 Dock YnNqú...
- Page 116 m≤Aϕ mC m°qú≈¼ w q ¼ wC \Kb ThinkPad X4 Dock W 4. pGz ThinkPad X41 Tablet tCqúA Nqú¬ ∩⌠ X4 Dock ¬ F MßT{qú í J YP X4 Dock J YwTΩ∩⌠C 1-106 ® ThinkPad X4 Dock User’s Guide...
- Page 117 ThinkPad X40 tCqúA NqúI ∩⌠ HKs C 5. ≥úqúΓ A Ñ dJnCoϕ qúw J X4 Dock FC wΦV αw Ω NΣΩWC Ω Osbw ΦC ≥óA hNLk ≈qúP X4 DockC ≈ ThinkPad X4 Dock YnNqúq ThinkPad X4 Dock ≈A ⌡µUCBJG qOR¼i ⌡µ@δ@ C 1-107 ÷≤...
- Page 118 T{ X4 Dock w Ω ≤ úΩw]½ 3. ÷¼qúπ 4. ÷UhXnDsC Jⁿ O }l{{Mß 1-108 ® ThinkPad X4 Dock User’s Guide...
- Page 119 5. ϕhX ⁿ OG A ÷UhXs qú W ϕqúΓ Aq X4 Dock XqúC ∩ ] H ΩTA \ Access IBM X4 Dock ⁿ°C w Sϕ m ThinkPad X4 Dock π ≈±ΩM CYnN X4 Dock Ωb½½WA p αA N≈±ΩMlus IBM úú ≈±ΩCz tµ∩...
- Page 120 ÷ U s ≈±ΩG 1-110 ® ThinkPad X4 Dock User’s Guide...
- Page 121 ThinkPad X4 ThinkPad X4 IBM Web www.ibm.com/pc/register ThinkPad X4 ThinkPad ThinkPad X40 ThinkPad ™ ThinkPad ThinkPad X4 ThinkPad ThinkPad ThinkPad X4 ThinkPad No.26 AWG : AC 16 VDC 3.5 A 1-111 © Copyright IBM Corp. 2005...
- Page 122 ThinkPad ThinkPad ThinkPad X4 ThinkPad ThinkPad X4 ThinkPad ThinkPad X4 ThinkPad ThinkPad X4 ThinkPad ThinkPad X4 ThinkPad ThinkPad X4 : ThinkPad X4 ThinkPad CD-RW/DVD 7 ThinkPad ThinkPad X4 ThinkPad ThinkPad X4 1-112 ® ThinkPad X4 Dock User’s Guide...
- Page 123 (USB) USB 1.1 USB 2.0 ThinkPad X4 ThinkPad 1-113 ThinkPad X4...
- Page 124 ThinkPad ThinkPad X4 ThinkPad ThinkPad X4 ThinkPad X4 10BASE-T LAN 100BASE-TX LAN 1000BASE-T ThinkPad ThinkPad ThinkPad X4 10BASE-T /100BASE-TX /1000BASE-T ThinkPad 10BASE-T /100BASE-TX 10BASE-T /100BASE-TX 1000BASE-T ThinkPad ThinkPad X4 ThinkPad ThinkPad X4 1-114 ® ThinkPad X4 Dock User’s Guide...
- Page 125 ThinkPad X4 ThinkPad : ThinkPad X40 ThinkPad ThinkPad X4 BIOS Easy Eject Utility BIOS Easy Eject Utility www.pc.ibm.com/support ThinkPad X4 ThinkPad ThinkPad X4 ThinkPad ThinkPad X4 ThinkPad X4 2. ThinkPad X4 1-115 ThinkPad X4...
- Page 126 ThinkPad ThinkPad X4 4. ThinkPad X41 ThinkPad ThinkPad ThinkPad X4 ThinkPad ThinkPad X4 1-116 ® ThinkPad X4 Dock User’s Guide...
- Page 127 ThinkPad X40 ThinkPad ThinkPad 5. ThinkPad ThinkPad ThinkPad X4 ThinkPad ThinkPad X4 ThinkPad X4 ThinkPad ThinkPad X4 1-117 ThinkPad X4...
- Page 128 2. ThinkPad X4 1-118 ® ThinkPad X4 Dock User’s Guide...
- Page 129 ThinkPad 6. ThinkPad ThinkPad X4 ThinkPad X4 Access ThinkPad X4 ThinkPad X4 1-119 ThinkPad X4...
- Page 130 1-120 ® ThinkPad X4 Dock User’s Guide...
-
Page 131: Appendix A. Service And Support
Appendix A. Service and Support The following information describes the technical support that is available for your product, during the warranty period or throughout the life of the product. Refer to your IBM Statement of Limited Warranty for a full explanation of IBM warranty terms. - Page 132 ® ThinkPad X4 Dock User’s Guide...
-
Page 133: Appendix B. Ibm Statement Of Limited Warranty Z125-4753-08 04/2004
Appendix B. IBM Statement of Limited Warranty Z125-4753-08 04/2004 Part 1 - General Terms This Statement of Limited Warranty includes Part 1 - General Terms, Part 2 - Country-unique Terms, and Part 3 - Warranty Information. The terms of Part 2 replace or modify those of Part 1. - Page 134 failure resulting from misuse (including but not limited to use of any Machine capacity or capability, other than that authorized by IBM in writing), accident, modification, unsuitable physical or operating environment, or improper maintenance by you; failure caused by a product for which IBM is not responsible; and any non-IBM products, including those that IBM may procure and provide with or integrate into an IBM Machine at your request.
- Page 135 discretion, 1) repair it to make it function as warranted, or 2) replace it with one that is at least functionally equivalent. If IBM is unable to do either, you may return the Machine to your place of purchase and your money will be refunded.
- Page 136 Limitation of Liability IBM is responsible for loss of, or damage to, your Machine only while it is 1) in IBM’s possession or 2) in transit in those cases where IBM is responsible for the transportation charges. Neither IBM nor your reseller are responsible for any of your confidential, proprietary or personal information contained in a Machine which you return to IBM for any reason.
-
Page 137: Part 2 - Country-Unique Terms
and IBM’s rights, duties, and obligations arising from, or relating in any manner to, the subject matter of this Statement of Limited Warranty, without regard to conflict of law principles. THESE WARRANTIES GIVE YOU SPECIFIC LEGAL RIGHTS AND YOU MAY ALSO HAVE OTHER RIGHTS WHICH VARY FROM STATE TO STATE OR JURISDICTION TO JURISDICTION. - Page 138 MEXICO Jurisdiction: The following is added after the first sentence: Any litigation arising from this Statement of Limited Warranty will be settled exclusively by the Federal Courts of Mexico City, Federal District. PARAGUAY Jurisdiction: The following is added after the first sentence: Any litigation arising from this Statement of Limited Warranty will be settled exclusively by the courts of the city of Asuncion.
- Page 139 UNITED STATES Governing Law: The following replaces "laws of the country in which you acquired the Machine" in the first sentence: laws of the State of New York. ASIA PACIFIC AUSTRALIA What this Warranty Covers: The following paragraph is added to this Section: The warranties specified in this Section are in addition to any rights you may have under the Trade Practices Act 1974 or other similar legislation and are only limited to the extent permitted by the applicable legislation.
- Page 140 Other vacancies shall be filled by the respective nominating party. Proceedings shall continue from the stage they were at when the vacancy occurred. If one of the parties refuses or otherwise fails to appoint an arbitrator within 30 days of the date the other party appoints its, the first appointed arbitrator shall be the sole arbitrator, provided that the arbitrator was validly and properly appointed.
- Page 141 If one of the parties refuses or otherwise fails to appoint an arbitrator within 30 days of the date the other party appoints its, the first appointed arbitrator shall be the sole arbitrator, provided that the arbitrator was validly and properly appointed.
- Page 142 Warranty shall be finally settled by arbitration which shall be held in Metro Manila, Philippines in accordance with the laws of the Philippines then in effect. The arbitration award shall be final and binding for the parties without appeal and shall be in writing and set forth the findings of fact and the conclusions of law.
- Page 143 If you purchase a Machine in one of the Western European countries, as defined above, you may obtain warranty service for that Machine in any of those countries from either (1) an IBM reseller approved to perform warranty service or (2) from IBM, provided the Machine has been announced and made available by IBM in the country in which you wish to obtain service.
- Page 144 will be the competent court of law in Vienna, Austria (Inner-City); 2) in Angola, Bahrain, Botswana, Burundi, Egypt, Eritrea, Ethiopia, Ghana, Jordan, Kenya, Kuwait, Liberia, Malawi, Malta, Mozambique, Nigeria, Oman, Pakistan, Qatar, Rwanda, Sao Tome, Saudi Arabia, Sierra Leone, Somalia, Tanzania, Uganda, United Arab Emirates, West Bank/Gaza, Yemen, Zambia, and Zimbabwe all disputes arising out of this Statement of Limited Warranty or related to its execution, including summary proceedings, will be submitted...
- Page 145 be final and binding upon both parties. Therefore, pursuant to paragraph 598 (2) of the Austrian Code of Civil Procedure, the parties expressly waive the application of paragraph 595 (1) figure 7 of the Code. IBM may, however, institute proceedings in a competent court in the country of installation. In Estonia, Latvia and Lithuania all disputes arising in connection with this Statement of Limited Warranty will be finally settled in arbitration that will be held in Helsinki, Finland in accordance with the arbitration laws of Finland...
- Page 146 the Machine. For purposes of this item, the term ″Machine″ includes Machine Code and Licensed Internal Code (″LIC″). The above limitation shall not apply to damages for bodily injuries (including death) and damages to real property and tangible personal property for which IBM is legally liable. UNDER NO CIRCUMSTANCES IS IBM, ITS SUPPLIERS OR RESELLERS LIABLE FOR ANY OF THE FOLLOWING, EVEN IF INFORMED OF THEIR POSSIBILITY: 1) LOSS OF, OR DAMAGE TO,...
- Page 147 The warranty for an IBM Machine covers the functionality of the Machine for its normal use and the Machine’s conformity to its Specifications. The following paragraphs are added to this section: The limitation period for consumers in action for breach of warranty is the statutory period as a minimum.
- Page 148 The following paragraphs are added to this section: The minimum warranty period for Machines is twelve months. In case IBM or your reseller is unable to repair an IBM Machine, you can alternatively ask for a partial refund as far as justified by the reduced value of the unrepaired Machine or ask for a cancellation of the respective agreement for such Machine and get your money refunded.
- Page 149 which together result in, or contribute to, substantially the same loss or damage will be treated as one Default occurring on the date of occurrence of the last such Default. Circumstances may arise where, because of a Default, you are entitled to recover damages from IBM.
-
Page 150: Part 3 - Warranty Information
IBM is legally liable to you, whether in contract or tort. A number of Defaults which together result in, or contribute to, substantially the same loss or damage will be treated as one Default. Circumstances may arise where, because of a Default, you are entitled to recover damages from IBM. -
Page 151: Types Of Warranty Service
Type of Machine Warranty Type Country or Region of Purchase Warranty Period Service ThinkPad Worldwide Parts and labor -1 year X4 Dock Types of Warranty Service If required, IBM provides repair or exchange service depending on the type of warranty service specified for your Machine in the above table and as described below. -
Page 152: Worldwide Telephone List
You will deliver or mail as IBM specifies (prepaid unless IBM specifies otherwise) the failing Machine suitably packaged to a location IBM designates. After IBM has repaired or exchanged the Machine, IBM will make it available for your collection or, for Mail-in Service, IBM will return it to you at IBM’s expense, unless IBM specifies otherwise. - Page 153 Country or Region Telephone Number Austria +43-1-24592-5901 (German) Belgium 02-210-9820 (Dutch) 02-210-9800 (French) Bolivia 0800-0189 (Spanish) Brazil Sao Paulo region: (11) 3889-8986 Toll free outside Sao Paulo region: 0800-7014-815 (Brazilian Portuguese) Canada 1-800-565-3344 (English, French) In Toronto only call: 416-383-3344 Chile 800-224-488 (Spanish) China...
- Page 154 Country or Region Telephone Number Italy +39-02-7031-6101 (Italian) Japan Desktop: Toll free: 0120-887-870 For International: +81-46-266-4724 ThinkPad: Toll free: 0120-887-874 For International: +81-46-266-4724 Both of the above numbers will be answered with a Japanese language voice prompt. For telephone support in English, please wait for the Japanese voice prompt to end, and an operator will answer.
-
Page 155: Guarantee Supplement For Mexico
Country or Region Telephone Number Slovakia +421-2-4954-1217 Slovenia +386-1-5830-050 Spain +34-91-714-7983 (Spanish) Sri Lanka +94-11-2448-442 +94-11-2421-066 +94-11-2493-500 (English) Sweden +46-8-477-4420 (Swedish) Switzerland +41-58-333-0971 (German, French, Italian) Taiwan 886-2-8723-9799 (Mandarin) Thailand 1-800-299-229 (Thai) Turkey 00800-211-4032 +90-212-317-1760 (Turkish) United Kingdom +44-1475-555-055 (English) United States 1-800-IBM-SERV (1-800-426-7378) - Page 156 In the event that warranty repair is required please call the IBM Support Center at 001-866-434-2080, where you will be directed to the nearest Authorized Service Center. Should no Authorized Service Center exist in your city, location or within 70 kilometers of your city or location, the guarantee includes any reasonable delivery charges related to the transportation of the product to our nearest Authorized Service Center.
-
Page 157: Appendix C. Notices
Appendix C. Notices IBM may not offer the products, services, or features discussed in this document in all countries. Consult your local IBM representative for information on the products and services currently available in your area. Any reference to an IBM product, program, or service is not intended to state or imply that only that IBM product, program, or service may be used. -
Page 158: Trademarks
IBM may use or distribute any of the information you supply in any way it believes appropriate without incurring any obligation to you. Any references in this publication to non-IBM Web sites are provided for convenience only and do not in any manner serve as an endorsement of those Web sites. - Page 159 v Increase the separation between the equipment and receiver. v Connect the equipment into an outlet on a circuit different from that to which the receiver is connected. v Consult an IBM authorized dealer or service representative for help. Properly shielded and grounded cables and connectors must be used in order to meet FCC emission limits.
- Page 160 Dieses Gerät ist berechtigt in Übereinstimmungmit dem Deutschen EMVG das EG-Konformitätszeichen - CE - zu führen. Verantwortlich für die Konformitätserklärung nach Paragraph 5 des EMVG ist die: IBM Deutschland Informationssysteme GmbH, 70548 Stuttgart. Informationen in Hinsicht EMVG Paragraph 3 Abs. (2) 2: Das Gerät erfüllt die Schutzanforderungen nach EN 55024:1998 und EN 55022:1998 Klasse B.
- Page 161 IBM ne peut accepter aucune responsabilité pour le manquement aux exigences de protection résultant d’une modification non recommandée du produit, y compris l’installation de cartes autres que les cartes IBM. Ce produit a été testé et il satisfait les conditions de l’équipement informatique de Classe B en vertu de Standard européen EN 55022.
- Page 162 Japanese statement of compliance for products less than or equal to 20 A per phase ® ThinkPad X4 Dock User’s Guide...
- Page 164 Part Number: 73P4525 Printed in China (1P) P/N: 73P4525...