Table of Contents
Advertisement
Quick Links
Advertisement
Table of Contents

Related Manuals for Kenwood M1GC7


Summary of Contents for Kenwood M1GC7
- Page 1 INSTRUCTION MANUAL DIGITAL AUDIO PLAYER M1GC7 © English /01 (E) 0610...
-
Page 2: Table Of Contents
Contents Playing music tracks Setting and adjusting the Player Safety precautions ..........3 Operating Precautions ........5 Selecting music for playback ..... 14 Sleep timer and alarm timer ...... 27 Handling...............5 Display during playback ......15 Various setups ..........28 Maintenance.of.the.unit........5 Operations available during playback ... -
Page 3: Safety Precautions
Safety precautions ¤ Caution: 6. Heat.–.Avoid.placing.the.appliance.under.direct.sunlight.or.near.a.source.of. heat.such.as.heating.equipment..Particularly,.never.leave.it.in.an.automobile.or.on. Read.this.page.carefully.to.ensure.safe.operation. the.dashboard. WARNING : 7. Temperature. – . T he. a ppliance. m ay. n ot. f unction. p roperly. i f. u sed. a t. e xtremely. l ow,. TO.PREVENT.FIRE.OR.ELECTRIC.SHOCK,.DO.NOT.EXPOSE.THIS.APPLIANCE. or.freezing.temperatures..The.ideal.ambient.temperature.is.above.+5°C.(41°F). TO.RAIN.OR.MOISTURE. 8. - Page 4 Safety precautions Notes on using through car stereo Information on Disposal of Old Electrical and Electronic •.. D o.not.leave.the.products.or.batteries.in.the.car,.particularly.above.the.dashboard,. Equipment (applicable for EU countries that have adopted for.this.may.lead.to.malfunction.or.damage.due.to.solar.heat. separate waste collection systems) •.. I f.the.unit.is.connected.to.a.car.stereo.using.an.audio.cord,.noise.may.sometimes. interfere. Products. with. the. symbol. (crossed-out. wheeled. bin)cannot. be. disposed.as.household.waste.
-
Page 5: Operating Precautions
Operating Precautions Unpacking Handling •. Do.not.apply.an.excessive.force.to.the.display.part..Otherwise,.it.may.be.damaged.. •. Avoid.storing.the.player.in.a.bag.together.with.a.hard.object..Otherwise,.the.player.may.be. damaged.when.the.bag.is.pushed. •. Do.not.expose.the.player.to.an.insecticide.or.other.volatile.substance.or.bring.the.player. in.extended.contact.with.a.rubber.or.vinyl.material..Otherwise,.discoloration.or.peeling.of. USB.cable the.surface.finish.may.result. •. Do. not. put. the. player. in. a. pocket. of. trousers.. Otherwise,. it. may. be. damaged. due. to. a. strong.impact.when.you.sit.down,.etc. •. Protect the player against sweat and moisture. . -
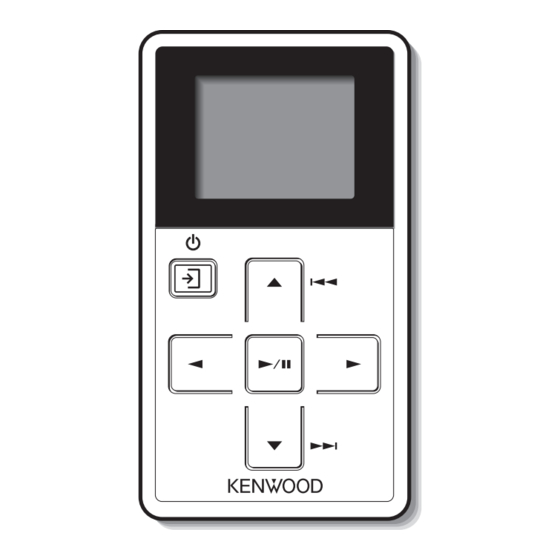
Page 6: Names And Functions Of Parts
Names and functions of parts Right button Power/Menu button •. Press.to.enter.an.item.and.advance.to. •. Press.shortly.to.open.the.pop-up. Strap.eyelet the.next.(right).item. menu..Pressing.the.button.again. closes.the.pop-up.menu. Play/Pause button •. Press.and.hold.to.switch.the.power. •. Press.to.play.a.track.or.let.it.pause. Phones.jack ON/OFF. •. Press.while.the.menu.is.displayed.to. •. Press.when.the.display.is.turned.off. enter.a.selected.item. (screen.saver.mode).to.turn.on.the. •. Also.used.to.switch.the.tuning.mode. display. during.FM.broadcast.reception. Multi-control button VOLUME button Up button •. -
Page 7: Flow For Music Playback
Flow for music playback Screen display items Home screen Pop-up menu Loading.the.battery.(page.8) Connecting.stereo.headphones.(page.9) Preparation Canceling.the.HOLD.function.(page.9) Switching.Power.ON.(page.9) Recharging.Battery/.Connecting.a.PC.(page.10) To Home screen Artist (page 14) SPRM (page 23) Album (page 14) Sound mode (page 23) Track (page 14) Play mode Preparation of (page 17) Favorite (page 14) -
Page 8: Loading The Battery
When inserting the battery, always fit the · end first. Do not insert the battery by force, as this may break the battery coating and cause short-circuiting, burst, fluid leak and/or burns. . •.Before.using.the.battery,.connect.the.Player.to.the.PC.and.fully.recharge.the.battery. •.If.. .(white).is.displayed,.connect.the.Player.to.the.PC.to.recharge.the.battery. •.Always.use.the.NB-3A90.rechargeable.battery.that.is.provided.but.also.available.optionally.. Never.attempt.to.recharge.a.battery.other.than.the.dedicated.battery.from.Kenwood. •.If.you.use.a.dry.cell.battery,.use.an.alkaline.battery..Normal.operation.may.not.be.possible.if.a. manganese.battery.is.used. English... -
Page 9: Connecting Stereo Headphones
Connect the provided stereo headphones to the Player. Switch the Player ON. Press and hold the Power/Menu button until the KENWOOD logo is displayed. The Player enters the mode before the last time it was switched OFF. Switch the Player OFF. -
Page 10: Recharging Battery/ Connecting A Pc
The battery is nearly exhausted. Recharge it if it is rechargeable. . •.All.of.the.above.specified.PC.environment.does.not.guarantee.full.operation.of.the.Player. (Red) The battery is not inserted or not rechargeable. •.. U se.a.PC.in.which.either.OS.mentioned.above.is.preinstalled..Operation.is.not.guaranteed.on.a. (ON) The indicator lights during recharging. PC.running.an.upgraded.OS.or.a.PC.assembled.by.yourself. (OFF) The indicator is extinguished when recharging completes. Recharging.completes.in.about.3.hours. . •.The.Player.can.recharge.only.the.NB-3A90.rechargeable.battery.that.is.provided.but.also. available.optionally..Never.attempt.to.recharge.a.battery.other.than.the.dedicated.battery.from. Kenwood. English... -
Page 11: Disconnecting.the.player.from.the.pc
Connecting a PC/Recharging Battery Disconnecting the Player from the PC Click the [Safe To Remove Hardware] icon. Click [Safely remove USB Mass Storage Device]. When the message showing that the Player can be disconnected safely, disconnect it from ∞ the PC. . -
Page 12: Capturing Music In Pc
Capturing Music in PC Using Windows Media Player 10/9 To play music files as tracks of this Player, first rip music files in the PC. A.music.CD.can.be.ripped.into.the.PC.using.the.Windows.Media.Player.10/9. The Player can play the following three types of music files. (The.following.steps.describes.the.operation.with.the.Windows.Media.Player.10.) • MP3 (*.mp3) : MPEG-1 Audio Layer-3 Sampling frequency 44.1 KHz Launch the Windows Media Player. -
Page 13: Transferring Music From Pc
Transferring Music from PC Data transfer by drag & drop The obtained music files can then be transferred to the Player. Open.the.Windows.Explorer.and.drag.&.drop.the.desired.file.from.the.PC’s.hard.disk.drive. Using Windows Media Player 10/9 to. this. Player. (expressed. as. [KENWOOD_DAP]. on.Windows).. Copy. &. paste. can. also. be. (The.following.steps.describes.the.operation.with.the.Windows.Media.Player.10.) used.for.data.transfer. -
Page 14: Selecting Music For Playback
Selecting music for playback Select and play the desired track. Select a major item ("Album", for example). Select Artist name = Album title = Track title. Artist Press the Right button to enter the selection. Select Album title = Track title. Album The list for the major item (intermediate items) is displayed. -
Page 15: Display During Playback
Display during playback Selecting music for playback The display shows various information during playback. Play a track ("Track 2", for example). Playback starts with the track selected in step 7 of the intermediate item selected in step 6. In this example, playback starts with "Track 2" in "Album 2". -
Page 16: Operations Available During Playback
Operations available during playback To skip an item: Played tracks can be skipped on a per-item basis as shown below. Artist skip Skips to the tracks of the next (Artist skip+) or previous (Artist skip-) artist. Album skip Skips to the tracks of the next (Album skip+) or previous (Album skip-) album. Up button Genre skip Skips to the tracks of the next (Genre skip+) or previous (Genre skip-) genre. -
Page 17: Various Play Modes
Various play modes Favorite One of the following six play modes can be selected. Tracks you are particularly fond of can be registered in the Favorite folder for playing only the favorite tracks later. Playback stops after having played the tracks in the list. Repeat one Playback of the same track repeatedly. -
Page 18: Selecting Fm Broadcasting
Display for FM reception Selecting FM broadcasting The Player can be used to receive FM broadcasting. The FM radio display shows various information. Tuning.mode Open the home screen. (page.19) Press and hold the Left button Auto:.Auto.tuning until the home screen appears. Manual:.Manual.tuning Preset:.Preset.tuning Stereo/Monaural... -
Page 19: Tuning A Fm Station
Tuning a FM station Auto tuning Manual tuning Tunable FM stations can be searched automatically. FM stations can be searched manually. Select the auto tuning mode. Select the manual tuning mode. Each press of the button switches the tuning Each press of the button switches the tuning mode in order of "Auto"... -
Page 20: Preset.tuning
Tuning a FM station Preset tuning FM stations can be preset and recalled later. Select the preset tuning mode. Each press of the button switches the tuning mode in order of "Auto" = "Manual" = "Preset". Select a preset number. : Recalls the previous preset number. -
Page 21: Presetting Fm Stations
Presetting FM stations Presetting by auto tuning Presetting by manual tuning The following steps makes it possible to search the FM stations with good reception The following steps make it possible to preset FM stations individually in desired preset conditions automatically and preset them together. (Auto preset) numbers so that the preset stations can later be recalled using the preset numbers. -
Page 22: Deregistering.a.preset.fm.station
Monaural reception Presetting FM stations Deregistering a preset FM station Stereo broadcasting can also be received in monaural. When the reception condition of an FM station is poor, the reception can sometimes be Preset FM stations can be deregistered as follows. improved and noise reduced by receiving it in monaural. -
Page 23: Adjusting The Audio
Selecting the sound effects Adjust the listening volume as follows. Select one of the 9 modes. SPRM Kenwood-original tone improvement technology, which creates (Supreme) realistic sound by interpolating the high-frequency components Select the volume level. that are lost in MP3 or WMA audio compression. - Page 24 Volume and tone adjustments To select "CUSTOM": Select "On". Select the frequency band to be adjusted. To select "Sound mode": Set the response level. Select "Sound mode". Set the response levels of other frequency bands by repeating steps 4 and 5 for each. Enter the selection.
-
Page 25: Viewing Files
Viewing files The list of the music files stored in the Player can be displayed. Root Folder Audio.data (PDF.file) Select "Folder". Select the folder in the lower level. A list of music files in the selected folder will be displayed. . -
Page 26: Deleting Tracks
Deleting tracks The music files transferred from the PC to the Player can be deleted from the Player. Select "Delete file". Select "Folder". Confirm the selection. Select the track (music file) to be deleted. Display the pop-up menu. . •.Once.deleted,.the.music.file.cannot.be.restored.again..Be.cautious.when.deleting.a.music.file. •.The.music.files.can.also.be.deleted.from.the.PC. -
Page 27: Sleep Timer And Alarm Timer
Sleep timer and alarm timer The sleep timer makes it possible to switch the Player OFF after the set period of time. Specify the timer period. The alarm timer makes it possible to generate an alarm (beep tone) after the set period Set in the range from 1 to 120 minutes, in 1- of time. -
Page 28: Various Setups
Various setups Function items that can be set The functions such as the button illuminations, display resume function and Auto • Button illumination brightness • Operation tone (Beep) Power OFF function can be set up as required. (Illumination) Select.whether.or.not.a.beep.is.generated. Select.the.brightness.level.of.the.indicators. when.a.button.is.pressed. -
Page 29: Setting The Menu Language
Setting the menu language Select the language used for the display. Open the home screen. Press and hold the Left button until the home screen appears. Open the Settings menu. Select "Settings". Open the language list. Select "Language". Select the language. Select the desired language. -
Page 30: Initialization/Formatting
Initialization/Formatting Formatting can be used to delete all of the music and other files stored in the Player. Select "Format" or "Initialize". Initialization resets the settings made using the Settings menu, etc. to the default settings made at the factory. Caution • Formatting deletes all of the files in the Player. It also deletes demonstration music, which cannot be restored later. -
Page 31: Connection Of External Components
Connection of external components The headphone jacks can be used to connect an external component such as a speaker Connecting to the USB connector with built-in amplifier. USB-compatible.stereo The USB connector can be used to connect an external component such as a stereo set with USB capability. -
Page 32: Digital Audio Player Link
Digital Audio Player Link When the Player is connected to a Kenwood audio component with the Digital Audio Player Link compatibility, playback of the Player can be controlled from the external audio component. Digital.Audio.Player.Link- compatible.stereo Digital.audio.input Special.cable 1.Switch.the.Player.ON. 2.Set.the.input.selector.of.the.connected.stereo.set.to."Digital.Audio". •. The.Player.operations.including."Play/Pause",."Skip.Up/Down".and."Folder.Skip.(Item.Skip)".can. -
Page 33: Glossary
Message Remedy An. international. data. compression. standard. of. MPEG,. which. is. a. working. group. in. ISO. System error An error occurred in the operation of the Player. Consult your Kenwood dealer. (International.Standardization.Organization)..It.offers.compression.rates.between.about.1/10. and.1/12. File system error An error occurred in the file system of the Player. -
Page 34: Troubleshooting
Select the storage mode. switched.ON,.it.switches.OFF.spontaneously.or.the.display.is.erroneous. USB cable is defective. For.details,.refer.to.the.support.information.in.our.website.by.visiting: Purchase and use another USB cable. http://www.kenwood.com/ The Player is connected to the PC improperly. Check the connection between the Player and PC. Symptom Remedy The player is connected to a USB hub. -
Page 35: Specifications
Specifications Built-in flash memory Battery type Playback format •. Kenwood.follows.a.policy.of.continuous. advancements.in.development...For.this. :.1.GB.* :.AAA.size.Ni-MH.rechargeable. reason.specifications.may.be.changed. battery Sampling.rate:.44.1.kHz Headphone output without.notice.. :.AAA.(LR03).size.alkaline.battery Bit.rate:.64.-.320.kbps :.3.5.mm.stereo.mini.jack •. The.full.performance.may.not.be. Variable.bit.rate:.64.-.320.kbps Battery operation time * :.4.5.+.4.5.mW/.16.Ω exhibited.in.an.extremely.cold.location. ID3.tag:.ver..2.2/.2.3/.2.4 Rechargeable battery operation (under.a.water-freezing.temperature). Interface WMA (DRM compatible) *1..