Cisco 7912 - TEKELEC Manual
Hide thumbs
Also See for 7912 - TEKELEC:
- Quick start manual (12 pages) ,
- User manual (10 pages) ,
- User documentation (5 pages)

Related Manuals for Cisco 7912 - TEKELEC


Summary of Contents for Cisco 7912 - TEKELEC
- Page 1 620-05600350 — Release 5.6.2 7912 T ISCO ELEPONE UIDE www.tekelec.com...
- Page 2 Tekelec, Inc. 3605 E. Plano Parkway, Suite 100 Plano, TX 75074 2005 Tekelec, Inc. All rights reserved. T100, T300, T6000, T7000, T8000, and T9000 are trademarks of Tekelec, Inc. Trademarks of Tekelec, Inc. include: • Tekelec, Inc. • Tekelec • dryISE •...
-
Page 3: Table Of Contents
1 Your Cisco Telephone Introduction ....................1 Accessing Phone Features ................... 1 In This Manual ....................... 1 Telephone Description ................1 Cisco 7912G Features Table ..............2 Moving Your Telephone ................3 2 Basic Phone Features Adjusting the Display Contrast ..............5 Adjusting the Handset Volume ..............5 Adjusting the Speaker Volume ..............6... - Page 4 Deleting Records in the Directories ..............11 Deleting All Records in a Directory..............11 Deleting Individual Records in a Directory............. 11 3 System Telephone Features Feature Activation Digit ................13 Abbreviated Dial ..................13 Creating an Abbreviated Dial Code ..............13 Using an Abbreviated Dial Code .................
- Page 5 Call Forward (Out of Service) ..............25 Enabling Call Forward (Out of Service) ............... 25 Disabling Call Forward (Out of Service) .............. 26 Call Pickup ....................26 Directed Call Pickup .................... 26 Using the Phone .................... 27 Using Star Codes ..................27 Group Call Pickup ....................
- Page 6 To join a Meet-Me Conference ..............35 Silencing Announcements ................36 Dialing In Too Early ..................37 Entering an Incorrect ID................. 37 Extending the Conference Duration .............. 38 Roll Call ......................38 Adding More Ports to an Active Meet-Me Conference ........38 Dropping a Conference Call ................
- Page 7 Managing the Access Code ................51 Changing the Access Code ................51 Listening to Access Code ................52 Managing the Selective Caller List ..............52 Adding to the List................... 52 Listening to the List..................52 Deleting from the List..................53 Redial ......................
- Page 8 Accessing Your Voice Mail ..............68 …from your phone....................68 …from any other internal phone ................69 …from any outside touchtone phone ..............69 Dialing Main Number ..................69 Dialing Your Telephone ................. 70 …from the email program on your PC..............70 Using Controls While Playing Messages ..........
- Page 9 Delete a Group Member ................81 Play the Group Name ..................82 Change the Group Name ................82 Deleting a Group ....................82 Listening to a List of Distribution Groups:............83 Exiting the Voice Mail System ..............83 5 Voice Mail Features (Option A Menu) Menus and Commands ................85 Accessing Your Voice Mail ..............
- Page 10 Personal Greetings ...................98 Recording Personalized Mailbox Greetings ............98 Listening to Your Greetings ................. 99 Receiving Pager Notification ..............99 What You Receive on Your Pager/Cell Phone ............ 99 Managing Distribution Groups .............. 100 Creating a New Group..................101 Editing or Modifying a Group ................101 List All Group Members ................
- Page 11 Zeroing Out to a Custom Operator ............114 Replaying a Message ................115 Saving a Message ................... 115 Skipping to the Next Message ............... 115 Deleting a Message ................115 Forwarding a Message to Another Mailbox ......... 115 Replying to a Message ................116 Dialing Back a Caller ................
- Page 12 Table of Contents...
-
Page 13: Your Cisco Telephone
Chapter 7 discusses setting up Outlook for TAPI. Telephone Description The Cisco IP phone is a full-featured telephone that provides voice communication over an IP network. The phone functions much like a traditional analog phone, allowing you to place and receive telephone calls. The phone also supports features such as call forwarding, redialing, speed dialing, transferring calls, conference calls, and accessing voice mail. -
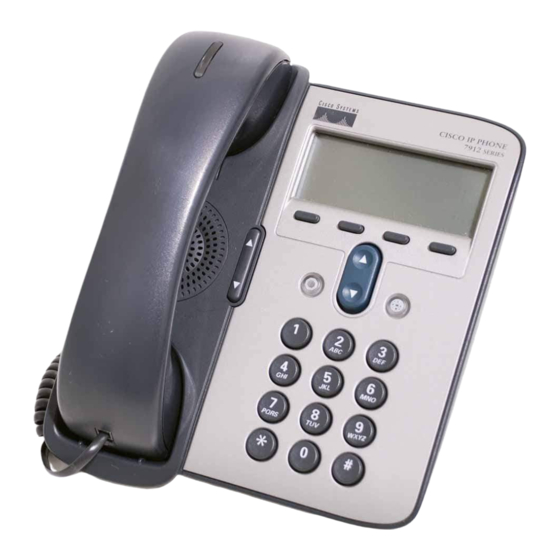
Page 14: Cisco 7912G Features Table
System Menu LCD Scroll or Speed Dial Menu when phone is idle. Dial Pad Figure 1: Cisco 7912G Telephone Cisco 7912G Features Table Features Descriptions LCD screen Displays features such as the time, date, your phone number, caller ID, line/call status, and softkey tabs. -
Page 15: Moving Your Telephone
Plug the telephone into the LAN connection jack and the power adapter into a wall outlet. Watch to ensure that the phone registers and boots up properly. If it does not, contact your system administrator. Cisco 7912 Telephone User Guide Your Cisco Telephone 620-05600350... - Page 16 Moving Your Telephone Your Cisco Telephone Cisco 7912 Telephone User Guide 620-05600350...
-
Page 17: Basic Phone Features
Press and release the up or down VOLUME button to adjust the volume as desired. TIP: A horizontal scale displays on the phone to indicate the volume level. To save the volume setting for future calls, press Save. Cisco 7912 Telephone User Guide Basic Phone Features 620-05600350... -
Page 18: Adjusting The Speaker Volume
Press Exit to exit the Setting menu. Answering Calls Your Cisco phone allows you to answer calls while the phone is idle or while you are already in a conversation. It is also easy to switch back and forth between calls. -
Page 19: Answering A Second Call (Call Waiting)
Replace the handset in its cradle. • Press the EndCall soft key. TIP: Using the EndCall key allows you to end a call without having to hang up the handset. You can then place another call. Cisco 7912 Telephone User Guide Basic Phone Features 620-05600350... -
Page 20: Making A Call
After the second call answers, you may switch to the call that is on hold by using the scroll key to select the other call, and pressing the Hold key. Basic Phone Features Cisco 7912 Telephone User Guide 620-05600350... -
Page 21: Monitoring A Call Hands-Free
Using the Hold Button NOTE: If your Cisco 7912 phone has a line appearance on another phone (such as a receptionist or secretary), then you will not be able to make a new call or answer an incoming call when your line is in use on the other phone. -
Page 22: Selecting A Ringer Sound
11. Press Exit to exit the Setting menu. Using the Call Directory The Cisco IP Phone maintains a directory of calls you miss, receive, or make. You can use this directory to locate numbers you want to redial. These sections... -
Page 23: Deleting Records In The Directories
Use the Navigation button to scroll through the records to find the one to delete. Press Delete. Repeat until you have deleted all the desired records. Press Exit twice or press the Menu button to exit the Directories. Cisco 7912 Telephone User Guide Basic Phone Features 620-05600350... - Page 24 Using the Call Directory Basic Phone Features Cisco 7912 Telephone User Guide 620-05600350...
-
Page 25: System Telephone Features
A voice prompt will lead you through the remaining steps. Press 1 to program (set) the Abbreviated Dial code. Press the digits (00-99) you wish to use as the Abbreviated Dial code or enter * to exit. Cisco 7912 Telephone User Guide System Telephone Features 620-05600350... -
Page 26: Using An Abbreviated Dial Code
Press # to save the changes or * to exit without saving. Program or verify another Abbreviated Dial code or hang up to exit. System Telephone Features Cisco 7912 Telephone User Guide 620-05600350... -
Page 27: Deleting An Abbreviated Dial Code
Disabling Anonymous Call Rejection Press *87 on the telephone keypad. Press the Dial soft key or pickup the handset. Hang up. Cisco 7912 Telephone User Guide System Telephone Features 620-05600350... -
Page 28: Authorization Code Calling
Call Block (also known as Selective Call Rejection) allows you to program your phone to reject calls from a list of telephone numbers. All calls from phones on the list receive a message which says you are not accepting calls. System Telephone Features Cisco 7912 Telephone User Guide 620-05600350... -
Page 29: Enabling/Disabling Call Block
Select a menu item or hang up. NOTE: Adding a number this way does not affect any numbers already on your list, but simply adds the most recent caller to your blocked list. Cisco 7912 Telephone User Guide System Telephone Features 620-05600350... -
Page 30: Adding Numbers To Call Block List
Press 5 to delete telephone numbers from the list of numbers which will be blocked. The voice prompt provides options for deleting members including: • Press 1 if you know the number to delete; (see Step 4) System Telephone Features Cisco 7912 Telephone User Guide 620-05600350... -
Page 31: Call Forward (All Calls)
“ping ring” when a call comes in to the phone. The “ping ring” is provided to remind you that your phone is forwarded to another number. Cisco 7912 Telephone User Guide System Telephone Features... -
Page 32: Enabling Call Forward (All)
Enter the number to which you want to forward all your calls. Be sure to enter the number exactly as you would if you were to call that number. Include the area code, if necessary. The display shows the number as it is entered. Press #. System Telephone Features Cisco 7912 Telephone User Guide 620-05600350... -
Page 33: Disabling Call Forward (All)
Call Forward (Busy) allows you to forward calls arriving at your phone while it is busy to be forwarded to the number you enter. Calls will not ring at your phone and will be sent to the number entered as the forward destination. Cisco 7912 Telephone User Guide System Telephone Features 620-05600350... -
Page 34: Enabling Call Forward (Busy)
If you pressed #, you are offered the option to verify the forwarding number. • Press 1 to verify the number you entered. • Press 2 to enable the number. Go to step 8. If you pressed 1, the forwarding number is dialed. System Telephone Features Cisco 7912 Telephone User Guide 620-05600350... -
Page 35: Disabling Call Forward (Busy)
External forwarding must be supported by your system for external numbers to be accepted. Be sure to include the access code for an outside line and the area code, if necessary, with the external number. Up to 20 digits may be entered. Cisco 7912 Telephone User Guide System Telephone Features 620-05600350... -
Page 36: Enabling Call Forward (No Answer)
Answering machine or voice mail answers: Press # to escape, and then press # to enable the forwarding number or * to exit without enabling forwarding. Call forward (no answer) is enabled. System Telephone Features Cisco 7912 Telephone User Guide 620-05600350... -
Page 37: Disabling Call Forward (No Answer)
If you previously configured a forwarding number, you will be instructed to do one of the following: • Press 1 to enable forwarding. Go to step 8. • Press 2 to change the current forwarding number. Go to step 2. Cisco 7912 Telephone User Guide System Telephone Features 620-05600350... -
Page 38: Disabling Call Forward (Out Of Service)
Both phones must be members of the same Directed Call Pickup Group. Your system administrator should tell you if you are in a pickup group and who the members are. System Telephone Features Cisco 7912 Telephone User Guide 620-05600350... -
Page 39: Using The Phone
Using this feature dials the telephone number of the last incoming call. However, if the caller is shown as “Unknown”, then Call Return will not work. Press *69 on the telephone keypad. Press the Dial soft key or pickup the handset. Cisco 7912 Telephone User Guide System Telephone Features 620-05600350... -
Page 40: Call Trace
To answer a second call without ending the current call, press the Answer softkey. The first call is placed on hold and you will be connected to the new incoming call. System Telephone Features Cisco 7912 Telephone User Guide 620-05600350... -
Page 41: Switching Between Held Calls
2 - “Please Hold” feature to put the call on hold. Pressing 1 or 3 for an incoming call for the other line-appearance will disconnect Cisco 7912 Telephone User Guide System Telephone Features 620-05600350... -
Page 42: Caller Id Block
• To transfer a conference call to another telephone, press the Transfer key. Dial the number to which you want to transfer the call and then press Transfer key again. System Telephone Features Cisco 7912 Telephone User Guide 620-05600350... -
Page 43: Dial Tone And Ringer Patterns
Enter your password, followed by the # key. The phone is now programmed to be your phone and your old phone is removed from service. Cisco 7912 Telephone User Guide System Telephone Features 620-05600350... -
Page 44: Re-Establishing The Guest Phone
The same star code is used to enable and disable Do Not Disturb since you are switching between the on and off mode for this feature. Press *04 on the telephone keypad. Press the Dial soft key or pickup the handset. System Telephone Features Cisco 7912 Telephone User Guide 620-05600350... -
Page 45: End Call
3 short rings sound from the phone speaker, even if you are using the handset. This is to remind you that you have a call on hold. For more details on handling two calls at once, see “Switching Between Held Calls” on page 29. Cisco 7912 Telephone User Guide System Telephone Features 620-05600350... -
Page 46: Hold-On Queuing
Check with your system administrator to find out if you are authorized to schedule Meet-Me Conferences. The default internal access number is 523, but check with your system administrator if the default does not work for your system. If a DID System Telephone Features Cisco 7912 Telephone User Guide 620-05600350... -
Page 47: Joining A Meet-Me Conference
If you do not complete this step within 5 seconds, you will be connected to the conference without being identified. Within the 5 seconds, you may press the * key to cancel the current recording and start the recording over. Cisco 7912 Telephone User Guide System Telephone Features 620-05600350... -
Page 48: Silencing Announcements
Starts Soon to Active. conference. The conference There are additional callers You are connected to the reservation state changes connected to the conference. from Starts Soon to Active. conference. System Telephone Features Cisco 7912 Telephone User Guide 620-05600350... -
Page 49: Dialing In Too Early
ID or press the * key to end the call. If you pressed 1, do the following: Enter the ID of the conference you wish to join. Press the # key. Cisco 7912 Telephone User Guide System Telephone Features 620-05600350... -
Page 50: Extending The Conference Duration
However, the meet-me conference reservation remains in effect and partitipants can be invited to re-join the conference by dialing the meet-me conference number and entering the appropriate guest ID. System Telephone Features Cisco 7912 Telephone User Guide 620-05600350... -
Page 51: Muting A Conference Call
If you are a member of a meet-me conference you can ask to be recognized or respond to a moderator’s question by raising and lowering your hand - in a virtual manner. • Press #8 to raise your hand Cisco 7912 Telephone User Guide System Telephone Features 620-05600350... -
Page 52: Scheduling A Meet-Me Conference
Write down this information. It should also be displayed across your display telephone. 11. Do one of the following: • Press 1 to hear the information again, or • Press * to return to the Meet-Me Conference setup menu, or System Telephone Features Cisco 7912 Telephone User Guide 620-05600350... -
Page 53: Canceling A Meet-Me Conference
Enter the two-digit year of the conference, followed by the # key. Enter the two-digit month of the conference, followed by the # key. Enter the two-digit day of the conference, followed by the # key. Cisco 7912 Telephone User Guide System Telephone Features 620-05600350... -
Page 54: Getting A List Of Meet-Me Conferences
Once the call is parked, the line is free again. Parking a Call Tell the caller that you are going to place them on hold. Press the more soft key until the Park soft key is displayed. System Telephone Features Cisco 7912 Telephone User Guide 620-05600350... -
Page 55: Retrieving A Parked Call
Mute The Cisco 7912G model phone does not support a mute function with a specific Mute button. However, you can monitor a call over the phone speaker where the called party cannot hear you. See “Monitoring a Call Hands-Free” on page 9 for more information. -
Page 56: Permanent Caller Id Block Release
NOTE: Once you have assigned your phone number to your phone, you may be required to change your password. If not, it is recommended that you change it for security. System Telephone Features Cisco 7912 Telephone User Guide 620-05600350... -
Page 57: Ip Address/Phone Number Announcement
Changing the Extension Number The extension number assigned to a phone may be changed using Phone Configurator. To change the extension number, dial 588 and follow the instructions. Cisco 7912 Telephone User Guide System Telephone Features 620-05600350... -
Page 58: Unassigning The Extension Number
Press *61. Press the Dial soft key or pickup the handset. A voice prompt tells you whether Priority Call is enabled or disabled and then gives the menu choices. System Telephone Features Cisco 7912 Telephone User Guide 620-05600350... -
Page 59: Adding Members To The Priority Call List
Deleting Priority Call Members Press *61. Press the Dial soft key or pickup the handset. A voice prompt tells you whether Priority Call is enabled or disabled and then gives the menu choices. Cisco 7912 Telephone User Guide System Telephone Features 620-05600350... - Page 60 14. Press 3 to immediately delete all member numbers. The voice prompt announces that all phone numbers have been removed from the list and you are returned to the Priority Call menu. System Telephone Features Cisco 7912 Telephone User Guide 620-05600350...
-
Page 61: Privacy Guard
Caller ID information was not received. They are instructed to do one of the following: • Press 1 to enter an access code. • Press 2 to record their name so that the call can be announced, . Cisco 7912 Telephone User Guide System Telephone Features 620-05600350... -
Page 62: Entering An Access Code
NOTE: Option 3 will be available if you have a voice mail button on your telephone for your voice mail mailbox or for another voice mail mailbox, such as the main number (attendant phone) or another person’s mailbox (executive assistant System Telephone Features Cisco 7912 Telephone User Guide 620-05600350... -
Page 63: Enabling/Disabling Privacy Guard
Enter the Access Code by pressing the desired digit keys on the telephone keypad. Press # to save the entry or * to exit without saving. Select a menu item or hang up. Cisco 7912 Telephone User Guide System Telephone Features 620-05600350... -
Page 64: Listening To Access Code
Press # to hear the next number. Continue pressing # until you have heard all the numbers. When you reach the end of the list, the system will take you back to the beginning of the list. System Telephone Features Cisco 7912 Telephone User Guide 620-05600350... -
Page 65: Deleting From The List
There is no confirmation for deleting all numbers in the Selective Call List. As soon as you press 3 all numbers are deleted. Be very sure this is what you want to do before pressing 3. Select a menu item or hang up. Cisco 7912 Telephone User Guide System Telephone Features 620-05600350... -
Page 66: Redial
Enter the new forwarding number followed by the # key. Enter the number as if you were dialing it, including the area code if necessary. You hear an announcement that the forwarding number has been changed and the call is idled. System Telephone Features Cisco 7912 Telephone User Guide 620-05600350... -
Page 67: Canceling Remote Forwarding
Phone and advises you to hang up the phone and try again. Until you hang up the phone and disconnect from the Remote Phone feature, you will receive the announcement. There are two ways to enable the Remote Phone feature: Cisco 7912 Telephone User Guide System Telephone Features 620-05600350... -
Page 68: Dial-In Setup Of Remote Phone
VoIP phone number on the Caller ID, you will know that it is an incoming remote call. You can also set the number of seconds the phone will ring unanswered before the call is redirected to voice mail or other destination. System Telephone Features Cisco 7912 Telephone User Guide 620-05600350... -
Page 69: Deactivating Remote Phone Via Web Portal
If you set up Remote Phone from the Web Portal, and you do not answer so Find- Me takes over, then Remote Phone mode will remain enabled and the next call coming in will also ring the remote phone. Cisco 7912 Telephone User Guide System Telephone Features 620-05600350... -
Page 70: Selective Call Forward
Press 1 to enable Selective Call Forward if it is disabled or to disable the feature if it is enabled. Hang up. Entering the Forwarding Destination Number Press *63 or *83. Press the Dial soft key or pickup the handset. System Telephone Features Cisco 7912 Telephone User Guide 620-05600350... -
Page 71: Identifying The Forwarding Destination Number
Press 5 to list telephone numbers of members who will be forwarded. Press # to hear the next number or press * to return to the Selective Call Forward menu. Cisco 7912 Telephone User Guide System Telephone Features 620-05600350... -
Page 72: Deleting Forwarded Phone Numbers
10. Press # until you find the number you wish to delete. 11. Press 1 to delete the number. The number is deleted immediately and the next number in the list is announced. System Telephone Features Cisco 7912 Telephone User Guide 620-05600350... -
Page 73: Speed Dial
) button. Use the Navigation button to scroll to Directories. Press Select. TIP: As a shortcut, press 2 on the keypad. Use the Navigation button to scroll to Speed Dial. Press Select. Cisco 7912 Telephone User Guide System Telephone Features 620-05600350... -
Page 74: Modifying A Speed Dial Number
They may be changed by your system administrator to meet the needs of your company. Any list of feature codes given to you by your system administrator should be used in place of the codes listed here. System Telephone Features Cisco 7912 Telephone User Guide 620-05600350... -
Page 75: Transfer
Use this feature to transfer a call to another number. Tell the calling party you will transfer the call, then press the more soft key. Press the transfer (Trnsfr) soft key. Cisco 7912 Telephone User Guide System Telephone Features 620-05600350... - Page 76 Press the HOLD button to cancel the transfer and return to the holding party, or • Hang up or press the EndCall soft key and let the call transfer to the called party’s voice mail. System Telephone Features Cisco 7912 Telephone User Guide 620-05600350...
-
Page 77: Voice Mail Features (Default Menu)
Greeting List” on page 67) Record personal greetings (for options see “Voice Mail Personal Greeting List” on page 67) Access personal distribution groups (for options see “Voice Mail Distribution List” on page 67) Cisco 7912 Telephone User Guide Voice Mail Features (Default Menu) 620-05600350... - Page 78 Fast Forward to the End Skip to Previous Menu Options NOTE: If you are listening to the introductory message and you press *, you will exit from voice mail. Voice Mail Features (Default Menu) Cisco 7912 Telephone User Guide 620-05600350...
- Page 79 Change message (re-record) Review message (listen to recorded message) Set message options (for options see “Voice Mail Message Options List” on page 68) Return to main voice mail menu (star) Cisco 7912 Telephone User Guide Voice Mail Features (Default Menu) 620-05600350...
-
Page 80: Accessing Your Voice Mail
Any touchtone phone outside your office. • The email program on your PC (password required) …from your phone Press the Messages button or dial *09 to access your voice mail system. Voice Mail Features (Default Menu) Cisco 7912 Telephone User Guide 620-05600350... -
Page 81: From Any Other Internal Phone
Enter your extension number. You will be prompted to enter your password. Enter your numeric password, followed by the # key. Cisco 7912 Telephone User Guide Voice Mail Features (Default Menu) 620-05600350... -
Page 82: Dialing Your Telephone
…from the email program on your PC Open your email reader. Open the email message containing the voice mail. Open the attachment in the email message. Voice Mail Features (Default Menu) Cisco 7912 Telephone User Guide 620-05600350... -
Page 83: Using Controls While Playing Messages
If you want to forward to the end of a message: • Press 99. Pause Play of a Message To pause play of a message or to resume play of a paused message: Cisco 7912 Telephone User Guide Voice Mail Features (Default Menu) 620-05600350... -
Page 84: Composing Messages Before Sending
• Press * to return to the voice mail main menu If you pressed any key from 1 -4, you are returned to the Compose Message menu (step 6). Voice Mail Features (Default Menu) Cisco 7912 Telephone User Guide 620-05600350... -
Page 85: Marking A Message As Urgent
Otherwise listen to your messages and then follow the above steps. Skipping the Mail Menu to Hear Messages To immediately begin listening to voice mail, press # during the voice mail menu announcement. Cisco 7912 Telephone User Guide Voice Mail Features (Default Menu) 620-05600350... -
Page 86: Returning To The Auto Attendant Or Operator
If you pressed 2, listen to the announcement that your default custom operator has been restored. If you pressed *, listen to the voice mail main menu. Voice Mail Features (Default Menu) Cisco 7912 Telephone User Guide 620-05600350... -
Page 87: Replaying A Message
(date, time, etc.) remains in the inbox listing until you exit voice mail. Forwarding a Message to Another Mailbox To forward a voice mail message to another mailbox, follow these steps: Cisco 7912 Telephone User Guide Voice Mail Features (Default Menu) 620-05600350... -
Page 88: Replying To A Message
• Press 3 to review reply. • Press 9 to mark urgent and reply. • Press * to cancel the reply and re-record. You hear the message options again. Voice Mail Features (Default Menu) Cisco 7912 Telephone User Guide 620-05600350... -
Page 89: Dialing Back A Caller
TIP: When you create your greeting be sure to tell the caller they can dial zero (0) to reach either the automated attendant or the person you have pro- grammed to answer “zero out” calls. Cisco 7912 Telephone User Guide Voice Mail Features (Default Menu) 620-05600350... -
Page 90: Recording Personalized Mailbox Greetings
• Cell phones support voice streaming. • Some cell phone models can receive text-only e-mails. • E-mail pagers can accept text-only e-mail messages. You may choose to be alerted: Voice Mail Features (Default Menu) Cisco 7912 Telephone User Guide 620-05600350... -
Page 91: What You Receive On Your Pager/Cell Phone
The “Everyone” group is updated whenever a mailbox assigned to the customer partition is added or deleted. The following options are available when you access the distribution groups menu item: Cisco 7912 Telephone User Guide Voice Mail Features (Default Menu) 620-05600350... -
Page 92: Creating A New Group
Enter the number of the group to be edited. Press a number to select an option from the edit menu: • List all members - press 1 • Add a member - press 2 Voice Mail Features (Default Menu) Cisco 7912 Telephone User Guide 620-05600350... -
Page 93: List All Group Members
Press the # sign. • The extension number you entered is played back to you for confirmation. Press the # key to delete the user or * key to cancel. Cisco 7912 Telephone User Guide Voice Mail Features (Default Menu) 620-05600350... -
Page 94: Play The Group Name
Press # to finish the delete or press * to cancel the delete process and return to the distribution group menu. NOTE: To delete group (corporate or company) distribution lists, you must be in the mailbox for your company's main number. Voice Mail Features (Default Menu) Cisco 7912 Telephone User Guide 620-05600350... -
Page 95: Listening To A List Of Distribution Groups
NOTE: To list all group (corporate or company) distribution lists, you must be in the mailbox for your company's main number. Exiting the Voice Mail System To exit the voice mail system, simply hang up. Cisco 7912 Telephone User Guide Voice Mail Features (Default Menu) 620-05600350... - Page 96 Exiting the Voice Mail System Voice Mail Features (Default Menu) Cisco 7912 Telephone User Guide 620-05600350...
-
Page 97: Voice Mail Features (Option A Menu)
Record personal greetings (for options see “Voice Mail Personal Greeting List” on page 88) Access personal distribution groups (for options see “Voice Mail Distribution List” on page 88) Change password Cisco 7912 Telephone User Guide Voice Mail Features (Option A Menu) 620-05600350... - Page 98 Replay message Forward Delete Reply Save Call originator Table 2: Voicemail Message Handling Controls Before Mail After Mail During Mail Feature Message Message Message Rewind Rewind to beginning Voice Mail Features (Option A Menu) Cisco 7912 Telephone User Guide 620-05600350...
- Page 99 Go to Next Message Rewind Rewind to the beginning Pause/Resume Fast Forward Fast Forward to the end 33 or # Replay message Forward Delete Reply Save Call originator Cisco 7912 Telephone User Guide Voice Mail Features (Option A Menu) 620-05600350...
- Page 100 Change message (re-record) Review message (listen to recorded message) Set message options (for options see “Voice Mail Message Options List” on page 89) Return to main voice mail menu (star) Voice Mail Features (Option A Menu) Cisco 7912 Telephone User Guide 620-05600350...
-
Page 101: Accessing Your Voice Mail
The email program on your PC (password required) …from your phone Press the Messages button or dial *09 to access your voice mail system. Enter your password (if required). Cisco 7912 Telephone User Guide Voice Mail Features (Option A Menu) 620-05600350... -
Page 102: From Any Other Internal Phone
Enter your extension number. You will be prompted to enter your password. Enter your numeric password, followed by the # key. Voice Mail Features (Option A Menu) Cisco 7912 Telephone User Guide 620-05600350... -
Page 103: Dialing Your Telephone
…from the email program on your PC Open your email reader. Open the email message containing the voice mail. Open the attachment in the email message. Cisco 7912 Telephone User Guide Voice Mail Features (Option A Menu) 620-05600350... -
Page 104: Using Controls While Playing Messages
If you want to forward to the end of a message: • Press 33. Pause Play of a Message To pause play of a message or to resume play of a paused message: Voice Mail Features (Option A Menu) Cisco 7912 Telephone User Guide 620-05600350... -
Page 105: Composing Messages Before Sending
(step 6). 10. Repeat steps 6 - 8 until you press 1 to send or * to return to the voice mail main menu or hang up. Cisco 7912 Telephone User Guide Voice Mail Features (Option A Menu) 620-05600350... -
Page 106: Marking A Message As Urgent
When you reach the main voice mail menu, press * to transfer to the main number or operator, depending on your system configuration. Voice Mail Features (Option A Menu) Cisco 7912 Telephone User Guide 620-05600350... -
Page 107: Zeroing Out To A Custom Operator
You will receive an error message if you enter an invalid number or are not allowed to enter a long distance number as your custom operator. Cisco 7912 Telephone User Guide Voice Mail Features (Option A Menu) 620-05600350... -
Page 108: Replaying A Message
Press 6. You hear a prompt to enter the number of the person(s) to whom you want to forward the message. Enter the phone number and then either: Voice Mail Features (Option A Menu) Cisco 7912 Telephone User Guide 620-05600350... -
Page 109: Replying To A Message
Press * to cancel the reply and re-record. You hear the message options again. Dialing Back a Caller To dial a caller who left a message (if Caller ID information is available): Press 88. Cisco 7912 Telephone User Guide Voice Mail Features (Option A Menu) 620-05600350... -
Page 110: Sending A Message Directly To An Extension
Press 5 from the main voice mail menu and choose the greeting you want to record by pressing the corresponding digit key. • Press 1 to record the No Answer greeting. Voice Mail Features (Option A Menu) Cisco 7912 Telephone User Guide 620-05600350... -
Page 111: Listening To Your Greetings
Numeric - You receive the numbers you entered in the Pager Info box; when you set up the pager option with the system administrator. The number could be a code that means something to you. Cisco 7912 Telephone User Guide Voice Mail Features (Option A Menu) 620-05600350... -
Page 112: Managing Distribution Groups
The following options are available when you access the distribution groups menu item: • List all distribution groups • Create a group • Edit a group • Delete a group • Return to the main menu Voice Mail Features (Option A Menu) Cisco 7912 Telephone User Guide 620-05600350... -
Page 113: Creating A New Group
Delete a member - press 3 • Play the group name - press 4 • Change the name - press 5 • Go back to the previous menu - press *. Cisco 7912 Telephone User Guide Voice Mail Features (Option A Menu) 620-05600350... -
Page 114: List All Group Members
If you press # and the member does not exist, you will hear “The member does not exist in this group, please try again.” • If you press *, you will be asked to reenter the extension number to delete. Voice Mail Features (Option A Menu) Cisco 7912 Telephone User Guide 620-05600350... -
Page 115: Play The Group Name
Listening to a List of Distribution Groups Access the voice mail system. Press 6 for distribution groups. Press 1 to list all your groups. Listen to the playback of your groups as follows Cisco 7912 Telephone User Guide Voice Mail Features (Option A Menu) 620-05600350... -
Page 116: Exiting The Voice Mail System
NOTE: To list all group (corporate or company) distribution lists, you must be in the mailbox for your company's main number. Exiting the Voice Mail System To exit the voice mail system, simply hang up. Voice Mail Features (Option A Menu) Cisco 7912 Telephone User Guide 620-05600350... -
Page 117: Voice Mail Features (Option B Menu)
Compose a message (for options see “Voice Mail Compose List” on page 107) Mailbox Options (for options see “Voice Mail Malbox Options List” on page 108) Exit the voice mail system Cisco 7912 Telephone User Guide Voice Mail Features (Option B Menu) 105 620-05600350... - Page 118 Return to main voice mail menu Return to main voice mail menu (star) Table 4: Voice Mail Distribution List Access Code Function Hear a list of all distribution groups Voice Mail Features (Option B Menu) Cisco 7912 Telephone User Guide 620-05600350...
- Page 119 NOTE: Occassionally a return receipt may be returned without the recipient hearing the message if your message is the first new message and the recipient hangs up or skips to the next message before listening to the message. Cisco 7912 Telephone User Guide Voice Mail Features (Option B Menu) 620-05600350...
-
Page 120: Accessing Your Voice Mail
Press the corresponding digit on your phone to select the desired voice mail function. Voice Mail Features (Option B Menu) Cisco 7912 Telephone User Guide 620-05600350... -
Page 121: From Any Other Internal Phone
Press the corresponding digit on your phone to select the desired voice mail function. Cisco 7912 Telephone User Guide Voice Mail Features (Option B Menu) 620-05600350... -
Page 122: Dialing Your Telephone
Your default media player will open. • If you get an error message, the voice mail has not been recorded in a compatible file format and cannot be played. Voice Mail Features (Option B Menu) Cisco 7912 Telephone User Guide 620-05600350... -
Page 123: Using Controls While Playing Messages
If you want to forward to the end of a message: • Press 44. Pause Play of a Message To pause play of a message or to resume play of a paused message: • Press *. Cisco 7912 Telephone User Guide Voice Mail Features (Option B Menu) 620-05600350... -
Page 124: Composing Messages Before Sending
Marking a Message as Urgent To mark a message as urgent, which places it in the recipient(s) voice mailbox before any regular messages, follow these steps: Record a message. Voice Mail Features (Option B Menu) Cisco 7912 Telephone User Guide 620-05600350... -
Page 125: Changing Your Password
When you reach the main voice mail menu, press 9 to transfer to the main number or operator. Cisco 7912 Telephone User Guide Voice Mail Features (Option B Menu) -
Page 126: Zeroing Out To A Custom Operator
You will receive an error message if you enter an invalid number or are not allowed to enter a long distance number as your custom operator. Voice Mail Features (Option B Menu) Cisco 7912 Telephone User Guide 620-05600350... -
Page 127: Replaying A Message
• press ## if this is the only (or last) person to receive the forwarded message. You get a prompt to leave an introduction to the forwarded message: Cisco 7912 Telephone User Guide Voice Mail Features (Option B Menu) 620-05600350... -
Page 128: Replying To A Message
You can send a voice mail message directly to an extension without dialing their extension and having to wait for the call to roll to the voice mail system. Voice Mail Features (Option B Menu) Cisco 7912 Telephone User Guide 620-05600350... -
Page 129: Personal Greetings
• Press 3 to record the Busy greeting. • Press 4 to replace your personal greetings with the default greetings. • Press 5 to play your personal greetings. Cisco 7912 Telephone User Guide Voice Mail Features (Option B Menu) 620-05600350... -
Page 130: Listening To Your Greetings
E-mail pagers can accept text-only e-mail messages. You may choose to be alerted: • Each time you receive any voice message. • Only when you receive a message marked as urgent. Voice Mail Features (Option B Menu) Cisco 7912 Telephone User Guide 620-05600350... -
Page 131: What You Receive On Your Pager/Cell Phone
The following options are available when you access the distribution groups menu item: • List all distribution groups • Create a group • Edit a group Cisco 7912 Telephone User Guide Voice Mail Features (Option B Menu) 620-05600350... -
Page 132: Creating A New Group
Press a number to select an option from the edit menu: • List all members - press 1 • Add a member - press 2 • Delete a member - press 3 Voice Mail Features (Option B Menu) Cisco 7912 Telephone User Guide 620-05600350... -
Page 133: List All Group Members
Press the # key to delete the user or * key to cancel. • If you press # and the member exists, you will hear “The member has been successfully deleted from this group.” Cisco 7912 Telephone User Guide Voice Mail Features (Option B Menu) 620-05600350... -
Page 134: Play The Group Name
Press # to finish the delete or press * to cancel the delete process and return to the distribution group menu. NOTE: To delete group (corporate or company) distribution lists, you must be in the mailbox for your company's main number. Voice Mail Features (Option B Menu) Cisco 7912 Telephone User Guide 620-05600350... -
Page 135: Listening To A List Of Distribution Groups
NOTE: To list all group (corporate or company) distribution lists, you must be in the mailbox for your company's main number. Exiting the Voice Mail System To exit the voice mail system, simply hang up. Cisco 7912 Telephone User Guide Voice Mail Features (Option B Menu) 620-05600350... - Page 136 Exiting the Voice Mail System Voice Mail Features (Option B Menu) Cisco 7912 Telephone User Guide 620-05600350...
-
Page 137: Set Up Outlook For Tapi
Start Outlook (if not already running). Click the Contacts icon to switch to the Contacts listing. Right click on the contact you wish to call to bring up the Actions pop-up menu. Cisco 7912 Telephone User Guide Set Up Outlook for TAPI 125 620-05600350... - Page 138 The speaker on your telephone should be activated and you should hear ringing or a busy signal as the call is connected to the dialed number. Set Up Outlook for TAPI Cisco 7912 Telephone User Guide 620-05600350...
-
Page 139: Installing The Tapi Support Software
Select a method for the installation and click OK. This procedure uses the Save this program to disk option so that the install is available if needed again. Cisco 7912 Telephone User Guide Set Up Outlook for TAPI 620-05600350... - Page 140 Find the TAPI.EXE file (shown here on the PC desktop) and double-click it to run the install program. Set Up Outlook for TAPI Cisco 7912 Telephone User Guide 620-05600350...
- Page 141 Click Run to install or Cancel to not install TAPI. Click Next in the Welcome dialog box to install the TAPI program. Cisco 7912 Telephone User Guide Set Up Outlook for TAPI 620-05600350...
- Page 142 Installing the TAPI Support Software 10. Click Next to start the installation. 11. The Installing dialog box shows the progress of the installation. Set Up Outlook for TAPI Cisco 7912 Telephone User Guide 620-05600350...
- Page 143 Click Add to add your telephone number (the one that will be used with the TAPI-enabled program [such as Outlook]). 13. Enter your telephone number and password and click OK. Cisco 7912 Telephone User Guide Set Up Outlook for TAPI 620-05600350...
-
Page 144: Configuring Windows For Tapi
These steps are from Windows XP. Other Windows versions should be similar. Click Start and Control Panel to open the Control panel window. Double click Phone and Modem Options (circled). Set Up Outlook for TAPI Cisco 7912 Telephone User Guide 620-05600350... - Page 145 Click Edit (circled) in the Phone and Modem Options dialog box. Cisco 7912 Telephone User Guide Set Up Outlook for TAPI 620-05600350...
- Page 146 (see arrows). c. Set the outside access digits in the Dialing Rules section to the digit that must be dialed to make an outside call (circled). Set Up Outlook for TAPI Cisco 7912 Telephone User Guide 620-05600350...
- Page 147 Area Code Rules field will be empty. If you have setup Phone and Modem Options before for any device or application, the previously entered information will be displayed. Cisco 7912 Telephone User Guide Set Up Outlook for TAPI 620-05600350...
- Page 148 NOTE: Depending on whether you clicked New or Edit, the dialog box will say either New Area Code Rule or Edit Area Code Rule. If you clicked Edit, the area code you highlighted will be displayed in the Area Code field. Set Up Outlook for TAPI Cisco 7912 Telephone User Guide 620-05600350...
- Page 149 NOTE: If you need additional information about using Calling Card, please consult the Windows on-line help from the Start menu. Cisco 7912 Telephone User Guide Set Up Outlook for TAPI 620-05600350...
- Page 150 “Configuring Outlook to Use TAPI”. 12. If you did not complete the T6000 setup as part of the TAPI install from Web Portal, click Add to open the Add Provider dialog box. Set Up Outlook for TAPI Cisco 7912 Telephone User Guide 620-05600350...
- Page 151 Click Add to add your telephone number (the one that will be used with the TAPI-enabled program [such as Outlook]). 15. Enter your telephone number and password and click OK. Cisco 7912 Telephone User Guide Set Up Outlook for TAPI 620-05600350...
-
Page 152: Configuring Outlook To Use Tapi
If not already running, start Outlook (or the TAPI-enabled application). Click the Contacts icon to switch to the Contacts listing. Right click any contact to bring up the Actions shortcut menu. Set Up Outlook for TAPI Cisco 7912 Telephone User Guide 620-05600350... - Page 153 Click Dialing Options to open the Dialing Options dialog box. Click on the drop-down menu in the Connect using line field and scroll down any entries until you find your telephone number (circled). Cisco 7912 Telephone User Guide Set Up Outlook for TAPI 620-05600350...
- Page 154 You may call this contact or close the New Call dialog box. NOTE: Outlook (or your TAPI-enabled application) is now configured to place calls using your telephone number. Set Up Outlook for TAPI Cisco 7912 Telephone User Guide 620-05600350...
-
Page 155: Index
Delete 15 Answering Second Call 7 Modify 14 Reconnect to the First Call 7 Use 14 Cisco IP Phone Verify 15 Call Directory, Using 10 Accessing Voice Mail Call Directory, Viewing or Dialing Missed Calls From any other internal phone... - Page 156 Default Menu 73 Disable Call Forward (All Calls) 21 Option A Menu 94 Phone Feature Buttons 21 Option B Menu 113 Star Codes 21 Cisco IP Phone Display Call Directory Adjust Display Contrast 5 Using 10 Distinctive Ring 31 Viewing or Dialing Missed Calls 10...
- Page 157 Deleting Phone Feature Buttons 20 Default Menu 82 Star Codes 20 Option A Menu 103 End Call 33 Option B Menu 122 Ending Call 7 Editing Exiting the Voice Mail System Default Menu 80 Default Menu 83 Option A Menu 101 Option A Menu 104 Option B Menu 120 Option B Menu 123...
- Page 158 Internal Dial Tone 31 Default Menu 65 Internal Ring 31 Option A Menu 85 Introduction 1 Option B Menu 105 Accessing Phone Features 1 Message Controls for Voice Mail In This Manual 1 Default Menu 71 IP Telephones Fast Forward to the End of a Message Components Default Menu 71 Descriptions 1...
- Page 159 Privacy Guard 49 Access Codes 49 On-hook Dialing 43 Answering Call 50 Operator Caller Actions 49 Returning to Entering Access Codes 50 Default Menu 74 Recording Name 50 Option A Menu 94 Disabling 51 Option B Menu 113 Enabling 51 Zero Out to Managing Access 51 Default Menu 74...
- Page 160 Caller ID Block 30 Delete Priority Call Members 47 Saving a Voice Mail Message Enable/Disable Priority Call 46 Default Menu 75 List Priority Call Members 47 Option A Menu 96 Permanent Caller ID Block Release 44 Option B Menu 115 Privacy Guard 49 Selecting a Ringer Sound 10 Access Codes 49...
- Page 161 Disable 17 Entering an Incorrect ID 37 Enable 17 Extending the Conference Duration 38 List Members 18 Join 35 Call Block (Selective Call Rejection) 16 List of 42 Call Forward (All Calls) 19 Locking 39 Phone Feature Buttons 20 Lowering Hands 39 Call Forward (Busy) 21 Modify (Edit) 41 Disable 23...
- Page 162 Delete Forwarded Numbers 60 Pause Play of a Message Disable 58 Default Menu 71 Enable 58 Option A Menu 92 Enter Forward Number 58 Option B Menu 111 Identify Forwarding Destination Number 59 Replying to a Message List Forwarded Numbers 59 Default Menu 76 Speaker Option A Menu 97...
- Page 163 Option A Menu 104 Default Menu 74 Option B Menu 123 Option A Menu 94 Forwarding a Message Option B Menu 113 Default Menu 75 Saving a Message Option A Menu 96 Default Menu 75 Option B Menu 115 Option A Menu 96 Introduction Option B Menu 115 Default Menu 65...
- Page 164 I-10 Index...